background image


20

Watching TV

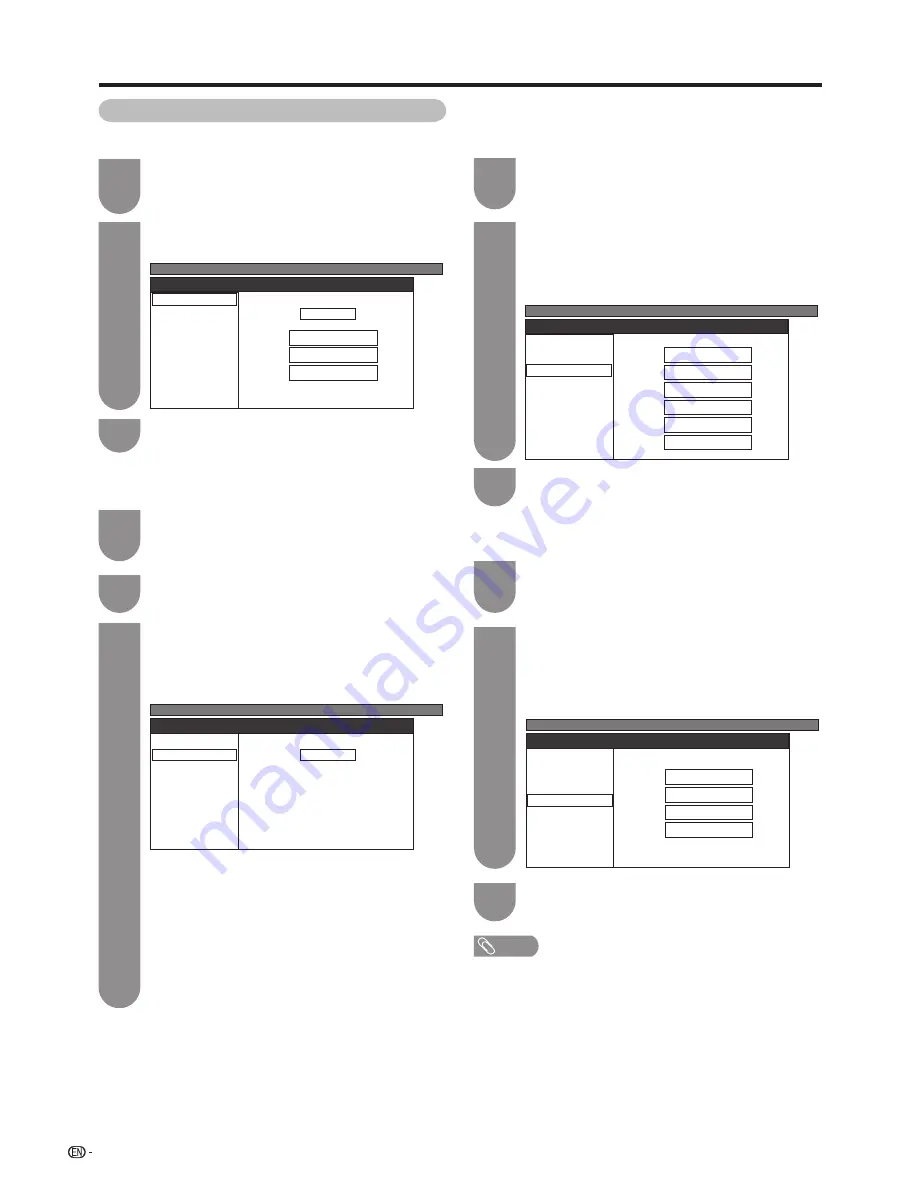
Search tuning

Press 

a

/

b

/

c

/

d

 to select the channel you 

want to edit, and then press 

ENTER

.

•  The selected channel information displays.

Press 

a

/

b

 to select “Search”, and then press 

ENTER

.

1

2

MENU

[Setup ... Programme Setup]

Fine

Colour System

Sound System

Label

Skip

Lock

Search 

[Auto]

[ I ]

[Off] 

[       ]

[Off] 

179.25

MHz

Next

Store

Cancel

As 

ENTER

 is pressed, the next channels will 

be searched in order.

3

Fine tuning

Press 

a

/

b

/

c

/

d

 to select the channel you 

want to edit, and then press 

ENTER

.

•  The selected channel information displays.

1

Press 

a

/

b

 to select “Fine”, and then press 

ENTER

.

2

Press 

c

/

d

 to adjust the frequency, and then 

press


RETURN

 or


MENU

.

•  Adjust while checking the background picture as 

a reference.

3

MENU

[Setup ... Programme Setup]

Fine

Colour System

Sound System

Label

Skip

Lock

Search 

[Auto]

[ I ]

[Off] 

[       ]

[Off] 

179.25

MHz

•  Instead of the method above, you can also set 

by directly entering the frequency number of the 
channel with 

– 

9

.

•  When setting a frequency on the “Fine” screen, 

the last fi gure of the frequency needs to be “0” or 
“5”.

b

•  179.25 MHz: Press 

1


s


7


s


9


s


2


s


5

.

•  49.25 MHz: Press 

4


s


9


s


2


s


5


s


ENTER

.

Sound system (Broadcasting system)

Press 

a

/

b

/

c

/

d

 to select the channel you 

want to edit, and then press 

ENTER

.

•  The selected channel information displays.

Press 

a

/

b

 to select “Sound System”, and 

then press 

ENTER

.

•  Receivable sound systems (Broadcasting systems) 

are listed.

1

2

Fine

Search 

Colour System

Sound System

Label

Skip

Lock

[Auto]

[ I ]

[Off] 

[       ]

[Off] 

B/G

D/K

I

M

MENU

[Setup ... Programme Setup]

Press 

a

/

b

 to select the optimum sound 

system, and then press 

ENTER

.

3

Sound system menu

Press 

a

/

b

 to select the optimum colour 

system, and then press 

ENTER

.

3

MENU

[Setup ... Programme Setup]

Fine

Colour System

Sound System

Label

Skip

Lock

Search 

[Auto]

[ I ]

[Off] 

[       ]

[Off] 

Auto

PAL

SECAM

NTSC 3.58

NTSC 4.43

PAL-60

Colour system

Press 

a

/

b

/

c

/

d

 to select the channel you 

want to edit, and then press 

ENTER

.

•  The selected channel information displays.

1

Press 

a

/

b

 to select “Colour System” and 

then press 

ENTER

.

•  Receivable colour systems are listed.

2

Colour system menu

Manual setting for each channel (Continued)

NOTE

•  Check the sound system if the sound output were not 

correct.

Содержание LC-32G100H

Страница 1: ...LC 32G100H 液晶彩色電視機 LCD COLOUR TELEVISION 使用說明書 OPERATION MANUAL ENGLISH 中文 ...

Страница 2: ......

Страница 3: ...ing a VCR game console or camcorder 10 Connecting a PC 10 Connecting a DVD player 11 Connecting a Set Top Box Satellite Cable etc 11 Inserting the batteries 12 Using the remote control unit 12 Cautions regarding the remote control unit 12 Turning the TV on off 13 Turning on the power 13 Turning off the power 13 About Menu operations 14 What is Menu 14 Basic Menu operations 14 About Guide Display 1...

Страница 4: ...e size manually for TV AV input mode 28 Selecting a preset AV MODE 29 Manual picture settings 30 Picture adjustment 30 Advanced picture settings 31 Other picture settings 32 Adjusting the image position 32 Game Play Time 32 Audio adjustment 33 Output Volume Select 33 Settings when using external devices Settings when using HDMI output devices 34 Selecting the input source and signal type 35 Select...

Страница 5: ...truck forcefully or with a sharp object If the LCD panel is broken be careful not to be injured by broken glass Heat sources Keep the product away from heat sources such as radiators heaters stoves and other heat generating products including amplifiers To prevent fire never place any type of candle or naked flames on the top or near the TV set To prevent fire or shock hazard do not place the AC power...

Страница 6: ...olatile substances such as insecticide In addition do not let it come into contact with objects made of rubber resin etc for a long time Maintenance of the LCD panel Before cleaning the LCD panel be sure to turn off the TV set and unplug the power cord from the outlet When cleaning the LCD panel use a dry and soft cloth made of cotton floss etc to clean the surface of the LCD panel gently For prote...

Страница 7: ...nt the TV on the wall using the optional bracket For details refer to the instructions supplied with the optional bracket CAUTION This TV should be mounted on a wall only with a wall mount bracket recommended by SHARP The use of other wall mount brackets may result in an unstable installation and may cause serious injuries Installing the TV requires special skills that should only be performed by ...

Страница 8: ...n TV VIDEO button MENU button Remote control sensor POWER indicator The illustrations and on screen displays in this operation manual are for explanation purposes and may vary slightly from the actual operations TV Front Side Preparation OPC Optical Picture Control See page 30 See page 13 for the TV status indicator OPC sensor ...

Страница 9: ...输出 Output terminals 输入 5 INPUT5 terminals 输入 2 INPUT2 HDMI terminal 输入 3 INPUT3 terminals 输入 6 INPUT6 PC input terminal TV Rear Preparation 输入 1 INPUT1 HDMI terminal 输入 6 INPUT6 Audio terminal The audio terminal is used both for 输入1 INPUT1 and 输入6 INPUT6 ...

Страница 10: ...and 8 EXIT Return to the default screen 9 AV MODE Select a video setting AV Mode STANDARD MOVIE GAME PC USER DYNAMIC FIXED DYNAMIC See page 29 10 SLEEP Set the Sleep timer See page 26 11 e Mute Mute the sound See page 23 12 MPX Select the sound multiplex mode See page 24 13 VOL e VOL f Set the volume See page 18 14 CH r CH s TV input mode Select the channel See page 18 15 TV VIDEO INPUT SOURCE Sel...

Страница 11: ...the AC outlet and keep the power plug within reach Disconnect the AC cord from the AC outlet if the TV will not be used for a long period of time TV rear view Connecting the antenna cable To enjoy a clearer picture use an outdoor antenna The following is a brief explanation of the types of connections that are used for coaxial cable Standard DIN45325 plug IEC169 2 75 ohm coaxial cable round cable ...

Страница 12: ...ng the 输入 3 INPUT3 composite terminals or the 输入 4 输入 5 INPUT4 INPUT5 component terminals VCR Game console Camcorder When using component cable commercially available Connecting external devices You can connect many types of external equipment to your TV like a VCR game console camcorder DVD player Set Top Box Satellite Cable etc and PC To view external source images select the input source from T...

Страница 13: ...ation Connecting a Set Top Box Satellite Cable etc You can use the 输入 1 输入 2 INPUT1 INPUT2 HDMI terminal the 输入 3 INPUT3 composite terminals or the 输入 4 输入 5 INPUT4 INPUT5 component terminals when connecting to a Set Top Box Satellite Cable etc and other audiovisual equipment NOTE When using a DVI HDMI adaptor use the 输入 1 INPUT 1 terminal analogue audio input terminal and PC audio input terminal ...

Страница 14: ...rminals corresponding to the e and f indications in the battery compartment 2 Insert the two supplied AA size batteries 3 Close the battery cover 5 m Use the remote control unit by pointing it towards the remote sensor window Objects between the remote control unit and sensor window may prevent proper operation Cautions regarding the remote control unit Do not subject the remote control unit to sh...

Страница 15: ...riod of time be sure to remove the AC cord from the AC outlet Minor power is consumed when the unit is in standby mode In standby mode the POWER indicator on the TV changes from red to green by pressing POWER on the TV Turning the TV on off Press POWER on the remote control The TV enters standby mode and the image on the screen disappears The POWER indicator on the TV changes from green to red Pre...

Страница 16: ...perational guide for the remote control The bar will change in accordance with each menu setting screen What is Menu You need to bring up the On Screen Display to perform settings for the TV The On Screen Display for the settings is called Menu The Menu enables various settings and adjustments See pages 15 and 16 The Menu can be operated with the remote control unit Press MENU and the MENU screen ...

Страница 17: ... 33 Surround Page 33 Bass Enhancer Page 33 Reset Page 33 Setup Auto Installation Page 17 Programme Setup Pages 19 22 Child Lock Page 25 Input Skip Page 36 Input Label Page 35 Position Page 32 HDMI Auto View Page 34 WSS Page 27 4 3 Mode Page 27 Standby Mode Page 24 Language Page 18 Identification Page 27 Reset Page 42 Option HDMI Audio Select Page 34 Output Volume Select Page 33 Audio Only Page 23 G...

Страница 18: ...ncer Page 33 Reset Page 33 Setup Input Skip Page 36 Input Label Page 35 Standby Mode Page 24 Language Page 18 Reset Page 42 Option Power Control Power Management Page 27 No Operation Off Page 26 Ecology Page 27 Output Volume Select Page 33 Audio Only Page 23 Fine Sync Page 39 Input Signal Page 39 Auto Sync Page 39 H Position Page 40 V Position Page 40 Clock Page 40 Phase Page 40 Reset Page 40 NOTE...

Страница 19: ...rd enter it here For setting a new password see page 25 4 6 Press a b to select the desired language listed on the screen and then press ENTER If you turn on the TV for the first time or if you have reset the TV press c d to select the place where you use the TV then press ENTER Press a b to select the desired sound system and then press ENTER You do not need to do anything during the auto search P...

Страница 20: ...annels directly by pressing buttons 0 to 9 a To select a 1 digit channel e g channel 2 Press 0 followed by 2 To select a 2 digit channel e g channel 12 Press 1 followed by 2 Watching TV 20 POWER MENU TV VIDEO CH VOL NOTE TV INPUT1 INPUT2 INPUT3 INPUT4 INPUT5 INPUT6 PC modes can store volume adjustment values separately Menu language settings You can also select a language from setup menu Select fr...

Страница 21: ... You can run the auto search procedure again at any time by accessing the Setup menu and Programme Setup Channels can be tuned automatically or manually Auto search You can also automatically search by performing the procedure below This is the same function as programme auto search in auto installation Press MENU and the MENU screen displays Press c d to select Setup Press a b to select Programme...

Страница 22: ...screen the last figure of the frequency needs to be 0 or 5 b 179 25 MHz Press 1 s 7 s 9 s 2 s 5 49 25 MHz Press 4 s 9 s 2 s 5 s ENTER Sound system Broadcasting system Press a b c d to select the channel you want to edit and then press ENTER The selected channel information displays Press a b to select Sound System and then press ENTER Receivable sound systems Broadcasting systems are listed 1 2 Fin...

Страница 23: ...ock Used to enable the Child Lock function of the channel Press a b to set Lock to On and then press ENTER 3 MENU Setup Programme Setup Fine Search Colour System Sound System Label Skip Lock Auto I Off Off On Off Press a b c d to select the channel you want to edit and then press ENTER The selected channel information displays 1 Press a b to set Lock and then press ENTER Lock menu displays 2 Lock ...

Страница 24: ...ays 1 Press c d to select Setup Press a b to select Programme Setup and then press ENTER If you already set the password enter it here See page 25 for setting a password 2 Press a b to select Sort and then press ENTER 4 Press c d to select Yes and then press ENTER 5 Repeat the steps 6 and 7 until all desired channels are sorted 8 Sorting programmes Channel positions can be sorted freely Press a b ...

Страница 25: ... On and then press ENTER 4 NOTE When you make operations that change the picture on the TV such as by changing the input source the Audio Only function is set to Off Selected item Description On Audio is output without screen image Off Both screen images and audio are output Returning to the previously selected channel Press A to switch the currently tuned channel to the previously tuned channel P...

Страница 26: ...PAL D K PAL NICAM 99 BBC2 MONO 99 BBC2 Bilingual mode D K CH A PAL NICAM 99 BBC2 D K CH B PAL NICAM 99 BBC2 MONO 99 BBC2 CH AB D K PAL D K PAL NICAM 99 BBC2 Monaural mode MONO D K PAL D K PAL NICAM 99 BBC2 MONO 99 BBC2 Stereo mode STEREO D K PAL D K PAL NICAM NICAM 99 BBC2 MONO 99 BBC2 Bilingual mode D K CH A PAL 99 BBC2 D K CH B PAL NICAM NICAM 99 BBC2 D K CH AB PAL NICAM 99 BBC2 Monaural mode MO...

Страница 27: ...assword New Password Reconfirm Enter the 4 digit number as a password using 0 9 6 NOTE As a precautionary measure make a note of your password on the back of this operation manual cut it out and keep it in a safe place that children cannot reach This function is only available for TV input mode If you want to enable the channel lock function see page 21 Reset Allows you to reset your password Yes ...

Страница 28: ... and then press ENTER Five minutes before the power shuts down the remaining time displays every minute 4 Press MENU and the MENU screen displays Press c d to select Power Control Press a b to select No Operation Off and then press ENTER Press a b to select 30 min 3 hr or Disable Five minutes before the power shuts down the remaining time displays every minute 4 NOTE Disable is the factory preset ...

Страница 29: ...WSS information the function will not work even if enabled When receiving weak or unstable signals and for avoiding wrong estimation of the signals it is recommended to set WSS to Off Picture size settings Selecting the Wide Screen Signalling WSS picture size manually The WSS signal has 4 3 auto switching that allows you to select between Panorama and Normal Press MENU and the MENU screen displays...

Страница 30: ...isplays The menu lists the wide mode options selectable for the type of video signal currently received 1 Press WIDE or a b while the WIDE MODE menu displays on the screen As you toggle down the options each mode is immediately reflected on the TV 2 WIDE MODE Normal Zoom 14 9 Panorama Full Cinema 16 9 Cinema 14 9 4 3 Mode set to Panorama 4 3 Mode set to Normal Auto Selection If you set WSS and 4 3 ...

Страница 31: ...r viewing PC For PC Available only when inputting an HDMI or PC signal USER Allows the user to customise settings as desired You can set the mode for each input source DYNAMIC FIXED Changes the image and sound settings to the factory preset values No adjustments are allowed DYNAMIC For a clear cut image emphasising high contrast for sports viewing AV Mode STANDARD AV Mode DYNAMIC AV Mode MOVIE AV ...

Страница 32: ...ically adjusted according to the lighting condition in the room OPC setting See this page Backlight The screen dims The screen brightens Contrast For less contrast For more contrast Brightness For less brightness For more brightness Colour For less colour intensity For more colour intensity Tint Skin tones become purplish Skin tones become greenish Sharpness For less sharpness For more sharpness A...

Страница 33: ...automatically adjusting the dark portion of an image Selected item Description On For high detail in black portions Off No adjustment w 3D Y C Provides high quality images with minimal dot crawl and cross colour noise NOTE 3D Y C is not selectable depending on the input signal type 3D Y C may not operate depending on the input signal type or noisy input signal w Monochrome For viewing images in mo...

Страница 34: ...y not be displayed properly depending on the settings and or signals Selected item Description H Position Centres the image by moving it to the left or right V Position Centres the image by moving it up or down Game Play Time This function displays the elapsed game time so you do not lose track of the time To display the elapsed time select GAME under AV Mode for the input mode of the terminal con...

Страница 35: ...For weaker bass For stronger bass Balance Decrease audio from the right speaker Decrease audio from the left speaker Selected item Description Fixed Sound via speakers is adjusted with VOL k l on the remote control unit or the TV Sound via the 输出 Output terminals is not adjustable and constantly outputs Variable Sound via the 输出 Output terminals is adjusted with VOL k l on the remote control unit ...

Страница 36: ...put the audio and picture from an HDMI output device on the TV select INPUT1 INPUT2 by switching the input source Settings when using HDMI output devices Audio cables used only for analogue audio input commercially available HDMI Setup items Selectable items Description HDMI Auto View Enable Disable Set whether or not to use WIDE MODE based on signal recognition including an HDMI signal HDMI Audio...

Страница 37: ...ample 6 Press a b c d to select letters to label the input source When you want to change the input label that you have already assigned to the default name press c d to move to CLEAR on the Input Label screen and then press ENTER 5 Settings when using external devices Press TV VIDEO on the remote control unit or on the TV to select the input source The image and sound from the selected source are...

Страница 38: ...selected colour system for each channel is automatically set If an image does not display clearly select another colour system e g PAL NTSC 4 43 Colour System is selectable only when inputting a composite signal Colour system settings Skipping HDMI PC input This setting allows you to skip the HDMI or PC input on the Input Select menu Press MENU and the MENU screen displays Press c d to select Setu...

Страница 39: ... Refer to page 40 for a list of PC signals compatible with the TV TV INPUT1 INPUT2 INPUT3 INPUT4 INPUT5 INPUT6 Signal names for 15 pin mini D sub connector NOTE Macintosh adaptor may be required for use for some Macintosh computers Pin No Signal name Pin No Signal name Pin No Signal name R GND Ground Not connected G GND Ground SDA B GND Ground HD Not connected 5V VD CSYNC GND Ground SCL Connecting...

Страница 40: ...E MODE Normal Full Example You can select the picture size as illustrated below NOTE Connect the PC before making adjustments Selectable picture size may vary with input signal type Connecting a PC Input Signal Full Normal Keeps the original aspect ratio in a full screen display a Picture size images An image fully fills the screen ...

Страница 41: ... 1360 x 768 Press a b to select Input Signal and then press ENTER 4 Example Press MENU and the MENU screen displays 1 Press c d to select Option 2 This function enables the screen to be automatically adjusted to its best possible condition when the analogue terminals of the TV and PC are connected with a commercially available RGB cable etc Adjusting the PC image automatically Press c d to select ...

Страница 42: ...depending on the settings and or input signals Selected item Description H Position Centres the image by moving it to the left or right V Position Centres the image by moving it up or down Clock Adjusts when the image flickers with vertical stripes Phase Adjusts when characters have low contrast or when the image flickers Adjusting the PC image manually V Position H Position Auto Sync Input Signal C...

Страница 43: ...age 12 Are batteries worn out Replace with new batteries Are you using it under strong or fluorescent lighting Is a fluorescent light shining on the remote control sensor Picture is cut off Is the image position correct See page 32 Are screen mode adjustments such as picture size made correctly See pages 27 28 and 38 Strange colour light colour or dark or colour shift Adjust the picture tone See pag...

Страница 44: ...d of time The screen will be returned to its original state Execute Auto Installation displays on the screen 4 Reset Press c d to select Yes and then press ENTER 5 NOTE If you execute Reset all the settings such as Picture Audio Programme and Language will be reset to the factory preset values Appendix Press a b to select the desired language listed on the screen and then press ENTER Press c d to ...

Страница 45: ...k 输入2 INPUT2 HDMI HDMI HDMI input 480P 576P 720P 50Hz 720P 60Hz 1080I 50Hz 1080I 60Hz 输入3 INPUT3 VIDEO in AUDIO in 输入4 INPUT4 COMPONENT in 480I 576I 480P 576P 720P 50Hz 720P 60Hz 1080I 50Hz 1080I 60Hz AUDIO in 输入5 INPUT5 COMPONENT in 480I 576I 480P 576P 720P 50Hz 720P 60Hz 1080I 50Hz 1080I 60Hz AUDIO in 输入6 INPUT6 PC input 15 pin mini D sub AUDIO in common use with 输入 1 INPUT1 Ø 3 5 mm jack 输出 Aud...

Страница 46: ...44 Dimensional drawings Unit mm Appendix 6 483 332 576 524 798 699 2 393 8 200 200 82 81 96 243 ...

Страница 47: ...is manual and keep it in a familiar place Clearing the password 4 The password input screen displays 5 If you enter 3001 using 0 9 the Child Lock setting menu will be displayed Press MENU and the MENU screen displays 1 Press c d to select Setup 2 Press a b to select Child Lock and then press ENTER 3 The new password is now set 6 Enter the 4 digit number as a password using 0 9 See page 25 ...

Страница 48: ...46 Memo ...

Страница 49: ...47 Memo ...

Страница 50: ...48 Memo ...

Страница 51: ......

Страница 52: ...TINS E461WJZZ 09P11 CH ...

Отзывы: