background image


13

tV menu

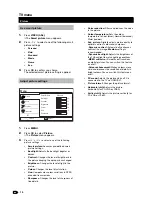
automatically switch the tV to standby 
(Sleeptimer)

Sleeptimer switches the TV to standby after a defined 

period of time.

Press 

1� 

menu.

Select 

2� 

Feature> Sleeptimer�

The 


Sleeptimer menu appears.

Press 

3� 

 to set the sleep time. 

The Sleeptimer can be up to 180 minutes in 

steps of five minutes. If set to zero minutes, the 

Sleeptimer is switched off.

Press 

4� 

oK to activate the Sleeptimer. 

The TV switches to standby after the pre-

defined period of time.

note 

You can always switch off your TV earlier or reset 

• 

Sleeptimer during the countdown.
When you press any button on the remote control with 

• 

less than one minute left in the countdown, Sleeptimer 
will be automatically canceled.

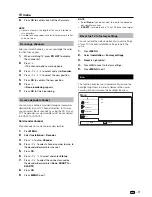
automatically switch the tV on  
(on timer)

On timer switches the TV to a specified channel at a 

specified time from standby.

Press 

1� 

menu�

Select 

2� 

Features > on timer.

Press 

3� 

π

 to enter the 

on timer menu.

Press 

4� 

oœpπ

 to select 

activate and set a 

frequency Daily, Once, or Off .

Press 

5� 

oK to confirm.

Press 

6� 

oœpπ

 to select Time and set the 

starting time.

Press 

7� 

Done to confirm.

Press 

8� 

oœpπ


to select 

programme no� and 

external source to set the channel.

Press 

9� 

oK to confirm.

Press 

10� 

menu to exit.


note

Select 

• 

on timer

 > 

activate 

off

 to disable 

on timer

.

When 

• 

on timer

 is 

off

, only 

activate

 can be selected

Set the 

• 

tV clock

 before activating 

on timer

 feature.

use tV lock

You can prevent your children from watching certain 

programmes or certain channels by locking the TV 

controls.

Set / change code 

Press 

1� 

menu�

Press 

2� 

oœpπ

 to select 

Features > Set 

code.

Press 

3� 

π

 to enter the 

code setup.

Enter your code using the 

4� 

numeric buttons

Re-enter the same code in the new dialogue 

5� 

box for confirmation. 

If the code is set successfully, the dialogue 

box will disappear. However, if the code cannot 

be set, a new dialogue box will prompt you to 

re-enter the code.

If you want to change the code, select 

6� 

Features > Change code

Enter your current code using the

7� 

 numeric 

buttons. 

If the code is validated, a new dialogue box will 

prompt you to enter your new code.

Enter the new code using the 

8� 

numeric 

buttons

A message appears prompting you to enter the 

new code again for confirmation.

note 

If you forget your code, enter ‘8888’ to override any 

• 

existing codes.

lock or unlock all channels and connected 
devices�

Press

1� 

 menu.

Press 

2� 

oœpπ

 to select 

Features > tV lock 

Press 

3� 

π

 to enter the 

tV lock 

A screen appears prompting you to enter a 


code.

Enter your code using 

4� 

numeric buttons�

Press 

5� 

 to select 

lock or unlock.

Press 

6� 

oK

All channels and connected devices are locked 

or unlocked.

Press 

7� 

menu to exit.

Содержание LC-19S7E

Страница 1: ...rp eu com LC 19S7E LC 26S7E LC 32S7E OPERATION MANUAL BEDIENUNGSANLEITUNG MODE D EMPLOI MANUALE DI ISTRUZIONI GEBRUIKSAANWIJZING MANUAL DE MANEJO MANUAL DO UTILIZADOR 1 OPERATION MANUAL BEDIENUNGSANLEITUNG MODE D EMPLOI MANUALE DI ISTRUZIONI GEBRUIKSAANWIJZING MANUAL DE MANEJO MANUAL DO UTILIZADOR PIN ENGLISH DEUTSCH FRANÇAIS ITALIANO NEDERLANDS ESPAÑOL PORTUGUESE P41G7830843 9D Printed in Poland ...

Страница 2: ...rs of the wires in the mains lead of this product may not correspond with the coloured markings identifying the terminals in your plug proceed as follows The wire which is coloured blue must be connected to the plug terminal which is marked N or coloured black The wire which is coloured brown must be connected to the plug terminal which is marked L or coloured red Ensure that neither the brown nor...

Страница 3: ... 10 Picture 10 Use smart picture 10 Adjust picture settings 10 Change picture format 11 Sound 12 Use smart sound 12 Adjust sound settings 12 Features 12 Set the TV clock 12 User timers 12 Automatically switch the TV to standby Sleeptimer 13 Automatically switch the TV on On timer 13 Use TV lock 13 Set change code 13 Lock or unlock all channels and connected devices 13 Lock or unlock one or more ch...

Страница 4: ...sources such as radiators heaters stoves and other heat generating products including amplifiers To prevent fire never place any type of candle or naked flames on the top or near the TV set To prevent fire or shock hazard do not place the AC cord under the TV set or other heavy items Do not display a still picture for a long time as this could cause an afterimage to remain There is power consumpti...

Страница 5: ...ing 20 MENU EXIT Press to activate the LCD TV OSD Press again to exit the LCD TV OSD 21 p Display programme information if available 22 R G Y B COLOUR BUTTON Press buttons to select the pictures with various colours of text Different channels display different functions 23 TELETEXT Press this button to activate Teletext Press again to turn off Teletext 24 MIX Press this button to activate Teletext...

Страница 6: ...L R VIDEO AV OUT L R Y Pb Pr COMPONENT 2 4 6 8 7 26 32 19 26 32 19 1 Power connector 2 HDMI HDMI 1 3 PC IN VGA AUDIO 4 SCART SCART 1 CVBS Tuner out 5 SCART 2 CVBS Monitor out 6 Component Video and L R Audio input 7 Tuner Input 8 AV VIDEO and L R Audio Output 9 SERVICE socket 10 Earphone Output 11 Composite AV IN AV LR 12 HDMI 2 For 26 and 32 only TV Front view TV Rear view Remote control sensor B ...

Страница 7: ...y using a cross head 3 screwdriver Not supplied NOTE To detach the TV stand perform the steps in reverse order Operation Manual Quick Setup Guide ECO EPG YPbPr PR LIST FREEZE MENU EXIT P PRE PR 26 32 x 3 19 x 4 Preparation AC IN VGA AUDIO PC IN 75Ω AC IN VGA AUDIO PC IN 75Ω Stand unit and Screws NOTE At the time of purchasing wall bracket please check if there is enough space between the wall brac...

Страница 8: ...ou find any chemical leakage wipe thoroughly with a cloth The batteries supplied with this product may have a shorter life expectancy due to storage conditions If you will not be using the remote control unit for an extended period of time remove the batteries from it Note on disposing batteries The batteries provided contain no harmful materials such as cadmium lead or mercury Regulations concern...

Страница 9: ...on the TV power with a Run the initial auto installation 4 Country setting Select your country Sweden Switzerl Trukey UK Ukraine Other 4 Language setting Select language Българ Dansk Deutsch Ελληνικά English Español Congratulations Now you can watch TV Channel search complete Channels found 10 If necessary adjust the antenna to attain maximum signal reception 4 Start searching channels System sear...

Страница 10: ... reach Press 1 MENU briefly to display the direct control screen Press 2 P instead of or i k l instead of p π to select the item Press 3 MENU to confirm the selection NOTE The direct control menu screen will disappear if left unattended for several seconds E To standby mode If the TV set is switched on you can switch it to standby by pressing B on the remote control E Switching on from standby Fro...

Страница 11: ...d for fast access NOTE Teletext will not work if the selected signal type is RGB Buttons for teletext operations Buttons Description P r s Increase or decrease the page number Colour R G Y B Select a group or block of pages displayed in the coloured brackets at the bottom of the screen by pressing the corresponding Colour R G Y B on the remote control unit 0 9 Directly select any page from 100 to ...

Страница 12: ...ration Hue Compensates colour variations in NTSC encoded transmissions Sharpness Changes the level of sharpness of fine details Noise reduction Filters and reduces the noise in the picture Colour temperature Sets the colour temperature to Cool bluer Normal balanced Warm redder Adv picture Digitally adjusts picture quality to optimal contrast colour and sharpness Dynamic contrast Automatically enha...

Страница 13: ...ars on the side of 4 3 broadcasts There is minimal distortion Not for PC mode and 1080i p 4 3 Displays the classic 4 3 format Subtitle zoom Displays 4 3 pictures over the full area of the screen with sub titles visible Part of the top of the picture is clipped off Not for PC mode and 1080i p Movie exp 14 9 Scales 4 3 format to 14 9 Not for PC mode and 1080i p Movie exp 16 9 Scales 4 3 format to 16...

Страница 14: ...s the bass value to fit your best Treble Adjusts the treble value to fit your best listening Volume Adjusts the volume Balance Sets the balance of the left and right speakers to best fit your listening Dual I II Selects between audio languages if dual sound is broadcast Mono Stereo Selects between mono or stereo if stereo is broadcast Surround Enables spatial sound Auto volume Automatically reduce...

Страница 15: ...ect On timer Activate Off to disable On timer When On timer is Off only Activate can be selected Set the TV clock before activating On timer feature Use TV lock You can prevent your children from watching certain programmes or certain channels by locking the TV controls Set change code Press 1 MENU Press 2 oœpπ to select Features Set code Press 3 π to enter the code setup Enter your code using the...

Страница 16: ...e step 3 and 4 won t appear before turn off the TV Lock or unlock one or more channels When watching TV press 1 PR LIST to display the channel list Press 2 oœpπ to select a channel to lock or unlock Press 3 π Press 4 oœto select Lock channel Unlock channel For each selection press 5 OK to lock or unlock the channel ...

Страница 17: ...ep 2 Install Channels Select your country for proper channel installation Press 1 MENU Select 2 Installation Channel install Channel assistant Move Select Sound Picture Features Installation Menu language Channel install Decoder Factory settings Current software Analogue Manual Channel assistant Menu Press 3 pπ to select Start or Cancel Press 4 OK to confirm your choice Press 5 oœ to select your c...

Страница 18: ...hannel Press 10 MENU to exit Fine tune analogue channels You can manually fine tune analogue channels when reception is poor Press 1 MENU Select 2 Installation Channel install Analogue Manual The Analogue Manual menu appears Press 3 oœpπ to select and enter Fine tune Press 4 oœ to adjust frequency Press 5 OK when done Press 6 oœ to select Store cur chan to store channel number Press 7 π to enter S...

Страница 19: ...T1 or SCART2 Set decoder channel Map channels from a decoder or descrambler Pres 1 MENU Select 2 Installation Decoder Press 3 π to enter Channel Press 4 oœ to select channel number to map to the decoder descrambler channel Press 5 OK Press 6 oœ π to select and enter Status Press 7 oœ to select the connector used by the decoder descrambler None SCART1 or SCART2 Press 8 OK Press 9 MENU to exit NOTE ...

Страница 20: ...C IN L R Y Pb Pr COMPONENT VGA PC IN L R Y Pb Pr COMPONENT DVI HDMI conversion Using an DVI HDMI adapter cable the digital video signals of a DVD can also be played via the compatible HDMI connection The sound must be fed in additionally Both HDMI and DVI use the same HDCP copy protection method Supported video signal 576i 576p 480i 480p 1080i 720p 1080p See page 20 for PC signal compatibility HDM...

Страница 21: ...o receive a signal from the TV make sure to select the appropriate input source Do not connect the decoder to the SCART 2 You cannot connect the VCR with Decoder using a fully wired SCART cable under the SCART 2 source E When using the SCART 2 Half SCART which transmits CVBS in and CVBS monitor out SCART 1 SCART 2 SCART Connecting external devices Speaker amplifier connection SCART connection Audi...

Страница 22: ... R Y Pb Pr COMPONENT Supported display resolutions Computer formats PC Resolution Refresh rate 640 x 480 60Hz 800 x 600 60Hz 72Hz 75Hz 1024 x 768 60Hz 1280 x 720 60Hz 1280 x 768 60Hz 1360 x 768 60Hz Video formats Resolution Refresh rate 480i 60Hz 480p 60Hz 576i 50Hz 576p 50Hz 720p 50Hz 60Hz 1080i 50Hz 60Hz 1080p HDMI Component only 50Hz 60Hz 24Hz PC PC HDMI cable DVI HDMI conversion cable Ø 3 5 mm...

Страница 23: ...ent channels through antenna Please use the Channel scan function to increase the number of channels not included in memory No colours Please adjust the colour setup Blinking picture accompanied by ghost image 1 Check the connection of antenna signal cable 2 Check if channel is in play mode 3 Press signal source and change input mode Broken lines or segments Adjust antenna Keep the TV away from no...

Страница 24: ...DMI HDMI 1 HDMI 2 For 26 and larger AV IN RCA pin AV input Headphones Ø 3 5mm jack Audio output Service Service socket OSD language Bulgarian Croatian Czech Danish Dutch English Finnish French German Greek Hungarian Italian Norwegian Polish Portuguese Romanian Russian Serbian Slovak Slovene Spanish Swedish Turkish Latvian Lithuanian Ukrainian Estonian Gaelic Power Requirement AC 220 240 V 50 Hz Po...

Страница 25: ... These include software components covered by a GNU General Public License hereafter GPL a GNU Lesser General Public License hereafter LGPL or other license agreement Acknowledgements The following open source software components are included in this product linux kernel modutils glibc zlib libpng Appendix Other information Item 19 26 32 2 Energy Save Mode W Eco On 25 W 33 W 82 W 3 Standby Mode W ...

Страница 26: ...nic equipment can be returned free of charge to the dealer even if you don t purchase a new product Further collection facilities are listed on the homepage of www swico ch or www sens ch B Information on Disposal for Business Users 1 In the European Union If the product is used for business purposes and you want to discard it Please contact your SHARP dealer who will inform you about the take bac...

Отзывы: