background image

IM-DR580H

– 23 –

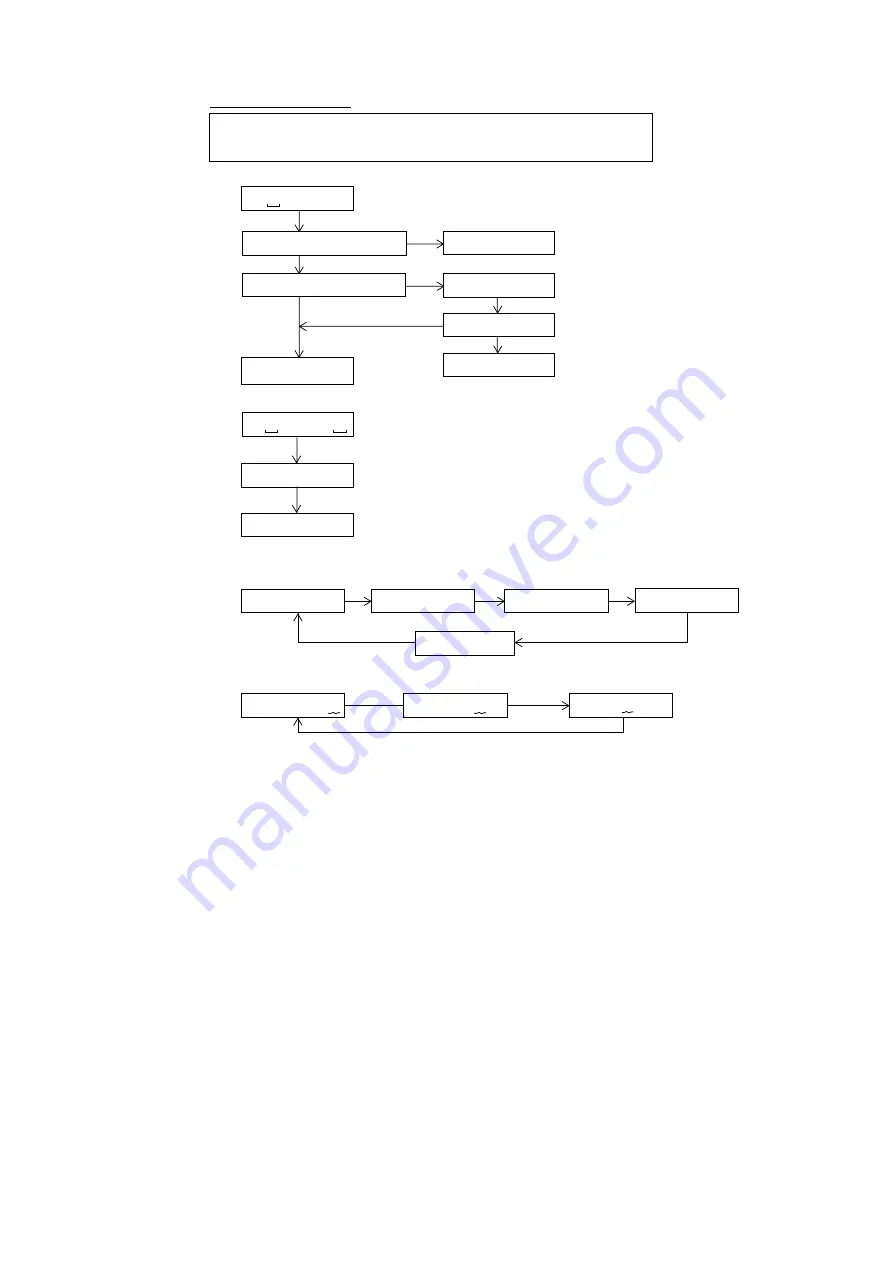
: Continuous record menu

Continuous Record

* When the [STOP] button is pressed in specific condition, the "TEST MODE STOP" state is set.
* In the start address set state the start address changes as follows when the [MENU] button is pressed.

• Continuous record from the current pickup position

: Continuous record menu

: Start address setting

: Continuous record 

# # # #: Address

: Continuous record 

# # # #: Address

DISP

T     R E C

A d  0  0  3  2

PLAY

A P #  #  #  #

• Continuous record playback from any address

A d 0  0  3  2 

       0 0 3 2 

H

 (initial value)

0 3 C 0 

H


0 7 0 0 

H

0 8 A 0 

H

A d 0  3  C  0

A d 0  7  0  0

A d 0  8  A  0

* In the start address setting state the start address change digit changes when the [REC] button is pressed.

* In the start address set state the value of selection digit changes in the range of 0h to Fh  when
  the [SKIP UP/DOWN] button is pressed.
* In the continuous record state and start address set state the record laser power changes in the
  range of "0h to Fh" when the [/-] button is pressed. (Initial value 0DH)

A d 0  0  5 0

1st digit (initial value)

2nd digit

3rd digit

A d 0  0  5  0

A d 0  0  5  0 

REC

REC

A d 0 9 5 0

0 9 5 0 

H

PLAY

T      R E C

 A P # # # #

AUTO1 Practice finish ?

AUTO2 Practice finish ?

YES

YES

E r A D J

AUTO2 Practice

No error ?

A D J. N G

NO

NO

YES

NO

Enter the EEPROM setting mode, and press the SKIP UP button.
Change the MSL setting value from 00 to 08 by using CTRL_ (control setting menu). 
(If the MSL remains in 00, no signal is recorded.)

REC

Содержание IM-DR580H(BK)

Страница 1: ... TRANSISTOR AND DIODE 48 WAVEFORMS OF MD CIRCUIT 49 TROUBLESHOOTING 51 FUNCTION TABLE OF IC 54 PARTS GUIDE EXPLODED VIEW PACKING METHOD FOR U K ONLY SERVICE MANUAL SHARP CORPORATION No SY380IMDR580H This document has been published to be used for after sales service only The contents are subject to change without notice In the interests of user safety the set should be restored to its original con...

Страница 2: ...ment service parts have already been adjusted prior to shipping 3 No adjustment to the Laser Power should be attempted when replacing or servicing the Pickup 4 Under no circumstances look directly into the Pickup Lens at any time 5 CAUTION Use of controls or adjustments or performance of procedures other than those specified herein may result in hazardous radiation exposure SAFETY PRECAUTION FOR S...

Страница 3: ...ing As the melting point of lead free solder Sn Ag Cu is about 220 C which is higher than the conventional lead solder by 40 C and as it has poor solder wettability you may be apt to keep the soldering bit in contact with the PWB for extended period of time However Since the land may be peeled off or the maximum heat resistance temperature of parts may be exceeded remove the bit from the PWB as so...

Страница 4: ...the rechargeable battery fully charged included with the unit Continuous recording Approx 8 hours Continuous play Approx 27 hours Continuous recording Approx 12 hours Continuous play Approx 36 hours Continuous recording Approx 15 hours Continuous play Approx 42 hours When using a commercially available high capacity AA size LR6 alkaline battery Continuous recording Approx 8 hours Continuous play A...

Страница 5: ...cording Mode Indicator 15 Monaural Mode Indicator 16 Group Indicator 17 My Entry Indicator 1 2 3 4 5 6 7 8 9 1 3 5 4 10 11 12 13 14 15 16 17 6 7 8 9 Remote control unit 1 Earphones Socket 2 Record Button 3 Display Bass Button 4 Playback or Recording Mode Switching Button 5 Menu Button 6 Volume Buttons 7 Stop Power Off Button 8 Fast Reverse Recording Level Menu Select Button 9 Play Pause Button 10 ...

Страница 6: ...top Button 6 Fast Forward Fast Reverse Recording Level Volume Button 7 Play Pause Button 8 Enter USB Switching Button 9 Menu Button 10 Connection Terminal to Main Unit 11 Speaker Output Selector Switch 12 3 V DC Input Socket 13 USB Socket 14 Optical Line Input Socket 15 Audio Output Socket 16 Speaker Output Socket 1 2 3 4 5 6 7 11 10 12 13 14 15 16 8 9 ...

Страница 7: ...the screws with length other than specified may cause contact with the mechanism unit resulting in malfunction 3 When repairing pay close attention so not to damage the IC from static electricity REMOVAL PROCEDURE STEP FIGURE Figure 7 1 Figure 7 2 Figure 7 4 Caution Carefully handle the main PWB and flexible PWB After removing the flexible PWB 1 for the optical pickup from the connector do not tou...

Страница 8: ...ook B3 x2 4 Multi Link Station B PWB Holder B4 x1 3 Multi Link Station 1 Hook C1 x2 8 2 A PWB REMOVAL PROCEDURE STEP FIGURE Multi Link Station Figure 8 1 Figure 8 2 A1 x4 ø2x5mm Bottom Cabinet Top Cabinet Pull Pull B1 x2 C1 x2 B3 x2 B2 x1 B1 x1 B4 x1 Bottom Cabinet Multi Link Station A PWB Multi Link Station B PWB ...

Страница 9: ...ed motor Note Take care so that the motor gear is not damaged If the gear is damaged noise is caused How to remove the magnetic head ass y See Fig 9 4 1 Remove the screws D1 x 2 pcs of the magnetic head ass y and the optical pickup and remove the solder joints D2 x 2 of the head flexible plate Note Mount carefully so as not to damage the magnetic head How to reinstall the optical pickup See Fig 9 ...

Страница 10: ... whole LCD 1 High reflection disc MMD 110 TEAC Test MD 88GMMD 110 2 Low reflection disc MMD 213A TEAC Test MD 88GMMD 213A 3 Low reflection disc Recording mini disc UDSKM0001AFZZ 4 Extension cable Performance test extension cable for motors QCNWN6936AFZZ 5 Extension relay PWB Performance test extension relay PWB for motors RUNTK0613AFZZ ADJUSTMENT Test disc MD adjustment needs two types of disc nam...

Страница 11: ...t is performed but the posture correction is not performed during continuous playback 4 T REC Mode Continuous record from the specified address is performed Change of record laser output servo gain is also changed according to laser output The temperature correction is performed only when servo start is performed but the posture correction is not performed during continuous recording 5 MANU 1 Mode...

Страница 12: ... within the allowable range the RND display lights When the STOP button is pressed during MANU1 menu or measure ment or adjustment the state is changed to the TEST mode stop state 6 MANU 2 Mode Adjustment item to be made in AUTO2 mode is performed manually When the VOLUME button is pressed during adjustment the setting increases and the new setting is output When the VOLUME button is pressed durin...

Страница 13: ... 44 o C 05 h 35 0 o C 2 Temperature measurement value correction table Temperature reference setting method 3 Temperature code identification 13 h Adjustment servo retraction excessive retrial 16 h C IN detection time over 17 h A B E F and TCRSO offset measurement value out of tolerable range 21 h Focus retraction completion allowable time over 22 h Unable to activate the spindle motor 23 h Track ...

Страница 14: ... _ 2A H T O R _ 2A H P L E _ 8B H R F T _ 00 H F L 1 _ 0F H F L 2 _ 1F H F G C _ 5A H T V R _ C0 H Item display Set values Focus setting S P G _ 0C H S P 1 _ 18 H P G 2 _ 18 H R G 2 _ 1C H R G 3 _ 1C H P G M _ C0 H S P 1 _ 10 H S P 2 _ 60 H S P 3 _ F2 H S P 4 _ F2 H S 4 2 _ F2 H S 4 3 _ F8 H S P 5 _ 10 H S L 1 _ 7F H S L 2 _ 7F H S D 2 _ 7F H S P K _ EB H M P 1 _ 14 H M P 2 _ 01 H S P L _ 60 H S P...

Страница 15: ... _ 42 H S H S _ 28 H T G 1 _ 17 H T G 2 _ 40 H T G 3 _ 66 H T F 0 _ 10 H T F 1 _ 70 H T F 2 _ E0 H T f 0 _ 10 H T f 1 _ 40 H T f 2 _ E4 H t F 0 _ 10 H t F 1 _ 20 H t F 2 _ E8 H T F S _ 00 H T B o _ 20 H T B t _ 34 H T K o _ 20 H T K t _ 32 H T D o _ 67 H T D t _ 0E H S C o _ 00 H S C t _ 3A H S C m _ 48 H C L p _ 24 H C L r _ 38 H J P I _ 0E H T K L _ 40 H T H P _ 02 H T H G _ 02 H T 0 P _ F0 H T ...

Страница 16: ...12 H w E 3 p 05 H w E 3 g 00 H w E A _ 16 H w E F _ 00 H R C 0 _ D7 H R C 1 _ D6 H R 2 0 _ 80 H R 2 1 _ 20 H R 4 0 _ BF H Item display Set values Control setting Item display Set values R 4 1 _ 02 H G U P _ 1B H S C G _ 00 H K 1 0 _ 0F H K 1 1 _ 8E H A T N _ 0C H A T U _ 0A H A H D _ 4D H A L D _ 60 H A C T _ 01 H P L G _ 22 H C R N _ 00 H S V V _ 80 H A V V _ 70 H V S N _ BB H B S 0 _ 00 H B S 1 ...

Страница 17: ... R M 6 0 00 H R M 6 1 00 H R M 6 2 00 H R M 6 3 00 H R M 6 4 00 H R M 0 0 37 H R M 0 1 32 H R M 0 2 36 H R M 0 3 42 H R M 0 4 18 H R M 0 5 0B H R M 0 6 E2 H R M 0 7 B6 H R M 0 8 7E H R M 0 9 8F H R M 0 A 44 H R M 0 B 36 H R M 0 C 4E H R M 0 D 52 H R M 0 E 7E H R M 0 F 8F H R M 1 0 1F H R M 1 1 BD H R M 1 2 E7 H R M 1 3 02 H R M 1 4 38 H R M 1 5 05 H R M 1 6 6A H R M 1 7 05 H R M 1 8 C7 H R M 1 9 0...

Страница 18: ...J O K A T 2 A T 1 Before you replace EEPROM be sure to set the EEPROM set value to the latest version Note After that be sure to perform the shipment setting The battery indicator starts to operate correctly after you complete the setting The indication of RANDOM A P Indication disappears All the supply of the power supply is turned off B Y E O K STOP is 2 pushed Remote controller MODE button A D ...

Страница 19: ...ps within 2 seconds When the VOLUME button is held down press the PLAY button When the PLAY button is held down release the VOLUME button Then release the PLAY button 2 When using the multi link station Place the main unit on the multi link station When the VOLUME button is pressed and held while the product is in the stand by state press the PLAY button When the PLAY button is held down release t...

Страница 20: ... UP SKIP DOWN SKIP UP When the STOP button is pressed in specific menu the TEST MODE STOP state is set When the VOLUME button is pressed in the TEST MODE STOP state the program version is displayed for 2 seconds When the VOLUME button is pressed in the TEST MODE STOP state all the displays appear for 2 seconds Pre manual adjustment menu ATT manual adjustment menu Continuous playback menu M A N U 1...

Страница 21: ...al setting 1 3 AB input LPFABO level setting 1 4 Focus ATT initial setting 1 6 TCRS input offset measurement It is necessary for each test mode where servo operation is made to complete the preliminary adjustment Otherwise ErADJ appears The preliminary adjustment complete state is stored on the EEPROM protected field ATT auto adjustment menu ATT adjustment error adjustment value output During ATT ...

Страница 22: ... finish AUTO2 Practice finish YES YES E r A D J AUTO2 Practice No error A D J N G NO NO YES NO 0 9 5 0 H REC H B L B S Q A P Continuous playback pit section Continuous playback groove section Address High reflection pit section B ATT focus setting Low reflection groove section B ATT focus setting ATT setting REC REC In the continuous playback state the number of jump lines changes as follows shown...

Страница 23: ...tate the start address change digit changes when the REC button is pressed In the start address set state the value of selection digit changes in the range of 0h to Fh when the SKIP UP DOWN button is pressed In the continuous record state and start address set state the record laser power changes in the range of 0h to Fh when the VOLUME button is pressed Initial value 0DH A d 0 0 5 0 1st digit ini...

Страница 24: ...O N P SKIP UP SKIP DOWN A B SKIP UP SKIP DOWN S a SKIP UP SKIP DOWN S b SKIP UP SKIP DOWN e f SKIP UP SKIP DOWN P C H SKIP UP SKIP DOWN e f SKIP UP SKIP DOWN G C H SKIP UP SKIP DOWN T C SKIP UP SKIP DOWN S E SKIP UP SKIP DOWN S F SKIP UP SKIP DOWN SKIP UP SKIP DOWN Pit section EF signal level measurement LPFEFO Measurement value Groove section EF signal level measurement LPFEFO Measurement value T...

Страница 25: ...nitial setting LPFEFO measurement value indication REPEAT Mark lighting Pit section adjustment COUT level setting Group section adjustment COUT level setting LPFABO measurement value indication REPEAT Mark lighting ABMAXO measurement value indication REPEAT Mark lighting A ATT focus tentative setting B ATT focus tentative setting A ATT focus tentative setting B ATT focus tentative setting DISP DIS...

Страница 26: ...e TEST MODE STOP state is set If the PLAY button is pressed in the B ATT setting state the mode is changed to the continuous playback mode And if the Remote Controller MODE button is pressed in the continuous playback state the mode is changed to the B ATT setting state of the ATT manual adjustment L b S Q PLAY MODE Continuous playback pit section Continuous playback groove section Address Low ref...

Страница 27: ...on F ATT tracking setting Groove section F ATT tracking setting EFMIO measurement value indication REPEAT 1 Mark lighting LPFEINO measurement value indication REPEAT Mark lighting Pit section E ATT tracking setting Groove section E ATT tracking setting TCRSMIO measurement value indication REPEAT Mark lighting TCRS ATT setting LPFABO measurement value indication REPEAT Mark lighting Low reflection ...

Страница 28: ...N a b SKIP UP SKIP DOWN P C H SKIP UP SKIP DOWN G C H SKIP UP SKIP DOWN S A SKIP UP SKIP DOWN SKIP UP SKIP DOWN T H SKIP UP SKIP DOWN When the STOP button is pressed in specific menu the TEST MODE STOP state is set In the specific setting display state the setting change digit changes when the REC button is pressed In the case of the setup value two digits 1st digit initial value 2nd digit In the ...

Страница 29: ...of the setup value three digits 1st digit initial value 2nd digit 3nd digit In the specific state the setting changes in the range of 0h to Fh when the VOLUME button is pressed REC REC REC Test mode normal playback menu Normal playback mode Mode and address indication PLAY N O R M A L Test Mode Normal Playback When the STOP button is pressed in specific menu the TEST MODE STOP state is set Error h...

Страница 30: ... SKIP UP SKIP DOWN SKIP UP TEMP setting menu TEMP standard value setup Setup value Temperature code TEMP A D input value indication PLAY T e m p TEMP Setting T M T P i n SKIP UP SKIP DOWN When the STOP button is pressed in specific menu the TEST MODE STOP state is set When the DISP button operation is performed in the specific state the menu changes to TEMP SETTING menu When the REC button is pres...

Страница 31: ...6C 2 6V DC DC CONVERTER IC842A 882145MH 4 5V REGULATOR VCC VS Q843 Q751 Q752 Q761 Q762 IC751 IC761 1 BIT AUDIO AMP J703 REMOTE CONTROL HEADPHONES J702 MIC IN IC771 6219B24M IC501 AK5354VT AD CONVERTER IC701 NJM2173AP MIC AMP 2 4V REGULATOR FROM MULTI LINK STATION PWB FROM MULTI LINK STATION PWB FROM MULTI LINK STATION PWB EXTENSION TERMINAL BATTERY TERMINAL XL201 33 8688 MHZ XL401 5 000MHz XL301 1...

Страница 32: ...BLOCK DIAGRAM 2 2 LCD JA01 OPTICAL LINE IN JA02 AUDIO OUTPUT JA05 SPEAKER OUTPUT JA03 USB SWA01 SWA10 SWA15 SWA16 SWA11 JA04 DC IN 2 6V LCD DATA OPTICAL IN LINE IN AUDIO OUT USB IN USB 5V KEY DC IN 3V DC GND D GND TO MAIN PWB ...

Страница 33: ...ME DOWN SKIP DOWN P35 9 F TO MAIN PWB M902 SLED MOTOR M903 LIFT MOTOR MECHANISM FLEXIBLE PWB 15 M901 SPINDLE MOTOR CN101 P35 7 C TO MAIN PWB OPTICAL PICKUP 17 MAGNETIC HEAD ASS Y 16 LCD UNIT 114 CN601 P36 5 B TO MULTI LINK STATION A PWB CNA101 OPERATION BUTTON FLEXIBLE PWB ASS Y 230 CN451 P35 7 D TO MAIN PWB ...

Страница 34: ... 5 1 3 4 6 1 3 4 6 1 4 5 8 MAIN PWB A TOP VIEW CR102 P36 2 G TO MULTI LINK STATION B PWB BATTERY TERMINAL 229 BATTERY TERMINAL 228 TP406 TP407 TP728 TP722 TP723 TP721 TP725 TP726 TP711 TP701 TP302 TP714 TP301 TP713 TP712 TP743 TP727 TPC12 TP403 TPC14 TP724 TP815 TP751 TP501 TP458 TP304 TP411 TP408 TP901 TP409 TP417 TPC04 TP811 TPC02 TPC03 TP400 TP200 TP404 TP212 TP401 TP122 TP402 TP410 TP804 TP805...

Страница 35: ...0 R311 Q255 C253 R805 C254 Q806 R254 R253 R255 R501 C717 C81 R727 R502 R503 R504 R319 Q314 R320 R303 C331Q331 R331 Q332 C315 C509 C731 L712 L713 C703 C710 C510 IC501 R332 IC303 C310 C332 Q333 C306 C740 C739 R443 C305 R307 C724 C723 C701 L711 R305 L714 C707 C708 IC701 R704 C521 C705 R703 R737 R738 C738 C709 L455 L456 C750 R781 Q701 R774 D493 R782 C737 C504 C503 IC751 L451 L452 L453 L457 L458 L454 D...

Страница 36: ...R OUTPUT SELECTOR FFCA01 CA71 CA73 CA72 LA17 1 22 1 7 MULTI LINK STATION A PWB B1 TOP VIEW MULTI LINK STATION B PWB B2 TOP VIEW 22 1 1 22 1 22 FROM LCD UNIT CR101 P34 6 B TO MAIN PWB P33 1 D TPA51 TPA52 TPB15 TPA41 TPA42 TPA43 TPC41 TPA45 TPB18 TPA21 TPA23 TPB16 TPA27 TPA28 TPA29 TPA22 TPB10 TPA24 TPA25 TPA33 TPB11 TPA31 TPA32 TPC63 TPA63 TPC62 TPA62 TPA61 TPA19 TPA17 TPA18 TPA14 TPA02 TPA04 TPA05...

Страница 37: ...G SIDE OF P W BOARD 5 5 CA61 LA16 LA14 LA15 LA12 CA31 LA11 LA13 LA04 CA46 CA45 LA22 LA21 LA102 LA103 LA101 CA28 CA24 MULTI LINK STATION A PWB B1 BOTTOM VIEW MULTI LINK STATION B PWB B2 BOTTOM VIEW 3 3 2 2 4 4 4 5 2 9 8 7 3 1 1 1 3 5 2 4 2 3 1 1 ...

Страница 38: ... 47 46 45 44 43 42 41 40 39 38 37 EFM 0 1 GND2 ADIPNF ADAGI 2 1 ADIP AGC ADIPO ADAGC 0 22 36 35 34 33 32 31 WB BPF MODE SW OPICPW VCC2 SGAIN DISC WBO 1 B B B B B B B B B B B B B TEMP SGAIN DISC 30 29 28 27 26 25 DTEMP 0 1 39K FSW TCGO AOUT BOUT EOUT RFADD TCGI FOUT 17 18 19 20 21 22 23 24 560K 0 22 390K 47K 47K 390K 13 14 15 16 ESW EIN FIN A B E F TCG 1 2K 0 033 VCC_LASER 33 6 3 10 µH VCC_SERVO LD...

Страница 39: ...8 69 70 71 72 73 74 75 76 77 89 88 87 86 85 84 83 82 81 80 79 VDDX VDD1 DSPIF0 DIN2 XO XI AGND3 PLLBVC EXTC AVCC3 1 47 DEFECT DSPIF2 CDBCLK DSPIF1 CDLRCK DSPIF3 CDDATA DIN DOUT 96 95 94 93 92 91 90 DILOCK 1 DIN DSPIF1 DSPIF3 DSPIF0 DSPIF2 5P CH 5P CH 1M 33 8688 MHz 47 µH VDD2 DHPIN LRCK BCLK DFCK ADDATA DADATA 99 98 97 107 106 105 104 103 102 101 100 DGND SFSY SBSY SBO SBCK 116 115 114 113 112 111...

Страница 40: ... SVO SVCO SWCO SWO OUT4 VS4 PGND4 SCOM WOUT VOUT COM SPGND UOUT TGND SPVS COMIN FIL SGND SGND VCO RMAX VCOIN 9 8 7 6 5 4 3 2 1 0 0022 56K 0 0047 0 47 16 15 14 13 12 11 10 MODE1 S S MUTE3 IN4 BRK PWM CLK 32 31 32 31 30 29 28 27 26 25 24 23 22 21 20 19 18 17 18 17 IN3F IN3R VS3 OUT3F OUT3R PGND3 PGND2 OUT2R OUT2F VS2 PGND1 OUT1R OUT1F VS1 IN1R IN1F IN2R IN2F MUTE MUTE2 CP1 CP2 CPC1 CPC2 VG VCC VCC S...

Страница 41: ...OEM PLVBTT _SYWR _SYRD SYPVUP SYRS CORCNT Vbus _XRT _DCEXT ARQD DCNT2 PCNT2 PCNT3 PCNT1 LED_R _AMUTE LSICNT VCC2 Vss DCNT1 BTRON OPTCNT DFCKC EPRT DAPON ADPON _EPCS RCLAT DISCPR EEPK RACLK RADAT EEPD SLCNT2 SLCNT1 SLCNT3 SENSE VCC_MAIN T1 T2 VBUS DCEXT PCNT1 PCNT3 PCNT2 LSICNT ADPON DFCKC RCAULT AUDATA AUSCLK SLCNT3 SLCNT1 SLCNT2 1K 8 7 6 5 4 3 2 1 100K MCPGIN TEST1 RFPCNT AUPON JPNP CKSTP _FOK _M...

Страница 42: ... E MSENSE 1 2 3 6 8K 3 3 10 47 6 3 1 470 12K 12K 12K 12K R ch L ch INPLUG MCNT 2 6V VCC4_5 CIKEY CAKEY DSPDAT DSPSCK DSPSTB MCPGIN 3 7 6 5 4 3 2 1 14 13 12 11 10 9 8 74LCX86T 1 1M 0 47 1M 1M 0 47 1M 74LCX00M VCC GND 14 13 12 11 10 9 8 7 6 5 4 3 2 1 1 MCH6630 R 6 5 4 3 2 1 D2 G1 D1 S1 G2 S2 4 7 4 7 MCH6630 6 5 4 3 2 1 D1 G1 G2 S2 S1 D2 15 0 47 0 47 22 µH 22 µH 2 7K 2 7K 15 22 µH 0 47 0 47 22 µH MCH...

Страница 43: ...5 0 47 47 13 6 5 4 R R L L 33 RKEY 3A6 8LFE R L R L 8 7 6 5 4 3 2 1 REMOTE CONTROL HEADPHONES 6 5 4 3 2 1 FDG312 P RMDAT 0 1 330K 0 047 100K RMTCNT PSLUSB DG1M3 6209B33M 5 4 3 2 1 470K 2 1 3 4 1 3A6 8LFE PWSCCR CPU_CK TX RX 1 CPU_SO 0 39 38 37 CPU_SI VSC3 CPU_XCS CK 33 32 31 30 29 28 27 26 36 35 34 EN USBVSS USB_SW USBVDD DM DP PLLVSS PLLVDD PLLTHRU VSC2 L AL A1 27 27 1 5K 2SB1462 J KRC404 E VCC3 ...

Страница 44: ... DSP_IF0 VDC0 DSPIF3 DSPIF2 DSPIF1 DSPIF0 BTRON VCC4_5 LDCNT0 LDCNT1 RFPCNT AUPON RMTCNT LSICNT RMDAT VCC_SERVO RKEY RFPCNT VOLDAC 680K 390K 0 33 5 6K 27K 27K 270P CH 47P CH 390K VCC0 2 47 6 3 47 µH 1 10 100 µH VCC2_1 3_5 180K 0 047 150K 1 2M 270K 15 14 13 12 11 1 VREF OSCI RT GND VCC EIP1 10 9 8 7 6 EIN1 EO1 CTL1 OUT1 PVCC CTL3 OUT2 PGND IR3M17U6 5 4 3 2 1 MOD CTL2 EO2 EIN2 EIP2 DSEL 16 17 18 19 ...

Страница 45: ...7 6 3 0 1 882145MH 10 10 1 6 5 4 3 2 1 VCC4_5 2 1 3 4 1 27 27 1 5K 2SB1462 J KRC404 E VCC3 3 1 2 3 3 9K 0 1 12 MHz VCC2 0 8P CH 4 3 2 1 8P CH 6219B185M 5 4 3 2 1 10K 10K 220P CH 2 7K 2SC5383 F 470K 2 4V PLVDCI DCEXT 100K 2SC5383 F 27K 68K PCNT2 1 8 1 8 220 4 MCH3427 PLVBTT 1 1 3 2 2 3 RT1N250 U RT1P150 U 1M PCNT3 BTRON CHGON PLVBTA CHGCNT 6 5 4 3 2 1 XP04501 1K 100K 560K 1 F10J2E D2 G1 D2 D1 G2 S2...

Страница 46: ... USB DISP BASS REC MODE CHARGE VOLUME DOWN VOLUME UP POWER STOP SKIP DOWN PLAY PAUSE MENU SKIP UP 18K 39K 12K 6 8K 3 3K 2 7K 3 9K 5 6K 2 2K 2 2K 120K 0 1 68K 0 1 GND VCC GND Vout R L 9 8 7 6 5 4 3 2 1 1K 100mA 100mA 100mA 100mA 100mA 100mA 22K 1 10 1 0 1 100P CH 100P CH L R 4 3 2 1 OPTICAL LINE IN AUDIO OUTPUT SPEAKER OUTPUT 4 3 2 1 L R 0 1 6 5 4 3 2 1 0 1 0 1 630mA USB 5 4 3 2 1 DC IN 3 2 1 0 1 0...

Страница 47: ... 96 97 98 99 100 101 102 103 104 105 106 107 108 109 110 111 112 113 115 116 117 118 119 120 121 122 123 124 125 126 127 128 3 P 0 83 V 0 97 V 0 77 V 0 72 V 2 64 V 0 5 V 0 66 V 1 08 V 0 V 0 V 0 6 V 2 58 V 2 59 V 2 6 V 0 V 300 V 2 6 V 2 6 V 0 V 2 6 V 2 6 V 0 V 0 V 2 2 V 0 V 0 V 2 6 V 0 V 0 V 0 V 0 V 0 V 2 6 V 0 V 0 V 0 V 2 6 V 0 V 2 2 V 0 V 0 V 0 V 0 V 0 V 0 V 0 V 0 V 0 V 0 V 0 V 200 mV 0 V 0 V 2 6...

Страница 48: ...ssion capacitance withstand voltage is used CH TH RH UJ Temperature compensation ML Mylar type The indicated voltage in each section is the one measured by Digital Multimeter between such a section and the chas sis with no signal given Parts marked with 1 are important for maintaining the safety of the set Be sure to replace these parts with specified ones for maintaining the safety and performanc...

Страница 49: ... LOUT IC201 73 Pin LOUTX IC201 68 Pin ROUT IC201 69 Pin ROUTX 11 12 13 Grids 4 Single Dual Quad Octal Gain Trace CHANNEL 4 FIND ZOOM Off On Coupling Fixed variable Start of normal playback 13 Sep 02 14 24 18 1 5 s 0 50 V 5 s 1 00 V 5 s 2 00 V 5 s 5 s 2 00 V 2 3 4 BWL 1 50 mV DC 1 DC 1 18 V X 10 2 1 V DC X 10 3 2 V DC X 10 2 V DC X 10 STOPPED 10 kS s 1 3 2 1 CK208 CK210 TEMON TP656 SPW TP652 SLW 5 ...

Страница 50: ...tton input Stand by Start STOPPED NORMAL STOPPED STOPPED 2 1 3 4 2 3 1 2 1 3 2 3 1 2 1 3 4 200 MS s 250 kS s SLOW TRIGGER 500 kS s 50 kS s SLOW TRIGGER 5 MS s TRIGGER SETUP Edge SMART CHANNEL 1 CHANNEL 4 TRIGGER SETUP Edge SMART TRIGGER SETUP Edge SMART trigger on 1 2 3 4 Ext Ext10 Line AC DC LFREJ HFREJ Neg POS Window holdoff Time Evts trigger on 1 1 3 4 Ext 2 Ext10 Line trigger on Ext10 Line cou...

Страница 51: ...tton is pressed Yes No Normal Yes No Yes Does the display operate normally Is playback state set Yes Is audio output normal Yes Is recording playback operation normal Yes No No No No Perform the check stated in item Abnormal display Perform the check stated in item Playback state cannot be set Perform the check stated in item Audio playback circuit Perform the check stated in item Recording playba...

Страница 52: ...ound in pins 1 4 9 and 12 of IC751 and pins 1 4 9 and 12 of IC761 Are pins 2 5 10 and 13 of IC751 H Abnormal display Yes Is a waveform found in pins 2 to 4 of CR101 and pins 2 to 4 of CR102 and pins 2 to 4 of CR103 and pins 2 to 4 of CR104 Is pin 1 VCC of CR101 and pin 22 VCC of CR104 and pin 20 GND of CR101 and pin 1 GND of CR104 normal Is a waveform found in pins 33 35 and 37 of IC401 Check the ...

Страница 53: ...d Check whether the pin 16 of IC501 and the pin 80 of IC201 are in H state Yes Yes Does a digital waveform appear in pins 9 to 12 of IC501 Insert a low reflection disc and ascertain audio output by normal playback and then set TEST REC mode Change MSL from 00 H to 80 H by the control setting of EEPROM After completing the operation return in to 00 H Does the head move down failing to start record ...

Страница 54: ...nput Power supply for interface 29 DGND GND for interface 30 ACRCER Output CRC error flag monitor output of ADIP 31 TCRS Output Track cross signal 32 PLLCK Three state Output EFM PLL clock output on playback 33 FEMON Output Focus error signal monitor output 34 TOTMON Output Total signal monitor output Series resistor 10 100 kohm built in 35 TEMON Output Tracking error signal monitor output 36 EFMO...

Страница 55: ...h 70 VDD4LR Input Analog power supply 71 MUTE Output Mute output 72 LOUT Output 1 bit PWM Lch 73 LOUTX Output 1 bit PWM Lch reversed phase 74 DGND4L Digital GND 75 76 FWMVDD Input PWM power supply 77 78 FWMOUT PWM power supply 79 PON Input Sync signal input for microcomputer power on 80 DGND Digital GND 81 VDDX Input Internal digital power supply 82 XI Input Oscillation circuit input 33 8688 MHz 8...

Страница 56: ...ut Terminal of interrupt request output to system control interface 115 VDD1 Input Power supply for interface 116 DGND Digital GND 117 RSTX Schmidt Input Chip reset input L reset Note 118 SYD0 Schmidt Input Data bus terminal of system control interface LSB Three state Output 119 124 SYD1 SYD6 Schmidt Input Data bus terminal of system control interface Three state Output 125 SYD7 Schmidt Input Data...

Страница 57: ...DON Output Recording head current control output 27 P75 CHGCNT Output Charge control 28 TA2OUT BUZOUT Output Beep tone pulse output 29 P73 CHGON Output Charge ON OFF control output 30 CLK2 SQC_SCK Output Security chip clock output 31 RXD2 SQC_SI Input Security chip data input 32 TXD2 SQC_SO Output Security chip data output 33 TXD1 DSPDAT Output Main unit display data output 34 VCC1 VCC1 Input Posi...

Страница 58: ...rity IC clock input ON OFF 78 P123 BTRON Output Battery load resistance ON OFF control 79 P122 OPTCNT Output Optical digital circuit ON OFF control 80 P121 ADPON Output A D converter operation control output 81 P120 DAPON Output D A converter operation control output 82 VCC2 VCC2 Input Positive power supply 83 P31 DCNT1 Output Mechanism driver enable output 84 VSS VSS Ground potential 85 P27 _AMUT...

Страница 59: ...el data bus 117 AN7 CIKEY Input Cradle interrupt key detection 118 AN6 CAKEY Input Cradle normal key detection 119 AN5 PLVBTA Input Battery voltage detection Via amp 120 AN4 PLVDCI Input DC IN voltage abnormality detection input 121 AN3 RKEY Input Remote control button operation detection input 122 AN2 HAKEY Input Main unit normal key detection input 123 AN1 HIKEY Input Main unit interrupt key det...

Страница 60: ...IN3F IN3R H bridge 3 logic input terminal 19 VS3 H bridge 3 power terminal A capacitor is connected to the paired GND 20 OUT3F H bridge 3 forward output terminal 21 OUT3R H bridge 3 reverse output terminal 22 PGND3 H bridge 3 output section GND terminal 23 PGND2 H bridge 2 output section GND terminal 24 OUT2F H bridge 2 forward output terminal 25 OUT2R H bridge 2 reverse output terminal 26 VS2 H b...

Страница 61: ...detection comparator output terminal of thread driver section 55 SWO 3 phase thread W phase output terminal 56 OUT4 Half bridge output terminal 57 VS4 Half bridge power terminal A capacitor is connected to the paired GND 58 PGND4 GND terminal of half bridge output section 59 SCOM Position detection comparator COM input terminal of thread driver section 60 WOUT 3 phase spindle W phase output termin...

Страница 62: ...IM DR580H 62 M E M O ...

Страница 63: ... type without lead wire VC MN Cylindrical type without lead wire VC TV Square type without lead wire VC TQ Square type without lead wire VC CY Square type without lead wire VC CZ Square type without lead wire VC J The 13th character represents capacity difference J 5 K 10 M 20 N 30 C 0 25 pF D 0 5 pF Z 80 20 If there are no indications for the electrolytic capacitors error is 20 Resistors VRD Carb...
Страница 64: ...801 VHDDG1H3 1 J AC Silicon DG1H3 D802 VHEMA8039L 1 J AB Zener MA8039L D803 VHD1SS388 1 J AC Silicon 1SS388 D811 VHDRB521S30 1 J AC Silicon RB521S30 D828 VHDF10J2E 1 J AC Silicon F10J2E D841 VHDDG1H3 1 J AC Silicon DG1H3 D862 VHDDG1H3 1 J AC Silicon DG1H3 COILS B301 RCILZ0070AWZZ J AB Tip Power Bead Induction B302 RCILZA002AWZZ J AG Tip Common Mode Choke Coil BA01 RCILZ0070AWZZ J AB Tip Power Bead...

Страница 65: ...KYCZ1EB472K J AB 0 0047 µF 25V C907 VCKYCZ1HB222K J AB 0 0022 µF 50V C908 909 VCKYCY0JB105K J AC 1 µF 6 3V C911 912 VCKYCY1AB224K J AB 0 22 µF 10V C913 RC KZ0015AWZZ J AB 1 µF 2 CA01 02 VCKYCY1CB104K J AB 0 1 µF 16V CA11 VCKYCY1CB104K J AB 0 1 µF 16V CA15 VCKYCY1CB103K J AA 0 01 µF 16V CA21 VCKYCY0JB105K J AC 1 µF 6 3V CA24 VCKYCY0JB105K J AC 1 µF 6 3V CA28 VCKYCY1CB104K J AB 0 1 µF 16V CA31 VCKYC...

Страница 66: ...3J J AA 33 kohms 1 16W RA13 VRS CY1JB243F J AA 24 kohms 1 16W RA14 VRS CY1JB183F J AA 18 kohms 1 16W RA16 VRS CY1JB124F J AA 120 kohms 1 16W RA21 VRS CY1JB102J J AA 1 kohm 1 16W RA22 VRS CY1JB223J J AA 22 kohms 1 16W RA23 VRS CY1JB683J J AA 68 kohms 1 16W RA24 VRS CY1JB100J J AA 10 ohm 1 16W OTHER CIRCUITRY PARTS CN101 QCNCW046XAWZZ J AM Socket 22Pin CN451 QCNCW050HAWZZ J AF Socket 8Pin CN601 QCNC...

Страница 67: ...3 QCNWG0029AWZZ J AK Connecting Cord 4 QCNWG0069AWZZ J AS USB Cable 5 QCNWG0422AFZZ J AQ Opticel Cable 1 6 RADPA5067AWZZ J AC Adaptor 1 6 RADPA5068AWZZ J AC Adaptor 1 6 RADPA5069AWZZ J AC Adaptor 1 6 RADPA7065AWZZ J AY AC Adapter 1 6 RADPA8066AWZZ J AY AC Adaptor 7 RPHOH0021AWZZ J AU Earphones 8 RPHOH0022AWZZ J BE Earphones 9 RRMCW0030AWSA J BN Remote Control 10 SPAKAA021AWZZ J Packing Add 11 SPAK...

Страница 68: ...IM DR580H A B C D E F G H 1 2 3 4 5 6 Figure 5 MD MECHANISM EXPLODED VIEW 5 M901 M902 M903 501 9 503x2 16 17 14 11 13 5 507 501x3 506x2 505 502 1 8 507 12 504 2 4 15 3 6 10 7 ...

Страница 69: ... 6 Figure 6 CABINET EXPLODED VIEW 6 MD MECHANISM 602x2 602x2 222x2 603x2 602x2 602 602 602 219 227 207 202 204 225 215 218 229 228 206 205 203 221 213 216 217 601 601 601 224 209 208 211 210 212 223 214 601 230 233 232 220 201 PWB A 234 ...

Страница 70: ...IM DR580H A B C D E F G H 1 2 3 4 5 6 Figure 7 MULTI LINK STATION EXPLODED VIEW 7 104 105 113 101 102 112 107 109 401 106 110 114 115 108 PWB B2 PWB B1 FFCA01 111x2 103x4 401x4 ...

Страница 71: ...379AWZZ 25 Carrying Case UBAGC0007AWSB 26 Rechargeable Battery UBATM0009AWSA 27 CD ROM UDSKA0004AWZZ 28 Polyethylene Bag 92LBAG1770A 1 Battery Case GCASZ0005AWSA 2 Battery Carrying Case PCoVW1015AWZZ 3 Connecting Cord QCNWG0029AWZZ 4 USB Cable QCNWG0069AWZZ 5 Optical Cable QCNWG0422AFZZ 6 AC Adaptor RADPA8066AWZZ 7 Earphones RPHoH0021AWZZ 8 Earphones RPHoH0022AWZZ 9 Remote Control RRMCW0030AWSA 10...

Страница 72: ...ed in a retrieval system or transmitted in any form or by any means electronic mechanical photocopying recording or otherwise without prior written permission of the publisher A0312 168DS HA M SG SK EX SHARP CORPORATION AV Systems Group Audio Systems Division Higashihiroshima Hiroshima 739 0192 Japan Printed in Japan ...

Отзывы: