background image

Loading the Thermal Paper

15

1. Installation

7

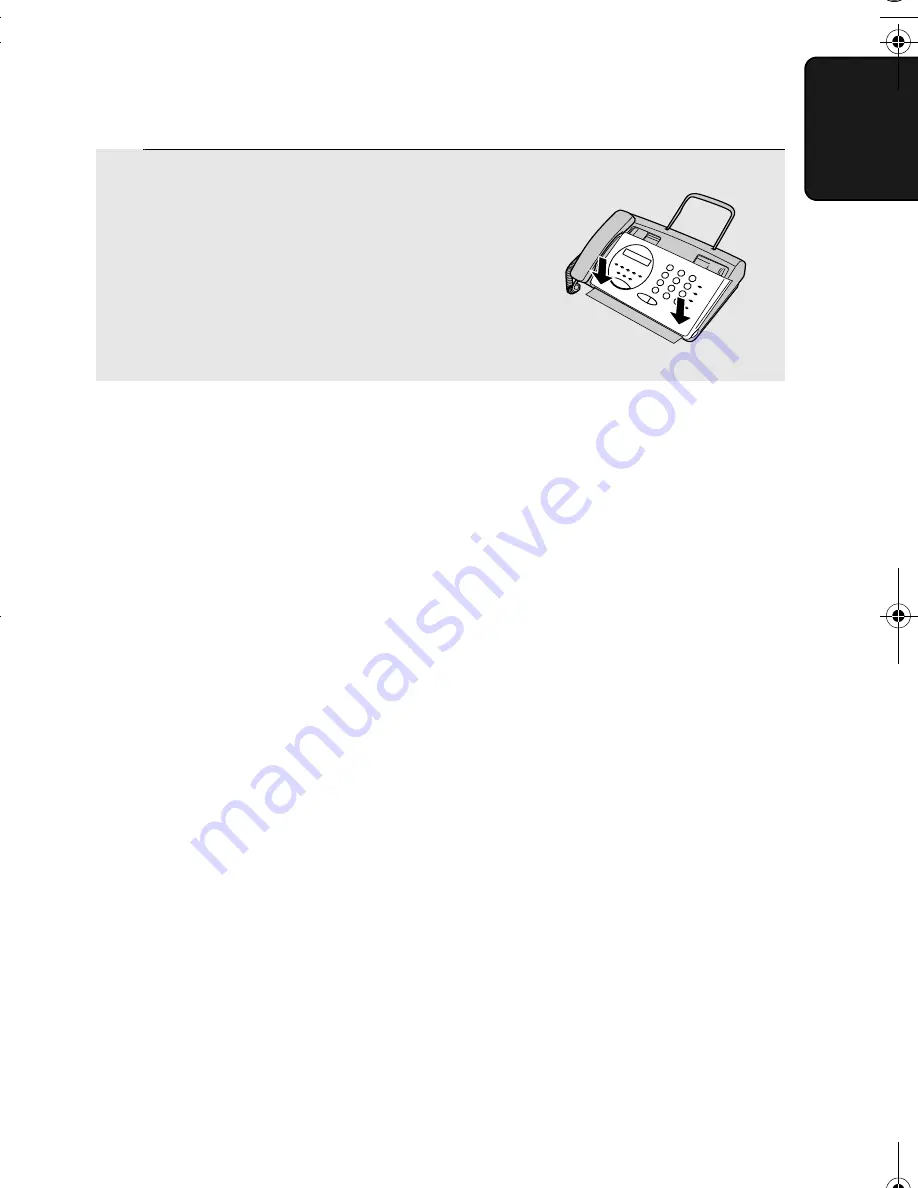
Close the operation panel, making sure 
it clicks into place.

UX-53

:

 A short length of the paper will 

feed out. Grasp the paper by the edge 
and pull upward to tear it off.

UX-73:

 A short length of the paper will 

be cut off.

Replacing the thermal paper

When the paper runs out, OUT OF PAPER will appear in the display. 
Reception and copying will no longer be possible. To replace the paper, first 
take out the old roll, then load the new roll as described above.

To assure a long life for your fax and obtain the best reproduction quality, we 
recommend that you use the following Sharp thermal paper, which is available 
from your dealer or retailer:

FO-20PR THERMAL PAPER (30 m roll)

The use of any other paper may result in poor copy quality and excessive 
build-up of residue on the head.

Handling thermal paper

Do not unpack the paper until you are ready to use it. It may become 
discoloured if:

It is stored at high humidity or high temperature.

It is exposed to direct sunlight.

It comes in contact with glue, thinner, or a freshly copied blueprint.

A rubber eraser or adhesive tape is used on it, or it is scratched.

Click

all.book  Page 15  Wednesday, November 2, 2005  1:03 PM

Содержание FO-77

Страница 1: ...MODEL FO 77 UX 73 1 Installation 2 Sending Faxes 3 Receiving Faxes 4 Making Copies 5 Making Telephone Calls 6 Answering Machine Connection 7 Special Functions 8 Printing Lists 9 Maintenance 10 Troubleshooting Quick Reference Guide ...

Страница 2: ...z a fax termék a TBR21 és TS103021 szabványnak megfelelo analóg nyilvános kapcsolt telefonhálózatokban muködtetheto Slonenian Faksiseade töötab analoogtelefoni kommutaatorvőrkudes mis vastavad TBR21 ja TS103021 standardile Šī telefaksa ierīce var strādāt publiski komutējamos analogajos telefonu tīklos kas atbilst standartam TBR21 un TS103021 Tai faksimilinis aparatas veikiantis analoginiuose šiuol...

Страница 3: ... 53 Tear off by hand UX 73 Automatic cutter Memory size 448 KB approx 17 average pages Modem speed 9 600 bps with automatic fallback to lower speeds Transmission time Approx 15 seconds Resolution Horizontal 8 pels mm Vertical Standard 3 85 lines mm Fine Halftone 7 7 lines mm Super fine 15 4 lines mm Automatic document feeder 10 pages max A4 80 g m2 paper Recording system Thermal recording Halftone...

Страница 4: ... T CCITT G3 mode Input document size Automatic feeding Width 148 to 210 mm Length 140 to 297 mm Manual feeding Width 148 to 210 mm Length 140 to 600 mm Effective scanning width 210 mm max Effective printing width 210 mm max Contrast control Automatic Dark selectable Reception modes TEL FAX TEL FAX A M Note A M mode is for connecting an answering machine Copy function Yes Telephone function Yes can...

Страница 5: ...ged The machine has been dropped or the housing damaged Do not allow anything to rest on the power cord and do not install the machine where people may walk on the power cord This machine must only be connected to a 220 240 V 50 60 Hz earthed outlet Connecting it to any other kind of outlet will damage the machine and invalidate the warranty Never insert objects of any kind into slots or openings ...

Страница 6: ...de 20 Setting the Display Language 22 Volume Adjustment 23 2 Sending Faxes 25 Transmittable Documents 25 Loading the Document 26 Adjusting the Resolution and Contrast 28 Sending a Fax by Normal Dialling 30 Sending a Fax by Automatic Dialling 31 3 Receiving Faxes 40 Using TEL FAX Mode 40 Using A M Mode 41 Using FAX Mode 41 Using TEL Mode 43 Optional Reception Settings 45 Substitute Reception to Mem...

Страница 7: ...ional A M Mode Settings 53 7 Special Functions 56 Caller ID Requires Subscription to Service 56 Blocking Reception of Unwanted Faxes 61 Polling Requesting a Fax Transmission 62 Key Lock Function 64 8 Printing Lists 68 9 Maintenance 71 10 Troubleshooting 73 Problems and Solutions 73 Messages and Signals 78 Clearing Paper Jams 81 Quick Reference Guide 84 Index 85 ...

Страница 8: ...ters when storing auto dial numbers SPEED key Press this key to dial a fax or voice number using an abbreviated 2 digit Speed Dial number REDIAL key Press this key to automatically redial the last number dialed RESOLUTION key When a document is in the feeder press this key to adjust the resolution for faxing or copying A Look at the Operation Panel 1 2 3 4 5 6 E D C B A 1 5 3 4 2 9 10 11 12 6 7 13...

Страница 9: ...eder press this key to make a copy At any other time press this key to print out the Help List a quick reference guide to the operation of your fax machine STOP key Press this key to cancel an operation before it is completed SPEAKER key Press this key to listen to the line and fax tones through the speaker when faxing a document Note This is not a speakerphone You must pick up the handset to talk...

Страница 10: ...d from a cold to a warm place it is possible that condensation may form on the scanning glass preventing proper scanning of documents for transmission To remove the condensation turn on the power and wait approximately two hours before using the machine Handset Original document support Handset cord Operation manual Fax paper Sample roll Paper roll shims Telephone line cord If any are missing cont...

Страница 11: ...go into either socket Make sure the handset cord goes into the socket marked with a handset symbol on the side of the machine Use the handset to make ordinary phone calls or to transmit and receive faxes manually 1 Grasp the finger hold and open the operation panel 2 Flip up the front paper guide Removing the packing paper Note Do not peel off or bend this strip of film UX 73 UX 53 ...

Страница 12: ...h so the power is turned on and off by simply plugging in or unplugging the power cord 3 Remove the packing paper 4 Flip down the front paper guide and then close the operation panel UX 73 UX 53 UX 73 UX 53 Moving your fax and reconnecting If it is necessary to move your fax to a new location first disconnect the telephone line cord before disconnecting the power cord When reconnecting it is neces...

Страница 13: ...sed from your dealer or at most telephone specialty stores 1 Press once and once 2 Press 4 times 3 Press to select tone dialling Only tone dialling should be selected The pulse dial settings are not for use in your country or region 4 Press to exit 4 1 TEL SET TEL LINE Display OPTION SETTING DIAL MODE Dial mode setting The dial mode setting is used to select the dial mode tone or pulse Tone dialli...

Страница 14: ...ed you can connect an extension phone to the TEL SET socket on the fax Phone calls can be made using the extension phone even when the Key Lock function is activated To connect an answering machine to your fax see page 50 1 Remove the seal covering the TEL SET socket 2 Connect the extension phone line to the TEL SET socket TEL SET TEL LINE ...

Страница 15: ...l shims on each side of the paper compartment Note that Sharp recommended paper including the initial roll is 216 mm in width The ribbed side of the shims should face in toward each other The fax machine s print head creates text and images by applying heat to the thermal paper Your fax machine prints incoming faxes on a special kind of paper called thermal paper Press the knob to make sure the fr...

Страница 16: ...The paper is only coated on one side for printing If the roll is placed backwards the paper will come out blank after printing 5 Insert the leading edge of the paper into the slot as shown Continue to push the paper through the slot until it comes out the opening in the front of the machine 6 Make sure the paper comes out straight and then flip down the paper guide YES NO UX 53 UX 73 ...

Страница 17: ...oll as described above To assure a long life for your fax and obtain the best reproduction quality we recommend that you use the following Sharp thermal paper which is available from your dealer or retailer FO 20PR THERMAL PAPER 30 m roll The use of any other paper may result in poor copy quality and excessive build up of residue on the head Handling thermal paper Do not unpack the paper until you...

Страница 18: ... keys max 20 digits To insert a space between digits press To enter a press To clear a mistake press 3 E D C B A 3 Display ENTER FAX ENTRY MODE OWN NUMBER SET Before you begin sending faxes enter your name and fax telephone number You also need to set the date and time Once you enter this information it will automatically appear at the top of each fax page you send ...

Страница 19: ...ample SHARP 77777 444 22 7777 77 To enter two letters in succession that require the same key press after entering the first letter moves the cursor forward and moves the cursor backward To clear a mistake press To change case press To enter one of the following symbols press or repeatedly _ 7 Press 8 Press to return to the date and time display A B C D E F G H I J K L M N O P Q R S T U V W X Y Z ...

Страница 20: ...e and once 2 Press 3 times 3 Press once 3 The date and time appear in the display and are printed at the top of every page you fax Set the date and time as shown below E D C B A Display The currently set date appears example ENTRY MODE DATE 15 08 2006 3 DATE TIME SET ...

Страница 21: ...or the month 01 for January 02 for February 12 for December etc Example January 6 Enter the year four digits Example 2006 7 Enter a two digit number for the hour 00 to 23 and a two digit number for the minute 00 to 59 Example 9 25 8 Press to start the clock 9 Press to return to the date and time display 0 5 0 1 2 0 0 6 0 9 2 5 The currently set time appears example TIME 12 19 05 JAN 09 25 KEY LOCK...

Страница 22: ...cted to the same line TEL FAX mode This mode is convenient for receiving both faxes and voice calls When a call comes in the fax will detect whether it is a voice call including manually dialled faxes or an automatically dialled fax If it is a voice call the fax will make a special ringing sound to alert you to answer If it is an automatically dialled fax reception will begin automatically A M mod...

Страница 23: ...M mode see Chapter 6 2 Press the number key of the desired reception mode TEL mode FAX mode TEL FAX mode A M mode The display will revert to the date and time display The selected reception mode will appear to the right of the time Note T F will appear when TEL FAX mode is selected and will appear when A M mode is selected 1 2 3 4 10 MAY 10 35 10 MAY 10 35 T F ...

Страница 24: ... or Polish can be selected Press the keys on the operation panel as follows 1 Press once and once 2 Press 4 times 3 Press 4 Press or until the desired language appears in the display 5 Press The machine will beep and the display will change to the selected language 6 Press to return to the date and time display 4 Display OPTION SETTING LANGUAGE ...

Страница 25: ...olume Adjustment You can adjust the volume of the speaker and ringer using 1 Press 2 Press one or more times to select the desired level Press again to turn off the speaker Speaker E D C B A Display SPEAKER MIDDLE SPEAKER HIGH SPEAKER LOW ...

Страница 26: ...ke sure has not been pressed and the handset is not lifted The ringer will ring once at the selected level then the date and time will reappear in the display 2 If you selected RINGER OFF OK press Display RINGER LOW RINGER MIDDLE RINGER HIGH RINGER OFF OK Ringer ...

Страница 27: ...eral pages at once Note Letters or graphics on the edges of a document will not be scanned 5 mm 5 mm Letters in the shaded area will not be scanned 210 mm 600 mm 52 g m 157 g m 297 mm 210 mm 80 g m Loading one page at a time Minimum size Maximum size Minimum weight Maximum weight Minimum size Maximum size Minimum weight Maximum weight Loading up to 10 pages at once 140 mm 148 mm 140 mm 148 mm 52 g...

Страница 28: ...o 10 pages can be placed in the feeder at one time The pages will automatically feed into the machine starting from the bottom page If you need to send or copy more than 10 pages place the additional pages gently and carefully in the feeder just before the last page is scanned Do not try to force them in as this may cause double feeding or jamming If your document consists of several large or thic...

Страница 29: ... Do not try to remove a document without first releasing it as explained below This may damage the feeder mechanism 1 Grasp the finger hold and pull up to open the operation panel 2 Remove the document If you can not remove the document see Clearing a jammed document on page 81 3 Close the operation panel Press down on both front corners of the panel to make sure it clicks into place If you need t...

Страница 30: ... you the fastest and most economical transmission FINE Use FINE for documents containing small letters or fine drawings SUPER FINE Use SUPER FINE for documents containing very small letters or very fine drawings HALF TONE Use HALF TONE for photographs and illustrations The original will be reproduced in 64 shades of gray You must adjust the settings each time you don t want to use the default sett...

Страница 31: ...e document must be loaded before the resolution and contrast can be adjusted 2 Press one or more times until the desired resolution and contrast settings appear in the display The first time you move through the list of resolution settings the contrast setting AUTO will appear next to each resolution setting The second time you move through the list the contrast setting DARK will appear Display ST...

Страница 32: ...her party answers ask them to press their Start key if you pressed pick up the handset to speak with them This causes the receiving machine to issue a fax tone or Sending a Fax by Normal Dialling With Normal Dialling you pick up the handset or press and dial by pressing the number keys If a person answers you can talk with them through the handset before sending the fax If you pressed you must pic...

Страница 33: ...full fax or telephone number in your fax machine When you store a fax or telephone number you select a two digit Speed Dial number for it 40 Speed Dial numbers are available 5 When you hear the fax tone press Replace the handset if you used it When transmission is completed the fax will beep once Speed Dial numbers 06 through 40 are for dialling with the SPEED key Speed Dial numbers 01 through 05 ...

Страница 34: ...fax or voice number by pressing the number keys Up to 32 digits can be entered Note A space cannot be entered To clear a mistake press If a pause is required between any of the digits to access a special service or an outside line press The pause appears as a hyphen two seconds per pause Several pauses can be entered in a row 6 Press 3 1 Display FAX TEL MODE ENTRY MODE 0 1 Example Storing fax and ...

Страница 35: ...e and time display Making changes To make changes in a number previously stored repeat the programming procedure Select the Rapid Key or Speed Dial number for which you want to make changes in Step 4 and then change the number and or name when they appear in the display in Steps 5 and 7 A B C D E F G H I J K L M N O P Q R S T U V W X Y Z SPACE Note The fax machine uses a lithium battery to keep au...

Страница 36: ...access code stored in a Rapid Key or Speed Dial number can only be used if the handset is lifted or the is pressed before dialling 1 Press once and once 2 Press once 3 Press to select CLEAR 4 Enter the Speed Dial number that you want to clear by pressing the number keys 5 Press 6 Return to Step 4 to clear another number or press to return to the date and time display 3 2 Display ENTRY MODE Clearin...

Страница 37: ...no name was stored the fax number will appear If the name or number is incorrect press The document will be automatically transmitted once the connection is established Rapid Keys A to E can be used to make phone calls even when the Key Lock function is activated For this reason it is recommended that you store emergency phone numbers in these keys READY TO SEND Sending a fax by Rapid Key Dialling...

Страница 38: ...c Dialling 1 Load the document s If desired press to set the resolution and or contrast 2 Press and then enter the Speed Dial number by pressing the numeric keys To enter numbers 1 through 9 first enter 0 and then the number 3 Check the display If the name or number shown is correct press If not press and then repeat Step 2 READY TO SEND 0 8 Example ...

Страница 39: ...pear as a hyphen two seconds per pause Several pauses can be entered in a row 3 Check the display If the number of the receiving machine shown is correct press If the number is not correct press to backspace and clear one digit at a time and then re enter the correct digit s Sending a fax by Direct Keypad Dialling You can also enter a full number with the number keys and then press to begin dialli...

Страница 40: ...ing If a name wasn t stored for the number press This will cause numbers not names to appear when you scroll 4 Press or to scroll through the names numbers if you pressed 0 Stop when the desired name appears in the display 5 Press The document will be automatically transmitted once the connection is established 1 1 0 READY TO SEND Searching for an auto dial number If you don t remember the Rapid K...

Страница 41: ...ne after the connection is made Note that the speaker is automatically activated when you press Automatic redialling If you use automatic dialling including Direct Keypad Dialling to send a fax and the line is busy the fax machine will automatically redial the number The fax machine will make 2 redial attempts at an interval of 5 minutes To stop automatic redialling press ...

Страница 42: ...egin reception of the incoming document If your fax machine doesn t detect a fax tone this means that the call is a voice call or manually dialled fax it will make a ringing sound called pseudo ringing for 30 seconds to alert you to answer If you don t answer within this time your fax will send a fax tone to the other machine to allow the calling party to send a fax manually if they desire Note On...

Страница 43: ... When the reception mode is set to FAX the fax machine will automatically answer all calls on two rings and receive incoming faxes Using A M Mode To select A M mode press and 1 4 If you pick up the handset before the machine answers you can talk to the other party and or receive a fax as explained in Using TEL Mode on page 43 To select TEL FAX mode press and 1 2 2 rings Fax reception 10 MAY 10 35 ...

Страница 44: ... the fax machine answers incoming calls in FAX and TEL FAX mode Any number from 2 to 5 can be selected 1 Press once and once 2 Press once 3 Enter the desired number of rings any number from 2 to 5 Example 3 rings 4 Press to return to the date and time display 4 3 Display OPTION SETTING NUMBER OF RINGS ...

Страница 45: ...nts to send a fax press after speaking Press before the sender presses their Start key When RECEIVING appears in the display hang up RECEIVING Note If you have set the Fax Signal Receive setting page 45 to NO press to begin reception Beep RECEIVING Using TEL Mode When the reception mode is set to TEL you must answer all calls by picking up the fax machine s handset or an extension phone connected ...

Страница 46: ... doesn t respond or if the other party first talks to you and then wants to send a fax press once and twice on the extension phone only on a tone dial phone This signals the fax to begin reception Hang up The above step is necessary if you have set the Fax Signal Receive setting page 45 to NO Your fax will not accept the signal to begin reception 5 if a document is loaded in its feeder 5 Phone goe...

Страница 47: ...If you use a computer fax modem to send documents on the same line you must turn this function off in order to prevent your fax from mistakenly attempting to receive documents from the computer fax modem Follow the steps below to change the setting 1 Press once and once 2 Press 3 times 3 Press to turn on the function or to turn it off 4 Press to return to the date and time display 4 1 2 Display OP...

Страница 48: ...lephone You can select any number from 0 to 9 Substitute Reception to Memory In situations where printing is not possible such as when your fax runs out of paper or the paper jams incoming faxes will be received to memory When you have received a document in memory FAX RX IN MEMORY will appear in the display alternating with OUT OF PAPER or PAPER JAMMED COVER OPEN When you add paper or clear the j...

Страница 49: ...ne can also be used to make copies 1 Load the document s face down Maximum of 10 pages If desired press to set the resolution and or contrast The default resolution setting for copying is FINE 2 When you are ready to begin copying press READY TO SEND ...

Страница 50: ...Listen for the dial tone 2 Dial the number using one of the following methods Normal Dialling Enter the full telephone number with the numeric keys Rapid Key Dialling Press the appropriate Rapid Key Speed Dialling Press and enter the 2 digit Speed Dial number with the numeric keys 3 Speak with the other party when they answer If you pressed pick up the handset to talk or Example Press Rapid Key A ...

Страница 51: ...eed Dial number First search for the number as described in Searching for an auto dial number in Sending a Fax by Automatic Dialling in Chapter 2 then pick up the handset or press The number will be dialed automatically do not press Redial The last number dialed can be redialed by pressing it is not necessary to pick up the handset or press When the other party answers pick up the handset to talk ...

Страница 52: ... to receive both voice messages and faxes when you are out Important If the answering machine is not connected to the TEL SET socket on the fax as shown the setup will not operate properly 1 Remove the seal covering the TEL SET socket 2 Connect the answering machine s telephone line plug to the TEL SET socket TEL SET TEL LINE To answering machine s telephone line socket ...

Страница 53: ... about four seconds at the beginning of the message This will give your fax a chance to detect fax tones sent when automatic dialling is used 1 Press and to set the reception mode to A M 2 Set your answering machine to auto answer Your answering machine must be set to answer on a maximum of two rings If not you may not be able to receive faxes sent by automatic dialling If your answering machine h...

Страница 54: ...ood or there is noise on the line the answering machine and or fax machine may not respond properly The call counter on your answering machine may indicate that voice messages were received when only fax messages were received To prevent the fax from taking over the line and beginning reception if you call in from an external phone or answer on an extension phone press any three keys other than th...

Страница 55: ...achine Some answering machines may have unusually fast disconnect times equal to or very slightly less than 4 seconds which means that the answering machine may disconnect the line before fax reception can begin In this case try a Quiet Detect Time setting of about 3 seconds If the fax machine is interrupting callers before they can leave a message try a longer Quiet Detect Time setting If your ou...

Страница 56: ...ilence detection so that the pause will not cause the fax to take over the line Quiet Detect Start Timing has been set to five seconds at the factory You can change this setting by entering a 2 digit number equal to the desired number of seconds of the delay or turn the function off by enttering 00 As general guide the delay time should be slightly longer than the pause before the outgoing message...

Страница 57: ...wering machine is not turned on This function has been turned off at the factory If you want to turn it on follow the steps below Note When this function is turned on make sure that the answering machine is set to answer on 4 rings or less If it isn t the fax will always answer first preventing callers from leaving voice messages 1 Press once and once 2 Press 5 times 3 Press to turn on the functio...

Страница 58: ... this function you must subscribe to a caller identification service from your telephone company Your fax may not be compatible with some caller identification services When the signal on the telephone line is abnormal incorrect Caller ID messages may be displayed 1 Press once and once 2 Press once 3 Press YES to turn on Caller ID To turn off Caller ID press 4 Press to return to the date and time ...

Страница 59: ... following messages will appear while the fax rings if caller information is not available NO SERVICE No caller information was received from your telephone company Make sure that the telephone company has activated your service CALLER ID ERROR Noise on the telephone line prevented reception of caller information OUT OF AREA The call was made from an area which does not have a caller identificatio...

Страница 60: ...ick up the handset when the other party answers 4 Press when you have finished viewing the list 2 Voice call REVIEWING CALLS Viewing the Caller ID list If you subscribe to a Caller ID service and have turned on the Caller ID function your fax machine will keep information on the most recent 20 calls and faxes you have received You can view this information which consists of the name and number of ...

Страница 61: ...fax to make a special ringing sound when you receive a call from a designated phone number This lets you know immediately who is calling without having to look at the display To use this function enter the desired phone number by following the steps below only one phone number can be entered Display ENTRY MODE PRIORITY CALL To delete calls from the Caller ID list If you want to delete a single cal...

Страница 62: ... well as faxes from your specified Anti Junk Number In this case when a voice call or a fax transmission comes in from a number you have specified as a Junk Number your fax will break the connection as soon as it receives the calling phone number from the caller ID service before the second ring To use this function enter the number that you wish to block as explained in Blocking Reception of Unwa...

Страница 63: ... to Step 4 to enter or clear another fax number or press to return to the date and time display 3 1 2 Blocking Reception of Unwanted Faxes The Anti Junk Fax function allows you to block reception of faxes from parties that you specify This saves paper by not printing out unwanted junk faxes To use this function enter the fax numbers from which you do not want to receive faxes as shown below Up to ...

Страница 64: ...he receiving fax machine not the transmitting fax machine initiates the transmission To use the polling function you must first set Rapid Key E POLL for use as a polling key When Rapid Key E POLL is set as a polling key it cannot be used for Rapid Key dialling 1 Press once and once 2 Press twice 3 Press YES to turn on the function To turn off the function press 4 Press to return to the date and ti...

Страница 65: ...ing methods Pick up the handset or press and press a Rapid Key Wait for the fax answerback tone Press and enter a 2 digit Speed Dial number Enter the full number using the numeric keys 2 Press If you used the handset replace it when POLLING appears in the display Reception will begin E POLL 2 5 8 GHI JKL MNO TUV WXYZ PQRS ABC DEF 1 4 7 3 6 9 E POLL ...

Страница 66: ...ou hear the fax tone from the receiving machine press to begin transmission if a person answers ask them to press their Start key can be pressed to adjust the resolution before dialling and can be pressed to cancel an operation Phone calls can be received on the handset Faxes can be received automatically when the reception mode is set to FAX TEL FAX or A M mode page 20 Faxes can be received manua...

Страница 67: ...Lock code as it must be entered to deactivate the Key Lock function and allow normal operation of the machine In the event that you forget the code and have kept no record contact SHARP customer service 1 STORE JUNK Activating the Key Lock function Note Before activating the Key Lock function be sure to store any Rapid Key numbers page 32 that you wish to use while the Key Lock function is activat...

Страница 68: ...or transmission see page 73 Press to clear the message If the Caller ID function has been turned on page 56 Caller ID information will appear when a call is received RINGING will appear to signal an incoming call if the ringer has been turned off page 24 Deactivating the Key Lock function Follow the steps below when you wish to deactivate the Key Lock function and allow normal operation of the mac...

Страница 69: ...de the code that you wish to clear 5 Press 6 Press to return to the date and time display 3 2 Display ENTRY MODE STORE JUNK Clearing changing the Key Lock code In the event that you need to clear the Key Lock code follow the steps below If you need to change the code first clear it and then store a new code KEY LOCK CODE 1 SET 2 CLEAR ...

Страница 70: ...st follow these steps 1 Press once and once 2 Press or until the desired list appears in the display 3 Press to print the list 2 Telephone Number List This list shows the fax and phone numbers that have been stored for automatic dialling Anti Junk Number List This list shows the numbers from which reception is not allowed Display LISTING MODE ...

Страница 71: ...ages transmitted received NOTE One of the following notes will appear under NOTE in the report to indicate whether the transaction was successful and if not the reason for the failure OK Transmission reception was successful P FAIL A power failure prevented the transaction JAM The printing paper or document jammed preventing the transaction BUSY The fax was not sent because the line was busy COM E...

Страница 72: ...a number from to to select the condition for printing 4 Press to return to the date and time display ALWAYS PRINT A report will be printed after each transmission reception or error ERROR PRINT A report will be printed only when an error occurs SEND ONLY A report will be printed after each transmission NEVER PRINT A report will never be printed 4 1 4 Display 1 2 3 4 OPTION SETTING TRANSACTION LIST...

Страница 73: ...p to open the operation panel 2 Flip up the green levers on each side of the white roller 3 Wipe the scanning glass and rollers with a cotton pad Make sure that all dirt and stains such as correcting fluid are removed as dirt will cause vertical lines on transmitted images and copies If necessary wipe with denatured alcohol Adhesive cellophane tape is useful for removal of debris from the rollers ...

Страница 74: ...r under it 6 Flip down the front paper guide 7 Close the operation panel Press down on both front corners of the panel to make sure it clicks into place Cleaning the housing Wipe the external parts and surface of the machine with a dry cloth Caution Do not use benzene or thinner These solvents may damage or discolor the machine ...

Страница 75: ...ion The cord from the TEL LINE socket to the wall socket should be no longer than two meters Make sure there are no modem devices sharing the same telephone line Check with the other party to make sure their fax machine is functioning properly Have your telephone line checked for line noise Try connecting the fax machine to a different telephone line If the problem still occurs your fax machine ma...

Страница 76: ...er is on but no transmission takes place Make sure that the receiving machine has paper Make sure that the telephone line cord is plugged into the TEL LINE socket and not the TEL SET socket If the receiving machine is in manual mode with no attendant reception will not be possible Check the display for error messages Pick up the handset and check for a dial tone Nothing is printed at the receiving...

Страница 77: ...eed service Make a copy or print a report to check your machine s printing ability Make sure you are using the recommended thermal paper See Loading the Thermal Paper in Chapter 1 Received images are distorted Noise on the telephone line may cause distortion Have the other party try sending the document again Make a copy or print a report on your fax machine If the copy or report is also distorted...

Страница 78: ...e sure that the Quiet Detect Time setting is set to three or four seconds see page 53 Problem Solution Voice calls taken on an extension phone are interrupted by the fax The fax may interrupt during a voice call if the reception mode is set to A M To prevent interruption on a tone dial extension phone press any three keys on the extension phone after answering Note Do not enter the code to activat...

Страница 79: ...iance to the outlet to see if it has power The machine does not respond when you press any of its keys If a beep sound is not made when you press the keys unplug the power cord and then plug it in again several seconds later Automatic document feeding does not work for transmission or copying Check the size and weight of the document see Transmittable Documents on page 25 ...

Страница 80: ...aper or the paper is jammed The fax will print out automatically when the problem is fixed FUNCTION MODE The FUNCTION key has been pressed HOLD The HOLD SEARCH key has been pressed to put the other party on hold during a phone conversation Press the HOLD SEARCH key again to take the other party off hold KEY LOCK The Key Lock function has been activated to prevent unauthorized use of the machine se...

Страница 81: ... the handset or press the STOP key to clear the message ON HOOK DIAL The SPEAKER key has been pressed and the fax machine is waiting for you to dial OUT OF PAPER You have run out of thermal paper Load a new roll of thermal paper as explained in Loading the Thermal Paper in Chapter 1 OVER HEAT The print head has overheated Operation can be continued after it cools PAPER JAMMED The printing paper is...

Страница 82: ...cates the end of transmission reception or copying Intermittent tone 3 beeps 5 seconds 1 second on 1 second off Indicates incomplete transmission reception or copying Rapid intermittent tone Continuous 0 7 seconds on 0 3 seconds off Indicates that the handset is off hook ...

Страница 83: ...JAMMED appears in the display first try pressing If the document doesn t feed out remove it as explained below Important Do not try to remove a jammed document without releasing it as explained below This may damage the feeder mechanism 1 Grasp the finger hold and pull up to open the operation panel 2 Flip up the green levers on each side of the white roller 3 Remove the document ...

Страница 84: ...de Clearing jammed printing paper 4 Flip down the green levers on each side of the white roller 5 Close the operation panel making sure it clicks into place Press down on both front corners of the panel to make sure it clicks into place Press the knob to make sure the front side of the metal guide is down UX 53 UX 73 ...

Страница 85: ...ly Remove any cut pieces of paper from the paper compartment 4 Cut off the wrinkled part of the paper 5 Reload the paper Jammed paper is often caused by improper loading Be sure to carefully follow the instructions for paper loading given in Loading the Thermal Paper in Chapter 1 ...

Страница 86: ...x number and press 3 1 4 Enter a name by pressing number keys To enter two letters in succession that require the same key press after entering the first letter 5 Press and then Receiving Faxes To set the reception mode press and then TEL mode FAX mode TEL FAX mode A M mode TEL mode Answer all calls even faxes by picking up the handset To begin fax reception press FAX mode The fax machine automati...

Страница 87: ...7 Display messages 78 Document feeder 26 Document guides 26 Document restrictions 26 Document sizes 25 Document maximum scanning size 25 E Extension telephone Connecting 12 Using 44 F FAX reception mode 20 41 Fax Signal Receive 45 H Halftone setting 28 Handset 9 Hold 49 Housing cleaning 72 J Jams clearing 81 83 K Key Lock function 64 L Language used in display 22 Letters entering 17 33 Line error ...

Страница 88: ... 28 Ringer volume 24 S Scanning glass cleaning 71 Search Dial 38 49 Sender s name and number entering 16 17 Speaker volume 23 Speed Dialling 36 48 T TEL reception mode 20 43 TEL LINE socket 11 TEL SET socket 12 50 TEL FAX reception mode 20 40 Tel Fax Remote Number 46 Telephone line cord 11 Telephone Number List 68 Thermal paper 13 15 Time setting 18 Transaction Report 69 70 ...

Страница 89: ...DRUKOWANO W TAJLANDII TINSX4520XHTZ SHARP ELECTRONICS EUROPE GMBH Zweigniederlassung Österreich Handelskai 342 1020 Wien Austria Telefon 01 7 27 19 0 Infolinia 0 801 601 609 koszt połączenia impuls minuta ...

Отзывы: