1 – 5
UX-178C/188C/108C/118C
FO-175LU/375C
3. Original document support
1
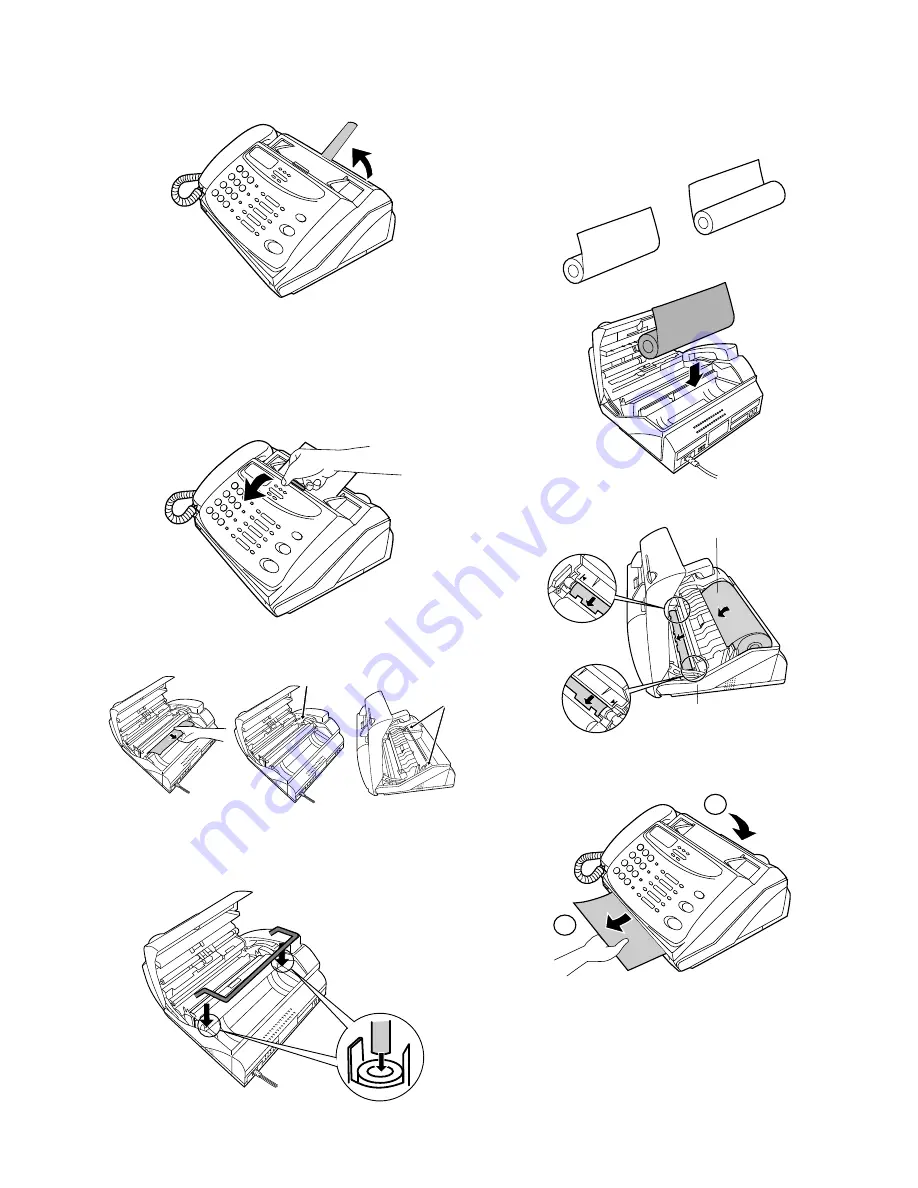
Rotate the original document support so that it points straight out.
4. Loading the fax paper
•
Your fax machine prints incoming faxes on a special kind of paper
called thermal paper.
•
The fax’s print head creates text and images by applying heat to
the thermal paper.
Note: The power must be on (plug in the power cord) when loading
fax paper in the fax machine.
1
Pull the release marked PANEL RELEASE toward you and open the
operation panel.
2
Remove the packing paper from the paper compartment.
4
Unwrap the roll of fax paper and place it in the compartment.
•
Important: The roll must be placed so that the leading edge of
the paper unrolls as shown. (The paper is only coated on one
side for printing. If the roll is placed backwards, the paper will
come out blank after printing.)
5
Insert the leading edge of the paper into the paper inlet. Continue to
push the paper through the inlet until it comes out of the opening in
the front of the fax.
6
Close the operation panel, making sure it clicks into place.
7
UX-108/118/FO-175: A short length of the fax paper will feed out.
Grasp the paper by the edge and pull upward to tear it off.
UX-178/UX-188/FO-375: A short length of the fax paper will feed out
and be cut off. (If this doesn’t happen, repeat the loading procedure.)
Note: The UX-178/UX-188/FO-375 has a built-in anti-curl mecha-
nism that will help to reduce paper curling problems. The anti-
curl mechanism is more effective at the beginning of the paper
roll and less effective towards the end.
3
Make sure the ends of the guide wire are inserted in the holes. (If the
guide wire is not inserted correctly, out-of-paper detection will not be
possible.).
YES
NO!
Paper inlet
The paper will reappear here. Make
sure it is aligned between the arrows
on each side of the guide, and then
passes under the plate and out the
front of the fax.
1
2
Click!
Remove cardboard and tape
UX-108/118/FO-175:
Remove the tape


