


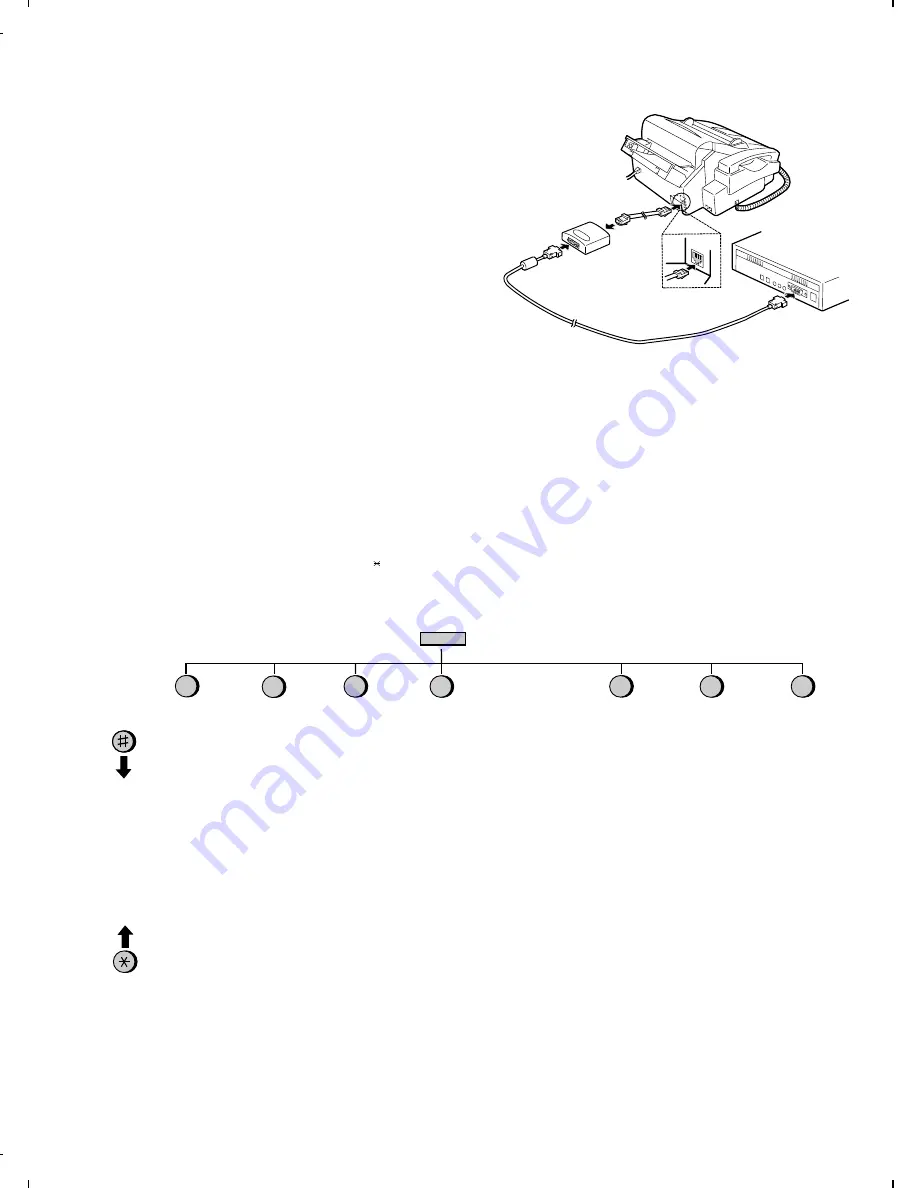
5. Connecting the Multifunction interface box
The Multifunction Interface kit which comes with your fax machine
allows you to use your fax as a printer and scanner, and lets you
perform fax operations from your computer via the fax modem in your
fax machine. Follow the steps below to connect the Multifunction
Interface box and cables.
Important:
Use only the provided interface cable and modular plug cable.
1. Make sure that your fax is unplugged and the power switch is
turned off on your computer.
2. Insert the female end of the interface cable into the serial
(RS232C) port on your computer. Tighten the screws with a
screwdriver.
3. Insert the male end of the interface cable into the port on the
Multifunction Interface box. Tighten the screws with a screwdriver.
4. Insert one end of the modular plug cable into the socket on the
Multifunction Interface box, and the other end into the socket on
your fax as shown (the ends of the cable are identical).
[5] Quick reference guide
FUNCTION key menu
The following chart shows the layout of the functions and settings accessed by pressing the FUNCTION key. First press the FUNCTION key, the
appropriate numeric key as shown, and then "#" or "
" until the desired item appears.
Instructions for making each setting appear in the display. If you have any difficulty, refer to the detailed instructions on the page shown below the
setting.
Cover Sheet
Cover Sheet
Header
Timer Mode
Send Mode
Poll Mode
Listing Mode
Activity Report
Timer List
Telephone Number
List
Passcode List
Option Setting List
Anti Junk Fax
Number List
Program and Group
List
Print Setup List
Entry Mode
Fax/Tel Numbers
for Auto Dialing
Own Number and
Name Set
Polling Security
Select
Passcode Numbers
for Polling
Date and Time Set
Daylight Saving
Store Junk Number
Optional Settings
Fine Resolution
Priority
Number of Rings in
Auto Mode
Recall Wait Interval
Recall Times
Tel/Fax Remoter
Number
Remote Reception
Select
Transaction Report
Print Select
Dial Mode
TAD Connected
Print Set-up
Initialize Film
Reception Ratio
2 in 1 Print
Paper Type Set
Paper Size Set
Copy Cut-off
Program/Group
Program Entry
Mode
Group Entry
Mode
Quiet Detect Time
Fax Reception
When TAD Fails
Distinctive Ringing
Fax Signal Receive
Junk Number Check
Polling
Auto Cover Sheet
Activity Report
Auto Print
ECM
FUNCTION
1
2
3
4
5
6
7
UX-600MU/MC
FO-1660U/C
1 – 9
Содержание FO-1660
Страница 15: ...M E M O UX 600MU MC FO 1660U C 1 13 ...
Страница 72: ...Control PWB parts layout Top side 6 8 UX 600MU MC FO 1660U C ...
Страница 73: ...Control PWB parts layout Bottom side 6 9 UX 600MU MC FO 1660U C ...
Страница 75: ...TEL LIU PWB parts layout 6 11 UX 600MU MC FO 1660U C ...
Страница 77: ...6 13 Power supply PWB parts layout UX 600MU MC FO 1660U C ...
Страница 80: ...Operation panel PWB parts layout 6 16 UX 600MU MC FO 1660U C ...
Страница 92: ...M E M O UX 600MU MC FO 1660U C 8 8 ...
Страница 115: ......


