– 7 –
EN
L
DIGITAL
R
VIDEO
S-VIDEO
VIDEO OUT
AUDIO OUT
PROGRESSIVE(480P)
P
B
Y
COMPONENT
INTERLACE
P
R
10
11
12
13
15
14
16
REAR VIEW
2
4
3
5
1
9
8
7
6
POWER
OPEN/CLOSE
PLAY
STOP
SKIP
REW
FWD
D V - S L 2 0
FRONT PANEL
REMOTE CONTROL
STILL/PAUSE
DIRECT SKIP
RETURN
ZOOM
MODE
SUBTITLE
MARKER
MENU
SKIP
REPEAT
A-B REPEAT
ANGLE
AUDIO
CLEAR
TITLE
STOP
PLAY
FWD
REV
SETUP
DIMMER
ENTER
OPEN/
CLOSE
GAMMA/
B.LEVEL
ON
SCREEN
POWER
1
2
3
6
5
4
7
C
0
+
10
8
9
1
2
3
5
7
9
10
11
12
13
8
4
6
14
29
28
26
27
25
24
23
22
21
19
17
16
15
18
20
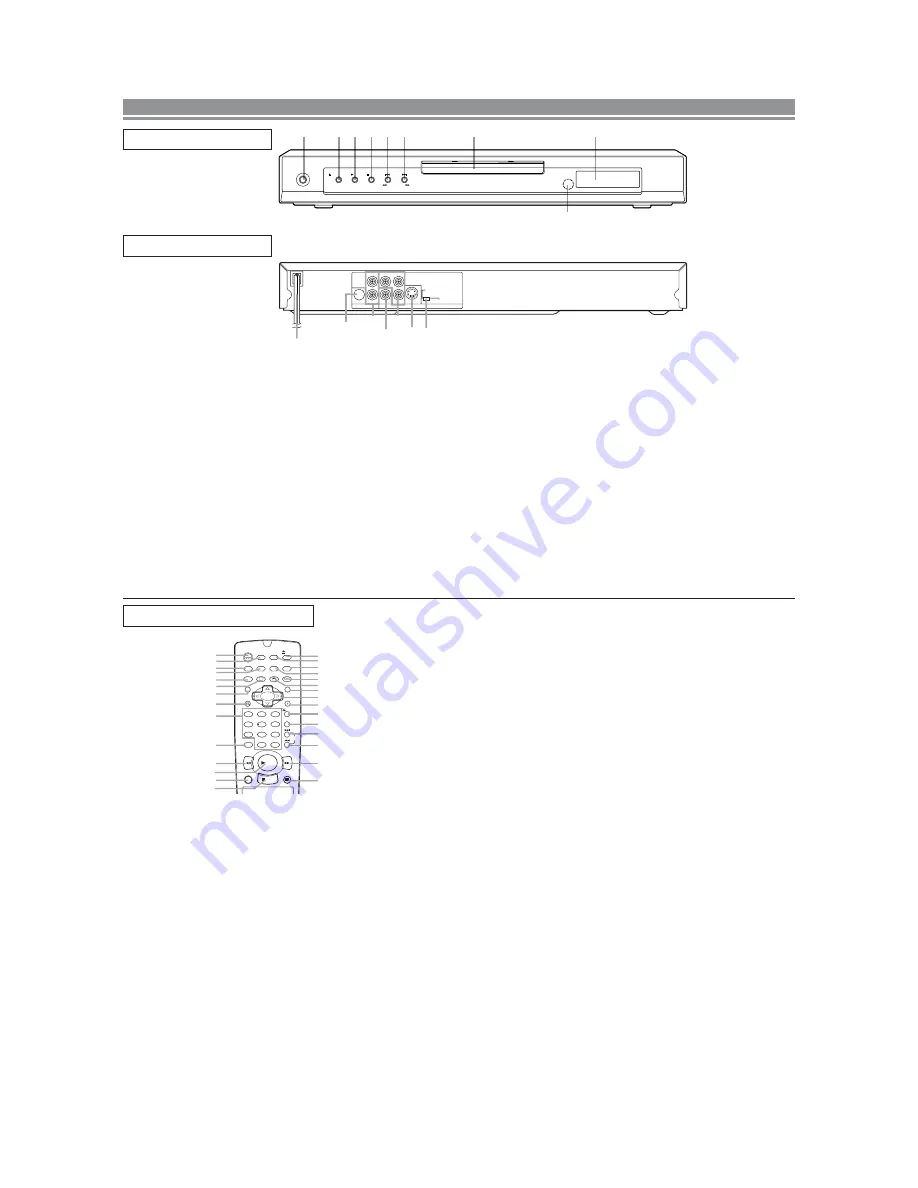
1. POWER
to switch the player to ON or OFF
2. OPEN/CLOSE
to open/close the disc tray
3. PLAY
to start or resume disc playback
4. STOP
to stop playback
5. SKIP
H
/ SEARCH
h
goes to previous chapter or track during playback; press
and hold for 1.5 seconds for a reverse search
6. SKIP
G
/ SEARCH
g
goes to next chapter or track during playback; press and
hold for 1.5 seconds for a forward search
7. Disc tray
8. Remote sensor window
9. Display
10. MAIN (AC Power Cord)
connect to a standard AC outlet
FUNCTIONAL OVERVIEW
11. COAXIAL (Digital audio out)
connect to AUDIO inputs of a digital (coaxial) audio
equipment
12. AUDIO OUT (Left/Right)
connect to AUDIO inputs of an amplifier, receiver or
stereo system
13. VIDEO OUT
connect to the Video Input of a TV
14. COMPONENT VIDEO OUT
connect to a TV with Component video in jacks
15. S-VIDEO OUT
connect to a TV with S-Video inputs
16. INTERLACE/PROGRESSIVE SCAN SELECTOR
to select interlace or progressive scanning (See page 6)
Caution: Do not touch the inner pins of the jacks on the
rear panel. Electrostatic discharge may cause permanent
damage to the player.
13. DIRECT SKIP Button [page 11]
Press to locate a desired point.
14. STOP Button [page 10]
Stops operation of the disc.
15. OPEN/CLOSE Button [page 10]
Press to insert discs into or remove them from the tray.
16. SETUP Button [page 14]
Press to enter the setup mode or to change setup items.
17. MARKER Button [page 14]
Press to call back the Marker display.
18. MODE Button [page 13]
Activates program playback or random playback mode.(CD/MP3)
Activates the 3D sound.(DVD)
19. AUDIO Button [page 13]
Press to select a desired audio language or sound mode.
20. ANGLE Button [page 13]
Press to change the camera angle to see the sequence
being played back from a different angle.
21. MENU Button [page 10]
Displays the DVD menus.
22. Arrow Buttons [page 10]
Use when making settings while watching the display on
a TV screen.
23. ENTER Button [page 10]
Press to accept a setting.
24. REPEAT Button [page 11]
Repeats playback of the current disc, title, chapter or track.
25. A-B REPEAT Button [page 12]
Repeats playback of a selected section.
26. SKIP UP Button [page 11]
Plays back from the beginning of the next chapter or
track.
27. SKIP DOWN Button [page 11]
Plays back from the beginning of the current chapter or
track.
28. FWD Button [page 11]
Fast forwards playback to a desired point.
29. STILL/PAUSE Button [page 10]
Pause playback temporarily/frame-by-frame playback.
1. POWER Button [page 10]
Press to turn the power on and off.
2. ON SCREEN Button [page 12]
Displays the current status on the TV screen for checking purposes.
3. DIMMER Button [page 15]
Press to change the Panel Display settings.
4. GAMMA/B.LEVEL Button [page 14]
Press to adjust the black parts of the picture brighter.
5. ZOOM Button [page 11]
Enlarges part of a DVD-reproduced image.
6. SUBTITLE Button [page 13]
Press to select a desired subtitle language.
7. TITLE Button [page 10]
Displays the title menu.
8. RETURN Button [page 14]
Returns to the previous operation.
9. Numeric Buttons [page 11]
10. CLEAR Button [page 11]
Resets a setting.
11. REV Button [page 11]
Fast reverse playback to a desired point.
12. PLAY Button [page 10]
Starts playback of the disc contents.
[Fig. 1]
[Fig. 2]
[Fig. 3]


