Sharp CP-HP600E Скачать руководство пользователя страница 14

03/1/31

XL-HP600E(E)2.fm

14

XL-HP600E

CD Playb

ack

Listening to a CD (CDs)

This system can also play audio CD-R and CD-RW discs, but can-
not record.
Some audio CD-R and CD-RW discs may not be playable due to the
state of disc or the device that was used for recording.
 

To interrupt playback:

Press the CD   button on the remote control.
To resume playback from the same point, press the     button.

To stop playback:

Press the   (CD  ) button.

To change other CDs whilst playing a disc:

Press the   button for the disc trays not in use.

To remove the CDs:

Whilst in the stop mode, press the desired   button.
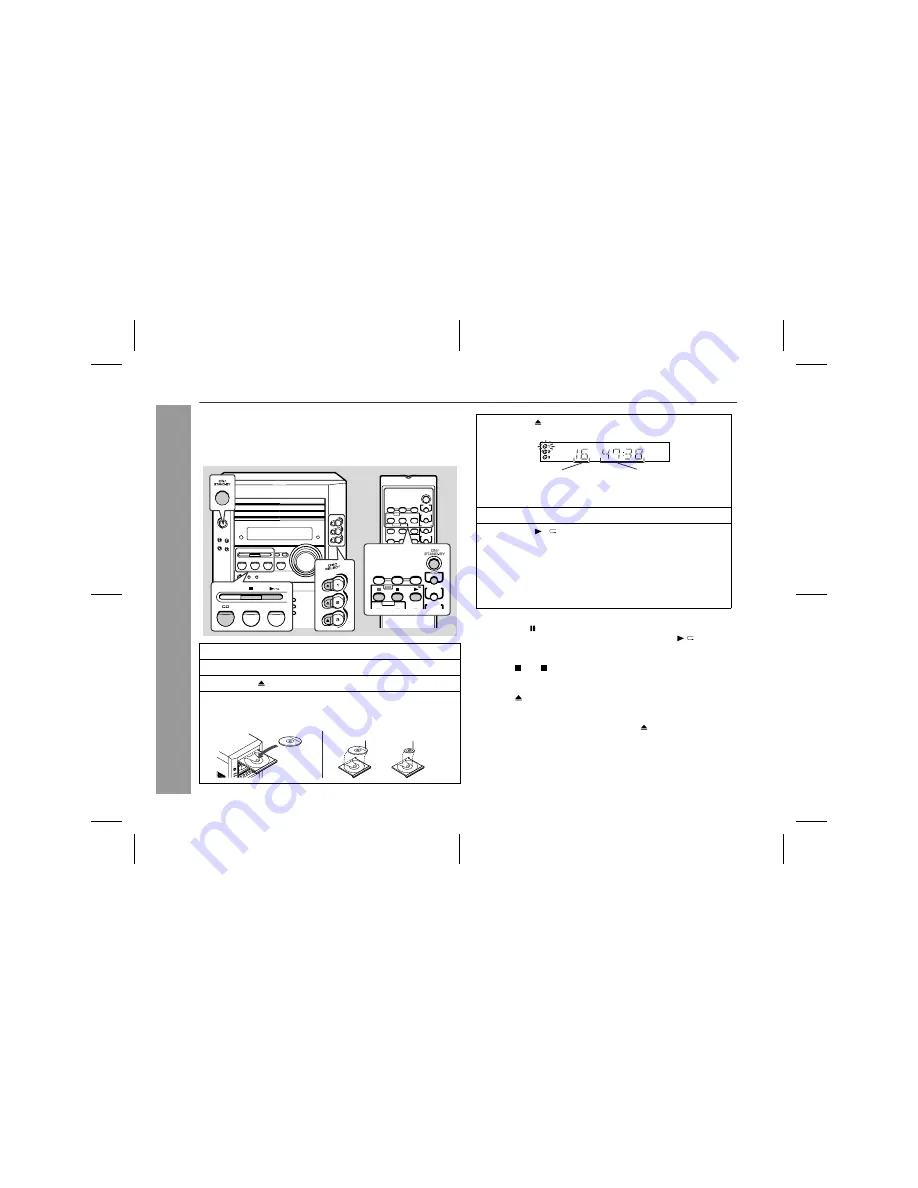
1

Press the ON/STAND-BY button to turn the power on.

2

Press the CD button.

3

Press the   button to open the disc tray 1.

4

Place the CD on the disc tray 1, label side up.

Be sure to place an 8 cm (3") CD in the middle of the disc tray.

12 cm (5")

8 cm (3")

5

Press the   button to close the disc tray 1.

Total number of tracks on 
the CD whose number is 
flashing

Total playing time of the 
CD whose number is 
flashing

6

You can place discs on trays 2 - 3 by following steps 3 - 5.

7

Press the   /   button to start playback.

"

Playback will begin from track 1 on DISC 1. After that disc 
finishes playing, the next disc will automatically play.

"

When the last track on the third disc has finished playing, 
the CD player will automatically stop.

"

When there is no CD in one of the disc trays (1 - 3), the 
empty tray will be skipped to the next tray with a CD.

Содержание CP-HP600E

Страница 1: ... consisting of XL HP600E main unit and CP HP600E speaker system MICRO COMPONENT SYSTEM MODEL XL HP600E OPERATION MANUAL If you require any advice or assistance regarding your Sharp product please visit our web site www sharp co uk customersupport Customers without Internet access may telephone 08705 274277 during office hours or 01 676 0648 if telephoning from Ireland 0301 XLHP600E_FRONT pm 03 2 3...

Страница 2: ...ls in your plug proceed as follows The wire which is coloured blue must be connected to the plug terminal which is marked N or coloured black The wire which is coloured brown must be connected to the plug terminal which is marked L or coloured red Ensure that neither the brown nor the blue wire is connected to the earth terminal in your three pin plug Before replacing the plug cover make sure that...

Страница 3: ...ratus NOTES Recording and playback of any material may require consent which SHARP is unable to give Please refer particularly to the provisions of the Copyright Act 1956 the Dramatic and Musical Performers Protection Act 1958 the Performers Protection Acts 1963 and 1972 and to any subsequent statutory enactments and orders This equipment complies with the requirements of Directives 89 336 EEC and...

Страница 4: ... 10 11 Basic Operation Sound control 12 Setting the clock 13 CD Playback Listening to a CD CDs 14 15 Advanced CD playback 16 17 Radio Listening to the radio 18 19 Tape Playback Listening to a cassette tape 20 21 Tape Recording Recording to a cassette tape 21 23 Advanced Features Timer and sleep operation 24 26 Enhancing your system 26 27 References Troubleshooting chart 28 29 Maintenance 30 Specif...

Страница 5: ...dangerous and may result in a fire or other type of acci dent causing damage SHARP will not be held responsible for any damage resulting from use of this unit with a voltage other than that which is specified Volume control The sound level at a given volume setting depends on speaker effi ciency location and various other factors It is advisable to avoid exposure to high volume levels Do not turn ...

Страница 6: ...ass Demo Mode Button 11 12 13 Volume Control 12 14 Cassette Compartment 20 15 Tape Reverse Play Button 20 16 CD or Tape Stop Button 14 21 17 CD Play or Repeat Tape Forward Play Button 14 16 20 18 CD Track Down or Fast Reverse Tape Fast Wind Tuner Preset Down Button 15 19 21 19 CD Track Up or Fast Forward Tape Fast Wind Tuner Preset Up Button 15 19 21 20 CD Button 14 21 Tape Record Pause Button 22 ...

Страница 7: ...e Indicator 13 CD Repeat Play Indicator 14 Tape Record Indicator 15 Sleep Indicator Rear panel Reference page 1 Cooling Fan 2 Subwoofer Output Socket 27 3 AC Power Lead 10 11 4 FM 75 Ohms Aerial Socket 10 5 AM Loop Aerial Socket 10 6 Video Auxiliary Audio Signal Input Sockets 26 7 Speaker Terminals 10 11 Note This product is equipped with a cooling fan inside which begins to run at a specified vol...

Страница 8: ...tton 26 12 CD Track Up or Fast Forward Tape Fast Wind Tuner Preset Up Button 15 19 21 13 Volume Up and Down Buttons 12 14 Direct Search Buttons 16 15 Programme Clear Button 17 16 CD Memory Button 17 17 CD Stop Button 14 18 CD Pause Button 14 19 Tape Reverse Mode Select Button 20 20 Tape Reverse Play Button 20 21 Tape Stop Button 21 22 CD Play or Repeat Button 14 16 23 Tape Record Pause Button 22 2...

Страница 9: ... the sensor on the unit with a soft cloth Exposing the sensor on the unit to strong light may interfere with operation Change the lighting or the direction of the unit Keep the remote control away from moisture heat shock and vibrations Test of the remote control Check the remote control after checking all the connections see pages 10 11 Point the remote control directly at the remote sensor on th...

Страница 10: ...reception Place the AM loop aerial on a shelf etc or attach it to a stand or a wall with screws not supplied Note Placing the aerial on the stereo system or near the AC power lead may cause noise pickup Place the aerial away from the stereo sys tem for better reception Installing the AM loop aerial External FM aerial Use an external FM aerial if you require better reception Consult your dealer Bla...

Страница 11: ...Notes The unit will start the tape initialisation when plugged in to the AC socket During this process initialising sound will be heard and the unit cannot be turned on Wait until the process is finished Unplug the AC power lead from the wall socket if the unit will not be in use for a prolonged period of time Demonstration mode To cancel the demonstration mode When the unit is in the power stand ...

Страница 12: ...ich emphasises the bass frequencies and X BASS will appear To cancel the extra bass mode press the X BASS DEMO X BASS button Equaliser When the EQUALIZER EQUALIZER MODE button is pressed the current mode setting will be displayed To change to a different mode press the EQUALIZER EQUALIZER MODE button repeat edly until the desired sound mode appears 1 2 29 30 MAXIMUM 0 X BASS indicator ROCK FLAT CL...

Страница 13: ... appear 0 00 23 59 AM 12 00 The 12 hour display will appear AM 12 00 PM 11 59 AM 0 00 The 12 hour display will appear AM 0 00 PM 11 59 Note that this can only be set when the unit is first installed or it has been reset Refer to Clearing all the memory reset on page 29 for details 4 Press the TUNING TIME or button to adjust the hour and then press the MEMORY SET button Press the TUNING TIME or but...

Страница 14: ...TAND BY button to turn the power on 2 Press the CD button 3 Press the button to open the disc tray 1 4 Place the CD on the disc tray 1 label side up Be sure to place an 8 cm 3 CD in the middle of the disc tray 12 cm 5 8 cm 3 5 Press the button to close the disc tray 1 Total number of tracks on the CD whose number is flashing Total playing time of the CD whose number is flashing 6 You can place dis...

Страница 15: ...the ON STAND BY button to enter the power stand by mode and then turn the power on again If TV or radio interference occurs during CD operation move the unit away from the TV or radio If a disc is damaged dirty or loaded upside down the disc will skip or not play back To move to the beginning of the next track Press the button for less than 0 5 seconds during playback To restart the track being pl...

Страница 16: ... played will be located In random play the CD player will select and play tracks auto matically You cannot select the order of the tracks Caution After performing repeat or random play be sure to press the CD button Otherwise the disc s will play continuously Use the direct search buttons on the remote control to select the de sired track whilst playing the se lected disc Selected track number The...

Страница 17: ...n and player Do not write on either side of the disc particularly the non label side from which signals are read Do not mark this surface Keep your discs away from direct sunlight heat and excessive moisture Always hold the CDs by the edges Fingerprints dirt or water on the CDs can cause noise or mistracking If a CD is dirty or does not play properly clean it with a soft dry cloth wiping straight ...

Страница 18: ...tedly to select the desired frequency band FM or AM 3 Press the TUNING TIME or button to tune in to the de sired station Manual tuning Press the TUNING TIME button as many times as required to tune in to the desired station Auto tuning When the TUNING TIME button is pressed for more than 0 5 seconds scanning will start automatically and the tuner will stop at the first receivable broadcast station...

Страница 19: ... in order starting with preset channel 1 4 Within 30 seconds press the MEMORY SET button to store that station in memory If the MEMORY and preset number indicators go out before the station is memorised repeat the operation from step 2 5 Repeat steps 1 4 to set other stations or to change a pre set station When a new station is stored in memory the station previously memorised will be erased Press...

Страница 20: ...e slack with a pen or a pencil 1 Press the ON STAND BY button to turn the power on 2 Press the TAPE button 3 Open the cassette door by push ing the area marked PUSH EJECT 4 Load a cassette into the cas sette compartment with side A facing you 5 Press the button to choose one side or both sides To listen to both sides For endless repeat play of both sides To listen to one side 6 Press the button to...

Страница 21: ... is restored Recording to a cassette tape Before recording When recording important selections make a preliminary test to ensure that the desired material is properly recorded SHARP is not liable for damage or loss of your recording arising from malfunction of this unit The volume and sound controls can be adjusted with no effect on the recorded signal Variable Sound Monitor For recording use only...

Страница 22: ...cording cannot be performed 4 Press the button to choose one side or both sides To record on both sides To record on only one side 5 Press the button Recording will be paused 6 Press one of the DISC SELECT 1 3 buttons to start recording To record on both sides begin with side A If recording is started from side B the tape will not switch over to side A Recording is started from the selected CD Whe...

Страница 23: ...ing an AM station move the AM loop aerial Erasing recorded tapes 1 Press the TAPE button 2 Follow steps 2 5 in Recording from the radio 1 Perform steps 1 5 in Recording from a CD CDs on page 22 2 Press the button to record on side A or the button for side B 1 Programme discs and tracks See page 17 2 Press the button 3 Press the button to record on side A or the button for side B 1 Tune in to the d...

Страница 24: ... to page 13 2 For timer play back Load a cassette or discs to be played For timer re cording Load a cassette for recording in the cassette compartment 1 Press the ON STAND BY button to turn the power on 2 Press the CD TUNER BAND or TAPE button to select the desired function To select the timer playback source Press CD TUNER BAND or TAPE To select the timer recording source Press TUNER BAND When yo...

Страница 25: ...then press the MEMORY SET button The illustrations show the timer playback setting 6 Press the TUNING TIME or button to specify the min utes then press the MEMORY SET button The unit will enter the timer stand by mode automatically To cancel the timer playback timer recording Press the ON STAND BY button to turn the power on 7 When the preset time is reached playback or recording will start The vo...

Страница 26: ... the TIMER SLEEP button repeatedly until SLEEP is displayed To change the sleep time Whilst the sleep time is displayed press the TUNING TIME or button Maximum 3 hours Minimum 1 minute 3 hours 5 minutes 5 minute intervals 5 minutes 1 minute 1 minute intervals 3 Press the MEMORY SET button 4 Your system will enter the power stand by mode automat ically after the preset time has elapsed The volume w...

Страница 27: ...s disconnects the speakers automati cally Adjust the volume using the VOLUME control Subwoofer connection When a commercially available speaker with a built in amplifier is connected to this unit you can enjoy sound with emphasised bass Connect an RCA lead from a commercially available speaker with a built in amplifier to the SUBWOOFER socket 1 Insert a cassette in the cassette compartment 2 Press...

Страница 28: ...tops in the mid dle or is not performed properly Does the disc satisfy the stan dards Is the disc distorted or scratched Playback sounds are skipped or stopped in the middle of a track Is the unit located near excessive vibrations Is the disc very dirty Has condensation formed inside the unit Symptom Possible cause Radio makes unusual noise consecutively Is the unit placed near the TV or computer ...

Страница 29: ...ry including clock timer settings tuner preset and CD programme Condensation Sudden temperature changes storage or operation in an extremely humid environment may cause condensation inside the cabinet CD pickup tape heads etc or on the transmitter on the remote control Condensation can cause the unit to malfunction If this happens leave the power on with no disc or cassette in the unit until norma...

Страница 30: ...ly wipe the cabinet with a soft cloth and a diluted soap solution then with a dry cloth Caution Do not use chemicals for cleaning petrol paint thinner etc It may damage the cabinet finish Do not apply oil to the inside of the unit It may cause malfunctions Specifications As part of our policy of continuous improvement SHARP reserves the right to make design and specification changes for product im...

Страница 31: ...cy response 20 20 000 Hz Dynamic range 90 dB 1 kHz Frequency range FM 87 5 108 MHz AM 522 1 620 kHz Frequency response 50 14 000 Hz normal tape Signal noise ratio 50 dB recording playback Wow and flutter 0 3 WRMS Type 2 way type speaker system 5 cm 2 tweeter 13 cm 5 1 8 woofer Maximum input power 150 W Rated input power 75 W Impedance 6 ohms Dimensions Width 165 mm 6 1 2 Height 260 mm 10 1 4 Depth...

Страница 32: ...e must be provided 4 The guarantee does not cover carriage costs jewelled styli audio tapes compact discs or batter ies 5 In the unlikely event of this product requiring repair please contact the supplier from whom it was purchased Where this is not possible please contact the Sharp Customer Information Centre on the telephone number given below 6 No person has any authority to vary the terms or c...

Отзывы: