background image

9

Web-site: www.sharp.co.uk/support    Help Line: 08705 274277 (office hours)

General Information

- Controls and Indicators -

MD-E9000H

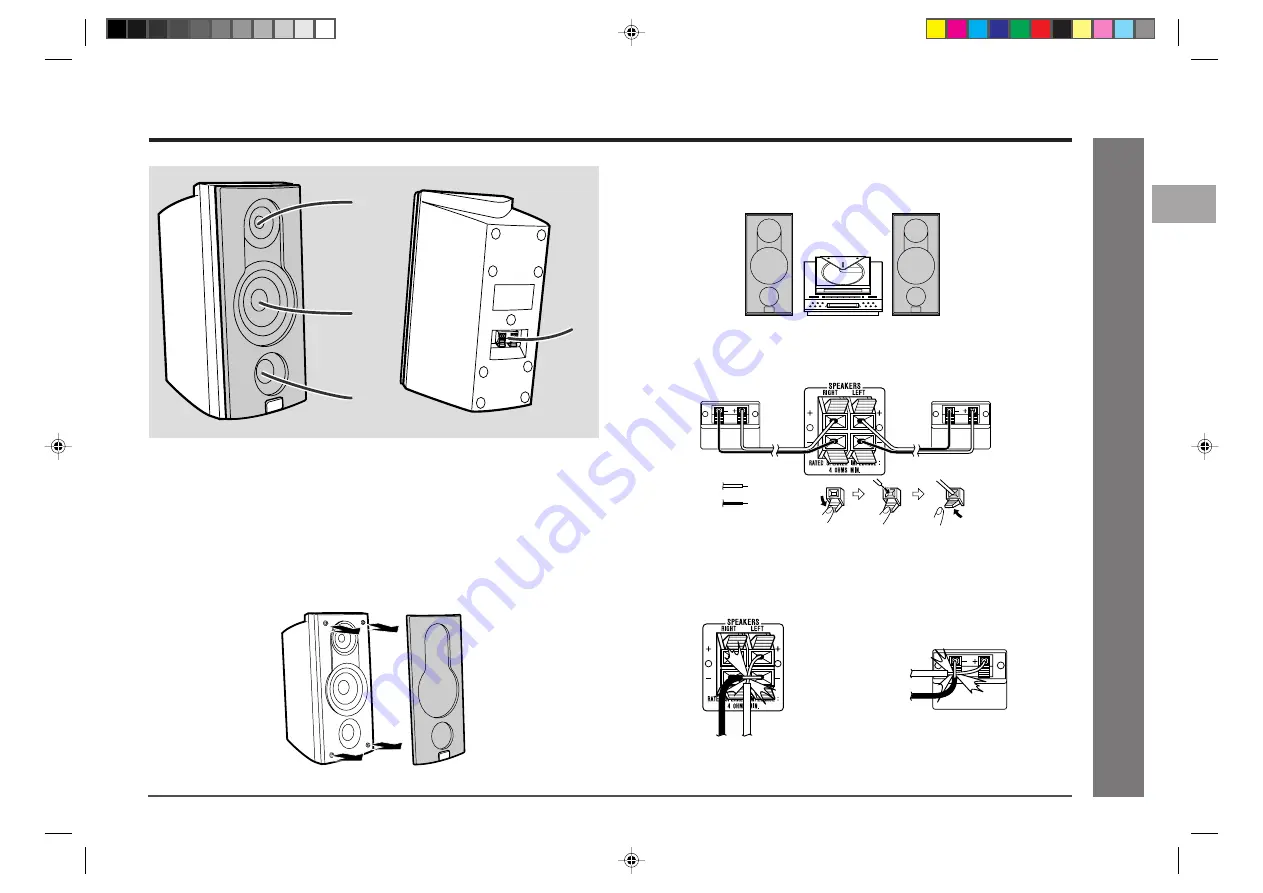
Speaker System

0

1.

Tweeter

0

2.

Woofer

0

3.

Bass Reflex Duct

0

4.

Speaker Terminals

Make sure nothing comes into contact with the speaker diaphragms when you re-
move the speaker grilles.

Controls and Indicators (continued)

Placing the speaker system:

There is no distinction between the right and the left speakers.

1

2

3

4

Left speaker

Right speaker

Speaker connection

Connect the black wire to the minus (-) terminal and the red wire to the plus (+)
terminal.

Caution:

Connect the speaker wires to the speakers first, then to the unit.

Use speakers with an impedance of 4 ohms or more, as lower impedance speak-
ers can damage the unit.

Do not mistake the right and the left channels. The right speaker is the one on the
right side when you face the unit.

Do not let the bare speaker wires touch each other.

Incorrect

Incorrect

Black

Red

11

12

10

9

8

6

7

5

4

3

2

1

*MD9000H-E04-09

2001.4.20, 2:51 AM

9

Содержание CP-E9000H

Страница 1: ...stem consisting of MD E9000H main unit and CP E9000H speaker system MD COMPACT COMPONENT SYSTEM MODEL MD E9000H OPERATION MANUAL If you require any advice or assistance regard ing your Sharp product please visit our web site www sharp co uk support Customers without internet access may tele phone 08705 274277 during office hours or 01 676 0648 if telephoning from Ireland MD9000H FRONT BACK 2001 4 ...

Страница 2: ...nt requiring repair please contact the dealer or supplier from whom it was purchased Where this is not possible please visit our web site www sharp co uk support Customers without internet access may telephone 08705 274277 during office hours or 01 676 0648 if telephoning from Ireland Please note all calls will be charged at local rate Certain replacement parts and accessories may be obtained from...

Страница 3: ...tereo System 44 References What is a MiniDisc 45 MiniDisc System Limitations 45 Error Messages 46 Troubleshooting Chart 47 48 Maintenance 48 Specifications 49 TERMS OF GUARANTEE Back cover Contents Important Instruction Page Special Notes 2 General Information Precautions 4 5 Accessories 5 Controls and Indicators 6 9 Preparation for Use System Connections 10 Remote Control 11 Basic Operation Gener...

Страница 4: ... local SHARP service facility The ventilation should not be impeded by cov ering the ventilation openings with items such as newspapers tablecloths curtains etc No naked flame sources such as lighted candles should be placed on the apparatus Attention should be drawn to the environmental aspects of battery dis posal The apparatus is designed for use in moderate climate This unit should only be use...

Страница 5: ...e from which signals are read Do not mark this surface Keep your discs away from direct sunlight heat and excessive mois ture Always hold the CDs by the edges Fingerprints dirt or water on the CDs can cause noise or mistracking If a CD is dirty or does not play properly clean it with a soft dry cloth wiping straight out from the centre along the radius Accessories Note Only the above accessories a...

Страница 6: ...r Button 14 19 23 12 Display Demo Button 12 21 13 CD Open Close Button 12 15 14 Volume Up and Down Buttons 13 15 MD Record Mode Selector Buttons SP LP2 LP4 32 35 16 CD MD Normal Speed Record Button 32 17 CD MD High Speed Record Button 32 18 MD Record Button 33 35 19 CD Stop Button 15 32 20 CD Play or Pause Button 15 21 CD MD Track Up and Fast Forward Tuner Preset Up Button 16 18 23 22 CD MD Track ...

Страница 7: ...r 15 Track Edit Indicator 16 Extra Bass Indicator 17 Timer Play Record Indicator 18 2 times Long Recording stereo Indicator 19 4 times Long Recording stereo Indicator 20 Sleep Indicator 21 Level Meter Character Information Frequency Indicator 22 Track Indicator 23 Random Play Indicator 24 Memory Indicator 25 Disc Indicator Rear Panel Reference page 01 AM Loop Aerial Socket 10 02 FM 75 Ohms Aerial ...

Страница 8: ...uttons 19 20 36 17 Symbol Time Button 21 36 18 Dimmer Button 12 19 MD Play or Pause Button 20 CD MD Fast Reverse Track Down Button 21 Recording Mode Selector Button 22 MD Stop Button 23 CD Play or Pause Button 24 CD MD Fast Forward Track Up Button 25 CD Stop Button 26 MD Record Button 27 RDS EON Button 28 29 28 RDS Programme Type Traffic Information Search Button 27 29 29 CD MD Play Mode Selector ...

Страница 9: ...the right and the left speakers 1 2 3 4 Left speaker Right speaker Speaker connection Connect the black wire to the minus terminal and the red wire to the plus terminal Caution Connect the speaker wires to the speakers first then to the unit Use speakers with an impedance of 4 ohms or more as lower impedance speak ers can damage the unit Do not mistake the right and the left channels The right spe...

Страница 10: ...e Placing the aerial on the unit or near the AC power lead may cause noise pickup Place the aerial away from the unit for better reception Installing the AM loop aerial Assembling Attaching to the wall External FM aerial Use an external FM aerial if you require better reception Consult your dealer Note When an external FM aerial is used disconnect the supplied FM aerial wire from the FM 75 OHMS so...

Страница 11: ...lling the batteries incorrectly may cause the unit to malfunction Notes concerning use Replace the batteries if the operating distance is reduced or if the operation be comes erratic Purchase 2 AAA size batteries UM 4 R03 HP 16 or similar Periodically clean the transmitter on the remote control and the sensor on the unit with a soft cloth Exposing the sensor on the unit to strong light may interfe...

Страница 12: ...e DISPLAY DEMO button again To turn the power on Press the ON STAND BY button To set the unit to stand by mode Press the ON STAND BY button again To change the display brightness 2 levels You can switch the display brightness by pressing the DIMMER button on the remote control Opening and closing the CD compartment The CD compartment cover is motorised When the power is turned on you can open or c...

Страница 13: ... and BASS will appear To cancel the extra bass mode press the X BASS button The X BASS function is only accessible with the equaliser set to FLAT Equaliser When the EQUALIZER button is pressed the current mode setting will be displayed To change to a different mode press the EQUALIZER button repeatedly until the desired sound mode appears 0 1 2 39 MAXIMUM Bass is emphasised Cancelled The sound is ...

Страница 14: ...e 5 3 5 3 5 3 5 3 5 3 or 2 4 2 4 2 4 2 4 2 4 button to adjust the hour and then press the MEMORY ENTER button When the 12 hour display is selected AM will change automatically to PM 4 Press the 5 3 5 3 5 3 5 3 5 3 or 2 4 2 4 2 4 2 4 2 4 button to adjust the minutes and then press the MEMORY ENTER button The hour will not advance even if minutes advance from 59 to 00 The clock starts from 0 second ...

Страница 15: ... on the spindle label side up 5 Press the CD 7 7 7 7 7 OPEN CLOSE button to close the CD compart ment 6 Press the CD 06 06 06 06 06 button to start playback from track 1 When the last track on the disc has finished the CD player will stop automati cally To interrupt playback Press the CD 06 06 06 06 06 button To resume playback from the same point press the CD 06 06 06 06 06 button again To stop p...

Страница 16: ...3 or 2 4 button on the remote control allows you the same opera tions Listening to a CD continued To remove the CD Whilst in the stop mode press the CD 7 OPEN CLOSE button Press the CD eject button and remove the CD Notes After removing the CD make sure to press the CD 7 OPEN CLOSE button and close the CD compartment When the unit enters the stand by mode the opened CD compartment cover will be cl...

Страница 17: ...time on the MiniDisc will be displayed 4 Press the MD 06 06 06 06 06 button to start playback If the MiniDisc has track names they will appear and scroll across the dis play Then the elapsed playing time will appear If the MiniDisc has no track names the elapsed playing time will appear When the last track has finished the MD player will stop automatically Each time the DISPLAY DEMO button is pres...

Страница 18: ... display and MiniDisc operation will be paused When the beginning of the first track is reached during fast reverse or the 5 button is released the unit will enter the playback mode The 5 3 or 2 4 button on the remote control allows you the same opera tions Listening to a MiniDisc continued To interrupt playback Press the MD 06 button To resume playback from the same point press the MD 06 button a...

Страница 19: ...or is flashing Each time the button is pressed one track will be cleared beginning with the last track programmed To cancel the programmed play mode Whilst in the stop mode press the CLEAR DELETE button to turn off the MEMORY dis play The programme contents will be erased When you open the CD compartment cover or eject a MiniDisc the programmed play mode will be cancelled To check which tracks are...

Страница 20: ...tically when all tracks are played once The same track will not be played back twice In random play the CD or MiniDisc player will select and play tracks automati cally You cannot select the order of the tracks To cancel repeat or random play Press the P MODE button repeatedly to select the normal playback mode When in the CD or MD mode press the direct buttons to select the desired track To selec...

Страница 21: ...tch the total playing time which is indicated on the CD or MiniDisc jacket as the time between tracks is not included Switching the display during MD playback Each time the DISPLAY DEMO button on the main unit or the DISPLAY CHARAC TER button on the remote control is pressed during MD playback the display will change The elapsed playing time for the current track will be displayed The track name w...

Страница 22: ... only When radio interference occurs auto scan tuning may stop automatically at that point Auto scan tuning will skip weak signal stations To stop the auto tuning press the TUNING button on the remote control again When an RDS Radio Data System station is tuned in the frequency will be displayed first and then the RDS indicator will light Finally the station name will appear Full auto tuning can b...

Страница 23: ...ENTER button to enter the preset tuning sav ing mode 3 Within 5 seconds press the PRESET X X X X X or W W W W W button to select the preset channel number Store the stations in memory in order starting with preset channel 1 4 Within 5 seconds press the MEMORY ENTER button to store that station in memory If the MEMORY and preset number indicators go out before the station is memorised repeat the op...

Страница 24: ...ro vide These FM stations send additional signals along with their regular programme signals They send their station names and information about the type of programme such as sports or music etc When tuned to an RDS station RDS and the station name will be displayed TP Traffic Programme will appear on the display when the received broadcast carries traffic information and TA Traffic Announcement w...

Страница 25: ...d of TA Using the Radio Data System RDS continued NEWS Short accounts of facts events and publicly expressed views re portage and actuality AFFAIRS Topical programme expanding or enlarging upon the news gener ally in different presentation style or concept including debate or analysis INFO Programmes whose purpose is to impart advice in the widest sense SPORT Programme concerned with any aspect of...

Страница 26: ...re quency will be stored in memory Any station which has the same frequency as the one stored in memory will not be stored If 40 stations have already been stored in memory the scan will be aborted If you want to redo the ASPM operation erase the preset memory If no stations have been stored in memory END will appear for about 4 sec onds If the RDS signals are very weak station names may not be st...

Страница 27: ...onds press the PTY TI button again After the selected programme type has been lit for 2 seconds SEARCH will appear and the search operation will start Notes If the display has stopped flashing start again from step 2 If the unit finds out a desired programme type corresponding channel number and frequency will flash for about 2 seconds and then the station name will flash for 7 seconds and re main...

Страница 28: ... 5 3 5 3 5 3 5 3 5 3 or 2 4 2 4 2 4 2 4 2 4 button The selected programme type will flash 4 Within 4 seconds press the PTY TI button The selected programme type and WAITING will be displayed for 2 sec onds each PTY will appear and the unit will enter the EON PTY stand by mode Using the Radio Data System RDS continued 5 When the specified programme starts on an ON other network station the unit wil...

Страница 29: ...fic Information by pressing the 5 3 5 3 5 3 5 3 5 3 or 2 4 2 4 2 4 2 4 2 4 button 4 Within 4 seconds press the PTY TI button TI and WAITING will appear for 2 seconds each TI will appear and the unit will enter the EON TI stand by mode Using the Radio Data System RDS continued 5 When a TA specified starts on an ON other network station the unit will automatically switch to that station and TI will ...

Страница 30: ...d When you press the ON STAND BY button to enter the stand by mode When the unit is switched to another band in the EON stand by mode When you change the FM station whilst in the EON stand by mode When a preset call is made Notes Whilst the same programme as the specified PTY or TA is being broadcast the unit will not switch to an ON other network station If there are more than two ON stations com...

Страница 31: ...be possible Before Recording to a MiniDisc Area for TOC recording track numbers track names etc Area for recording the sound CD MiniDisc First track Second track Third track Track A Track B Track C First track Second track Third track Track A Track B Track C About track numbers When recording from a CD New track numbers will be created automatically according to the original tracks Synchro mark fu...

Страница 32: ...cannot be changed whilst recording The recording mode remains unchanged until another mode is selected 5 Press the HIGH or NORMAL button Press the NORMAL button for actual speed HIGH for high speed record ing Recording will begin starting from the first track of CD After recording all of the tracks that can be recorded the unit will stop automatically To check the remaining recording time Whilst i...

Страница 33: ...times long recording or 4 times long recording mode cannot be played with units that do not support these modes On such a unit LP is displayed at the beginning of the track and no sound is heard The operation and the display may vary depending on the unit Caution for 4 times long recording LP4 To realise 4 times long stereo recording special compression methods are used Due to the high levels of c...

Страница 34: ...e first several tracks of a CD Create your own hit collection For example you can record the first several tracks of a CD 1 Press the ON STAND BY button to turn the power on 2 Press the CD button 3 Load a CD and a recordable MiniDisc 4 Press the TRACK EDIT button 5 Press the TRACK EDIT button repeatedly to select the last track number you want to record If you select 21 tracks or more EDIT OVER wi...

Страница 35: ... by mode and then separate the AM loop aerial from the main unit Adjust it so that the AM broadcast can be tuned in most clearly During recording you cannot change stations To interrupt recording Press the MD 06 button To resume recording press the MD 06 button again To stop recording Press the MD button The recording will stop and the track number will be written on the MiniDisc To record the tra...

Страница 36: ...ge 37 5 When the name has been entered press the MEMORY ENTER button Titling a MiniDisc Cursor Creating disc and track names You can give a name to discs and tracks One disc name and up to 255 track names can be created per disc a maximum of 40 characters for the disc and each track name and a total of 1 700 characters can be entered Playback only MiniDiscs cannot be edited Whilst in the stop mode...

Страница 37: ...reating disc and track names section on page 36 2 Press the CURSOR ZZ or YY button to flash the character before which you want to add a new character 3 Select a character to enter and press the MEMORY ENTER button 4 Press the MEMORY ENTER button again To change a character Example To change LAVE SONG to LOVE SONG 1 Perform steps 1 4 in the Creating disc and track names section on page 36 2 Press ...

Страница 38: ...cannot be used in the random or programmed play mode In the following cases tracks may not be combined Digital recorded track and analogue recorded track Long play recorded track and stereo recorded track Tracks whose recording time is less than 12 seconds Editing a Recorded MiniDisc To divide a track 1 Press the MD button and load a MiniDisc see page 17 2 Play the track which you want to divide i...

Страница 39: ...e position will have priority Editing a Recorded MiniDisc continued To move a track 1 Press the MD button and load a MiniDisc see page 17 2 Whilst in the stop mode select the track you want to move using the 5 3 5 3 5 3 5 3 5 3 or 2 4 2 4 2 4 2 4 2 4 button Or start playing the track and then press the MD 06 06 06 06 06 button 3 Press the NAME TOC button and within 10 seconds select MOVE using the...

Страница 40: ...3 or 2 4 2 4 2 4 2 4 2 4 button Or start playing the track and then press the MD 06 06 06 06 06 button 3 Press the NAME TOC button and within 10 seconds select ERASE using the 5 3 5 3 5 3 5 3 5 3 or 2 4 2 4 2 4 2 4 2 4 button 4 Within 10 seconds press the MEMORY ENTER button To cancel the operation press the MD button 5 Press the MEMORY ENTER button again The track is erased and the unit is stoppe...

Страница 41: ... 3 or 2 4 2 4 2 4 2 4 2 4 button to specify the minutes to start and then press the MEMORY ENTER button 7 Press the 5 3 5 3 5 3 5 3 5 3 or 2 4 2 4 2 4 2 4 2 4 button to specify the hour to stop and then press the MEMORY ENTER button 8 Press the 5 3 5 3 5 3 5 3 5 3 or 2 4 2 4 2 4 2 4 2 4 button to specify the minutes to stop and then press the MEMORY ENTER button 9 Select the desired function by us...

Страница 42: ...and by mode press the ON STAND BY button to turn the power on The timer operation will be cancelled You can also cancel the timer operation by the following steps without turning on the power 1 Press the TIMER button 2 Within 10 seconds press the 5 3 or 2 4 button to select CANCEL 3 Press the MEMORY ENTER button Caution In the following cases the timer recording function will not work When a MiniD...

Страница 43: ...eep operation by the following steps without setting the unit to the power stand by mode 1 Whilst in the sleep operation press the SLEEP button 2 Within 10 seconds press the MEMORY ENTER button SLEEP indicator will go out To confirm the remaining sleep time 1 Whilst in the sleep operation press the SLEEP button 2 Within 10 seconds press the 5 3 or 2 4 button to select SLEEP The remaining sleep tim...

Страница 44: ... volume using the VOLUME buttons Recording on a MiniDisc 1 Use a connection cable to connect an external device to the AUX INPUT sockets 2 Press the ON STAND BY button to turn the power on 3 Press the AUX button 4 Load a recordable MiniDisc 5 Press the REC button 6 Start playback on the external device 7 Adjust the recording level using the TUNING X or W button 8 Press the A MARK button on the rem...

Страница 45: ... re cording time may not show an increase Two tracks may not be com bined in editing The total of the recorded time and time remaining on a disc may not add up to the maxi mum possible recording time If recorded tracks are fast re versed or fast forwarded the sound may skip In the MD system the delimiter of the recording area on a MiniDisc is programmed in a TOC If partial erasing recording and ed...

Страница 46: ...iniDisc is not working prop erly You chose 21 or more tracks for track editing The remaining time available for recording is short A MiniDisc has not been loaded The MiniDisc data cannot be read A CD has not been loaded The CD data cannot be read When an error message is displayed proceed as follows Meaning The number of characters for the disc name or track name exceeds 40 The data recorded on th...

Страница 47: ...wires disconnected CD player Symptom Playback does not start Playback stops in the middle or is not performed properly Playback sounds are skipped or stopped in the middle of a track Possible cause Is the disc loaded upside down Does the disc dissatisfy the standards Is the disc distorted or scratched Is the unit located near excessive vibra tion Is the disc very dirty Has condensation formed insi...

Страница 48: ... the ON STAND BY button After the RESET is displayed for about 1 second the unit will enter the power stand by mode Caution This operation will erase all data stored in memory including clock timer settings tuner preset and CD or MiniDisc programme Before transporting the unit Remove the CD and the MiniDisc from the unit Your unit checks whether there is a disc inside the unit when the compartment...

Страница 49: ... 5 kg 3 3 lbs each As part of our policy of continuous improvement SHARP reserves the right to make design and specification changes for product improvement without prior notice The performance specification figures indicated are nominal values of production units There may be some deviations from these values in individual units General Power source AC 230 V 50 Hz Power consumption Power on 50 W ...

Страница 50: ...MEMO MD9000H MEMO 2001 4 20 2 17 AM 50 ...

Страница 51: ...MEMO MD9000H MEMO 2001 4 20 2 17 AM 51 ...

Страница 52: ...lity within one year from the date this product was purchased Proof of purchase must be provided 4 The guarantee does not cover carriage costs jewelled styli audio tapes compact discs or batter ies 5 In the unlikely event of this product requiring repair please contact the supplier from whom it was purchased Where this is not possible please contact the Sharp Customer Information Centre on the tel...

Отзывы: