background image

21

HT-CN300H_(E)3.fm

02/6/17

HT-CN300H

Re

mote

 C

o

ntr

o

l

M

e

mor

is

ing the

 r

e

mote

 c

ontr

o

b

u

ttons

 -


Memorising operations in the Memory 1 buttons for other equipment:

Set the MEMORY 1/2 selector switch to MEMORY 1 and perform steps 2 - 6 in
"Memorising operations in the Memory 2 buttons for other equipment".

Note:

If a new function is memorised, the default operation on the button will be cleared.


Using the supplied labels:

Main features are already printed on the labels. Write in other operations as you pre-
fer.


Memorising operations in the operation buttons for other equipment:

1

Move the LEARN/TRANSMIT selector switch to LEARN.

2

Press down the desired button on the remote control for 2 seconds or more.

3

Perform steps 4 - 6 in "Memorising operations in the Memory 2 buttons for other
equipment".

„

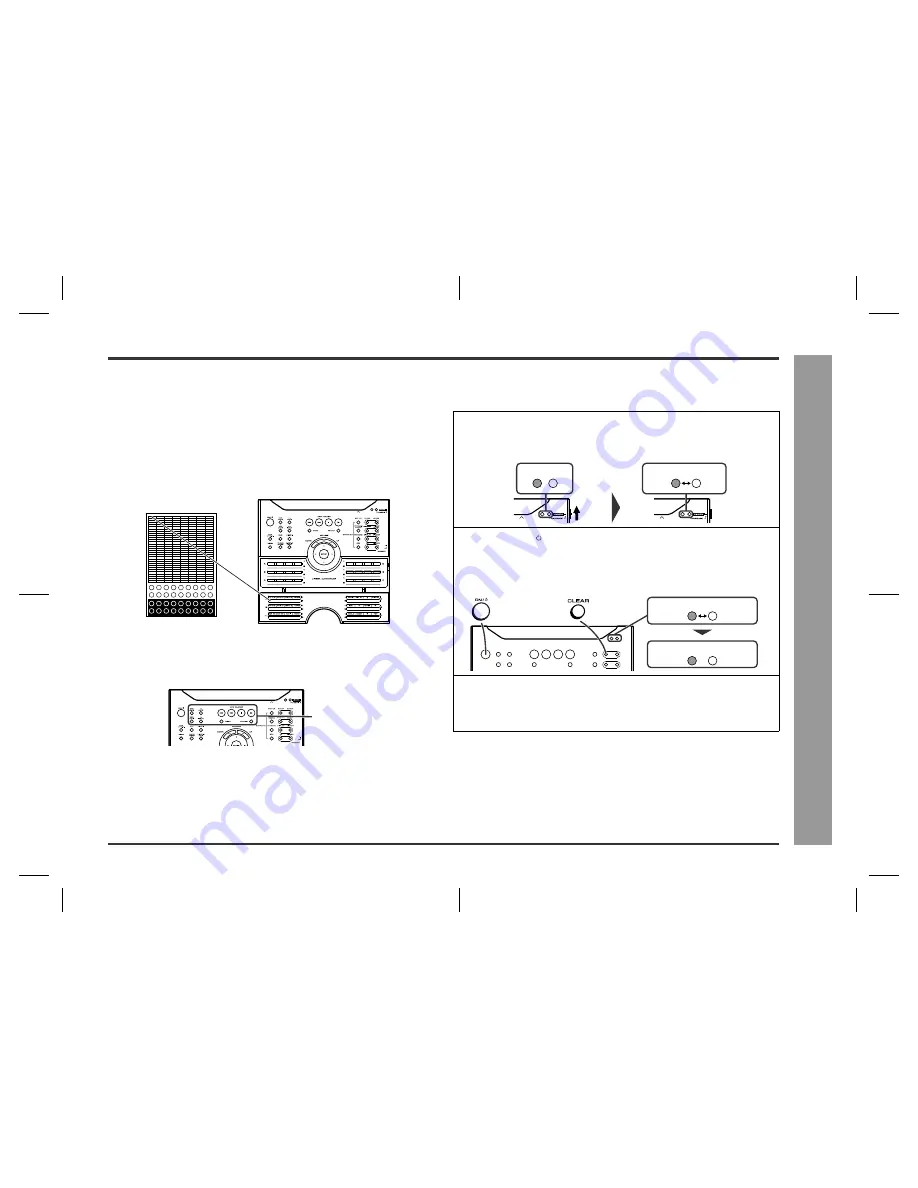
Initialising the remote control buttons

You can delete memorised functions and restore the buttons to the factory settings.

Caution:

You cannot initialise only one button. If initialisation is performed, all the stored func-
tions will be cleared.

Registrable buttons

1

Move the LEARN/TRANSMIT selector switch to LEARN.

The red learn indicator will light up. Though the red and green learn indicators 
light up alternately after approx. 15 seconds, you can go on to the next step.

2

Press the ON/  (STAND-BY) and CLEAR buttons simultaneously
for more than 3 seconds.

Initialisation is completed when the red and green learn indicators light up alter-
nately and then the red learn indicator lights up.

3

Move the LEARN/TRANSMIT selector switch to TRANSMIT.

z

You can use the remote control.

z

Operation buttons and Memory 1 buttons for other equipment will return to the 
factory setting.

Lights up

Alternately light up

Alternately light up

Lights up

Goes off

Содержание CP-CN300HC

Страница 1: ...sting of HT CN300H main unit CP CN300HF front speakers CP CN300HC center speaker and CP CN300HR surround speakers HOME CINEMA COMMAND MODEL HT CN300H OPERATION MANUAL If you require any advice or assistance regarding your Sharp product please visit our web site www sharp co uk support Customers without Internet access may telephone 08705 274277 during office hours or 01 676 0648 if telephoning fro...

Страница 2: ...propriate type DANGER The fuse from the cut off plug should be removed and the cut off plug destroyed immediately and disposed of in a safe manner Under no circumstances should the cut off plug be inserted elsewhere into a 13A socket outlet as a serious electric shock may occur To fit an appropriate plug to the mains lead follow the instructions below IMPORTANT The wires in the mains lead are colo...

Страница 3: ... buttons 20 21 Basic Operation Setting the clock 22 Display control 23 Sound control 23 Enjoy Surround Sound sound mode 24 26 Listening to the radio 27 Listening to a memorised station 28 Advanced Features Using the Radio Data System RDS 29 34 Speaker settings 35 37 Timer and sleep operation 38 39 References Troubleshooting chart 40 41 Error indicators and warnings 42 Maintenance 42 Specifications...

Страница 4: ...ing this product with a higher voltage other than that which is specified is dangerous and may result in a fire or other type of accident causing damage SHARP will not be held responsible for any damage resulting from use of this unit with a voltage other than that which is specified Volume control The sound level at a given volume setting depends on speaker efficiency location and various other f...

Страница 5: ...rch Button 32 12 DVD Button 18 13 Video 1 Button 18 14 RDS ASPM Auto Station Programme Memory Button 31 15 Tuner Band Button 27 16 Video 2 Auxiliary Button 18 17 Memory 1 2 Buttons for Other Equipment 19 18 Label Sealing Area 21 19 Clock Button 22 34 20 Memory Button 28 21 Timer Sleep Button 38 22 TV Screen Display RDS Display Mode Selector Button 23 29 34 23 Dimmer Button 23 24 Extra Bass Demo Mo...

Страница 6: ...cator 14 Dynamic PTY Indicator 15 Radio Text Indicator Reference page 16 Power Indicator 13 17 On Stand by Button 13 18 Remote Control Sensor Socket 9 19 TV Monitor Output Sockets 11 20 DVD Video Input Sockets 11 21 Video and Audio Input Sockets VIDEO 2 12 22 Video and Audio Input Sockets VIDEO 1 12 23 Subwoofer 24 AC Power Lead 13 25 DVD Optical Digital Audio Input Socket 11 26 DVD Coaxial Digita...

Страница 7: ...ou place the remote control sensor as the adhesive tape may damage or peel the surface coating when the tape is removed z Never locate the remote control sensor in an unstable place Otherwise it may fall Note Fix the remote control sensor on a flat surface 1 1 3 2 2 5 Bottom Front Side 6 4 3 Front Speaker right Red Front Speaker left White Centre Speaker Green Surround Speaker right Grey Surround ...

Страница 8: ... Black White Red Black Grey Red Black Blue Red Black Red Blue Green Green White Red The speaker terminals on the main unit the tube and plugs of the speaker lead and speaker labels are distinguished by colour Connect the speaker and the unit by matching the colours Connect the speaker wires to the speakers first then to the unit Speaker Main unit Label Tube Black Red Recess Label Speaker plug Plug...

Страница 9: ...terminals of the speaker leads z Do not let the bare speaker wires touch each other z Do not stand or sit on the speakers You may be injured z Insert the speaker plug fully with the rising side facing up z Hold the speaker plug when removing it from the unit Pulling the lead may cause breakage Connect the plug of the remote control sensor and push the plug cover until it clicks Removing the remote...

Страница 10: ...TV Camcorder Satellite receiver etc VCR S video cable See page 11 See page 12 See page 12 Video cable Audio cable Video cable supplied DVD player Optical digital audio cable or Coaxial digital audio cable S video cable Video cable Tape deck etc Audio cable See page 11 See page 12 One video cable and two SCART adaptors are supplied Video cable Audio cable Video cable Audio cable Video cable Audio c...

Страница 11: ...e or the coaxial digital cable To connect to the video socket with the video cable Note When connecting a DVD player with a video cable be sure to use another video cable for the TV To connect to the S video socket with the S video cable Note When connecting a DVD player with an S video cable be sure to use another S video cable for the TV This unit cannot convert the S video signal into the video...

Страница 12: ...or z The image and sound are not emitted from the VIDEO 1 OUT sockets when the equipment is connected to the DVD or VIDEO 1 IN sockets If connected to the VIDEO 2 IN sockets they are emitted from the VIDEO 1 OUT sockets If connected to the AUX IN sockets or whilst in the tuner mode only the sound is emitted Video cable Video cable Audio cable Audio cable To audio output sockets To video output soc...

Страница 13: ...e unit is plugged in the unit will enter the demonstration mode You will see words scroll To cancel the demonstration mode When the unit is in the power stand by mode demonstration mode press the X BASS button The demonstration mode will be cancelled and the display will disap pear To return to the demonstration mode When the unit is in the power stand by mode press the X BASS button again Note Wh...

Страница 14: ...just above the height of your ears The supplied speakers may be placed beside or near the TV as they are magnetically shielded However colour variation may occur depending on the type of the TV If colour variation occurs Turn off the TV from the power switch After 15 30 minutes turn the TV on again If the colour variation is still present Move the speakers further away from the TV Refer to the use...

Страница 15: ... extends about 3 5 mm 9 64 out from the wall 4 Install the speaker on the wall by inserting the screw head into the slot on the back of the speaker Set the speaker lead in the recess preventing it from being caught between the wall and the speaker 9 mm 3 8 5 mm 3 16 3 2 mm 1 8 Min 22 mm 7 8 8 9 mm 3 8 32 mm 1 1 4 Wall surface Wall mounting screw Recess Wall surface 5 Raise the speaker the most upw...

Страница 16: ...ock and vibrations Test of the remote control Point the remote control directly at the remote sensor The remote control can be used within the range shown below z Press the ON STAND BY button Does the power turn on Now you can enjoy your system z When the signal is received the remote control indicator will flash Whilst in the dimmer mode page 23 it will not flash or light Note Exposing the remote...

Страница 17: ...ANDARD Sets the sound mode to STANDARD 6 DYNAMIC SOUND Switches the dynamic sound 7 SET UP Changes the speaker setting 8 CLEAR Deletes the tuner pre selections 9 CLOCK Sets or displays the clock time 10 MEMORY Presets the tuner 11 TIMER SLEEP Sets the power to ON or STAND BY at the desired time 12 DIMMER Adjusts the brightness of the main unit display 13 DISPLAY Switches the TV display or selects ...

Страница 18: ... see page 20 1 DVD Used when the unit is set to DVD Switch the setting according to the connected sound source by pressing it repeatedly 2 TUNER BAND Selects the tuner function or switches the frequency band 3 VIDEO 2 AUX Selects the VIDEO 2 or AUX mode 4 VIDEO 1 Selects the VIDEO 1 mode 1 2 3 4 Optical Coaxial 1 DVD ON STAND BY Sets the DVD power to ON or STAND BY 2 TV ON STAND BY Sets the TV pow...

Страница 19: ... setting for Memory 1 buttons For details refer to the operation manual attached to the other equipment OPEN 1 2 3 4 13 14 15 16 5 6 7 8 9 19 20 21 10 11 12 22 23 24 18 17 1 TV VCR Switches the input to TV or VCR 2 VCR CH Switches up the VCR channels 3 TV VOL Turns up the TV volume 4 TV CH Switches up the TV channels 5 TV VOL Turns down the TV volume 6 TV CH Switches down the TV channels 7 VCR CH ...

Страница 20: ...or switch to MEMORY 2 2 Move the LEARN TRANSMIT selector switch to LEARN The red learn indicator will light up Though the red and green learn indicators light up alternately after approx 15 seconds you can go on to the next step 3 Press down the desired button on the remote control for 2 seconds or more The green learn indicator will flash the red indicator remains lit Lights up Alternately light ...

Страница 21: ...ons for other equipment Initialising the remote control buttons You can delete memorised functions and restore the buttons to the factory settings Caution You cannot initialise only one button If initialisation is performed all the stored func tions will be cleared Registrable buttons 1 Move the LEARN TRANSMIT selector switch to LEARN The red learn indicator will light up Though the red and green ...

Страница 22: ...t when the unit is first installed or it has been reset see page 41 0 00 The 24 hour display will appear 0 00 23 59 AM 12 00 The 12 hour display will appear AM 12 00 PM 11 59 AM 0 00 The 12 hour display will appear AM 0 00 PM 11 59 4 Press the or button to adjust the hour and then press the EN TER button z Press the or button once to advance the time by 1 hour Hold it down to advance continuously ...

Страница 23: ... VOLUME button for decreasing Bass control When the X BASS button is pressed the unit will enter the extra bass mode which emphasises the bass frequencies To cancel the extra bass mode press the X BASS button Equaliser When the EQ button is pressed the current mode setting will be displayed To change to a different mode press the EQ button repeatedly until the desired sound mode appears Note Bass ...

Страница 24: ... theatre system Standard Dynamic sound The disc recorded in the Dolby Digital system is recognised by this unit automatically when it is played back Virtual Disc with this trademark Stereo DTS Digital Theater Sys tems One of the digital audio systems for theatrical use As the sound quality is emphasised you can enjoy the realistic sound effect in the home theatre system The disc recorded in the DT...

Страница 25: ...ect Standard The maximum of 5 1ch surround sound is reproduced to provide three dimen sional effect This unit automatically emits the 5 1ch sound according to the recorded audio signal STANDARD appears on the display of the unit and TV screen Dynamic sound You can enjoy normal surround sound with various scenes MOVIE The bass level is increased for powerful sound effect MUSIC You can enjoy lively ...

Страница 26: ...ton To enjoy in the standard mode During playback press the STANDARD button STANDARD appears on the display of the unit and TV screen To enjoy in the virtual mode During playback press the 2CH button repeat edly to select VIRTUAL VIRTUAL appears on the display of the unit and TV screen To enjoy in the stereo mode During playback press the 2CH button repeat edly to select STEREO STEREO appears on t...

Страница 27: ...M or AM 3 Press the or button to tune in to the desired station Manual tuning Press the or button as many times as required to tune in to the desired sta tion Auto tuning When the or button is pressed for more than 0 5 seconds scanning will start automatically and the tuner will stop at the first receivable broadcast station Notes z When radio interference occurs auto scan tuning may stop automati...

Страница 28: ...l number z Store the stations in memory in order starting with preset channel 1 z When is displayed a station has already been stored in memory 4 Within 30 seconds press the MEMORY button to store that station in memory If the MEMORY and preset number indicators go out before the station is mem orised repeat the operation from step 2 5 Repeat steps 1 4 to set other stations or to change a preset s...

Страница 29: ...ent will appear whilst a traffic information is on air PTYI Dynamic PTY Indicator will appear whilst the Dynamic PTY station is received RT Radio Text will appear whilst the unit receives the Radio text data CT Clock Time will appear whilst the unit receives the RDS CT data You can control the RDS by using the remote control only Information provided by RDS Each time the DISPLAY button is pressed ...

Страница 30: ...cialist music of which Rhythm Blues and Reggae are examples WEATHER Weather reports and forecasts and meteorological information FINANCE Stock Market reports commerce trading etc CHILDREN For programmes targeted at a young audience primarily for entertain ment and interest rather than where the objective is to educate SOCIAL Programmes about people and things that influence them individually or in...

Страница 31: ... stored in mem ory It may be impossible to store station names in memory using the ASPM function if there is lots of noise or if the signal is too weak In this case perform as follows Notes z The same station name can be stored in different channels z In a certain area or during certain time periods the station names may temporarily be different 1 Press the TUNER BAND button to select the FM band ...

Страница 32: ...ear This does not mean that you can listen to the traffic information at that time When a traffic information is broadcast TA will appear To specify station names and select stations manually You can select a station by specifying the name BBC R1 BBC R2 etc from the sta tions stored in memory Before starting this operation you must store one or more station names in memory 1 Press the TUNER BAND b...

Страница 33: ... seconds and then they will scroll across the display z If you tune in to an RDS station which is not broadcasting any radio text NO RT will be displayed when you switch to the radio text position z Whilst radio text data is received or when the text contents change RT will be displayed Notes for PTY Languages z When you press the DISPLAY button after entering the PS Programme Service PTY Language...

Страница 34: ...appear The RDS clock time appears with RDS so that you will know it is not the internal clock time Notes z If you tune in to an RDS station which is not sending clock time and date CT data and you select CT NO CT will be displayed z If you are not receiving CT data even though you are tuned into an RDS station CT will be displayed The CT data is sent at the top of each minute z If an RDS signal is...

Страница 35: ...ned If the subwoofer is changed to SW NO whilst the front speakers are set to F SMALL they are changed to F LARGE When the front speakers are changed to F SMALL whilst the subwoofer is set to SW NO it is changed to SW YES 1 Press the SET UP button 2 Within 10 seconds press the or button to select SP SIZE and press the ENTER button 3 Within 10 seconds press the or button to select the desired speak...

Страница 36: ...ing to the distance you set and provide the same effect as if they are placed at the same distance from the lis tening position 1 Press the SET UP button 2 Within 10 seconds press the or button to select SP DELAY and press the ENTER button 3 Within 30 seconds press the or button to select the desired speaker 4 Within 30 seconds press the or button to select the distance and press the ENTER button ...

Страница 37: ...ess the or button to select SP LEVEL and press the ENTER button 3 Within 10 seconds press the or button to select the desired speaker 4 Within 10 seconds press the or button to adjust the level TV screen z You can adjust the level at 1 dB intervals z To adjust the levels of other speakers repeat the operation from step 3 z You can complete the setting operation by pressing the SET UP button twice ...

Страница 38: ...er function 1 Press the ON STAND BY button to turn the power on 2 Press the TUNER BAND button Tune in to the desired station See page 27 3 Adjust the volume using the VOLUME or button Do not turn the volume up too high 4 Press the TIMER SLEEP button repeatedly until is displayed 5 Press the or button to specify the hour to start then press the ENTER button 6 Press the or button to specify the minu...

Страница 39: ...ource in step 1 of Setting the sleep timer but this unit cannot set the sleep timer of other equipment To confirm the remaining sleep time Press the TIMER SLEEP button z The remaining sleep time is displayed for about 5 seconds z You can change the remaining sleep time whilst it is displayed by pressing the ENTER button steps 3 4 To cancel the sleep operation Press the ON STAND BY button whilst th...

Страница 40: ...unds from speakers are not well balanced z Are the speaker leads connected to the wrong channels P 8 z Is each speaker placed at the same distance from the listener P 14 z Are speakers adjusted to the same level P 37 Noise is heard during play back z Move the unit away from any com puters or mobile phones Symptom Possible cause Reference page No images are displayed z Is TV turned on P 18 z Is the...

Страница 41: ...T selector switch set to LEARN P 20 z Is the remote control sensor ex posed to strong light inverter fluo rescent light direct sunlight etc P 16 z Is the remote control for another equipment used simultaneously The unit cannot be turned on with the remote control z Is the AC power lead of the unit plugged in P 13 z Is the remote control plugged in P 13 z Are the batteries inserted P 16 Signals are...

Страница 42: ...age appear even if the unit is unplugged and plugged in or is set to the stand by mode and on again contact your local dealer where you pur chased the unit Periodically wipe the cabinet with a soft cloth and a diluted soap solution then with a dry cloth z Do not use chemicals for cleaning petrol paint thinner etc It may damage the cabinet finish z Do not apply oil to the inside of the unit It may ...

Страница 43: ... W 10 T H D 1 kHz Surround speakers RMS 60 W 30 W 30 W 10 T H D 1 kHz Subwoofer RMS 30 W 10 T H D 100 Hz Frequency range FM 87 5 108 MHz AM 522 1 620 kHz Type Full Range Speaker System Magnetic shield 80 mm 3 1 8 Speaker Maximum input power 60 W Rated input power 30 W Impedance 6 ohms Dimensions Width 104 mm 4 1 8 Height 110 mm 4 3 8 Depth 123 mm 4 7 8 Weight 0 8 kg 1 8 lbs each Type Subwoofer Sys...

Страница 44: ... Proof of purchase must be provided 4 The guarantee does not cover carriage costs jewelled styli audio tapes compact discs or batter ies 5 In the unlikely event of this product requiring repair please contact the supplier from whom it was purchased Where this is not possible please contact the Sharp Customer Information Centre on the telephone number given below 6 No person has any authority to va...

Отзывы: