– 15 –
CD-M10000W/CP-M10000
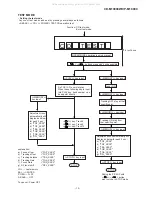
TEST MODE
• Setting the test mode
Any one of test mode can be set by pressing several keys as follows.
<X-BASS> + <CD> + <POWER> TEST:CD operation test
Function:-CD test mode.
-Enter test mode.
C D T E S T
OPEN/CLOSE operation is using manual.
<<
>>, <<
>> buttons make pick's slide possible.
Do TOC IL. Do normal play
When these following key is input
into PLAY key, track number can
be appoint directly
<<PLAY>> key input.
<<MEMORY>> key input.
<<
1>> key: Track 4
<<
2>> key: Track 9
<<
3>> key: Track 15
<<STOP>> key input.
STOP
Laser ON.
<<MEMORY>> key input.
Tracking OFF play at that
specific point.
<<MEMORY>> key input.
Tracking ON play from
that specific point.
<<STOP>> key input.
STOP
IL isn't done
VOL — Last memory
BAL — CENTER
P.GEQ — FLAT
X-BASS — OFF
To cancel : Power OFF
Sliding the PICKUP with
<<
>>, <<
>> button
must only be in STOP mode.
<<MEMORY>>
key input
Adjustment result
automatically will
display as below
for each 2 sec :
a) "FOF_XXXX"
b) "TOF_XXXX"
c) "TBA_XXXX"
d) "TGA_XXXX"
f) "FGA_XXXX"
g) "RFL_XXXX"
explanation:
a) Focus off set
="FOF_XXXX"
b) Tracking off set
="TOF_XXXX"
c) Tracking balance
="TBA_XXXX"
d) Tracking Gain
="TGA_XXXX"
f)
Focus Gain
="FGA_XXXX"
g) RF level shift
="RFL_XXXX"
Adjustment result automatically will
display as below for each 2 sec :
a) "FOF_XXXX"
b) "TOF_XXXX"
c) "TBA_XXXX"
d) "TGA_XXXX"
f) "FGA_XXXX"
g) "RFL_XXXX"
<<MEMORY>> key input.
All manuals and user guides at all-guides.com


