


E-6
ENGLISH
General Information
CD-G7500DVD (S)
TINSZA159AWZZ
CD-G7500DVD
CP-G7500
7
H
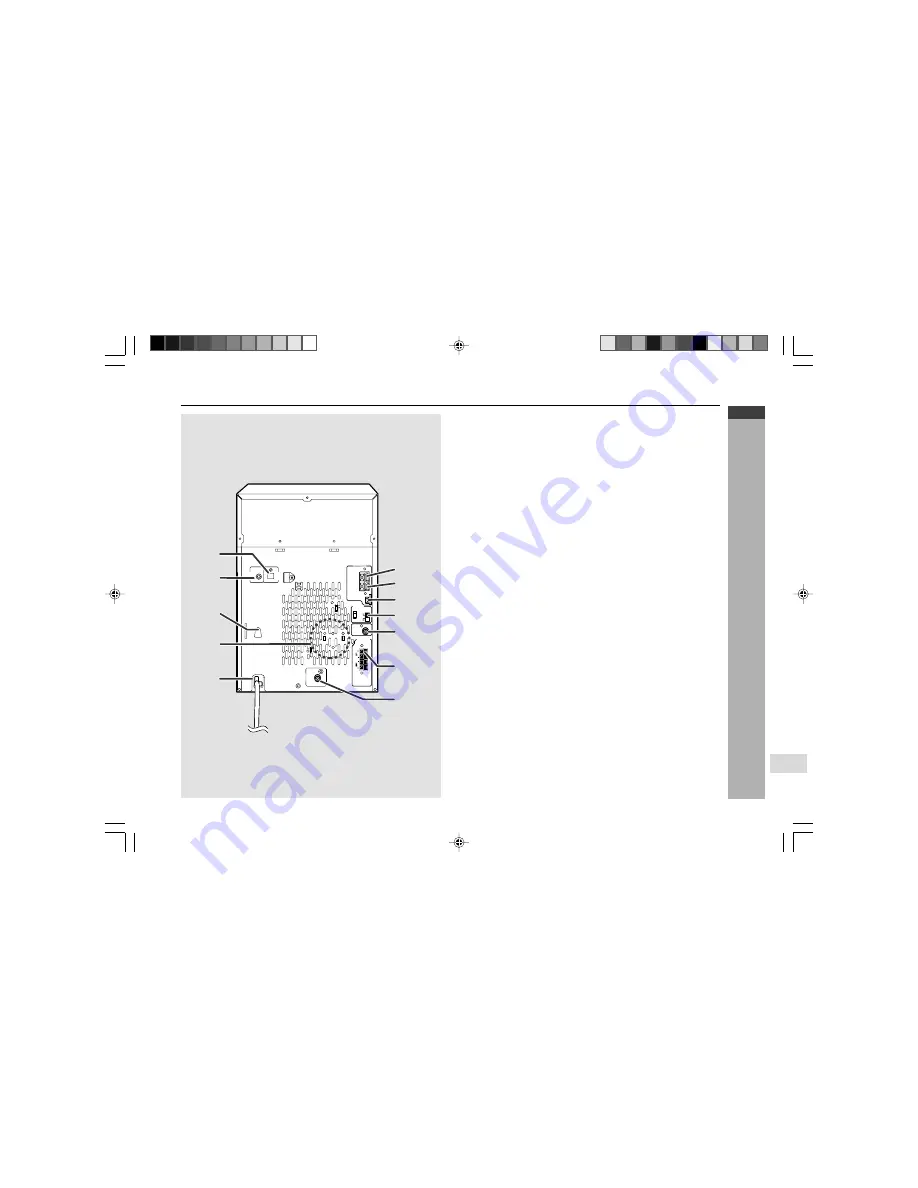
Rear panel
Reference page
1. Audio Digital Out Socket .................................................................... 71
2. S-Video Output Socket ....................................................................... 22
3. AC Voltage Selector ...................................................................... 13, 14
4. Cooling Fan
5. AC Power Lead ............................................................................. 13, 14
6. FM 75 Ohms Aerial Terminal ........................................................ 10, 11
7. FM Aerial Earth Terminal .............................................................. 10, 11
8. AM Loop Aerial Socket ................................................................. 10, 11
9. Span Selector Switch ......................................................................... 15
10. Video Output Socket .......................................................................... 12
11. Speaker Terminals ........................................................................ 10, 11
12. Subwoofer Pre-output Socket ..................................................... 10, 14
Cooling fan:
This product is equipped with a cooling fan inside, which begins to run once the
power is on for better heat radiation.
VIDEO
OUT
S-VIDEO
OUT
RATED LINE
VOLTAGE
RATED SPEAKER
IMPEDANCE:
6 OHMS MIN.
AUDIO
DIGITAL
OUT
DVD/CD
AC INPUT
50/9
100/10
FM/AM(kHz)
GND
FM
75 OHMS
AM
LOOP
ANTENNA
SPAN
SELECTOR
FRONT
SPEAKERS
6
SUBWOOFER
PRE-OUT
3
1
5
4
2
8
11
12
9
10
7
*CD-G7500DVD(EN)06-09
05.1.13, 14:41
6


