background image

SETTINGS

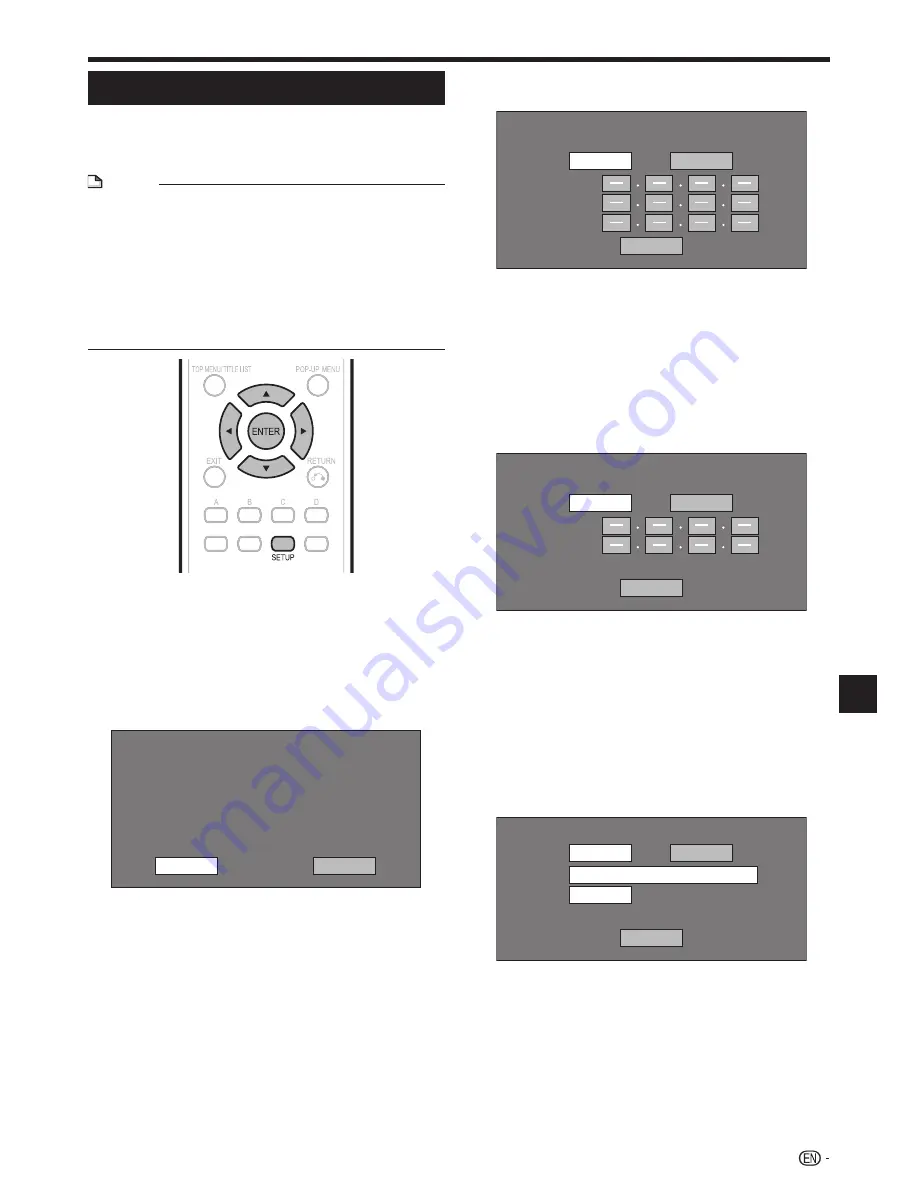
Communication Setup

This allows you to perform and/or change the 
communication setting. This setting is required to use 
BD-LIVE functions that connect to the internet.

NOTE 

Make sure that the LAN cable is connected to this Player. 
(See page 18.)
For manually performing the setting, the following 
information of the connected router or modem is required. 
Confirm the information prior to the setting.

IP address, netmask, gateway, DNS IP address

Besides, if specifying a proxy server, the following 
information specified from your internet service provider is 
also required. Confirm the information prior to the setting.

IP address and port number of the proxy server

Press 

SETUP

 to display the Setup Menu screen.

Press 

a

/

b

/

c

/

d

 to select “Settings”, then 

press 

ENTER

.

Press 

a

/

b

 to select “Communication Setup”, 

then press 

ENTER

.

Press 

c

/

d

 to select “Change”, then press 

ENTER

.

Current Ethernet setup info.

: Auto Setup
: Auto Setup
: Auto Setup
: Auto Setup
: Not Use

IP Address
Netmask
Gateway
DNS
Proxy

Change

Initialize

For initializing the current setting, select “Initialize”, 
then press 

ENTER

.

1
2

3

4

For setting the IP address, press 

c

/

d

 to select 

“Yes” or “No”, then press 

ENTER

.

Do you obtain the IP address
automatically?

IP Address

Netmask

Gateway

Next

Yes

No

If selecting “Yes”: The IP address is automatically 
obtained.
If selecting “No”: The IP address, netmask and 
gateway are manually entered using the screen for 
inputting characters. (See page 41.)
Regarding each of the setup values, confirm the 
specifications of your broadband router.

Select “Next”, then press 

ENTER

.

For setting the DNS IP address, press 

c

/

d

 to 

select “Yes” or “No”, then press 

ENTER

.

Do you obtain the DNS IP address
automatically?

Primary

Secondary

Next

Yes

No

If selecting “Yes”: The DNS IP address is automatically 
obtained. (The DHCP server function of the router or 
modem is used for the automatic acquisition.)
If selecting “No”: The primary and secondary IP 
addresses are entered using the screen for inputting 
characters. (See page 41.)
Regarding each of the setup values, confirm the 
specifications of your broadband router.

Select “Next”, then press 

ENTER

.

For setting the proxy server, press 

c

/

d

 to 

select “Yes” or “No”, then press 

ENTER

.

Do you use the proxy server?

Address

Port

Next

Yes

No

If selecting “Yes”: The IP address or proxy server 
name and port number for the proxy server specified 
from your internet service provider are entered using 
the screen for inputting characters. (See page 41.)
If selecting “No”: Go to the next step.

5

6
7

8
9

(Continued on the next page)

 39

Settings

Содержание BD-HP17U - AQUOS 1080p Blu-ray DiscTM Player

Страница 1: ...BLU RAY DISC PLAYER REPRODUCTOR DE DISCO BLU RAY OPERATION MANUAL MANUAL DE MANEJO BD HP17U ENGLISH ESPAÑOL ...

Страница 2: ......

Страница 3: ...ASS 1 LASER PRODUCT label is located on the rear cover This product contains a low power laser device To ensure continued safety do not remove any cover or attempt to gain access to the inside of the product Refer all servicing to qualified personnel 1 ENGLISH BD HP17U ENGLISH ...

Страница 4: ...menu 24 Using the disc menu 24 Using the pop up menu 24 Enjoying BONUSVIEW or BD LIVE 25 Use of Picture in Picture function secondary audio video playback 25 Virtual Package 25 BD LIVE 25 DVD R RW BD RE R Playback 26 27 Playback by selecting a title 26 Playback by selecting a chapter 27 Sorting the titles 27 Playback by selecting a Playlist 27 Playing back the title you stopped while being played ...

Страница 5: ...yer with simple operations Introduction to Connections p 13 Video Connections p 14 Enjoying BD LIVE functions through the internet This Player is compatible with BD LIVE You can enjoy bonus content such as movie trailers through the internet when playing back BD Video discs compatible with BD LIVE Enjoying BONUSVIEW or BD LIVE p 25 What would you like to do with this Player 3 Introduction pp 1 12 ...

Страница 6: ... liquid has been spilled or objects have fallen into the apparatus the apparatus has been exposed to rain or moisture does not operate normally or has been dropped Additional Safety Information Power Sources This product should be operated only from the type of power source indicated on the marking label If you are not sure of the type of power supply to your home consult your product dealer or lo...

Страница 7: ...ther similar surface since they can block ventilation openings This product is not designed for built in installation do not place the product in an enclosed place such as a bookcase or rack unless proper ventilation is provided or the manufacturer s instructions are followed Heat The product should be situated away from heat sources such as radiators heat registers stoves or other products includ...

Страница 8: ...yed This Player s region code is A for BD and 1 for DVD Discs marked ALL will play in any player BD DVD Video operations and functions may be different from the explanations in this manual and some operations may be prohibited due to disc manufacturer s settings If a menu screen or operating instructions are displayed during playback of a disc follow the operating procedure displayed The audio com...

Страница 9: ... It may take some time to play files depending on the number of folders number of files and volume of data involved EXIF information will not be displayed EXIF stands for Exchangeable Image File Format and is a standard for storing interchange information in image files especially those using JPEG compression Refer to http exif org for more information When using the unit to play a CD RW R disc wi...

Страница 10: ...ons Used in This Operation Manual BD VIDEO Indicates the functions that can be performed for BD Video discs BD RE Indicates the functions that can be performed for BD RE discs BD R Indicates the functions that can be performed for BD R discs DVD VIDEO Indicates the functions that can be performed for DVD Video discs DVD RW Indicates the functions that can be performed for DVD RW discs DVD R Indica...

Страница 11: ...ation Take out the disc and leave the Player with the power off until the condensation disappears Using the Player when there is condensation may cause malfunction Copyright Audio visual material may consist of copyrighted works which must not be recorded without the authority of the owner of the copyright Refer to relevant laws in your country This product incorporates copyright protection techno...

Страница 12: ...Connection varies with the equipment used Refer to Connection Pages 13 18 Turn off the devices before connecting Step 3 Playing back discs Play back a Blu ray disc after connecting the Player to your favorite equipment Refer to Disc Playback Pages 19 34 Step 4 Adjust settings Adjust settings to enjoy various features and other functions for playing discs Refer to Settings Pages 35 44 HDMI cable ...

Страница 13: ...ress in on the tab until it clicks into position 1 2 3 Connect the HDMI cable to the rear of the main unit while providing some slack 11 Introduction COMPONENT VIDEO OUT jacks p 15 VIDEO output jack p 16 2CH AUDIO output jacks p 17 DIGITAL AUDIO OUT OPTICAL terminal p 17 ETHERNET terminal p 18 BD STORAGE SERVICE terminal BD STORAGE pp 25 42 SERVICE for software p 43 HDMI OUT terminal p 14 HDMI cab...

Страница 14: ... 24 n RETURN p 29 HDMI p 36 SETUP pp 21 35 Keylock function You can set the keylock to prevent accidental operations This function allows TVs compatible with AQUOS LINK to also perform a Key Lock on the player Press and hold Lock for more than 5 seconds Each time you perform this operation the function is activated or deactivated If you try to operate the Player while the keylock function is set H...

Страница 15: ...nals jacks on this Player Higher Quality Standard Quality HDMI OUT terminal 1 Page 14 COMPONENT VIDEO OUT jacks 2 Page 15 VIDEO output jack 3 Page 16 Audio terminals jacks on this Player Digital audio connection Higher Quality Standard Quality HDMI OUT terminal 1 Page 14 DIGITAL AUDIO OUT OPTICAL terminal 2 Page 17 Analog audio connection Standard Quality 2CH AUDIO output jacks Page 17 Broadband I...

Страница 16: ...an HDMI cable only and the TV is turned on the video output switches to HDMI automatically The above setting is unnecessary When you connect the player to a TV with an HDMI cable HDMI Video Out is set to Auto If you don t get a stable image select the desired resolution When you set HDMI Video Out to a setting other than Auto you can only select resolutions that are compatible with the connected T...

Страница 17: ...ected to LCD TV directly CAUTION You need to select the priority video output in Settings Audio Video Settings Video Out Select See page 36 When the priority video output is set to HDMI in Video Out Select the video resolution which is output from the COMPONENT VIDEO OUT jacks is the one set in HDMI Video Out When the output from the COMPONENT VIDEO OUT jacks is prioritized set the priority video ...

Страница 18: ...ly Also the playback image via VCR may deteriorate due to this function However this is not a malfunction When you watch the program where copyright is protected we recommend that the Blu ray disc player be connected to LCD TV directly 16 STEPS Be sure to turn off this Player and the equipment before making any connections Firmly connect an AV cable supplied to the video jacks 1 and 2 1 2 AV cable...

Страница 19: ... any connections Firmly connect an optical digital cable commercially available or AV cable supplied to the optical digital audio terminals or audio jacks 1 and 2 or 3 and 4 1 2 After connecting Load a disc and start playback Pages 23 28 Amplifier When using OPTICAL output 5 1 ch Digital Output is available 7 1 ch Digital Output is not available NOTE 7 1 ch Audio is available via the HDMI terminal...

Страница 20: ...turn off this Player and the equipment before making any connections Firmly connect a LAN cable commercially available to the ETHERNET terminal 1 and 2 1 2 Example of a Broadband Internet Connection This Player 18 CAUTION When using a broadband internet connection a contract with an internet service provider is required For more details contact your nearest internet service provider Refer to the o...

Страница 21: ...tteries properly Do not mix old and new batteries or mix different brands Remove the batteries if you will not use the remote control unit for an extended period of time 1 2 3 Connecting the Power Cord Plug the supplied AC cord into the AC IN terminal on the rear of the Player Then plug into AC outlet NOTE Place the Player close to the AC outlet and keep the power plug within reach TO PREVENT RISK...

Страница 22: ...power again NOTE When the ON STANDBY indicator is blinking may take some time the Player cannot be turned on Indicators on the Player ON STANDBY indicator Green on Power on Red blinks Preparing for standby Red on Standby AQUOS PURE MODE indicator Green on Output in AQUOS PURE MODE See page 22 BD DVD CD mode indicator Off No disc Blue on Playing back White on Disc stopped White blinks Loading a dis...

Страница 23: ... down CH r s Language Setting Changing the on screen display language Press SETUP to display the Setup Menu screen Press a b c d to select On Screen Language then press ENTER Displays The Title List Settings On Screen Language Picture Press a b to select the language you want to display on the screen then press ENTER English Español Français NOTE To select the DVD disc language such as subtitle la...

Страница 24: ... to the HDMI terminal Automatic input select function When you start playback of this player the input selector of the LCD TV will automatically switch to the LCD TV input terminal connected to the player and the playback image will appear on the screen even if you are watching a TV program Automatic power off function If you turn off the LCD TV when this player is in stop mode the power of this p...

Страница 25: ...1 2 3 4 1 2 To stop playback Press H STOP Resume playback function If you press d PLAY next playback will resume from the point where the Player was previously stopped To playback from the beginning cancel resume mode by pressing H STOP then press d PLAY This may not work depending on the type of disc In this case open the disc tray or enter standby NOTE Resume playback may not function depending ...

Страница 26: ...Title Menu Use TOP MENU TITLE LIST on the remote control when the instructions refer to Title Menu If no top menu is available the TOP MENU TITLE LIST button will have no effect 1 2 BD DVD CD Playback Using the disc menu DVD VIDEO Example Select SUBTITLE LANGUAGE Press TOP MENU TITLE LIST The disc menu screen is displayed if present on the DVD video disc Press a b to select SUBTITLE LANGUAGE then ...

Страница 27: ...ble may prevent the player from performing correctly Use of Picture in Picture function secondary audio video playback BD Video that includes secondary audio and video compatible with Picture in Picture can be played back with secondary audio and video simultaneously as a small video in the corner NOTE To listen to secondary audio make sure that Secondary Audio is set to On See page 37 The seconda...

Страница 28: ...red title then press ENTER When seven or more titles are displayed switch pages by pressing KSKIP k or LSKIP l Playback of the selected title will begin You can playback by pressing d PLAY instead of pressing ENTER Press H STOP to stop playback 1 2 3 NOTE The Title List screen also can be displayed by pressing TOP MENU TITLE LIST when playback is stopped or by pressing ENTER after choosing Display...

Страница 29: ...screen press B Green Press a b c d to select the desired chapter then press ENTER Playback of the selected chapter will begin You can playback by pressing d PLAY instead of pressing ENTER Press H STOP to stop playback Sorting the titles Each time you press B Green while the Title Name screen is displayed the Title Name display changes between displaying the newest title first and the oldest title ...

Страница 30: ...2 3 Playback by selecting a track Press a b to select the track then press ENTER during playback or when playback is stopped Playback of the selected track will begin 1 Track 01 5 16 2 Track 02 5 10 3 Track 03 5 23 4 Track 04 5 03 5 Track 05 4 44 6 Track 06 5 08 00 00 11 3 12 3 12 Off 3 L R Select Enter Functions 5 23 0 00 Track 03 Functions D Press H STOP to stop playback Operation procedure for ...

Страница 31: ...E Some BD DVD Video discs are not compatible with Pause Frame Advance Playback Frame Advance Reverse Playback can be performed for DVD discs by pressing L SKIP l or K SKIP k during pause Slow Playback Slow Playback functions when L SKIP l or K SKIP k is pressed for more than 2 seconds during pause Press d PLAY to return to normal playback NOTE This doesn t work for audio CDs Reverse Slow Playback ...

Страница 32: ...the start and end points within the same title Repeat Playback may be forbidden depending on the disc Partial Repeat Playback may not work in multi angle scenes If you press DISPLAY you can confirm the Repeat Playback status Displaying the Audio Information You can display the audio information on the disc currently being played back by pressing AUDIO The displayed contents vary depending on the d...

Страница 33: ...also in Function Control screen Page 33 The operations of subtitles angle and audio differ according to each disc You may need to refer to the operation manual of the disc The following operations will not work when playing back an audio CD Slow Playback Frame Advance Display of functions The display for subtitles angle or audio automatically disappears after 5 seconds Switching between functions ...

Страница 34: ...eplace one image with another The same operation can be performed by pressing c d or S REV V FWD Press n RETURN if you wish to return to the folder selection screen To stop the still image playback at any time press H STOP Playing back Slide Show In Step 2 of the left side Playing back still images in a selected folder press d PLAY Slide Show The still images inside the selected folder are played ...

Страница 35: ...Provides help on remote control button operations 1 2 3 Function control operation procedure Press FUNCTION during playback The Function Control screen is displayed on the TV Press a b to select the desired setting then press ENTER For a description of each setting see Functions which can be set Page 34 BD VIDEO 00 20 30 1 1 3 5 1ch 5 5 2 2 English 1 Off Press a b c d to set then press ENTER Opera...

Страница 36: ... time Press c d to select the Hour Minute or Second then press a b or the Number buttons to set the time Press ENTER to start playback at the set time Shows the currently selected subtitle language If subtitles are provided in other languages you can switch to your preferred language Shows the currently selected type of audio You can select the desired type of audio The current Title or Chapter or...

Страница 37: ...lect Yes to enter the password setting menu then press ENTER 1 2 3 4 5 1 Enter a 4 digit number for the password then the same 4 digit number for confirmation Press ENTER to complete the password setting procedure and move to the next setting screen Press c d to select the parental control level for DVD VIDEO BD ROM and then select the country code Press ENTER after making each selection Parental ...

Страница 38: ...nd the HDMI Video Out is set to Auto 1080p 24Hz will automatically be displayed when compatible discs are played back At 1080p 24Hz 1080p 60Hz there is no output from the COMPONENT VIDEO OUT jacks and VIDEO output jack HDMI Component When the priority video output is selected video is output from the other video terminal with the resolution of the selected video output There is no output from the ...

Страница 39: ...ayer to receive the control signal from the AQUOS LINK remote control via the HDMI cable Yes No NOTE For details refer to the operation manual of TV If Component is selected from the Video Out Select menu AQUOS LINK is not available Select HDMI if you want to use AQUOS LINK features NOTE When Quick Start is set to Yes the Player requires some time to turn off This sets the audio output mode for DI...

Страница 40: ... Allow all BD LIVE discs Limit Allow only discs with owner certification Prohibit Prohibit all BD LIVE discs NOTE The available functions differ depending on the disc Regarding playback method of BD LIVE contents etc perform the operations in accordance with the instructions in the BD disc manual To enjoy BD LIVE functions perform the broadband internet connection page 18 and communication setting...

Страница 41: ...NTER Do you obtain the IP address automatically IP Address Netmask Gateway Next Yes No If selecting Yes The IP address is automatically obtained If selecting No The IP address netmask and gateway are manually entered using the screen for inputting characters See page 41 Regarding each of the setup values confirm the specifications of your broadband router Select Next then press ENTER For setting t...

Страница 42: ...en press ENTER Option Ethernet Connection Speeds Next Yes Auto Detection 10M Half Duplex 100M Half Duplex 10M Full Duplex 100M Full Duplex No For testing the connection to the internet after confirming the settings press c d to select Test then press ENTER Test is available only when setting to obtain the IP address automatically Test cannot be selected if the IP address has not been obtained auto...

Страница 43: ... Z w x y z Spc space Numeric 1 2 3 4 5 6 7 8 9 0 Sign _ ˆ Spc _ _ ˆ ˆ Spc space Edit Cancel Left Right Complete Del Char The same operation as the colored buttons and n RETURN can be performed by selecting each of the items and pressing ENTER Del Char stands for deleting characters Press c d to select a number character then press ENTER Repeat the step 3 to display all of the desired characters nu...

Страница 44: ...are update data after the software is updated delete the data on the USB memory device using a PC Erases BD VIDEO data on USB memory Erase all contents on USB memory including protected contents Format Erase NOTE Data which has been saved to the player s internal memory game score etc will also be deleted Press c d select Yes and press ENTER Yes No Start the process The screen for the current oper...

Страница 45: ...memory device are displayed To update this player software with update file select Yes and press ENTER Software update file is detected in the USB memory device Start update Current Ver Update Ver 1234567 1234567 Yes No 1 2 3 4 5 6 7 If the USB memory device is not properly installed or the correct update file cannot be found on the USB memory device an error message is displayed Check the file on...

Страница 46: ...pali NL Dutch NO Norwegian OC Occitan OM Afan Oromo OR Oriya PA Panjabi PL Polish PS Pashto Pushto PT Portuguese QU Quechua RM Rhaeto Romance RN Kirundi RO Romanian RU Russian RW Kinyarwanda SA Sanskrit SD Sindhi SG Sangho SH Serbo Croatian SI Singhalese SK Slovak SL Slovenian SM Samoan SN Shona SO Somali SQ Albanian SR Serbian SS Siswat ST Sesotho SU Sundanese SV Swedish SW Swahili TA Tamil TE Te...

Страница 47: ... 9 Make sure that the disc is loaded properly aligned in disc tray and label side up Page 23 Make sure that region code on the disc matches that of this Player Page 6 Allow any condensation in or near the Player to dry Page 9 Check that the disc is recorded in the compatible TV system PAL or NTSC The Player cannot play back video which was not recorded normally Page 6 Proper playback may be imposs...

Страница 48: ... protection will prevent normal playback Pages 15 16 Audio is not output or images are not played back properly The audio may not be output or the images may not be played back properly for some discs in which copyright protected contents are recorded Sound Problem Possible causes and solutions No sound or sound is distorted If the volume of the TV or amplifier is set to minimum turn the volume up...

Страница 49: ...correctly when using the remote control of this Player Use such TVs away from this Player The Player heats up during use When using this Player the console cabinet may heat up depending on the usage environment This is not a malfunction ON STANDBY indicator will remain lit When the AC cord is removed from the outlet the ON STANDBY indicator will remain lit for a short period This is normal and is ...

Страница 50: ...y supports 7 1 multi channel surround sound Dolby TrueHD Dolby TrueHD is a lossless coding technology that supports up to 8 channels of multi channel surround sound for the next generation optical discs The reproduced sound is true to the original source bit for bit DTS This is a digital sound system developed by DTS Inc for use in cinemas DTS HD High Resolution Audio DTS HD High Resolution Audio ...

Страница 51: ...he viewer With this Player you can set the control level for viewing such broadcasts and discs Pop up menu page 24 An enhanced menu operation available on BD video discs The pop up menu appears when POP UP MENU is pressed during playback and can be operated while playback is in progress Progressive format Compared to the Interlace format that alternately shows every other line of an image field to...

Страница 52: ...DVD Video DVD RW R RW R Dual Layer Video VR format Audio CD CD DA CD RW R CD DA JPEG file format Input Output HDMI HDMI 19 pin standard connector 1080p 24Hz output HDMI V 1 3 with x v Color Dolby TrueHD DTS HD Master Audio Essential Component video output Output level Y 1 Vp p 75 ohms PB CB PR CR 0 7 Vp p 75 ohms Jacks RCA jack Video output Output level 1 Vp p 75 ohms Jack RCA pin jack Digital aud...

Страница 53: ...me periods set forth herein No other representations or prom ises made by anyone are permitted Correction of defects in the manner and for the period of time described herein shall constitute complete fulfillment of all liabilities and responsibilities of Sharp to the purchaser with respect to the Product and shall constitute full satisfaction of all claims whether based on contract negligence str...

Страница 54: ......

Страница 55: ...Printed in China Impreso en China TINS E176WJQZ 09P03 CH NG SHARP ELECTRONICS CORPORATION Sharp Plaza Mahwah New Jersey 07495 1163 SHARP CORPORATION VRD1237 A ...

Отзывы: