Sharp AR-M236 Скачать руководство пользователя страница 76

74

CLEANING THE MACHINE

DOCUMENT GLASS AND DOCUMENT COVER/RSPF

If the document glass, document cover/RSPF, or scanning glass for originals fed from the RSPF (the long narrow 
glass surface on the right side of the document glass) become dirty, the dirt may appear on copies. Always keep 
these parts clean.
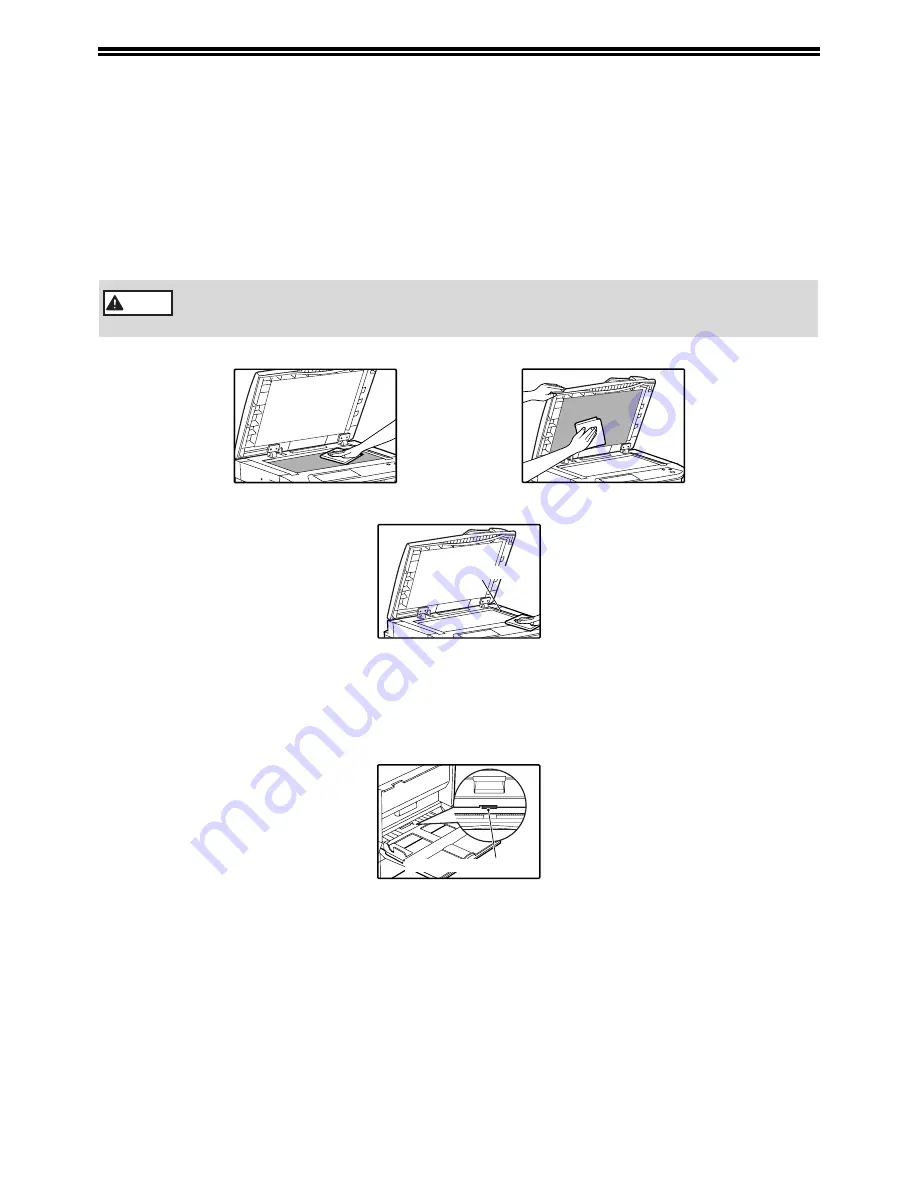
Stains or dirt on the document glass/document cover/RSPF will also be copied. Wipe the document glass, the 
document cover, the RSPF and the scanning window on the document glass with a soft, clean cloth.
If necessary, dampen the cloth with water. Do not use thinner, benzene, or similar volatile cleaning agents.

THE BYPASS TRAY PAPER FEED ROLLER

If misfeeds occur frequently when feeding envelopes or other thick paper from the bypass tray, wipe the paper feed 
roller at the feed slot of the bypass tray with a soft, clean cloth moistened with alcohol or water.

Do not spray flammable cleaner gas. Gas from the spray may come in contact with the internal 
electrical components or high-temperature parts of the fusing unit, creating a risk of fire or 
electrical shock.

Surface of document glass

Underside of document cover/RSPF

Scanning glass

Warning

Scanning glass for RSPF

Bypass tray paper feed roller

Содержание AR-M236

Страница 1: ...IONAL SYSTEM OPERATION MANUAL for copier BEFORE USING THE MACHINE COPY FUNCTIONS CONVENIENT COPY FUNCTIONS USER SETTINGS TROUBLESHOOTING AND MAINTENANCE PERIPHERAL DEVICES AND SUPPLIES APPENDIX 8 21 35 50 56 75 79 Page With the RSPF installed ...

Страница 2: ...36 CEE et 73 23 CEE modifiées par la directive 93 68 CEE Dit apparaat voldoet aan de eisen van de richtlijnen 89 336 EEG en 73 23 EEG gewijzigd door 93 68 EEG Dette udstyr overholder kravene i direktiv nr 89 336 EEC og 73 23 EEC med tillæg nr 93 68 EEC Quest apparecchio è conforme ai requisiti delle direttive 89 336 EEC e 73 23 EEC come emendata dalla direttiva 93 68 EEC Este equipamento obedece à...

Страница 3: ...PYING 27 USING THE DOCUMENT GLASS 27 USING THE RSPF 28 EXPOSURE ADJUSTMENT 29 SELECTING THE ORIGINAL IMAGE TYPE AND MANUALLY ADJUSTING THE EXPOSURE 29 REDUCTION ENLARGEMENT ZOOM 30 AUTOMATIC RATIO SELECTION 30 MANUAL RATIO SELECTION 31 SELECTING THE VERTICAL AND HORIZONTAL COPY RATIOS SEPARATELY XY ZOOM copying 32 INTERRUPTING A COPY RUN 34 3 CONVENIENT COPY FUNCTIONS COPY FINISHING FUNCTIONS 35 S...

Страница 4: ...nstalled 69 MISFEED IN AN OUTPUT TRAY when a finisher AR FN5N is installed 69 REPLACING THE TONER CARTRIDGE 71 STAPLE CARTRIDGE REPLACEMENT 72 STAPLE JAM REMOVAL 73 CHECKING THE TONER QUANTITY AND TOTAL OUTPUT COUNT 73 CLEANING THE MACHINE 74 DOCUMENT GLASS AND DOCUMENT COVER RSPF 74 THE BYPASS TRAY PAPER FEED ROLLER 74 6 PERIPHERAL DEVICES AND SUPPLIES PERIPHERAL DEVICES 75 FINISHER AR FN5N 76 50...

Страница 5: ...r the machine with a dust cover cloth or plastic film while the power is on Doing so may prevent heat dissipation damaging the machine Use of controls or adjustments or performance of procedures other than those specified herein may result in hazardous laser radiation exposure The socket outlet should be installed near the machine and should be easily accessible IMPORTANT POINTS WHEN SELECTING AN ...

Страница 6: ...s or copyrights of Microsoft Corporation in the U S A and other countries IBM and PC AT are trademarks of International Business Machines Corporation Acrobat Reader Copyright 1987 2002 Adobe Systems Incorporated All rights reserved Adobe the Adobe logo Acrobat and the Acrobat logo are trademarks of Adobe Systems Incorporated PostScript is a registered trademark of Adobe Systems Incorporated Macint...

Страница 7: ... on the CD ROM and explains the procedures for using the machine as a printer network printer and network scanner Software setup guide for printer This manual contains instructions for installing the software that allows the machine to be used with your computer and procedures for establishing initial printer settings Operation manual for network scanner When the network scanner is installed This ...

Страница 8: ...stalled see PERIPHERAL DEVICES p 75 AB series metric and inch series references Both specifications are quoted where applicable For example Page 15 A5 to A3 5 1 2 x 8 1 2 to 11 x 17 Page 79 25 50 70 81 86 100 115 122 141 200 400 25 50 64 77 100 121 129 200 400 Although AB series size indications are shown on the operation panel of this manual inch series indications are displayed on the inch serie...

Страница 9: ...pamphlet copy dual page copy and cover copy are available Key operator programs allow the setting or modification of functions to meet your specific needs The key operator programs can also be used to enable audit mode which allows the machine administrator to control use of the machine Black and white LCD touch panel makes it easy to operate the machine Employing a backlit black and white LCD dis...

Страница 10: ...ove the machine Operation panel Contains operation keys and the touch panel p 10 Job separator tray upper tray optional Print jobs and received faxes are delivered to this tray Centre tray Finished copies are delivered to the centre tray Front cover Open to remove paper misfeeds and perform machine maintenance p 65 Paper trays Each tray holds 500 sheets of copy paper p 15 Upper right side cover Op...

Страница 11: ... paper p 65 Photoconductive drum Copy images are formed on the photoconductive drum Fusing unit release levers To remove a paper misfeed in the fusing unit push up on these levers and remove the paper p 66 Fusing unit paper guide Open to remove misfed paper p 66 18 17 19 20 21 22 Do not touch the photoconductive drum green portion Doing so may damage the drum and cause smudges on copies 15 16 17 1...

Страница 12: ...is lights up while faxes are being sent or received DATA indicator Blinks when a fax has been received to memory and lights steadily when a fax is waiting in memory for transmission See operation manual for facsimile JOB STATUS key Press to display the current job status p 12 CUSTOM SETTINGS key Use to adjust various settings of the machine including the contrast of the touch panel and key operato...

Страница 13: ...highlighted at the time a screen appears are already selected and will take effect when the OK key is touched Example 2 If you need to cancel a selection simply press the key once again so that it is not highlighted The key is no longer highlighted and the selection is cancelled Example 3 When the machine is used in copy mode or fax mode and a special mode is selected a icon representing the featu...

Страница 14: ...jobs JOB QUEUE Shows jobs that have been stored and the job that is currently being executed COMPLETE Shows the jobs that have been finished Note that copy jobs do not appear in this list If the power is turned off or if auto power shut off mode activates when there are no jobs the jobs in the COMPLETE list will be erased PRINT JOB key Use to view the list of output jobs for all modes print copy a...

Страница 15: ...status will appear on the main screen for several seconds Then copying can be performed See Key operator s guide POWER OFF When the machine is not used for a long time be sure to turn it off Make sure that the machine is not in operation and then turn the power switch to the OFF position If the power switch is turned off while the machine is in operation a misfeed may occur and the job that was in...

Страница 16: ...e time settings for each mode can be changed in the key operator programs See the Key operator s guide Preheat mode When the set time elapses the temperature of the fusing unit is automatically lowered to reduce power consumption while on standby The factory default setting is 15 minutes To return to normal operation touch any key on the operation panel To make a copy when the machine is in this m...

Страница 17: ...e Weight Capacity 1 Upper paper tray 1 Plain paper Letterhead paper Recycled paper Colour paper A5 to A3 5 1 2 x 8 1 2 to 11 x 17 56 g m2 to 105 g m2 15 lbs to 28 lbs 500 sheets 4 2 Lower paper tray 2 3 500 sheet paper feed unit Upper paper tray of 2 x 500 sheet paper feed unit 4 Lower paper tray of 2 x 500 sheet paper feed unit Bypass tray Plain paper Letterhead paper Recycled paper Colour paper ...

Страница 18: ...ng from the seal area Envelopes with part of the seal area peeled off Letterhead paper Letterhead paper is paper with information pre printed at the top such as a company name and address Use SHARP recommended transparency film and label sheets Using other than SHARP recommended paper may result in misfeeds or smudges on the output If other than SHARP recommended media must be used feed each sheet...

Страница 19: ...aper in the tray 6 Push the paper tray firmly back into the machine If you loaded a different size of paper that was loaded previously place the appropriate paper size card in the front of the paper tray to indicate the new paper size Front guide Left guide Load the paper with the print side facing up Insert the paper along the guides The tray holds up to 500 sheets of 80 g m2 21 lbs paper Do not ...

Страница 20: ...de facing down When loading envelopes make sure that they are straight and flat and do not have loosely glued construction flaps not the closure flap When adding paper first remove any paper remaining in the bypass tray combine it with the paper to be added and then reload as a single stack The paper to be added must be the same size and type as the paper already in the bypass tray Do not use pape...

Страница 21: ...until it appears 5 Select the size and type of paper that is loaded in the tray The currently selected paper type will be highlighted To change the paper type selection touch the appropriate type key To change the paper size selection touch the appropriate size key To change the displayed size selections to AB sizes touch AB INCH 6 Touch the OK key 7 A message appears prompting you to check the pa...

Страница 22: ...plained in Loading paper in the bypass tray p 18 2 Touch the PAPER SELECT key 3 Touch the paper type selection key 4 Select the paper type JAPANESE P C refers to official postcards used in Japan 5 Touch the PAPER SELECT key You will return to the main screen of copy mode DATA LINE B STATUS CUSTOM SETTINGS TOT L COUNT TRAY SETTINGS ADDRES CONTRO KEYBOARD SELECT KEY CONTRA TRAY 4 BYPASS TRAY TYPE SI...

Страница 23: ...SPF Paper size display This shows the location of the paper trays the size of the paper in the trays indicates whether or not there is paper A paper tray can be touched to change the paper tray selection Original size display Displays the original size only when an original is placed for copying Exposure display Displays the icon of the selected exposure type and the exposure scale EXPOSURE key p ...

Страница 24: ...press the START key The number in the copy quantity display will decrease by 1 each time a copy is made If you are only making a single copy the copy can be made with the copy number display showing 0 To clear a mistake press the CLEAR key If AUDITING MODE p 55 has been enabled enter your 5 digit account number Note If the original size is not automatically detected manually set the original size ...

Страница 25: ...e RSPF while this message appears will be fed and copied automatically Copying a large number of originals Job Build mode is useful when you need to copy more originals that can be placed in the RSPF at once For information on Job Build mode see JOB BUILD MODE p 45 If AUDITING MODE p 55 is enabled enter your 5 digit account number If the RSPF is disabled in the key operator programs the RSPF canno...

Страница 26: ... placed together in the RSPF as long the widths are equal however some copy functions may not operate correctly Acceptable originals Originals of size A5 to A3 5 1 2 x 8 1 2 to 11 x 17 having a weight of 35 g m2 to 128 g m2 9 lbs to 34 lbs or 52 g m2 to 105 g m2 14 lbs to 28 lbs for two sided originals can be used Other considerations Use originals that are within the specified size and weight ran...

Страница 27: ...ferent orientation than the copy paper the original image will be automatically rotated 90 When an image is rotated a message will be displayed If a function is selected that is not suitable for rotation such as enlarging the copy to greater than A4 8 1 2 x 11 size or margin shift copy rotation will not be possible Example This function operates in both the auto paper select and auto image modes R...

Страница 28: ... size of paper in the bypass tray the starting position of printing can be shifted vertically for fine adjustment of the image position To adjust the starting position of printing follow the steps below This function can only be used when feeding special sizes of paper from the bypass tray 1 Touch the PAPER SELECT key and then touch the EXTRA IMAGE ADJUST key on the bypass tray 2 Use the key or ke...

Страница 29: ...tomatic two sided copying is not possible on thick paper thin paper labels transparency film envelopes and other special types of paper If automatic two sided copying is performed using super photo mode the memory may become full MEMORY IS FULL SELECT ANOTHER EXPOSURE MODE will appear Touch the OK key to cancel automatic two sided copying set the exposure setting to other than super photo mode and...

Страница 30: ... copy mode 4 Touch the OK key 5 Make sure that a suitable paper size is automatically selected or select another size using the PAPER SELECT key 6 Select the number of copies and any other desired copy settings and then press the START key EXPOSURE AUTO A4 PAPER SELECT 100 ACC C When making two sided copies of an odd number of originals touch the READ END key after scanning the last original Note ...

Страница 31: ... copy exposure Touch the key to make darker copies Touch the key to make lighter copies To change back to automatic exposure adjustment follow these steps 1 Touch the EXPOSURE key 2 Touch the TEXT key The AUTO MANUAL key appears when TEXT is selected 3 Touch the AUTO MANUAL key so that AUTO is highlighted 4 Touch the OK key 4 Touch the OK key You will return to the main screen of copy mode 5 Check...

Страница 32: ... then press the START key Original type setting Original position Selectable ratios Other than super photo mode Document glass 25 to 400 RSPF 50 to 200 Super photo mode Document glass 50 to 200 RSPF 50 to 141 If the original size does not appear in the touch panel specify the original size manually p 47 Automatic ratio selection is not possible if the original or paper is a non standard size If pa...

Страница 33: ...ange faster 5 Touch the OK key PAPER SELECT 100 COPY RATIO B4 B5 A3 A4 B5 A5 B4 A4 A5 B5 A4 B4 A4 B5 A3 B4 B5 B4 A4 A3 70 81 86 115 122 141 B5 A4 B4 A3 ZOOM XY ZOOM MENU AUTO IMAGE EXPOSURE PAPER SELECT COPY RATIO READY TO COPY AUTO AUTO A4 0 1 2 100 OK 100 READY TO COPY 0 100 ZOOM 50 200 25 400 100 XY ZOOM MENU AUTO IMAGE 2 1 EXPOSURE PAPER SELECT COPY RATIO AUTO AUTO A4 OK Touch a reduction or e...

Страница 34: ...os to be changed independently Example Vertical ratio set to 100 and horizontal ratio set to 50 1 Place the original s p 22 p 23 2 Touch the COPY RATIO key 3 Touch the XY ZOOM key EXPOSURE AUTO A4 PAPER SELECT 77 To return the ratio setting to 100 touch the COPY RATIO key to display the ratio menu and then touch the 100 key p 31 step 3 ACC C Note The AUTO IMAGE MULTI SHOT PAMPHLET COPY feature can...

Страница 35: ...ll not become highlighted when touched If you need to readjust the horizontal ratio touch the X key again 8 Touch the OK key 9 Make sure that a suitable paper size is automatically selected or select another size using the PAPER SELECT key If AUTO PAPER SELECT is enabled the appropriate copy paper size is automatically selected based on the original size and selected copy ratios 10 Select the numb...

Страница 36: ...fset from the previous copies Offset function p 35 4 When the copy job is finished press the INTERRUPT key and remove the original s 5 Replace the previous original s and press the START key to resume copying Replace only the originals that have not yet been scanned Automatic two sided copying sort group copying staple sort cover copy pamphlet copy mixed feeding job build job programs or multi sho...

Страница 37: ...talled GROUP COPY This function is used to group sets of copies by page The copies are delivered to the centre tray and to other trays when a job separator tray or finisher is installed OFFSET FUNCTION Each set of copies is offset from the previous set in the output tray making it easy to distinguish one set from another The offset function can be used in the centre tray or in the offset tray of t...

Страница 38: ... this step until all originals have been scanned and then touch the READ END key The copies are grouped as follows If the memory becomes full while scanning the originals MEMORY IS FULL PRESS START TO BEGIN COPYING OR CA TO CANCEL will appear To copy only the originals that have been scanned press the START key To cancel the job press the CLEAR ALL key To enable the offset function p 35 touch the ...

Страница 39: ...ies will be stapled at the position shown below Stapling position Top left corner Portrait orientation Landscape orientation Available paper sizes A4 and B5 8 1 2 x 11 Stapling capacity For each size up to 30 sheets can be stapled Available paper sizes A3 B4 and A4R 11 x 17 8 1 2 x 14 8 1 2 x 13 8 1 2 x 11 R Stapling capacity For each size up to 30 sheets can be stapled Stapling position Stapling ...

Страница 40: ...nd press the START key Repeat this step until all originals have been scanned and then touch the READ END key If the memory becomes full while scanning the originals MEMORY IS FULL PRESS START TO BEGIN COPYING OR CA TO CANCEL will appear To copy only the originals that have been scanned press the START key To cancel the job press the CLEAR ALL key 2 SIDED COPY OUTPUT OUTPUT TOP TRAY OFFSET TRAY ST...

Страница 41: ...nction is used to copy two or four originals onto one sheet of copy paper in any of four layout patterns key key Use these to change pages in the special functions screen ORIGINAL SIZE key p 47 Use to manually select the original size When the original size is selected the auto ratio select function will automatically select an appropriate ratio based on the paper size COVER key p 48 Press this to...

Страница 42: ...UNCTIONS 1 Touch the SPECIAL MODES key 2 Touch the key of the desired special mode Example Selecting the margin shift function Procedures for modes that require further settings are explained starting on the next page SPECIAL MODES 2 SIDED COPY MARGIN SHIFT PAMPHLET COPY ...

Страница 43: ...the right Image shifted to the left Image shifted down Margin Margin Margin Margin One sided copying Two sided copying Image shifted to the right Margin Image shifted to the left Margin Image shifted down Or Right left or down can be selected for the shift direction as shown in the illustration The shift width margin can be set from 0 mm to 20 mm in increments of 1 mm 0 to 1 in increments of 1 8 I...

Страница 44: ... to indicate that the function is turned on 2 Select the desired erase mode Select one of the three erase modes The selected key will be highlighted 3 Adjust the erase width as needed and touch the OK key Use the and keys to adjust the erase width The erase width can be set from 0 mm to 20 mm in increments of 1 mm 0 to 1 in increments of 1 8 4 Touch the OK key in the special modes screen You will ...

Страница 45: ...or A4 8 1 2 x 11 size paper is not selected touch the PAPER SELECT key to select B5 or A4 8 1 2 x 11 paper 5 Select the number of copies and any other desired copy settings and then press the START key A reduction setting can be selected when using the dual page copy function however an enlargement setting cannot be selected The dual page copy function can only be used when copying from the docume...

Страница 46: ...e OK key in the pamphlet copy setting screen You will return to the special modes menu screen 4 Touch the OK key in the special modes screen You will return to the main screen of copy mode 5 Place the original s p 22 p 23 6 Make sure that a suitable paper size has been automatically selected If the desired copy paper size is not selected use the PAPER SELECT key to select the paper size After the ...

Страница 47: ...Touch the READ END key Copying begins If the memory becomes full while scanning the originals MEMORY IS FULL PRESS START TO BEGIN COPYING OR CA TO CANCEL will appear To copy only the originals that have been scanned press the START key To cancel the job press the CLEAR ALL key Depending on the content of the originals the memory may become full before 100 originals have been scanned In this case p...

Страница 48: ...en to indicate that the function is enabled 2 Select the number of originals to be copied onto one sheet in the multi shot copy selection screen 3 Select the layout Select the order in which the originals will appear on the copy 4 Select a borderline setting Select or 5 Touch the OK key in the multi shot setting screen You will return to the special modes menu screen 6 Touch the OK key in the spec...

Страница 49: ...riginal size MANUAL key is highlighted and the selected paper size is displayed 4 Touch the inside OK key You will return to the special modes menu screen 5 Touch the OK key in the special modes menu screen You will return to the main screen of the copy mode To select an inch size original touch the AB INCH key Inch sizes will appear ORIGINAL SIZE COV AL MODES MANUAL GINAL SIZE AUTO MIX SIZE ORIGI...

Страница 50: ...ed or two sided originals One sided copies from one sided or two sided originals 1 2 3 4 SHARP Cover original 2 3 4 1 SHARP Back cover no copying Front cover can copy onto front side Back side of cover is blank A front cover back cover or both a front and a back cover can be selected You can specify whether or not the front cover is copied on Copying is not possible on either side of a back cover ...

Страница 51: ...turn to the special modes screen 5 Touch the OK key in the special modes screen You will return to the main screen of copy mode 6 Load the cover paper to be used into the bypass tray Load the same size of paper as the paper to be used for the copy job L COVER COVER SPECIAL MODES FRONT BACK FRONT BACK PRINT ON FRONT COVER YES NO OK CANCEL OK CK PRINT ON FRONT COVER YES NO OK CANCEL About the steps ...

Страница 52: ...l in the operation manual for facsimile ADDRESS CONTROL 2 If your machine has the fax option this setting is used to store fax numbers for automatic dialling Group keys and user indexes can also be programmed RECEIVE MODE 2 This is used to select the fax receive mode automatic or manual FAX DATA FORWARD 2 This is used to forward faxes received in memory to another destination KEYBOARD SELECT 3 Whe...

Страница 53: ...A checkmark will appear to indicate that the item is selected In the above settings tray 1 can be used for printer copy and fax mode Tray 2 and tray 3 can only be used for copy mode For a detailed explanation of the trays see CHANGING A TRAY S PAPER TYPE AND PAPER SIZE SETTINGS p 19 DATA LINE B STATUS CUSTOM SETTINGS CUSTOM SETTINGS TOTAL COUNT TRAY SETTINGS ADDRESS CONTROL KEYBOARD SELECT KEY OPE...

Страница 54: ...ons that require date and time information Tray settings The paper type paper size and enabled modes can be set for each tray Automatic tray switching and disabling of two sided printing on letterhead paper can also be set See page 19 and 20 for details on setting the paper type and paper size To select which trays can be used in each of copy printer and fax modes select the checkboxes of the desi...

Страница 55: ...operation panel or touch the EXIT key on the touch panel STORING A JOB PROGRAM 1 Press the key 2 Touch the STORE DELETE key 3 Touch a program number from 1 to 10 in the storage register screen 4 Select the copy settings that you wish to store in the program The number of copies cannot be stored 5 Touch the OK key The selected settings will be stored under the program number selected in step 3 If a...

Страница 56: ...program number of the program to be deleted If a number key for which no job program has been stored is selected the proceed to step 4 on the previous page for storing a job program 4 Touch the DELETE key The selected program will be deleted and you will return to the screen of step 3 If the CANCEL key is touched you will return to the screen of step 3 without deleting the program If you are finis...

Страница 57: ... copy mode fax mode network scanner mode and printer mode in the key operator programs See the Key operator s guide To print in printer mode when auditing mode is enabled enter your account number in the printer driver setup screen on your computer Note ENTER YOUR ACCOUNT NUMBER ACC C S SPECIAL MODES 2 SIDED COPY OUTPUT READY TO COPY AUTO EXPOSURE AUTO A4 PAPER SELECT 100 COPY RATIO A4 ORIGINAL 0 ...

Страница 58: ...s tray A copy job stops before it is finished The contrast of the touch panel is too high or too low Image cannot be rotated Original size is not selected automatically or copying does not take place on paper that matches the original size 60 Paper size for a paper tray cannot be set Order of copies is incorrect The job is cancelled after the originals were being scanned Not all pages are copied T...

Страница 59: ...the paper in the tray selected for copying 48 TONER SUPPLY IS LOW The toner cartridge must be replaced soon 71 CHANGE THE TONER CARTRIDGE The toner cartridge is out of toner Replace the toner cartridge 71 CHECK THE TONER CARTRIDGE Make sure that the toner cartridge is installed correctly 71 THE DOCUMENT FEEDER IS DISABLED The RSPF has been disabled in the key operator programs Use the document gla...

Страница 60: ...your authorised service representative MAINTENANCE REQUIRED It is time for regular maintenance Contact your authorised service representative CALL FOR SERVICE CODE Turn off the power and then turn it back on If this does not clear the message write down the 2 digit main code and 2 digit sub code and promptly contact your authorised service representative PLEASE CHECK THE ORIGINAL SIZE JOB IS CANCE...

Страница 61: ...ne to normal operation 14 Copy mode is not selected Press the COPY key to select copy mode 10 Two sided copying is not possible Automatic two sided copying was attempted on paper that is not suitable for automatic two sided copying Two sided copying is not possible on special paper Use paper that is suitable for automatic two sided copying 27 Two sided copying is prohibited in the key operator pro...

Страница 62: ... 63 Paper tray settings are prohibited in the key operator programs Change the setting in the key operator programs to permit paper tray settings Key operator s guide Order of copies is incorrect The originals were placed in the wrong order When using the document glass scan the originals one sheet at a time beginning from the first page When using the RSPF insert the originals with the first page...

Страница 63: ... tray exceeds the maximum number Do not place more than the maximum number of sheets 15 The bypass guide is not adjusted to the size of the loaded paper Adjust the bypass guide to the size of the loaded paper 18 Paper misfeeds The paper is outside of the specified size and weight range Use copy paper within the specified range 15 Paper is curled or damp Do not use curled or crimped paper Replace w...

Страница 64: ... different size of paper was loaded in the tray Be sure to change the tray s paper size setting when loading a different size of paper in the tray 19 For AB metric countries An inch paper size is being used When using copy paper that is an inch size set the original size manually For inch metric countries An AB paper size is being used When using copy paper that is an AB size set the original size...

Страница 65: ...isfeed Misfeed in the RSPF p 64 Misfeed in the finisher p 69 Misfeed in the machine p 65 p 66 Misfeed in the bypass tray p 65 Misfeed in the upper paper tray p 67 Misfeed in the lower paper tray p 68 MISFEED REMOVAL GUIDANCE Misfeed removal guidance can be displayed by touching the INFORMATION key on the touch panel after a misfeed has occurred If the fax option is installed all received faxes are...

Страница 66: ...remove the misfed original from the exit area If the misfed original cannot be easily removed from the exit area open the moveable part of the document feeder tray and remove the reversing tray and then remove the original 2 Open and close the RSPF to clear the misfeed message from the touch panel The message can also be cleared by opening and closing the document feeder cover or the document tran...

Страница 67: ...y and the side cover 2 Press gently on both sides of the front cover and pull it open 3 Carefully remove the misfed paper Turn the roller rotating knob in the direction of the arrow to assist in removing it Be careful not to tear the misfed paper during removal If paper is misfeed here go to A Misfeed in the paper feed area below If paper is misfed go to B Misfeed in the fusing area p 66 The fusin...

Страница 68: ...he fusing unit paper guide knob to open the paper guide and carefully remove the misfed paper 6 Close the fusing unit paper guide and press down on the fusing unit release levers 7 Close the front cover and side cover Make sure that the misfeed message is cleared The fusing unit is hot Do not touch the fusing unit when removing misfed paper Doing so may cause a burn or injury Roller rotating knob ...

Страница 69: ...the machine before pulling the tray out p 65 1 Lift and pull out the upper paper tray and then remove the misfed paper Be careful not to tear the misfed paper during removal 2 Replace the upper paper tray Push the upper paper tray in completely 3 Open and close the side cover Make sure that the misfeed message is cleared The message can also be cleared by opening and closing the front cover ...

Страница 70: ... x 500 sheet paper feed unit 1 Open the lower side cover 2 Remove the misfed paper Be careful not to tear the misfed paper during removal 3 If the misfed paper is not visible in step 2 lift and pull out the lower paper tray and remove the misfed paper Be careful not to tear the misfed paper during removal 4 Replace the lower paper tray Push the lower paper tray in completely 5 Close the lower side...

Страница 71: ... 1 Open the upper right side cover 2 Gently pull the misfed paper out Be careful not to tear the misfed paper during removal 3 Close the upper right side cover Make sure that the misfeed message is cleared MISFEED IN AN OUTPUT TRAY when a finisher AR FN5N is installed 1 Grasp the handle of the stapler compiler cover and pull to open the cover 2 Remove any misfed paper from the transport area A MIS...

Страница 72: ...move any misfed paper from the stapler compiler 4 Close the stapler compiler cover 5 If the offset tray is being used remove any misfed paper from the offset tray 6 If the top tray is being used open the top cover remove any misfed paper and close the top cover Make sure that the misfeed message is cleared ...

Страница 73: ...ge Do not hold the cartridge by the shutter Be sure to only shake the cartridge before the tape is removed 4 While pushing the lock release lever gently insert the toner cartridge along the guides until it clicks into place 5 Remove the tape from the shutter Pull the shutter out of the toner cartridge as shown in the illustration Discard the shutter 6 Close the front cover When running long copy j...

Страница 74: ...x from the stapler 3 Remove the staple cartridge from inside the staple box 4 Insert the new staple cartridge into the box until it clicks into place Insert the new cartridge by aligning the arrows on the cartridge with those on the box Check that the cartridge has locked into place by pulling it slightly 5 Remove the tape from the cartridge 6 Insert the staple box into the stapler unit until it c...

Страница 75: ... TONER QUANTITY AND TOTAL OUTPUT COUNT The approximate quantity of toner remaining and the total output count can be displayed as explained below The output count shows the combined output total of the copy fax and printer functions Checking the total output count and toner quantity Hold down the COPY key The total output count and toner quantity appear while the key is held down Each A3 11 x 17 p...

Страница 76: ...loth If necessary dampen the cloth with water Do not use thinner benzene or similar volatile cleaning agents THE BYPASS TRAY PAPER FEED ROLLER If misfeeds occur frequently when feeding envelopes or other thick paper from the bypass tray wipe the paper feed roller at the feed slot of the bypass tray with a soft clean cloth moistened with alcohol or water Do not spray flammable cleaner gas Gas from ...

Страница 77: ... AR NC5J 1 This optional expansion kit adds the network printer function 10 100 BASE TX PS3 EXPANSION KIT AR PK1 1 This kit offers PostScript 3 compatibility BARCODE FONT KIT AR PF1 1 This font set adds barcode printing capability NETWORK SCANNER EXPANSION KIT AR NS2 2 This allows the machine to be used as a network scanner FACSIMILE EXPANSION KIT AR FX7 This allows the machine can be used as a fa...

Страница 78: ... 1 Paper sizes that can be stapled B5 A4 A4R B4 A3 8 1 2 x 11 8 1 2 x 11 R 8 1 2 x 13 8 1 2 x 14 11 x 17 Stapling capacity 30 sheets 80 g m2 21 lbs Power supply Drawn from the machine Weight Approx 19 kg 42 lbs Dimensions Exit area 470 mm W x 511 mm D x 540 mm H 18 33 64 W x 20 1 8 D x 21 17 64 H Stapler compiler 562 mm W x 444 mm D x 109 mm H 22 9 64 W x 17 31 64 D x 4 19 64 H As a part of our po...

Страница 79: ...500 sheets 500 sheets Lower tray 500 sheets Weight Approx 6 1kg 13 5 lbs Approx 11 8kg 26 1 lbs Dimensions 596 mm W x 498 mm D x 97 mm H 23 15 32 W x 19 39 64 D x 3 53 64 H 596 mm W x 498 mm D x 194 mm H 23 15 32 W x 19 39 64 D x 7 53 64 H Power supply Drawn from the machine As a part of our policy of continuous improvement SHARP reserves the right to make design and specification changes for prod...

Страница 80: ... to 28 lbs for two sided original Size A5 to A3 5 1 2 x 8 1 2 to 11 x 17 Capacity Up to 100 sheets Thickness 13 mm 33 64 and below Power supply Drawn from the machine Detectable original sizes A5 A4 A4R B4 A3 5 1 2 x 8 1 2 5 1 2 x 8 1 2 R 8 1 2 x 11 8 1 2 x 11 R 8 1 2 x 14 11 x 17 Weight Approx 7 5 kg 16 6 lbs Dimensions 586 mm W x 457 mm D x 145 mm H 22 61 64 W x 17 9 64 D x 5 1 4 H As a part of ...

Страница 81: ... 2 x 11 1200dpi 7 5 copies min A3 11 x 17 8 copies min 8 1 2 x 14 8 5 copies min B4 8 1 2 x 13 9 copies min A4R 8 1 2 x 11 R 10 5 copies min B5R 13 5 copies min A5 B5 A4 5 1 2 x 8 1 2 8 1 2 x 11 1200dpi 7 5 copies min A3 11 x 17 8 copies min 8 1 2 x 14 8 5 copies min B4 8 1 2 x 13 9 copies min A4R 8 1 2 x 11 R 10 5 copies min B5R 13 5 copies min A5 B5 A4 5 1 2 x 8 1 2 8 1 2 x 11 Continuous copy Ma...

Страница 82: ...s 623mm W x 609 5mm D x 785 5mm H 24 17 32 W x 24 D x 30 15 16 H Operating conditions Temperature 15 C to 30 C 59 F to 86 F Humidity 20 to 85 Noise level Sound Power Level LwA 1B 10dB Copying 6 3 B Standby 3 6 B Sound Pressure Level LpA bystander positions Copying 50 dB A Standby 25 dB A Sound Pressure Level LpA operator position Copying 51 dB A Standby 20 dB A Noise emission measurement in accord...

Страница 83: ...se 3 20097 Hamburg Telephone number to access MSDS 040 2376 2185 For more information 040 2376 2613 United Kingdom Sharp Electronics U K Ltd Telephone number for information 08705 274 277 France Sharp Electronics France S A Telephone number for information 01 49 90 34 00 Austria Sharp Electronics GMBH Telephone number for information 01 727 19 0 Italy Sharp Electronics Italy S P A Telephone number...

Страница 84: ...ersonnel Ingestion Rinse with water and drink several glasses of water If irritation or discomfort does occur consult medical personnel 5 FIRE FIGHTING MEASURES Extinguishing Media Water CO2 foam and dry chemicals Special Fire fighting Procedures None Fire and Explosion Hazards Toner material like most finely divided organic powders may form an explosive mixture 6 ACCIDENTAL RELEASE MEASURES Perso...

Страница 85: ... explosion like most finely divided organic powders Conditions to Avoid Electric discharge throwing into fire Materials to Avoid Oxidizing Materials Hazardous Decomposition Products CO CO2 and NOX Further Information None 11 TOXICOLOGICAL INFORMATION Acute Toxicity Ingestion oral LD50 2000mg kg Rats Inhalation LC50 4 97mg L Eye irritation Not an irritant Rabbits Skin irritation Not an irritant Rab...

Страница 86: ...s or order under TSCA SARA Superfund Amendments and Reauthorization Act Title III 302 Extreme Hazardous Substance None 311 312 Hazard Classification None EU Information 1999 45 EC and 67 548 EEC Symbol Indication Not required R Phrase Not required 76 769 EEC All chemical substances in this product comply with all applicable rules or order under 76 769 EEC 16 OTHER INFORMATION NFPA Rating USA Healt...

Страница 87: ...20097 Hamburg Telephone number to access MSDS 040 2376 2185 For more information 040 2376 2613 United Kingdom Sharp Electronics U K Ltd Telephone number for information 08705 274 277 France Sharp Electronics France S A Telephone number for information 01 49 90 34 00 Austria Sharp Electronics GMBH Telephone number for information 01 727 19 0 Italy Sharp Electronics Italy S P A Telephone number for ...

Страница 88: ...stion Rinse with water and drink several glasses of water If irritation or discomfort does occur consult medical personnel 5 FIRE FIGHTING MEASURES Extinguishing Media Water CO2 foam and dry chemicals Special Fire fighting Procedures None Fire and Explosion Hazards Toner material like most finely divided organic powders may form an explosive mixture 6 ACCIDENTAL RELEASE MEASURES Personal Precautio...

Страница 89: ...ke most finely divided organic powders Conditions to Avoid Electric discharge throwing into fire Materials to Avoid Oxidizing Materials Hazardous Decomposition Products CO CO2 and NOX Further Information None 11 TOXICOLOGICAL INFORMATION Acute Toxicity Ingestion oral LD50 2500mg kg Rats Inhalation No data Eye irritation No data Skin irritation Not an irritant Rabbits Skin sensitizer No sensitizati...

Страница 90: ...le rules or order under TSCA SARA Superfund Amendments and Reauthorization Act Title III 302 Extreme Hazardous Substance None 311 312 Hazard Classification None EU Information 1999 45 EC and 67 548 EEC Symbol Indication Not required R Phrase Not required 76 769 EEC All chemical substances in this product comply with all applicable rules or order under 76 769 EEC 16 OTHER INFORMATION NFPA Rating US...

Страница 91: ... CLEAR key 10 22 23 Clock 50 Colour paper 15 Copy finishing functions Group copy 35 Offset function 35 Sort copy 35 Staple sort 37 COPY key 21 71 73 Copy number display 21 Copy ratio display 21 COPY RATIO key 21 31 32 Cover copy 48 COVER key 39 49 Custom settings 50 CUSTOM SETTINGS key 10 19 20 51 D DELETE key 54 DETAIL key 12 Disabling of two sided printing on letterhead paper 52 Display contrast...

Страница 92: ...upper exit area 69 Misfeed in the upper paper tray 67 Misfeed removal Bypass tray 65 Centre tray 67 Lower paper tray 68 Machine 65 Output tray 69 RSPF 64 Upper exit tray 69 Upper paper tray 67 Misfeed removal guidance 63 Mixed feeding 25 Mode select keys 10 Mode switching key 12 Multi shot copy 46 MULTI SHOT key 39 46 N Network scanner expansion kit 75 Normal copying document glass 22 RSPF 23 Numb...

Страница 93: ... cover 9 66 Side cover handle 9 Sort copy 35 SORT key 36 Special modes Cover copy 48 Dual page copy 43 Erase copy 42 Job build mode 45 Margin shift copy 41 Multi shot copy 46 Original size 47 Pamphlet copy 44 SPECIAL MODES key 21 39 40 Special papers Envelope 16 Letterhead paper 16 special papers 26 Specifications 79 Staple box 72 Staple cartridge 72 Staple cartridge replacement 72 Staple cover 73...

Страница 94: ...t copying 46 Offset function using 35 Original size specifying 47 Pamphlet copying 44 Selecting finishing functions Group copying 35 Offset function 35 Sort copying 35 Staple sort function 37 Sort copying using 35 Special modes using Cover copy 48 Dual page copy 43 Erase copy 42 Job build mode 45 Margin shift copy 41 Multi shot copy 46 Original size 47 Pamphlet copy 44 Staple sort function using 3...

Страница 95: ...MEMO ...

Страница 96: ...MEMO ...

Страница 97: ...MEMO ...

Страница 98: ...urposes Any connection to this terminal may cause malfunctions of the copy machine Instruction for service technician The cable length for the service terminal has to be less than 3 m 10 feet RSPF connector Finisher connector Parallel connector USB connector CLASS 1 LASER PRODUCT LASER KLASSE 1 ...

Страница 99: ...diately and disposed of in a safe manner Under no circumstances should the cut off plug be inserted elsewhere into a 13A socket outlet as a serious electric shock may occur To fit an appropriate plug to the mains lead follow the instructions below IMPORTANT The wires in this mains lead are coloured in accordance with the following code GREEN AND YELLOW Earth BLUE Neutral BROWN Live As the colours ...

Страница 100: ...TED IN CHINA 2003H KS TINSE1005QSZ1 AR M236 AR M276 for copier Printed on 100 post consumer recycled paper SHARP CORPORATION SHARP ELECTRONICS U K LTD Sharp House Thorp Road Newton Heath Manchester M40 5BE ...

Отзывы: