Sharp AR-BC320 Скачать руководство пользователя страница 46

2-24

TROUBLESHOOTING

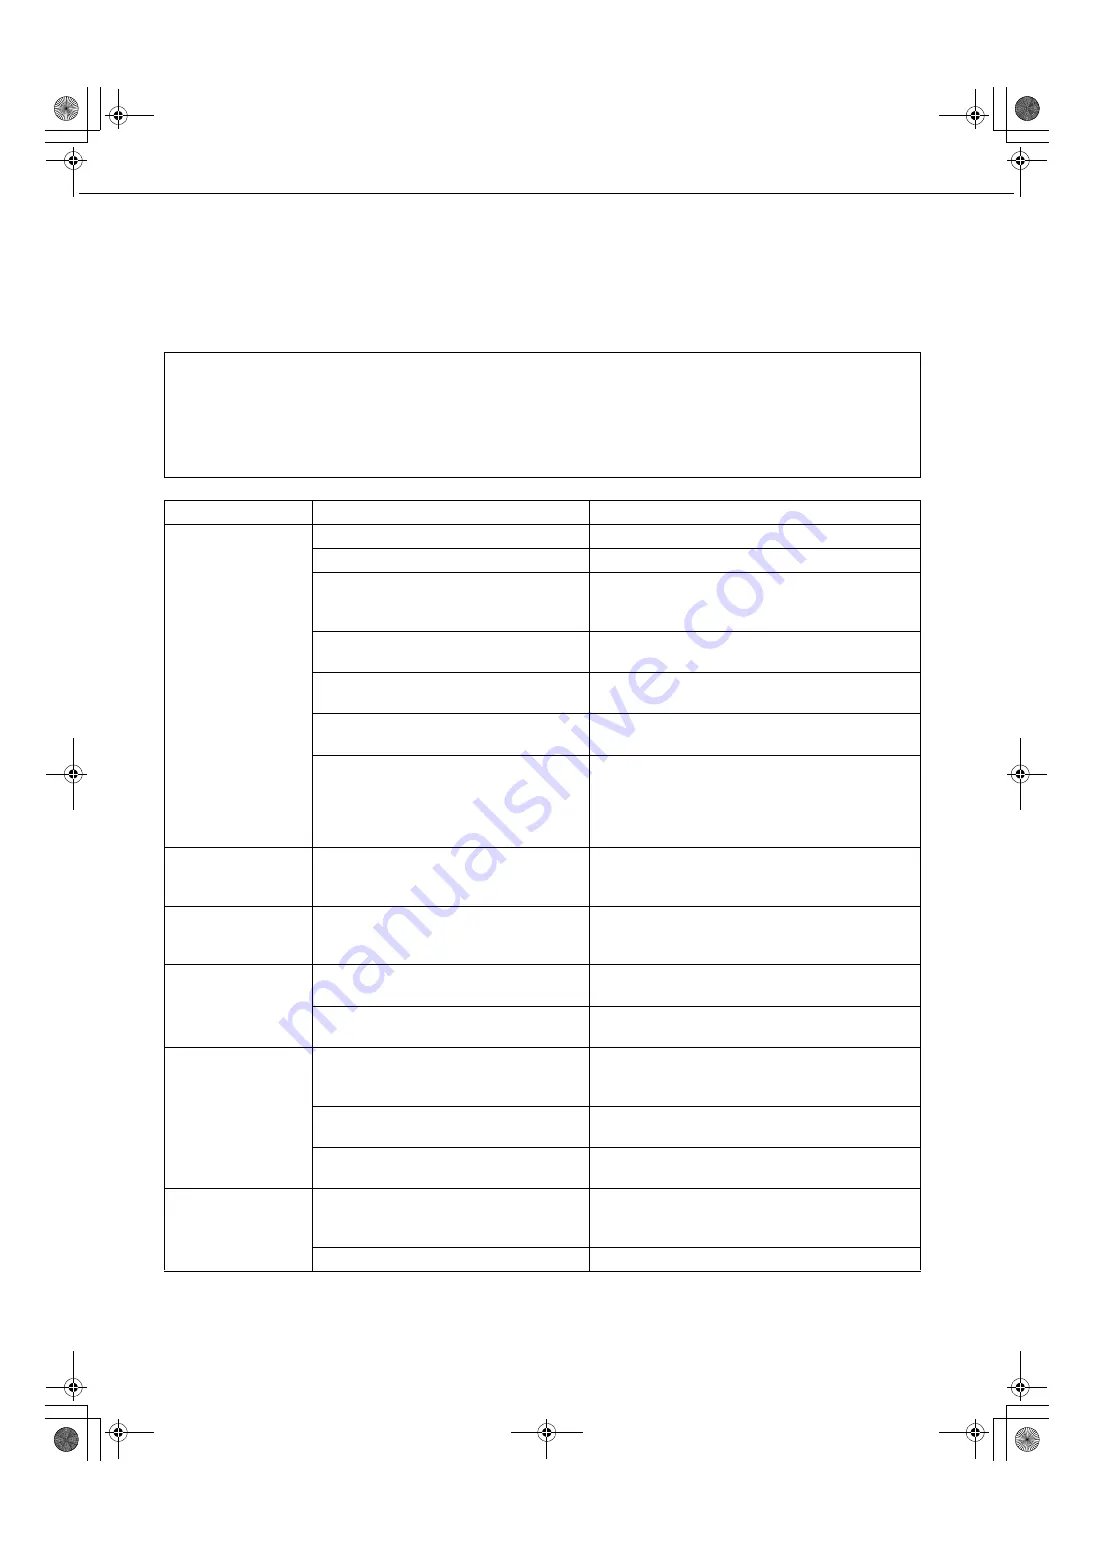
Check the following troubleshooting list before requesting service as many problems can be fixed by the user. If you
are unable to solve the problem by checking the list, turn off the power switch, unplug the power cord.
Problems related to general use of the machine are described below. For problems related to the copy function, see
page 7-4. For fax, printer, and network scanner problems, see the manuals for those functions. For peripheral device
problems, see the explanation of the device.

If the message "CALL FOR SERVICE. CODE:**-**" appears in the touch panel, turn off the power switch, wait
about 10 seconds, and then turn the power switch back on. If the message still appears after turning the switch
off and on several times, it is likely that a failure has occurred and maintenance would be required. In this event,
stop using the machine, unplug the power cord, and contact your Sharp dealer.
Note : Letters and numbers appear in "**-**" above. When you contact your Sharp dealer, please tell your dealer

what letters and numbers appear.

Problem

Check

Solution or cause

The machine does
not operate.

Printer plugged in?

Plug the printer into a grounded outlet.

Power switch on?

Turn on the power switch.

READY indicator off?

The printer is warming up. (Warm-up time is
approximately 99 seconds.) Wait until the
READY indicator lights up.

Message indicating need to load paper
displayed?

Load paper. (page 2-2)

Message indicating need to replace the
toner cartridge displayed?

Replace the toner cartridge.(page 2-15)

Message indicating a paper misfeed
displayed?

Remove misfed paper. (page 2-18)

A message appears saying that the
power must be turned off and then
turned on.

Turn off the power switch, wait about 10 seconds,
and then turn on the switch again. If the same
message appears after turning the power switch off
and on several times, it is possible that the machine
needs service. In this event, contact your dealer.

Copying/printing is
not possible.

A message appears saying that this type
of paper cannot be used for two-sided
copying.

Two-sided printing is not possible on special
paper. Use paper that can be used for automatic
two-sided printing. (page 2-10)

Incorrect bypass
tray paper size.

Incorrect display of paper sizes 12" x 18",
11" x 17", 8-1/2" x 14", 8-1/2" x 13", 8-1/2"
x 11"R, A3W, A3, B4, or A4R only.

When loading sizes 12" x 18", 11" x 17", 8-1/2" x
14", 8-1/2" x 13", 8-1/2" x 11"R, A3W, A3, B4, or
A4R, be sure to open the tray extension.

Copying/printing on
paper from the
bypass tray is
skewed.

The number of sheets placed on the bypass
tray exceeds the maximum number.

Do not place more than the maximum number of
sheets.

The bypass guide is not adjusted to the
size of the loaded paper.

Adjust the bypass guide to the size of the loaded
paper.

Paper from the
bypass tray
misfeeds.

The paper size and paper type have not
been set.

Be sure to set the paper size and paper type
when using special size or special type papers.
(page 2-12)

The number of sheets placed on the bypass
tray exceeds the maximum number.

Do not place more than the maximum number of
sheets.

The bypass guide is not adjusted to the
size of the loaded paper.

Adjust the bypass guide to the size of the loaded
paper.

Printing stops
before the job is
finished.

If too many pages collect on the output
tray, the tray full sensor activates and
stops printing.

Remove the paper from the output tray.

You have run out of paper.

Load paper. (page 2-2)

WhaleII_general-copy_SEC.book  24 

ページ


2004年9月14日 火曜日 午前11時45分

Содержание AR-BC320

Страница 1: ...n Duplex bypass inverter unit and Stand 3 x 500 sheet paper drawer NA KS1 CZZ Be sure to become thoroughly familiar with this manual to gain the maximum benefit from the product Before installing this product be sure to read the installation requirements and cautions sections Be sure to keep all operation manuals handy for reference including this manual the Operation manual for general informatio...

Страница 2: ...ht laws The power switch positions are marked I to indicate power ON and to indicate stand by In the stand by position power is being supplied to a drying heater within the optical system of the copier Caution For complete electrical disconnection pull out the main plug The socket outlet shall be installed near the equipment and shall be easily accessible FOR YOUR RECORDS To protect against loss o...

Страница 3: ...Part 1 General Information WhaleII_general copy_SEC book 1 ページ 2004年9月14日 火曜日 午前11時45分 ...

Страница 4: ...WhaleII_general copy_SEC book 2 ページ 2004年9月14日 火曜日 午前11時45分 ...

Страница 5: ...nner This manual explains the procedures for using the machine as a network scanner when connected to a computer The Operation manual for printer and the Operation manual for network scanner are provided as PDF files on the supplied CD ROM These manuals are not provided as printed manuals NOTES Considerable care has been taken in preparing this manual If you have any comments or concerns about the...

Страница 6: ...unlight poorly ventilated subject to extreme temperature or humidity changes e g near an air conditioner or heater 4 Be sure to allow the required space around the machine for servicing and proper ventilation A small amount of ozone is produced within the copier during operation The emission level is insufficient to cause any health hazard NOTE The present recommended long term exposure limit for ...

Страница 7: ...king and unlocking the casters and the adjusters see page 0 4 Left side Right side Bypass tray Exit tray Handles Handles Caution Two people are required to lift and carry this machine If the machine is to be left unused for a long time If the machine is to be left unused for a month or longer follow the procedure on pages 2 6 and 2 7 to release the pressure on the fusing roller Before lifting the ...

Страница 8: ...erson to prevent injury 7 When connecting this machine to a computer be sure to first turn both the computer and the machine off 8 Do not make copies of anything which is prohibited from copying by law The following items are normally prohibited from printing by national law Other items may be prohibited by local law Money Stamps Bonds Stocks Bank drafts Checks Passports Driver s licenses BATTERY ...

Страница 9: ...e and paper size in the bypass tray 2 12 CUSTOM SETTINGS 2 13 Operation procedure common to all custom settings 2 13 About the settings 2 14 REPLACING THE TONER CARTRIDGES 2 15 STORAGE OF SUPPLIES 2 17 MISFEED REMOVAL 2 18 Misfeed removal guidance 2 18 Misfeed in the paper feed area 2 19 Misfeed in the transport area fusing area and exit area 2 20 Misfeed in the stand 1 x 500 sheet paper drawer 2 ...

Страница 10: ... operation procedure for using the special functions 6 3 Margin shift 6 4 Erase 6 5 Dual page copy 6 6 Centering 6 7 Transparency film with insert sheets 6 8 Covers 6 9 B W reverse 6 10 COLOR ADJUSTMENTS MENU 6 11 RGB adjust 6 12 Sharpness 6 13 Suppress background 6 13 Color balance 6 14 Brightness 6 15 Intensity 6 15 IMAGE EDIT MENU 6 16 Single color 6 17 Mirror image 6 17 Photo Repeat 6 18 Multi...

Страница 11: ...uct Page INTRODUCTION 1 2 MAIN FEATURES 1 2 PART NAMES AND FUNCTIONS 1 4 Exterior 1 4 Interior 1 5 Part names and functions of peripheral devices 1 6 Operation panel 1 8 Touch panel 1 9 AUDITING MODE 1 11 Using the machine when the auditing mode is enabled 1 11 WhaleII_general copy_SEC book 1 ページ 2004年9月14日 火曜日 午前11時45分 ...

Страница 12: ...ait the landscape orientation size indication will contain an R These are indicated as 8 1 2 x 11 R 5 1 2 x 8 1 2 R A4R B5R etc Sizes that can be placed only in the landscape orientation 11 x 17 8 1 2 x 14 8 1 2 x 13 A3 B4 do not contain the R in their size indication Size indication with R Landscape orientation Size indication without R Portrait orientation MAIN FEATURES 1 Full color copies with ...

Страница 13: ...ing modes to help conserve natural resources and reduce environmental pollution Preheat mode Preheat mode automatically reduces the temperature of the fusing unit after the time set in the key operator programs elapses when the machine is on standby This allows the machine to use less power while on standby The machine automatically returns to normal operation when a key is pressed on the operatio...

Страница 14: ...tray See page 5 5 Finished sheets are deposited here Bypass tray Special papers including transparency film and copy paper can be fed from the bypass tray Stand 1 x 500 sheet paper drawer See page 2 7 Stand 3 x 500 sheet paper drawer See page 2 7 Duplex module 2 x 500 sheet paper drawer See page 2 8 Paper tray Each tray can hold approximately 500 sheets of the recommended paper for color 21 lbs or...

Страница 15: ...hen indicated on the operation panel See page 2 15 Right side cover Open when a misfeed has occurred in the paper feed area Right cover of paper drawer Open this cover to remove paper misfed in the paper drawer CAUTION The fusing unit is hot Take care in removing misfed paper WhaleII_general copy_SEC book 5 ページ 2004年9月14日 火曜日 午前11時45分 ...

Страница 16: ... SHARP standard paper 21 lbs or 80 g m2 To perform two sided printing a duplex bypass inverter unit AR RB1 is required Stand 3 x 500 sheet paper drawer AR D18N This stand has three paper trays Each tray can hold approximately 500 sheets of the recommended paper for color 21 lbs or 80 g m2 or approximately 500 sheets of SHARP standard paper 21 lbs or 80 g m2 Saddle stitch finisher AR F13 The finish...

Страница 17: ...tray This product has two exit trays center tray and left tray The paper specifications page 8 3 and output conditions differ for each tray however if the paper and output conditions are such that the paper can be delivered to either tray you can select the tray to which the paper will go Paper exits to the center tray face down only Paper exits to the left tray face up only However if a duplex by...

Страница 18: ...y Press to select the copy mode JOB STATUS key Press to display the current job status See page 1 10 CUSTOM SETTINGS key Use to adjust the contrast of the touch panel or to set key operator programs See page 2 13 Numeric keys Use to enter number values for various settings key ACC C key This is used when the copy network scan and fax functions are used P key This is used as a program key when usin...

Страница 19: ...stered to function if the OK key is touched Example 2 When the machine is used in the copy mode the functions shown in the table below can only be set or canceled on the special feature screen by alternate touches of the function keys on the panel Example 3 When the machine is used in the copy mode and a special feature is selected a corresponding icon representing the feature will appear on the t...

Страница 20: ...creen of fax mode The key is used to switch the job list display between JOB QUEUE and COMPLETE JOB QUEUE Shows stored jobs and the job in progress COMPLETE Shows finished jobs PRINT JOB key Use to display the print job list for printer copy and fax mode SCANNER JOB key This displays a list of jobs that only used the network scanner function FAX JOB key This displays the transmission reception sta...

Страница 21: ...r copy mode Account counter enabled for both the color copy and the black and white copy modes The account counter is enabled only for the color copy mode When the key ACC C key or the COLOR COPY START key is pressed the message at left appears In this case enter your 5 digit account number as explained on the next page to gain access to the copier functions NOTES When the account counter is turne...

Страница 22: ...llow the appropriate steps to perform the copy job When copying is begun the following message will appear In the case of interrupt copying page 6 27 the following message will appear 3 When the copy job is finished press the key ACC C key NOTE If Account number security is turned on in the key operator programs the following message will appear in the event that an incorrect account number is ent...

Страница 23: ...drawer 2 8 Specifications of paper trays 2 9 Setting the paper type except the bypass tray 2 11 Setting the paper size when an extra size is loaded 2 11 Setting the paper type and paper size in the bypass tray 2 12 CUSTOM SETTINGS 2 13 Operation procedure common to all custom settings 2 13 About the settings 2 14 REPLACING THE TONER CARTRIDGES 2 15 STORAGE OF SUPPLIES 2 17 MISFEED REMOVAL 2 18 Mis...

Страница 24: ...being loaded If a special size paper is loaded in the paper tray set the size slide to EXTRA to inform the machine that a special size paper has been loaded When AB based size paper is loaded move the size slide to EXTRA Note that setting the size slide to EXTRA only informs the machine that a special size of paper has been loaded it does not inform the machine of the specific size If you wish to ...

Страница 25: ...paper from the previous paper be sure to set the new paper type as explained in Setting the paper type page 2 11 7 Changing paper size in paper tray 1 is now complete NOTE If the size slide position step 2 of page 2 2 is not set correctly after changing the paper size or if the paper type page 2 11 is not set correctly incorrect paper selection or paper misfeeding may occur WhaleII_general copy_SE...

Страница 26: ...e up If the bypass tray guides are set wider than the copy paper the inside of the machine may become soiled resulting in smudges on succeeding copies Special purpose papers other than SHARP recommended transparency film must be fed individually Multiple sheets of SHARP recommended transparency film can be loaded in the bypass tray 4 Set the type and size of the paper loaded in the bypass tray If ...

Страница 27: ...paper remaining in the tray combine it with the paper to be added and reload as a single stack Do not use paper that has already been printed on by a plain paper fax machine or a laser printer This may cause printed images to become dirty When printing on transparency film be sure to remove each sheet as it exits the machine Allowing sheets to stack in the output tray may cause curling Use only SH...

Страница 28: ... 10 mm from the edges of the envelope Print quality is not guaranteed on parts of envelopes where there is a large step like change of thickness such as on three layer or four layer envelopes Print quality is not guaranteed on envelopes having peel off flaps for sealing the envelopes Fusing unit pressure adjusting levers In some cases damage to the envelopes color deviations or smudging may occur ...

Страница 29: ...fications are subject to change for improvement without notice A B B Front side of fusing unit Normal position Lower pressure position A Rear side of fusing unit NOTE If the size of paper being loaded is different from the previous size or is an extra size or if the paper type is different from the previous type you must change the paper tray settings in the custom settings Change the settings as ...

Страница 30: ...he paper tray settings in the custom settings Change the settings as explained in Setting the paper type and Setting the paper size when an extra size is loaded on page 2 11 Name Duplex module 2 x 500 sheet paper drawer AR D19N Paper size weight 11 x 17 8 1 2 x 14 8 1 2 x 13 8 1 2 x 11 8 1 2 x 11 R 7 1 4 x 10 1 2 R 5 1 2 x 8 1 2 Extra A3 B4 A4 A4R B5 B5R A5 17 to 28 lbs or 64 to 105 g m2 Paper cap...

Страница 31: ...ray Special paper Refer to the next page for applicable special papers Heavy paper Heavy paper 1 5 1 2 x8 1 2 12 x18 A6R A3W Special paper weight 28 to 54 lbs 106 to 200 g m2 Postcard See More information on special media that can be used on the next page Heavy paper 2 5 1 2 x8 1 2 12 x18 A6R A3W Special paper weight 54 to 80 lbs 201 to 300 g m2 Transparency film Transparency film Envelopes Standa...

Страница 32: ...n paper SHARP standard paper 21 lbs 80g m2 Restrictions on paper other than SHARP standard paper 17 to 28 lbs or 64 to 105g m2 Recycled colored pre punched pre printed and letterhead papers must conform to the same conditions as above Type Remarks Special paper Heavy paper heavy paper 1 For paper sizes from 5 1 2 x 8 1 2 to 12 x 18 A6R to A3W paper weights from 28 to 54 lbs 106 to 200 g m2 can be ...

Страница 33: ...you can enter the dimensions of the paper To set the paper size when an extra size of paper is loaded in the bypass tray see page 2 12 1 Perform steps 1 through 4 of Setting the paper type at left 2 Touch the key to display the paper size setting screen 3 When the loaded paper size appears in the display if you loaded an AB based size such as A4 touch the size key to highlight it and then touch th...

Страница 34: ...h quality image 5 Touch the type of envelope and go to step 7 6 If you inserted a non standard size of paper in the bypass tray remove the checkmark from ENABLE AUTO SIZE DETECTION and then touch the EXTRA SIZE tab When the screen opens the X key will be highlighted Use the and touch keys to enter the X dimension If you inserted a standard size of paper in the bypass tray make sure that a checkmar...

Страница 35: ...isplay keyboard used for storing and editing destinations in the English character entry screen Key operator program These are programs that are used by the key operator administrator of the machine to configure machine settings A key appears for these settings in the custom settings menu screen For information on these settings see the key operator s guide These fax settings can be configured onl...

Страница 36: ...arker List print Used to print a list of the settings configured in the fax printer and network scanner function Clock adjust Use this to set the date and time in the machine s built in clock This clock is used by functions that require date and time information The format of the printed date can also be changed Tray settings The paper type paper size enabled modes and automatic tray switching can...

Страница 37: ...t the machine will stop and the following message will appear This indicates the color of toner that is low Yellow toner Magenta toner Cyan toner Black toner Y M C Bk NOTES There may be cases that copy images become light or uneven before the message is displayed depending on the way the machine is used If this occurs take out the toner cartridge by following the same steps as replacement shake it...

Страница 38: ...placed the machine automatically enters resolution adjustment mode In some cases this may take about 1 to 5 minutes NOTE A toner cartridge of a different color cannot be installed For instance a yellow cartridge cannot be installed in the cyan position NOTE Do not push the white area shown in the illustration The lock lever may come down CAUTION Do not throw the toner cartridge into a fire Toner m...

Страница 39: ...orously and will remain inside the cartridge without flowing out For best copying results be sure to use only Sharp Genuine Supplies which are designed engineered and tested to maximize the life and performance of Sharp products Look for the Genuine Supplies label on the toner package GENUINE SUPPLIES Supply and Consumables The supply of spare parts for a repair of the appliance is guaranteed for ...

Страница 40: ...uring removal If paper is accidentally torn during removal be sure to remove all pieces Take care not to damage or leave fingerprints on the transfer belt when removing the misfed paper Misfeed in the fusing area and exit area page 2 20 Misfeed in the duplex bypass inverter unit page 2 22 Misfeed in the saddle stitch finisher page 3 10 Misfeed in the reversing automatic document feeder see page 7 ...

Страница 41: ...val 2 After removing the misfed paper open and close the duplex bypass inverter unit to reset Grasp the finger hold and gently open the unit After closing confirm that the misfeed message has been cleared and the normal display appears If the duplex bypass inverter unit is not installed close the side cover in the same way NOTE Paper misfed from a paper tray may be extending out of the tray into t...

Страница 42: ...the transfer belt remove it gently without touching the transfer belt Do not pull out the transfer unit 4 Gently close the duplex bypass inverter unit After closing confirm that the misfeed message has been cleared and the normal display appears If the duplex bypass inverter unit is not installed close the side cover in the same way NOTE If paper is loaded in the bypass tray temporarily remove the...

Страница 43: ... display appears Misfeed in the stand 3 x 500 sheet paper drawer To remove a misfeed in the upper middle or lower tray follow steps 1 through 5 above of Misfeed in the stand 1 x 500 sheet paper drawer NOTE Paper misfed from a paper tray may be extending out of the tray into the right side cover area In this case if the tray is drawn out of the machine the paper may become torn and difficult to rem...

Страница 44: ...t to tear the misfed paper during removal 7 Close the cover of the duplex bypass inverter unit and return the exit tray to its original position 8 Remove a misfeed from the bottom of the duplex bypass inverter unit Gently remove the misfed paper from the bottom of the duplex bypass inverter unit as shown in the illustration taking care not to tear the paper Make sure that there is no misfed paper ...

Страница 45: ...plex module Push the tray firmly all the way into the machine 12Gently close the duplex bypass inverter unit Misfeed in the upper or lower tray To remove misfed paper from the upper tray or lower tray follow steps 1 through 5 of Misfeed in the stand 1 x 500 sheet paper drawer on page 2 21 WhaleII_general copy_SEC book 23 ページ 2004年9月14日 火曜日 午前11時45分 ...

Страница 46: ...r must be turned off and then turned on Turn off the power switch wait about 10 seconds and then turn on the switch again If the same message appears after turning the power switch off and on several times it is possible that the machine needs service In this event contact your dealer Copying printing is not possible A message appears saying that this type of paper cannot be used for two sided cop...

Страница 47: ...Is paper other than SHARP recommended paper being used Use SHARP recommended paper Paper curled or damp Do not use curled or crimped paper If you do not use paper for a long time store paper in the wrapper in a dry location Is the paper curled and does it frequently misfeed in the duplex module 2 x 500 sheet paper drawer or saddle stitch finisher Paper may be curled when output depending on the pa...

Страница 48: ...WhaleII_general copy_SEC book 26 ページ 2004年9月14日 火曜日 午前11時45分 ...

Страница 49: ...sher 3 6 Staple cartridge replacement and staple jam removal 3 7 Misfeed in the saddle stitch finisher 3 10 Troubleshooting saddle stitch finisher problems 3 12 Stapling position quick reference guide for duplex output 3 13 Relation between print image and saddle stitch 3 14 LARGE CAPACITY TRAY 3 15 Part name 3 15 Specifications 3 15 Loading paper in the large capacity tray 3 16 Misfeed in the lar...

Страница 50: ... 105 g m2 Paper types Upper tray Same as paper specifications of the machine Lower tray Plain paper only Number of trays 2 offset tray saddle stitch tray Tray capacity Upper paper tray Non stapling 1000 sheets of paper 8 1 2 x 11 8 1 2 x 11 R A4 A4R B5 B5R 21 lbs or 80 g m2 500 sheets of paper Sizes other than 8 1 2 x 11 8 1 2 x 11 R A4 A4R B5 or B5R up to 10 envelopes or postcards inside the stap...

Страница 51: ...s 24 59 64 W x 23 3 4 D x 30 23 64 H 633mm W x 603mm D x 771mm H Weight Approximately 79 4lbs 36kg Overall dimensions when attached to machine 56 25 64 W x 26 5 8 D 1432mm W x 676mm D when tray is extended Remarks Paper output Upper tray Supports both face up and face down output Lower tray Face down output only Paper full detection Both upper and lower tray Offset function Upper tray only offset ...

Страница 52: ...ng capacity are shown below Printouts Original Printouts Original Offset mode Non offset mode Stapling positions Top left corner of printouts Lower left corner of printouts Portrait orientation Landscape orientation Available paper sizes 8 1 2 x 11 A4 and B5 Stapling capacity For each size up to 30 sheets can be stapled Same as above Available paper sizes 11 x 17 8 1 2 x 14 8 1 2 x 13 8 1 2 x 11 R...

Страница 53: ...be selected at the same time The automatic image rotation will not function when the hole punching function is used For the allowed paper sizes for punching see the specifications on page 3 3 When using the punch function in copy mode place the original with the top toward the inside of the machine If the original is not placed in this orientation punching will not take place at the correct positi...

Страница 54: ...perate when No is selected The offset checkmark is automatically cleared when the staple sort function is turned on CENTER TRAY key If the center tray is selected output paper will be delivered to the exit tray located above the main unit OK key Touch to close the OUTPUT screen and to return to the main screen SADDLE STITCH key See page 3 5 When saddle stitching is selected the copies will be stap...

Страница 55: ... 6 Insert a new staple cartridge into the staple box After inserting the staple cartridge press down on the staple box cover to lock the cartridge in place 7 Remove the tape from the staple cartridge by pulling it straight 8 Insert the staple box Push the staple box in until it clicks into place 9 Push the stapler section back into the finisher 10Close the front cover NOTE If staples remain the st...

Страница 56: ...ed open the saddle stitch section cover 6 Remove the misfed paper Be careful not to tear the misfed paper during removal 7 Close the saddle stitch section cover 8 Pull out the stapler section 9 Turn roller rotating knob A in the direction of the arrow to move the staple unit to the front Turn the roller rotating knob until the triangle mark is aligned with the index 10Remove the staple box Blue Ro...

Страница 57: ...gainst the main unit Disposal of hole punch scrap when the punch unit is installed 1 Unlatch the saddle stitch finisher and slide it away from the main unit 2 Pull out the punch scrap collecting container and empty it Discard the punch scraps in a plastic bag or other container taking care not to let the scraps scatter 3 Return the punch scrap collecting container to its original position 4 Push t...

Страница 58: ...ing knob B on the punch unit towards you and rotate it Only when an optional punch unit is installed Rotating roller rotating knob B releases the caught paper 4 Open the top cover 5 Remove the misfed paper Remove the paper gently taking care not to tear it 6 Close the top cover 7 Remove the misfed paper from the stapler compiler Be careful not to tear the misfed paper during removal 8 Open the sad...

Страница 59: ...he arrow 12Remove any misfed paper from the saddle stitch tray Be careful not to tear the misfed paper during removal 13Close the saddle stitch section cover 14Close the front cover 15Push the saddle stitch finisher back against the main unit WhaleII_general copy_SEC book 11 ページ 2004年9月14日 火曜日 午前11時45分 ...

Страница 60: ...that a staple cartridge has been installed See page 3 7 Different size paper included Stapling cannot be performed onto different size paper Is the paper badly curled preventing stapling Differences in paper quality and type may result in bad curling of output paper Take the paper out of the tray or bypass tray turn it around and reload it so that the top and bottom edges are reversed The punch ho...

Страница 61: ...osition stapling Two position stapling One position stapling One position stapling One position stapling Left binding with two position stapling is not possible Right binding with two position stapling is not possible Top binding with two position stapling is not possible Two position stapling along the shorter edge is not possible Two position stapling along the shorter edge is not possible Two p...

Страница 62: ... relationships Same as above Orientation of original or original data Output result Page 1 Page 3 Page 2 Page 4 Page 1 Page 2 Duplexed Page 3 Page 4 Duplexed Right binding Left binding Portrait orientation printing Page 1 Page 3 Page 2 Page 4 Page 1 Page 2 Duplexed Page 3 Page 4 Duplexed Left binding Right binding Landscape orientation printing Same as above WhaleII_general copy_SEC book 14 ページ 20...

Страница 63: ...e capacity tray the optional duplex module 2 x 500 sheet paper drawer or the stand 3 x 500 sheet paper drawer must also be installed Name LARGE CAPACITY TRAY AR LC8 Paper size 8 1 2 x 11 A4 Paper weight 17 to 28 lbs 64 to 105 g m2 Number of trays 1 tray Paper capacity 3 500 sheets 21 lbs or 80 g m2 Power supply Supplied from machine Dimensions 14 13 16 W x 21 15 32 D x 23 7 16 H 376 mm W x 545 mm ...

Страница 64: ...table The paper stack must not be higher than the indicator line up to 3 500 sheets of SHARP standard paper 21 lbs 80 g m2 If the paper type was changed be sure to change the appropriate settings as explained in Setting the paper type except the bypass tray See page 2 11 3 Push the tray firmly all the way into the machine The paper table will automatically rise to the paper feed position WhaleII_g...

Страница 65: ...area fusing area and exit area on page 2 20 3 Open the top cover 4 Remove the misfed paper Be sure not to tear the misfed paper during removal After removing the misfed paper close the top cover 5 Push the large capacity tray towards the main unit and latch it into place Gently push the large capacity tray back in until it stops 6 If misfed paper is not found in step 2 pull the tray out 7 Remove t...

Страница 66: ...WhaleII_general copy_SEC book 18 ページ 2004年9月14日 火曜日 午前11時45分 ...

Страница 67: ...Part 2 Copier Operation WhaleII_general copy_SEC book 1 ページ 2004年9月14日 火曜日 午前11時45分 ...

Страница 68: ...WhaleII_general copy_SEC book 2 ページ 2004年9月14日 火曜日 午前11時45分 ...

Страница 69: ...es Page PART NAMES AND FUNCTIONS The Reversing Automatic Document Feeder 4 2 Exterior 4 2 Operation Panel 4 3 Touch Panel main screen of copy mode 4 4 REVERSING AUTOMATIC DOCUMENT FEEDER 4 5 Acceptable originals 4 5 SETTING ORIGINALS 4 6 SELECTING THE ORIGINAL SIZE 4 8 STORING DELETING AND USING ORIGINAL SIZES 4 9 WhaleII_general copy_SEC book 1 ページ 2004年9月14日 火曜日 午前11時45分 ...

Страница 70: ...4 6 Adjust to the size of the originals Document feeder tray page 4 6 Set the originals here for automatic feeding RADF exit area cover page 7 2 Open to remove misfed originals RADF exit area Finished originals are output here Document cover Document glass All originals which cannot be copied from the document feeder tray must be copied here RADF is an acronym for Reversing Automatic Document Feed...

Страница 71: ...ed Numeric keys Use to select the number of copies and to make numerical entries for setting operations C key clear key Press to clear a copy quantity entry If this key is pressed while the reversing automatic document feeder is being used any originals in progress will be automatically output CA key clear all key This returns all copy mode settings to the default settings However the touch panel ...

Страница 72: ...iginal See page 12 of the key operator s guide Paper size display The display shows the location of the paper trays the size of the paper in the trays and the approximate amount of paper loaded in each tray The approximate amount of paper in a tray is indicated by Original size display Displays the original size only when an original is placed for copying Original display AUTO appears when the aut...

Страница 73: ...y cause an original misfeed Before loading originals into the document feeder tray be sure to remove any staples or paper clips If originals have damp spots from correction fluid ink or glue from pasteups be sure they are dried before they are fed If not the interior of the document feeder or the document glass may be soiled To prevent incorrect original size detection original misfeeds or smudges...

Страница 74: ... not place any objects under the original size detector because they may damage it or the original size may not be detected properly Original size detector R R 8 x14 or B4 11x17 or A3 8 x11 or A4 8 x11 or A4 5 x8 or A5 Original scale Centering scale Original scale Centering scale NOTE Original size detection function One of the four groups of standard original sizes shown below can be selected for...

Страница 75: ...r rotation such as enlarging the copy to greater than 8 1 2 x 11 A4 size or staple sorting with the saddle stitch finisher rotation will not be possible Example This function operates in both the auto paper select or auto image mode Rotation copying can be disabled with a key operator program See page 15 of the key operator s guide Document feeder tray Document glass Top Bottom Top Top Bottom Bott...

Страница 76: ...B INCH key once again If the original size is a non standard size touch the SIZE INPUT tab and then enter the X width and Y length dimensions of the original with the or key The X dimension width is initially selected Touch the Y key and enter the Y dimension length The range of original sizes that can be entered is as follows 3 Touch the OK key You will return to the initial screen 4 The selected...

Страница 77: ...nter X and then touch the key to enter Y A width of 2 1 2 to 17 inches can be entered in X and a length of 2 1 2 to 11 5 8 inches can be entered in Y 6 Touch the OK key The original size entered in step 5 is stored in the key selected in step 4 To exit touch the ORIGINAL key 7 When you touch a key that shows an original size in step 4 a message screen appears that contains the keys CANCEL DELETE a...

Страница 78: ...WhaleII_general copy_SEC book 10 ページ 2004年9月14日 火曜日 午前11時45分 ...

Страница 79: ... reversing automatic document feeder 5 2 Automatic two sided copying from the reversing automatic document feeder 5 6 Copying from the document glass 5 7 Automatic two sided copying from the document glass 5 9 EXPOSURE ADJUSTMENTS 5 10 REDUCTION ENLARGEMENT ZOOM 5 12 Automatic selection auto image 5 12 Manual selection 5 13 XY ZOOM 5 15 SPECIAL PAPERS 5 17 WhaleII_general copy_SEC book 1 ページ 2004年...

Страница 80: ...paper in a paper tray with paper of the required size Even if the message above is displayed copying can be performed onto the currently selected paper Note The following requirements must be satisfied Originals of a standard size 11 x 17 8 1 2 x 14 8 1 2 x 11 8 1 2 x 11 R or 5 1 2 x 8 1 2 A3 B4 A4 A4R B5 B5R or A5 are set and the auto paper select function is enabled If originals of a size other ...

Страница 81: ...n entry if a mistake has been made 9 Press the COLOR COPY START or BLACK COPY START key If the C key is pressed while originals are being scanned scanning will stop If copying had already started copying and scanning will stop after the original in progress is output to the original exit area In these cases the copy quantity will be reset to 0 NOTE The 1 sided to 1 sided copying mode is set as the...

Страница 82: ...per size Sort Group Sort Group One sided copying Color copying Up to 11 x 17 A3 12 x 18 A3W Black and white copying Up to 11 x 17 A3 12 x 18 A3W Automatic two sided copying Color copying Up to 8 1 2 x 11 A4 8 1 2 x 14 11 x 17 B4 A3 12 x 18 A3W Black and white copying Up to 11 x 17 A3 12 x 18 A3W Output mode Original type Original size No added memory Added memory 128 MB 256 MB Color copying Full c...

Страница 83: ...e COLOR COPY START key Set the number of copies 5 Touch the OUTPUT key Touch the SORT key Five sets of copies Sort is automatically selected when the original is placed on the document feeder tray of the reversing automatic document feeder SPECIAL MODES 2 SIDED COPY OUTPUT OUTPUT SORT GROUP Original Press the BLACK COPY START key Press the COLOR COPY START key Set the number of copies 5 Touch the ...

Страница 84: ...atic document feeder a duplex module 2 x 500 sheet paper drawer and a duplex bypass inverter unit are installed The display will vary depending on the equipment installed If a copy key is touched for a mode that cannot be selected a double beep will be sounded The image to be copied onto the second side of 2 sided copies can be inverted so that the resultant 2 sided copies are in the correct orien...

Страница 85: ... be satisfied Originals of a standard size 11 x 17 8 1 2 x 14 8 1 2 x 11 8 1 2 x 11 R or 5 1 2 x 8 1 2 A3 B4 A4 A4R B5 B5R or A5 are set and the auto paper select function is enabled If originals of a size other than the sizes above are to be copied manually select the desired paper size by touching the PAPER SELECT key and then touching the desired paper size selection key The selected key will b...

Страница 86: ... entry if a mistake has been made 6 Press the COLOR COPY START or BLACK COPY START key Replace the original with the next original and press the START key Repeat this operation until all originals have been scanned 7 Touch the READ END key If you selected Sort for the output in step 4 it is necessary to touch the READ END key NOTE If the SORT or GROUP key is touched its corresponding icon will app...

Страница 87: ...es of a one sided 11 x 17 A3 or 8 1 2 x 14 B4 size portrait original or when the front and back side of a two sided original are copied backwards touch the BINDING CHANGE key 4 Touch the OK key Make selections and proceed as in steps 3 to 7 on pages 5 7 and 5 8 NOTE Certain restrictions exist depending on the amount of memory installed and the copy settings See Copy mode output restrictions and Gu...

Страница 88: ...o select the mode Three resolution settings are available when this mode is selected TEXT PRINTED PHOTO TEXT and PRINTED PHOTO For brighter colors in color copies touch the COLOR TONE ENHANCEMENT checkbox The following restrictions apply when color tone enhancement is selected Color tone enhancement cannot be selected at the same time as COPY OF COPY mode above Brightness adjustment page 6 15 and ...

Страница 89: ...ensity originals 4 to 5 Originals written with pencils or light color characters Color adjustment menu As special functions for color copying the following color image adjustments can be made Page 6 11 RGB ADJUST SHARPNESS SUPPRESS BACKGROUND COLOR BALANCE BRIGHTNESS INTENSITY MANUAL PRIN PHOT TEXT 1 3 5 To return to the automatic exposure mode touch the EXPOSURE key and select AUTO NOTE The expos...

Страница 90: ...READ END key after all pages of the original have been scanned Step 7 on page 5 8 NOTE Automatic ratio adjustment can only be used for the following original and paper sizes It cannot be used for other sizes However in the case of non standard original and paper sizes the sizes can be entered to make automatic ratio adjustment possible for those sizes page 4 8 Original sizes 11 x 17 8 1 2 x 14 8 1...

Страница 91: ...rease the ratio or the key to decrease the ratio If you continue to touch either key for 3 seconds the ratio begins to change quickly 5 Touch the OK key AUTO 8 x11 PAPER SELECT 100 COPY RATIO READY TO COPY 100 ZOOM 77 64 121 129 XY ZOOM MENU AUTO IMAGE 2 1 0 OK 100 ORIGINAL PAPER SELECT COPY RATIO AUTO EXPOSURE AUTO AUTO 8 x11 11x17 8 x14 11x17 8 x11 8 x14 8 x11 8 x11 5 x8 8 x14 11x17 8 x11 11x17 ...

Страница 92: ...lass set the output to Sort you must touch the READ END key after all pages of the original have been scanned Step 7 on page 5 8 NOTE If the auto paper select display does not appear no appropriate paper size for the selected ratio is available Use the C clear key to cancel an entry if a mistake has been made To return the ratio to 100 To return the ratio setting to 100 touch the COPY RATIO key to...

Страница 93: ... change the ratio from 45 to 400 in increments of 1 Touch the key to increase the ratio or the key to decrease the ratio If you continue to touch either key for 3 seconds the ratio begins to change quickly 6 Touch the Y key Original Copy AUTO 8 x11 PAPER SELECT 100 COPY RATIO PLAIN 5 x8 READY TO COPY 100 ZOOM 77 64 121 129 XY ZOOM MENU AUTO IMAGE 2 1 0 OK 100 ORIGINAL PAPER SELECT COPY RATIO AUTO ...

Страница 94: ...he PAPER SELECT key and select the paper tray with the desired paper size If the AUTO PAPER SELECT mode is on the appropriate copy paper size will have been automatically selected based on the original size and selected copy ratios 10Make all other desired settings such as exposure paper size and number of copies and then press the COLOR COPY START or BLACK COPY START key ZOOM 77 Y A X 64 50 77 50...

Страница 95: ...ress the COLOR COPY START or BLACK COPY START key If you placed the original on the document glass set the output to Sort you must touch the READ END key after all pages of the original have been scanned Step 7 on page 5 8 AUTO EXPOSURE UTO ORIGINAL AUTO 8 x11 PAPER SELECT 100 COPY RATIO AIN AL x8 8 x11 NOTES Output location for copies on heavy paper 2 transparencies and envelopes Copies on these ...

Страница 96: ...WhaleII_general copy_SEC book 18 ページ 2004年9月14日 火曜日 午前11時45分 ...

Страница 97: ...y film with insert sheets 6 8 Covers 6 9 B W reverse 6 10 COLOR ADJUSTMENTS MENU 6 11 RGB adjust 6 12 Sharpness 6 13 Suppress background 6 13 Color balance 6 14 Brightness 6 15 Intensity 6 15 IMAGE EDIT MENU 6 16 Single color 6 17 Mirror image 6 17 Photo Repeat 6 18 Multi shot 6 19 11 x 17 A3 Full bleed 6 21 Multi page enlargement 6 22 Pamphlet copy 6 24 JOB PROGRAM MEMORY 6 25 Storing a job progr...

Страница 98: ...he special modes menu consists of two screens Touch the key to switch to the screen below The special modes below can be selected in the second screen 2 2 COLOR ADJUSTMENTS key page 6 11 Touch this key to display the color adjustments menu screen This allows you to select the special functions shown below for color adjustment when making color copies IMAGE EDIT key page 6 16 Touch this key to disp...

Страница 99: ...nt or image editing you will go to the menu screen for selection of the corresponding functions Setting procedures for modes requiring setting screens start on the next page The dual page copy centering transparency film with insert sheets B W reverse mirror image and 11 x 17 A3 full bleed functions do not require setting screens SPECIAL MODES 2 SIDED COPY MARGIN SHIFT CENTERING WhaleII_general co...

Страница 100: ...wer and duplex bypass inverter unit are not installed the margin shift setting for back side copies will not be displayed 4 Touch the OK key on the SPECIAL MODES screen Return to the main screen of copy mode The shift direction can be selected from right or left shift as shown in the illustration One sided copying Original Image shifted to the right Margin Two sided copying Original Or Margin Marg...

Страница 101: ...reen will appear The erase icon will also appear in the upper left of the screen to indicate that the function is turned on 2 Select the desired erase mode Select one of the three erase modes The selected key will be highlighted 3 Adjust the amount of erase and touch the OK key Use the and keys to adjust the erase width and then touch the OK key 4 Touch the OK key on the SPECIAL MODES screen Retur...

Страница 102: ... SELECT key to select 8 1 2 x 11 A4 size paper The dual page copy function can be used with reduction copying but cannot be used with enlargement copying The dual page copy function can be done only from the document glass The reversing automatic document feeder cannot be used with this function Only 8 1 2 x 11 A4 paper can be used Book original Dual page copy TRANSPARENCY INSERTS DUAL PAGE COPY O...

Страница 103: ...nal Copy This function can be used to reduce a larger sized original image and center it on a copy of smaller paper size as well as center a smaller original onto a larger sized copy This function will not work when non standard size originals or copy paper are used This function cannot be selected when enlargement copying has been selected About the steps that follow If a reversing automatic docu...

Страница 104: ...he transparency film To load paper in the bypass tray see pages 2 4 and 2 5 4 Touch the PAPER SELECT key and select the transparency film loaded in the bypass tray Touch the TRANSPARENCY key 5 Touch the SPEED MODE key or the QUALITY MODE key for the transparency film SPEED MODE is for fast printing QUALITY MODE is for a high quality image After touching either key followed by the OK key you will r...

Страница 105: ...d originals Two sided copies copying onto a cover Two sided originals 2 3 4 1 Cover original SHARP Two sided copies from one sided or two sided originals One sided copies from one sided or two sided originals 1 2 3 4 SHARP Cover original 2 3 4 1 SHARP Back cover no copying Front cover can copy onto front side Back side of cover is blank Selections for front cover back cover or front and back cover...

Страница 106: ...f the screen 3 Touch the OK key on the SPECIAL MODES screen Return to the main screen of copy mode OK CANCEL PRINT ON FRONT COVER YES NO About the steps that follow See pages 5 2 through 5 6 NOTE Be sure to place the originals in the document feeder tray of the reversing automatic document feeder The document glass cannot be used for this function NOTES During cover copying the stream feeding mode...

Страница 107: ...color copies BRIGHTNESS page 6 15 This copier allows the level of brightness to be adjusted If brightness is selected color tone can be darkened or lightened INTENSITY page 6 15 This copier allows the level of intensity to be adjusted If intensity is selected color saturation can be made to be more vivid or more dull SPECIAL MODES MARGIN SHIFT ERASE COVERS TRANSPARENCY INSERTS CENTERING OK DUAL PA...

Страница 108: ...turn to the COLOR ADJUSTMENTS menu screen 5 Touch the OK key on the COLOR ADJUSTMENTS menu screen Return to the SPECIAL MODES screen 6 Touch the OK key on the SPECIAL MODES screen Return to the main screen of copy mode OLOR ADJUSTMENTS RGB ADJUST SH COLOR BALANCE BR RGB ADJUST OK COLOR ADJUSTMENTS ONLY ONE COLOR CAN BE ADJUSTED R RED G GREEN B BLUE OK CANCEL 2 1 0 1 2 OK CANCEL 2 1 0 1 2 About the...

Страница 109: ...evel can be adjusted in three steps The default setting is level 3 3 Touch the OK key inside OK key on the SUPPRESS BACKGROUND setting screen Return to the COLOR ADJUSTMENTS menu screen 4 Touch the OK key on the COLOR ADJUSTMENTS menu screen Return to the SPECIAL MODES screen 5 Touch the OK key on the SPECIAL MODES screen Return to the main screen of copy mode T SHARPNESS NCE BRIGHTNESS S BA INT O...

Страница 110: ...g level or the key to decrease the density D Use this key to return the densities of all eight levels to the initial settings The initial color balance settings are the values set with key operator program Initial color balance setting See page 15 of the key operator s guide For this reason the initial settings may not necessarily be 0 the middle indicator position for all levels The initial setti...

Страница 111: ... upper left of the screen to indicate that the function is turned on 3 Touch the OK key inside OK key on the INTENSITY setting screen Return to the COLOR ADJUSTMENTS menu screen 4 Touch the OK key on the COLOR ADJUSTMENTS menu screen Return to the SPECIAL MODES screen 5 Touch the OK key on the SPECIAL MODES screen Return to the main screen of copy mode T SHARPNESS NCE BRIGHTNESS IN S BA OK CANCEL ...

Страница 112: ...nts divided images onto multiple sheets of copy paper for assembly into large composite copy PAMPHLET COPY page 6 24 The pamphlet copy function is used to arrange copies in proper order for eventual center stapling and folding into a booklet Two original pages are copied onto each side of copy paper Four pages are therefore copied onto one sheet A duplex module 2 x 500 sheet paper drawer and a dup...

Страница 113: ...l be highlighted to indicate that the function is turned on and the mirror image icon will appear in the upper left of the screen 2 Touch the OK key on the IMAGE EDIT menu screen Return to the SPECIAL MODES screen 3 Touch the OK key on the SPECIAL MODES screen Return to the main screen of copy mode IMAGE EDIT SINGLE COLOR 11x17 FULL BLEED M I MULT ENLA IMAGE EDIT 1 SINGLE COLOR 4 YELLOW 5 MAGENTA ...

Страница 114: ...inal size to 3 x 5 130 x 90 mm Four copies are made on a sheet of 8 1 2 x 11 A4 size paper Eight copies are made on a sheet of 11 x 17 A3 size paper Two copies are made on a sheet of 8 1 2 x 11 A4 size paper Four copies are made on a sheet of 11 x 17 A3 size paper Eight copies are made on a sheet of 8 1 2 x 11 A4 size paper 16 copies are made on a sheet of 11 x 17 A3 size paper 12 copies are made ...

Страница 115: ...t the desired paper size and select the copying mode before selecting the multi shot function on the special modes screen When using the multi shot function the appropriate copy ratio will be automatically set based on the original size paper size and the number of originals to be copied onto one sheet The minimum possible reduction ratio is 25 Depending on the original size paper size and the num...

Страница 116: ...n the BORDER LINE checkbox is selected borderlines are added around the borders of the images 5 Touch the OK key inside OK key on the MULTI SHOT setting screen Return to the IMAGE EDIT menu screen 6 Touch the OK key on the IMAGE EDIT menu screen Return to the SPECIAL MODES screen 7 Touch the OK key on the SPECIAL MODES screen Return to the main screen of copy mode OK AT MULTI SHOT OPY OK CANCEL OK...

Страница 117: ...key on the SPECIAL MODES screen Return to the main screen of copy mode 4 Load 12 x 18 A3W copy paper into the bypass tray Adjust the bypass guide to 12 x 18 width before loading the paper Remove any paper remaining in the tray Pull out the tray extension and wire extension See page 2 4 5 Touch the PAPER SELECT key on the touch panel and then select the paper type in the bypass tray Touch the PLAIN...

Страница 118: ...ge on 8 sheets of 11 x 17 A3 paper Example OR PHOT EED MIRROR IMAGE MULTI PAGE ENLARGEMENT PAMP IMAGE EDIT OK 34x44 44x68 22x34 11x17 8 x14 CANCEL OK MULTI PAGE ENLARGEMENT ENLARGEMENT SIZE INCH ORIGINAL SIZE ORIENTATION 22x17 3 3 8 x11 IMAGE EDIT A0 A0x2 A1 A2 A5 A3 A4 CANCEL OK OK MULTI PAGE ENLARGEMENT ENLARGEMENT SIZE A SIZE ORIGINAL SIZE ORIENTATION 1 3 IMAGE EDIT OK B1 B0 B2 B4 ORIGINAL SIZE...

Страница 119: ... number of sheets required for the enlarged image and the ratio are automatically selected based on the selected original size and enlargement size The paper size and ratio cannot be selected by the operator The relations between the original size and enlargement size selected by the operator and the automatically selected paper size number of sheets and ratio are shown on the previous page If no ...

Страница 120: ...ing and touch the OK key inside OK key on the PAMPHLET COPY setting screen Return to the IMAGE EDIT menu screen 4 Touch the OK key on the IMAGE EDIT menu screen Return to the SPECIAL MODES screen 5 Touch the OK key on the SPECIAL MODES screen Return to the main screen of copy mode 6 Place the original in the document feeder tray or on the document glass pages 4 6 to 4 9 7 Ensure that the desired p...

Страница 121: ...re registers which already have programs stored 4 Make all copier selections to be stored The number of copies cannot be stored 5 Touch the OK key The selected settings will be stored under the register number selected in step 3 If a number key is selected in step 3 that has already been programmed A setting confirmation screen will appear To replace the existing program with the new program touch...

Страница 122: ...storing a job program 4 Touch the DELETE key When the DELETE key is touched the screen in step 3 will return and the program will be deleted If the CANCEL key is touched the screen in step 3 will return but the program will not be deleted If no other programs are to be deleted touch the EXIT key on the screen displayed in step 3 to exit the job program mode JOB PROGRAMS PRESS PROGRAM NUMBER RECALL...

Страница 123: ...esume the interrupted copy job If a color copy job was interrupted replace the originals that have not yet been copied and resume copying If a black and white copy job was interrupted replace the originals that have not yet been copied and press the BLACK COPY START key to resume copying NOTES If you touch the INTERRUPT key when the account counter function is turned on the display will prompt you...

Страница 124: ...WhaleII_general copy_SEC book 28 ページ 2004年9月14日 火曜日 午前11時45分 ...

Страница 125: ...a reversing automatic document feeder cleaning the machine and troubleshooting Page REMOVING AN ORIGINAL MISFEED 7 2 Removing a misfed original from the reversing automatic document feeder 7 2 USER MAINTENANCE For copying 7 3 TROUBLESHOOTING 7 4 WhaleII_general copy_SEC book 1 ページ 2004年9月14日 火曜日 午前11時45分 ...

Страница 126: ... original If the original is difficult to remove open the document feeder cover and then remove the original 2 Open and close the document feeder cover Opening and closing the cover clears the misfeed display Copying cannot be resumed until this step is performed However this step is not necessary after a misfeed is removed from location C A message may appear indicating the number of originals wh...

Страница 127: ...he reversing automatic document feeder with a soft clean cloth CAUTION Do not use flammable spray to clean the machine If gas from the spray comes in contact with hot electrical components or the fusing unit inside the machine fire or electrical shock may result NOTE When cleaning do not use thinner benzene or similar volatile cleaning agents These may degrade or discolor the housing WhaleII_gener...

Страница 128: ...ot been selected Change the resolution setting to TEXT Moiré appears on a copy of a magazine catalogue or other printed material An appropriate resolution setting for the original has not been selected Change the resolution setting to PRINTED PHOTO Text overlaying a photo is not clear on a copy of a map magazine or other printed material An appropriate resolution setting for the original has not b...

Страница 129: ... in sort mode When color copying is performed in sort mode for an interrupt copy job only one set of copies can be made If more than one set is needed replace the original and repeat the copy procedure for each set needed Not all pages are copied When making copies the memory became full during scanning of the originals and a message appears asking you whether you want to continue copying or cance...

Страница 130: ...WhaleII_general copy_SEC book 6 ページ 2004年9月14日 火曜日 午前11時45分 ...

Страница 131: ...ontains useful information about the machine Page SPECIFICATIONS 8 2 Copier and Main unit 8 2 Reversing automatic document feeder 8 4 Duplex bypass inverter unit optional 8 4 INDEX 8 5 WhaleII_general copy_SEC book 1 ページ 2004年9月14日 火曜日 午前11時45分 ...

Страница 132: ...eets bound documents Maximum size 11 x 17 or A3 Copy paper Plain paper and special papers Copy sizes Max 12 x 18 or A3wide min 5 1 2 x 8 1 2 or A6R Image loss 4 mm 2 mm at edges Warm up time 99 seconds or less First copy time Full color single color copying 8 0 seconds or less Black white copying 7 0 seconds or less Copy ratio Variable 45 to 400 in 1 increments total 356 steps Fixed presets 25 50 ...

Страница 133: ...1 2 x 11 A4 26 copies min 26 copies min Transparencies high resolution setting 8 1 2 x 11 A4 13 copies min 13 copies min Heavy paper 1 2 8 1 2 x 11 A4 13 copies min 13 copies min Output method Center tray Face down output Left tray Face up output Maximum number of sheets 8 1 2 x 11 A4 size recommended paper for color Center tray 500 sheets Left tray 250 sheets Paper type Center tray Plain paper in...

Страница 134: ... Approx 12 kg Number of sheets 1 sheet non stack method Paper size Face up output Same as paper feed specifications of machine Face down output 12 x18 11 x17 8 1 2 x14 8 1 2 x13 8 1 2 x11 8 1 2 x11 R 7 1 4 x10 1 2 R 8 1 2 x5 1 2 A3W A3 B4 A4 A4R B5 B5R A5 Page weight Face up output 17 to 80 lbs 64 to 300 g m2 Face down output 17 to 54 lbs 64 to 200 g m2 Transport reference point Center reference p...

Страница 135: ...ctions 5 4 Copy output 5 5 Copy ratio 5 12 Copy ratio display 4 4 Copy ratio selection 5 13 Copying from the bypass tray 5 17 Covers 6 2 6 9 Custom settings 1 8 2 13 Cyan toner 2 15 D Deleting a stored job program 6 27 Detail 1 10 Display contrast 2 14 Display switching 1 10 Disposal of hole punch scrap 3 9 Document feeder tray 4 2 4 6 Document feeding area cover 4 2 7 2 Document glass 4 2 1 sided...

Страница 136: ... Stand 3 x 500 sheet paper drawer 2 21 Transport area 2 20 Mode select 1 8 4 3 to 4 4 More information on plain paper 2 10 More information on special media 2 10 Moving this machine 0 3 Multi shot 6 16 6 19 Multi page enlargement 6 16 6 22 N Non standard size 2 9 to 2 11 6 24 Number of copy sheets used by each account 1 11 Number of scannable originals 5 4 Numeric keys 4 3 O Offset 3 4 3 6 5 5 Off...

Страница 137: ...isher 3 2 Stand 1 x 500 sheet paper drawer 2 7 Stand 3 x 500 sheet paper drawer 2 7 Specifications of paper trays 2 9 Speed mode 2 12 Stand 1 x 500 sheet paper drawer 1 6 2 7 2 21 Stand 3 x 500 sheet paper drawer 1 6 2 7 2 21 Stand paper drawer 0 3 Standard sizes 1 2 2 9 to 2 10 Standard sizes in both the inch and AB systems 1 2 Standard supplies 2 17 Staple cartridge 3 3 Staple cartridge replacem...

Страница 138: ...WhaleII_general copy_SEC book 9 ページ 2004年9月14日 火曜日 午前11時45分 ...

Страница 139: ...ny representations or warranties on behalf of Sharp Specifically SHARP DOES NOT EXTEND TO YOU THE END USER ANY EX PRESS WARRANTY OR ANY IMPLIED WARRANTY OF MERCHANTABILITY FITNESS FOR USE OR FITNESS FOR ANY PARTICULAR PURPOSE IN CON NECTION WITH THE HARDWARE SOFTWARE OR FIRMWARE EMBODIED IN OR USED IN CONJUNCTION WITH THIS PRODUCT Sharp is not respon sible for any damages or loss either direct inc...

Страница 140: ...rp Plaza Mahwah New Jersey 07430 1163 www sharpusa com SHARP ELECTRONICS OF CANADA LTD 335 Britannia Road East Mississauga Ontario L4Z 1W9 This manual has been printed using a vegetable based soy oil ink to help protect the environment Printed on 100 post consumer recycled paper sec_whale_cover4 fm 1 ページ 2004年11月15日 月曜日 午前10時57分 ...

Отзывы: