Sharp AR-215 Скачать руководство пользователя страница 103

SINGLE PASS FEEDER (AR-SP4N)/REVERSING SINGLE PASS FEEDER (AR-RP3N)

101

OP

T

IO

N

AL E

Q

UIP

M

E

N

T

7

4

Set the number of copies and press the START (

) key.

Be sure not to touch the originals as they move on the reversing tray. This may cause
misfeeds.


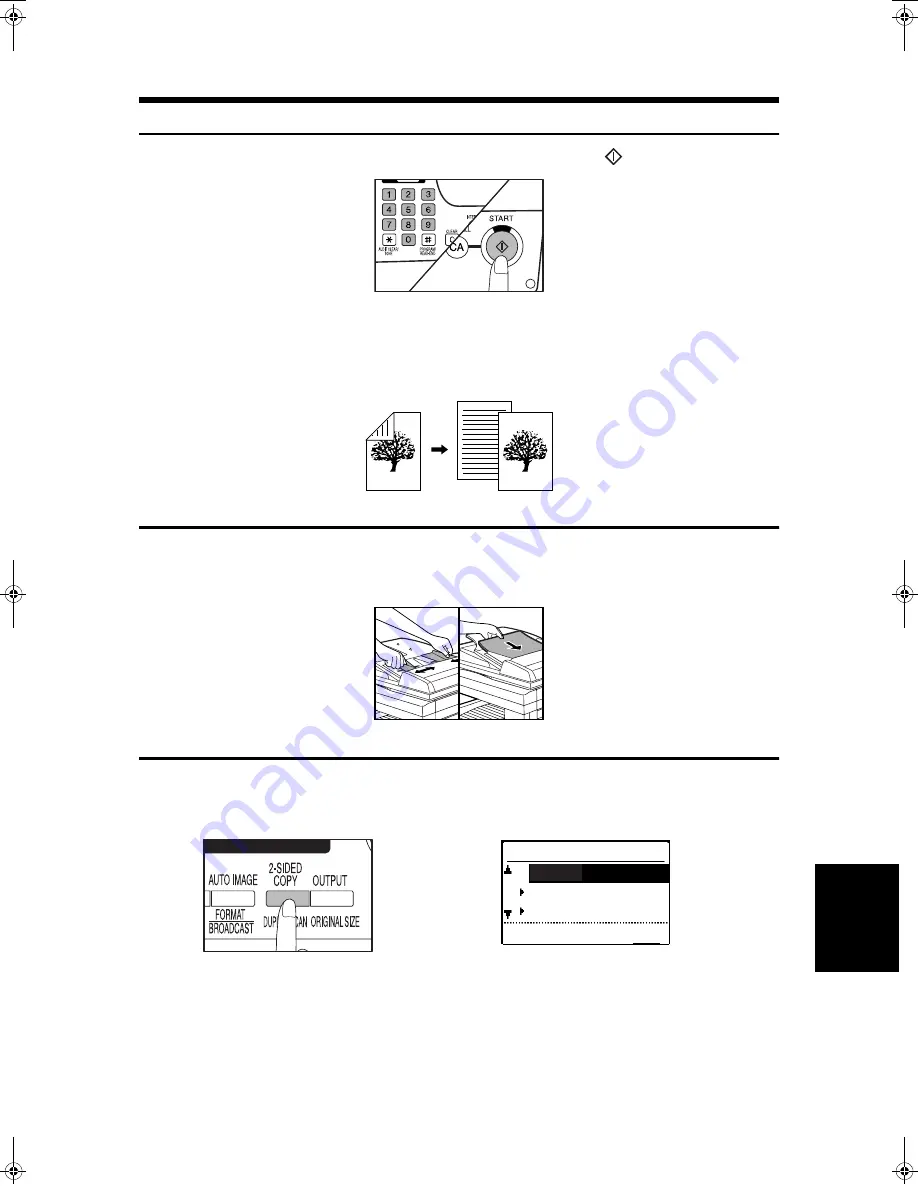
One-sided copies from two-sided originals

To copy in the two-sided to one-sided copy mode, an RSPF must be installed.

1

Ensure that no original is left on the platen glass. Adjust the original
guides to the size of the originals and set the originals face up in the
document feeder tray.

5-1/2" x 8-1/2" size originals cannot be used.

2

Press the 2-SIDED COPY key.

The 2-sided copy mode selection screen will appear.

COPY MODE

1 to 1

1 to 2
2 to 2

1

2

2

2

!AR-215_EX.book  101 

ページ


2003年1月10日 金曜日 午前10時24分

Содержание AR-215

Страница 1: ... MAKING COPIES SPECIAL FUNCTIONS 1 SPECIAL FUNCTIONS 2 COPIER TROUBLE GENERAL INFORMATION OPTIONAL EQUIPMENT KEY OPERATOR S GUIDE 5 23 41 55 67 79 93 119 DIGITAL LASER COPIER PRINTER OPERATION MANUAL Page MODEL AR 215 ...

Страница 2: ...EG Richtlinien 89 336 EWG und 73 23 EWG mit Änderung 93 68 EWG Ce matériel répond aux exigences contenues dans les directives 89 336 CEE et 73 23 CEE modifiées par la directive 93 68 CEE Dit apparaat voldoet aan de eisen van de richtlijnen 89 336 EEG en 73 23 EEG gewijzigd door 93 68 EEG Dette udstyr overholder kravene i direktiv nr 89 336 EEC og 73 23 EEC med tillæg nr 93 68 EEC Quest apparecchio...

Страница 3: ...EB6 is installed 5 COPIER TROUBLE This chapter describes how to remove misfed paper and how to remedy minor problems 6 GENERAL INFORMATION This chapter describes general information about the use of the copier and the loading of paper and toner 7 OPTIONAL EQUIPMENT This chapter describes operating instructions for the Single Pass Feeder AR SP4N the Reversing Single Pass Feeder AR RP3N the Finisher...

Страница 4: ...URE ADJUSTMENT 29 REDUCTION ENLARGEMENT ZOOM 31 Automatic selection 31 Manual selection 33 BYPASS FEED special paper 35 Acceptable paper for copying from the bypass tray 35 Copying from the bypass tray 35 INTERRUPTING A COPY RUN 38 DUAL PAGE COPY 42 B W REVERSE 44 XY ZOOM 46 TRANSPARENCY 49 JOB MEMORY 51 Storing a job program 51 Deleting a job program 52 Recalling a job program 53 ROTATION COPYING...

Страница 5: ... OF SUPPLIES 90 Proper storage 90 SPECIFICATIONS 91 SYSTEM CONFIGURATION 94 SINGLE PASS FEEDER AR SP4N REVERSING SINGLE PASS FEEDER AR RP3N 95 Part names 95 Specifications 96 Acceptable originals 96 Unacceptable originals 96 Using the SPF or the RSPF 97 Misfeed removal 103 FINISHER AR FN5N 105 Part names 105 Specifications 106 Supplies 106 Finisher functions 107 Staple sort 108 Staple cartridge re...

Страница 6: ...OPERATOR PROGRAMS 123 USING THE KEY OPERATOR PROGRAMS 126 KEY OPERATOR PROGRAMS 128 Function setting 128 Timer setting 132 Enable disable 134 Account control 137 Other program 140 CHAPTER 8 KEY OPERATOR S GUIDE INDEX 142 KEY OPERATOR CODE NUMBER FACTORY SETTING 145 Page ...

Страница 7: ...RODUCTION 6 CAUTIONS 8 COPIER INSTALLATION 9 MAIN FEATURES 10 PART NAMES AND FUNCTIONS 12 Exterior 12 Interior 13 Operation panel 14 POWER ON AND OFF 16 Power on 16 Power off 16 Initial settings 17 Power save modes 17 FUNCTION ICONS 18 FUNCTION REVIEW 19 AUDITING ACCOUNTS 20 How to copy in the auditing mode 20 ...

Страница 8: ... the separate relevant manuals All descriptions in this manual are based on the assumption that the COPY mode has been selected the COPY indicator is on The chapter entitled KEY OPERATOR S GUIDE is written especially for key operators It contains the programs and programming information that will enable the key operators to tailor functions for maximum benefit The operation procedures and the disp...

Страница 9: ...er KEY OPERATOR Information which is relevant to key operator functions is described The key operator must pay close attention to these notes AB series metric and inch series references Both specifications are quoted where applicable The inch series specifications are quoted in brackets For example Page 35 step 1 A4R B4 or A3 8 1 2 x 11 R 8 1 2 x 14 or 11 x 17 Page 33 step 3 A 86 81 70 and 50 95 7...

Страница 10: ...ower switch off and remove the power cord from the outlet Do not cover the copier with a dust cover cloth or plastic film while the power is on Doing so may prevent heat dissipation damaging the copier Do not drop the copier subject it to shock or strike it against any object Store spare toner cartridges in a cool dry place without removing from the package before use If they are exposed to direct...

Страница 11: ... easy connection and disconnection Be sure to connect the power cord only to a power outlet that meets the specified voltage and current requirements See page 91 Also make certain the outlet is properly grounded For this copier s power supply requirements see the name plate located on the back of the unit NOTE Connect the copier to a power outlet which is not used for other electric appliances If ...

Страница 12: ...hotos and colour photos These modes are adjustable in five steps 3 Substantial copying features Zoom copies can be made from 50 to 400 in 1 increments at 600 dpi When the optional dual function board is not installed and the optional SPF or RSPF is not being used Up to 999 copies can be made in a single run Automatic two sided copying can be performed Useful special features such as erase margin s...

Страница 13: ...s automatic stapling of up to 30 sheets This copier can be used as a laser printer if an optional dual function board is installed This copier can be used as a network printer if an optional print server card is installed This copier can be used as a facsimile machine if an optional facsimile expansion kit is installed This copier can be used as a network scanner if an optional network scanner exp...

Страница 14: ...n the centre tray Front cover p 70 Open to remove misfeeds and for copier servicing Paper tray p 80 Holds 500 sheets of copy paper Upper exit area cover p 75 Open to remove misfeeds when an optional job separator tray kit or finisher is installed Side cover p 69 Open to remove misfeeds Side cover handle p 69 Pull to open the side cover Bypass tray paper guides p 36 Adjust to the width of the copy ...

Страница 15: ...nob p 71 Turn to remove misfed paper Photoconductive drum Copy images are formed on the photoconductive drum Fusing unit release levers p 72 Lower to remove misfed paper WARNING The fusing unit is hot Take care in removing paper Paper guide p 73 Open to remove misfed paper Accessories Operation manual Digital Laser Copier Printer 1 Operation manual Multi Access 1 Toner cartridge 1 ...

Страница 16: ...ctions or the status of reserved output jobs OK key Press to confirm the selected setting or entered data Copy quantity display Displays the specified copy quantity during standby and displays the copy countdown as copies are made Numeric keys Use to select the desired copy quantity INTERRUPT key and indicator p 38 Interrupts a copy run CLEAR ALL CA key p 17 Clears all selected settings and return...

Страница 17: ...1 Press to close an open account Zero key Use as part of numeric keys to enter copy quantity Press during a continuous copy run to display the number of copies completed in the current run PROGRAM P READ END key p 51 59 Press to select the job memory mode Press to finish scanning of originals and to start copying when copying in the sort group or staple sort mode from the platen glass CLEAR C key ...

Страница 18: ...ill change to Ready to copy and the START key indicator will light up indicating that copying is possible If the copier has been programmed in the auditing mode the message Enter your account number will appear after warming up Once a valid account number has been entered the message display will change to Ready to copy and copying will be possible See page 20 Power off When the copier is not used...

Страница 19: ...ed without any copier operation after the last copy of a run is made or power is turned on and no copier operations have been made When the copier enters the preheat mode the backlight of the display will be turned off In this condition the fuser in the copier is maintained at a lower heat level thereby saving power The preheat level is however high enough to allow the copier to come to a ready co...

Страница 20: ...py mode Output mode Margin shift 2 in 1 4 in 1 One sided to two sided copying Two sided to two sided copying Two sided to one sided copying Sort mode Staple sort mode Group mode Right Down Left 2 in 1 4 in 1 Erase Dual page copy B W reverse Edge erase Centre erase Edge Centre erase Only when the optional dual function board is installed ...

Страница 21: ...o select a function The setting for the selected function will appear in the display The settings of the 2 sided copy mode 1 sided to 1 sided etc output mode and special functions can be displayed Exposure paper size and copy ratio settings which are normally displayed on the basic screen cannot be displayed on the review screen 3 To exit the review screen press the BACK key The display will retur...

Страница 22: ...uditing mode the following message will appear in the display in place of the normal initial conditions display 1 Enter your account number using the numeric keys As each digit is entered the dashes in the display will change to asterisks After the number is entered the following message will appear in the display The message will be displayed for several seconds then change to the following messa...

Страница 23: ...n in the display indicating that the number was not accepted When the key operator program for account number security has been set and unassigned numbers are entered three successive times the copier will not accept another number for one minute and the following message will appear KEY OPERATOR See page 139 for account number security Please see your key operator for assistance ...

Страница 24: ...AUDITING ACCOUNTS 22 GETTING STARTED ...

Страница 25: ...ure adjustments Page NORMAL COPYING 24 TWO SIDED COPYING 26 Two sided copying from the platen glass 26 EXPOSURE ADJUSTMENT 29 REDUCTION ENLARGEMENT ZOOM 31 Automatic selection 31 Manual selection 33 BYPASS FEED special paper 35 Acceptable paper for copying from the bypass tray 35 Copying from the bypass tray 35 INTERRUPTING A COPY RUN 38 ...

Страница 26: ... key Use the and key to select AB or INCH and use the and keys to select the desired original size Press the OK key 2 Close the platen cover Paper matching the size of the original will be automatically selected when the auto paper select function has been enabled To copy onto paper of a different size press the PAPER SELECT key Paper of the different orientation may be selected if the auto paper ...

Страница 27: ...s been folded or a crumpled original press down lightly on the platen cover This will reduce shadow lines caused by uneven contact between the original and the platen glass The platen cover can be removed to allow copying of bulky objects To remove it open the platen cover and lift it at a slightly backward angle To reattach the platen cover reverse the above procedure The capacity of the centre t...

Страница 28: ...used in the 2 sided copy mode are A5 B5 B5R A4 and A4R 8 1 2 x 11 and 8 1 2 x 11 R If a dual function board is installed paper sizes that can be used are A5 B5 B5R A4 A4R B4 and A3 8 1 2 x 11 8 1 2 x 11 R 8 1 2 x 13 8 1 2 x 14 and 11 x 17 The image for the second side can be rotated 180 top to bottom to allow tablet type binding Only when the optional dual function board is installed Two sided cop...

Страница 29: ...ed paper tray is selected Paper sizes that can be used in the 2 sided copy mode are A5 B5 B5R A4 and A4R 8 1 2 x 11 and 8 1 2 x 11 R If a dual function board is installed paper sizes that can be used are A5 B5 B5R A4 A4R B4 and A3 8 1 2 x 11 8 1 2 x 11 R 8 1 2 x 13 8 1 2 x 14 and 11 x 17 Neither the bypass tray nor 5 1 2 x 8 1 2 paper can be used for two sided copying 6 Set the number of copies an...

Страница 30: ...op a copy run during two sided copying press the CLEAR C key To cancel the 2 sided copy mode press the 2 SIDED COPY key select the one sided to one sided mode and press the OK key If an uneven number of originals are being copied press the READ END key after the last original is scanned The last copy will be output single sided ...

Страница 31: ...o Text mode This mode is useful for enhancing very low density areas of an original or suppressing unusually high density background areas Text photo mode This mode provides the best balance for copying an original which contains both text and photos This mode is also useful for copying printed photographs Photo mode This mode is good for copying photographs with fine details 1 Press the EXPOSURE ...

Страница 32: ...o adjust the copy density as desired Copy density cannot be adjusted manually in the AUTO exposure mode 4 Press the OK key To return to the AUTO mode press the EXPOSURE key use the and key to select AUTO and press the OK key EXPOSURE AUTO TEXT PHOTO AUTO TEXT ...

Страница 33: ...lly 1 Place an original on the platen glass and close the platen cover The original size will be automatically detected and indicated in the display If the original is a non standard size it cannot be detected In this case press the SPECIAL FUNCTION key to enter the original size See page 24 2 Use the PAPER SELECT key to select the paper tray with the desired paper size This feature will not work ...

Страница 34: ...ed In this case a message indicating Image edge loss will appear Only when the optional dual function board is installed KEY OPERATOR Rotation of the image can be disabled using a key operator program See page 129 If the message Image edge loss is displayed part of the original image may not be copied 4 Enter the number of copies and press the START key To cancel the automatic reduction enlargemen...

Страница 35: ... 200 and 400 C Zoom ratios Any ratio from 50 to 400 can be set in 1 increments Use the and keys to set the approximate ratio then press the key to decrease the ratio or the key to increase the ratio To decrease or increase the zoom ratio rapidly press and hold down the or key However the value will stop at the preset reduction or enlargement ratios To move beyond these ratios release the key and t...

Страница 36: ... function has been enabled the appropriate copy paper size will have been automatically selected based on the original size and the selected copy ratio If the auto paper select function has been disabled or if copying onto a different size paper use the PAPER SELECT key to select the paper feed station with the desired paper size 6 Set the number of copies and press the START key ...

Страница 37: ... recommended transparency film labels and envelopes must be fed one sheet at a time through the bypass tray Up to 40 sheets of SHARP recommended transparency film and labels can be set at one time Up to 5 envelopes can be set at one time When feeding two or three hole prepunched paper load the paper so that the punched edge is not positioned in the feed slot Copying from the bypass tray 1 Unfold t...

Страница 38: ...s not the closure flap 4 Press the PAPER SELECT key to select the bypass tray NOTE When copying onto paper that is fed from the bypass tray the print start position in the vertical direction can be adjusted as follows Press the SPECIAL FUNCTION key Use the and key to select EXTRA IMAGE ADJ and then press the OK key Use the and key to adjust the print start position to the front or to the rear Pres...

Страница 39: ...START key NOTE The bypass tray can be used to copy onto the two sides of paper manually When copying the second original be sure to turn over the copy of the first original left to right and place it into the bypass tray as shown in the illustration Second original Copy of first original ...

Страница 40: ...during copying when an optional SPF or RSPF is being used the copier will stop after completing copying of any original which has been fed by the SPF or RSPF If this copier has been programmed in the auditing mode the account number entry message will appear Enter your account number using the numeric keys The number of copies of the interrupt copying will be accumulated against this account numbe...

Страница 41: ...finished press the INTERRUPT key again to cancel the INTERRUPT mode and remove the original used for interrupt copying All settings for the interrupted job will be automatically restored 6 Replace the original s for the interrupted job and press the START key to resume copying ...

Страница 42: ...INTERRUPTING A COPY RUN 40 MAKING COPIES ...

Страница 43: ...chapter describes special copying functions including various image editing functions Page DUAL PAGE COPY 42 B W REVERSE 44 XY ZOOM 46 TRANSPARENCY 49 JOB MEMORY 51 Storing a job program 51 Deleting a job program 52 Recalling a job program 53 ...

Страница 44: ... sort features If this feature is selected when the auto image feature has been selected the auto image feature will be cancelled When originals are set in an optional SPF or RSPF this feature cannot be selected 1 Place the originals on the platen glass with the centre of the two pages aligned with the paper size index A4 Close the platen cover Set the page to be copied first to the right of the p...

Страница 45: ...re that A4 8 1 2 x 11 sized copy paper is selected A4R 8 1 2 x 11 R paper can also be used if the auto paper select mode is selected and rotation copying has been enabled 5 Make all other desired copier selections and press the START key To cancel the dual page copy feature highlight DUAL PAGE COPY with a check mark on the SPECIAL MODES screen and press the OK key SPECIAL MODES DUAL PAGE COPY XY Z...

Страница 46: ...tomatically be cancelled 1 Place an original on the platen glass or in the document feeder tray 2 Press the SPECIAL FUNCTION key Then press the OK key The SPECIAL MODES screen will appear 3 Use the and keys to select B W REVERSE and press the OK key A check mark will appear to the left of B W REVERSE and the display will return to the basic screen Original Copy Document feeder tray SPECIAL MODES D...

Страница 47: ...45 SPECIAL FUNCTIONS 1 3 4 Make all other desired copier selections and press the START key To cancel the B W reverse feature highlight B W REVERSE with a check mark on the SPECIAL MODES screen and press the OK key ...

Страница 48: ...y ratio range is limited to the following conditions If the AUTO IMAGE function has been set the XY ZOOM feature cannot be set If the XY ZOOM feature is set the AUTO IMAGE function cannot be set 1 Place an original on the platen glass or in the document feeder tray 2 Press the SPECIAL FUNCTION key Then press the OK key The SPECIAL MODES screen will appear Options Copy ratio range When the SPF or R...

Страница 49: ...in the horizontal direction Use the and keys to set the approximate ratio then press the key to decrease the ratio or key to increase the ratio 5 Press the key The copy ratio in the vertical direction will be highlighted 6 Use the and keys to change the copy ratio in the vertical direction To change the copy ratio in the horizontal direction again press the key XY ZOOM ZOOM X 100 Y 100 X Y 115 100...

Страница 50: ...omatically selected based on the original size and the selected copy ratios Image rotation may occur 9 Make all other desired copier selections and press the START key To cancel the XY zoom feature press the COPY RATIO key A confirmation display will appear Select OFF and press the OK key Set the copy ratio again if needed If you select ADJUST and press the OK key the copy ratio for XY ZOOM can be...

Страница 51: ...ture cannot be used with duplex copying or staple sort copying 1 Place an original on the platen glass or in the document feeder tray 2 Press the SPECIAL FUNCTION key Then press the OK key The SPECIAL MODES screen will appear 3 Use the and keys to select TRANSPARENCY and press the OK key A check mark will appear to the left of TRANSPARENCY and the display will return to the basic screen Document f...

Страница 52: ...ypass tray Load transparency film one sheet at a time in the portrait orientation 5 Make all other desired copier selections and press the START key To cancel the transparency feature highlight TRANSPARENCY with a check mark on the SPECIAL MODES screen and press the OK key ...

Страница 53: ...ored in a job program is modified by a key operator program the key operator settings will supersede the previous setting The job memory feature cannot be used in the interrupt copy mode KEY OPERATOR Job memory replacement deletion can be prohibited See page 134 Storing a job program 1 Make all copier selections to be stored 2 Press the PROGRAM P key The JOB PROGRAMS screen will appear 3 Use the a...

Страница 54: ...lace it will appear to confirm the selection To replace an existing program with the new program select YES with the and keys and press the OK key If the existing program is not to be replaced select NO with the and keys press the OK key and select another register number Deleting a job program 1 Press the PROGRAM P key The JOB PROGRAMS screen will appear 2 Use the and keys to select DELETE and pr...

Страница 55: ...will appear to confirm the selection to delete the program To delete the program select YES with the and keys and press the OK key If NO is selected the previous screen will reappear Recalling a job program 1 Press the PROGRAM P key The JOB PROGRAMS screen will appear with RECALL highlighted 2 Press the OK key The RECALL JOB PROGRAM screen will appear JOB PROGRAMS RECALL STORE DELETE RECALL JOB PR...

Страница 56: ...which contain job programs If a checked number is entered the settings for that job program will be recalled and the display will return to the basic screen The recalled settings may be modified for a particular job run but any changes made will not be stored in the job memory To store the new settings follow the Storing a job program procedure ...

Страница 57: ...2 This chapter describes the functions that can be used when the optional dual function board AR EB6 is installed Page ROTATION COPYING 56 SORT GROUP 57 Copying in the sort or group mode 57 MARGIN SHIFT 60 ERASE 62 2 IN 1 OR 4 IN 1 64 ...

Страница 58: ...ying onto a paper size larger than A4 8 1 2 x 11 is performed the image cannot be rotated In this case the original must be rotated 90 If the margin shift feature is set rotation copying will not function KEY OPERATOR See page 129 for enabling disabling rotation copying Example Copying from an A3 11 x 17 original onto A4 8 1 2 x 11 paper 1 Place an original on the platen glass and close the platen...

Страница 59: ...der tray in the group mode original images will be stored in the copier memory each time an original is scanned and copying will start after all originals have been scanned However if originals are set in the document feeder tray and the sort mode is selected copying will start immediately after the first original is scanned 1 Place an original on the platen glass or in the document feeder tray If...

Страница 60: ...ns and press the START key If originals have been set in an optional SPF or RSPF in step 1 copying will start If an original has been set on the platen glass proceed to the next step 5 Replace the finished original with the next original and press the START key after it lights up Repeat this step until all originals have been scanned If the non sort mode has been selected in step 3 copying will st...

Страница 61: ...ils Offset stack If the offset stack mode is enabled using a key operator program each copy set will be offset by approximately 25 mm 1 inch from the previous set When copying in the sort mode collated sets of copies will be made and each collated set of copies produced will be stacked offset from the previous set in the centre tray When copying in the group mode groups of multiple copies from the...

Страница 62: ... initial shift setting can be changed from 5 mm to 20 mm in 5 mm increments from 1 4 to 1 in 1 4 increments See page 128 1 Place an original on the platen glass or in the document feeder tray When copying from the platen glass and the margin is to be increased on the left side set the original face down so that the margin side is positioned to the right If the margin is to be increased on the righ...

Страница 63: ...t amount Select the shift direction from DOWN RIGHT and LEFT Select the shift amount from 5 mm 10 mm 15 mm and 20 mm 1 4 1 2 3 4 and 1 5 Press the OK key The display will return to the basic screen 6 Make all other desired copier selections and press the START key To cancel the margin shift feature select the margin shift feature again and select OFF MARGIN SHIFT OFF DOWN RIGHT 10 mm 5 20 ...

Страница 64: ...The initial setting of the width for edge erase and centre erase can be changed See page 129 This feature cannot be used with the 2 in 1 or 4 in 1 feature If the dual page copy feature has been set centre erase and edge centre erase cannot be set This feature cannot be used with non standard size originals 1 Place an original on the platen glass or in the document feeder tray 2 Press the SPECIAL F...

Страница 65: ... EDGE CENTRE or EDGE CENTRE 5 Use the and keys to adjust the amount of erase if needed 6 Press the OK key The display will return to the basic screen 7 Make all other desired copier selections and press the START key To cancel the erase feature select the erase feature again and select OFF ...

Страница 66: ...1 copying and four patterns of layout for 4 in 1 copying Non standard size paper cannot be used with the 2 in 1 or 4 in 1 feature If this feature is set the copy ratio will be automatically set and cannot be changed manually The 2 in 1 or 4 in 1 feature cannot be set for interrupt copying While 2 in 1 or 4 in 1 is being set interrupt will not function 1 Place an original on the platen glass or in ...

Страница 67: ... in 1 4 in 1 will appear 5 Use the and keys to select 2in1 or 4in1 and press the OK key The setting screen for 2 in 1 or 4 in 1 will appear 6 Use the and keys to select the desired layout pattern Select the order of originals which will be arranged on the copies For layout patterns see the previous page SPECIAL MODES MARGIN SHIFT ERASE DUAL PAGE COPY OK ADJUST 2in1 4in1 OFF 2in1 4in1 OK CHANGE PAT...

Страница 68: ...ter it lights up Repeat this step until all originals have been scanned Copies will be output each time two originals for 2 in 1 copy or four originals for 4 in 1 copy have been scanned To start copying before scanning all originals for a copy after only one original for 2 in 1 or three originals or less for 4 in 1 have been scanned press the READ END key Portions of original images may not be cop...

Страница 69: ...remove misfed paper and how to remedy minor problems Page STATUS MESSAGES 68 MISFEED REMOVAL 69 Misfeed in the bypass tray 69 Misfeed in the copier 70 Misfeed in the centre tray 73 Misfeed in the paper tray 74 Misfeed in the upper exit area 75 TROUBLESHOOTING 76 ...

Страница 70: ...ed properly Can not continue Remove paper from the centre tray The number of copies on the centre tray has reached the limit Remove the copies from the centre tray Please check paper in paper tray Check to see if copy paper has been loaded properly Load paper into tray The paper size specified for the tray is different from the actual size See page 80 Selected paper tray is out of service Contact ...

Страница 71: ...quipment see their respective sections of the operation manual KEY OPERATOR Changing of the display colour can be disabled via a key operator program See page 136 First confirm the misfeed locations Misfeed in the bypass tray 1 Gently pull the misfed paper out from the bypass tray 2 Open and close the side cover to cancel the misfeed display You can also cancel the misfeed display by opening and c...

Страница 72: ...on in the illustration below A Misfeed in the paper feed area 1 Open the bypass tray and the side cover 2 Gently open the front cover If the misfed paper is seen from this side proceed to C Misfeed in the transport area If paper is misfed here proceed to A Misfeed in the paper feed area If paper is misfed here proceed to B Misfeed in the fusing area ...

Страница 73: ...Take care in removing paper CAUTION Do not touch the photoconductive drum green portion when removing the misfed paper Doing so may damage the drum and cause smudges on copies 4 Close the front cover and the side cover Confirm that the misfeed display has been cleared B Misfeed in the fusing area 1 Open the bypass tray and the side cover 2 Gently open the front cover Roller rotating knob ...

Страница 74: ...positions WARNING The fusing unit is hot Take care in removing paper CAUTION Do not touch the photoconductive drum green portion when removing the misfed paper Doing so may damage the drum and cause smudges on copies Be careful there may be unfused toner on the misfed paper which could soil your hands or clothes 5 Close the front cover and the side cover Confirm that the misfeed display has been c...

Страница 75: ...e the green tabs on either side of the paper guide to rotate the guide open and remove the misfed paper WARNING The fusing unit is hot Take care in removing paper 3 Close the side cover Confirm that the misfeed display has been cleared Misfeed in the centre tray 1 Remove the paper by pulling it into the centre tray ...

Страница 76: ...en perform steps 1 to 3 described in the A Misfeed in the paper feed area section 1 Pull out the paper tray and remove the misfed paper 2 Close the paper tray 3 Open and close the side cover to cancel the misfeed display You can also cancel the misfeed display by opening and closing the front cover Confirm that the misfeed display has been cleared ...

Страница 77: ...If an optional job separator tray kit or an optional finisher is installed a misfeed may occur in the upper exit area 1 Open the upper exit area cover 2 Gently pull the misfed paper out 3 Close the upper exit area cover Confirm that the misfeed display has been cleared ...

Страница 78: ...h dry copy paper Be sure to store copy paper in a dry location See page 90 Paper misfeeds frequently Non standard paper used Use standard paper If using special paper feed the paper through the bypass tray See pages 35 and 80 Paper properly installed Make sure the paper is properly installed See pages 35 and 80 Pieces of paper inside copier Remove all pieces of misfed paper See page 69 Paper curle...

Страница 79: ...e set Is the COPY indicator off Press the COPY key to select the COPY mode See page 14 Is copying printing or facsimile printing being performed Set the paper size after copying printing or facsimile printing is complete Power is on but copying is not possible Are only the mode indicators on The copier is in the auto power shut off mode Press the COPY key or another mode key that is lit Is the COP...

Страница 80: ...TROUBLESHOOTING 78 COPIER TROUBLE ...

Страница 81: ...s and sizes of copy paper 80 Loading copy paper 80 Changing the copy paper size in the tray 82 TONER CARTRIDGE REPLACEMENT 84 CHECKING THE TONER QUANTITY AND TOTAL OUTPUT COUNT 86 CLEANING THE PLATEN GLASS AND PLATEN COVER 87 CLEANING THE BYPASS TRAY PAPER FEED ROLLER 88 DISPLAY CONTRAST ADJUSTMENT 89 STORAGE OF SUPPLIES 90 Proper storage 90 SPECIFICATIONS 91 ...

Страница 82: ...ly SHARP recommended paper The message TRAY Add paper will be displayed when there is no copy paper in the selected paper feed station When the selected paper tray is not installed or is improperly installed Close paper tray will be displayed Install it or push it back firmly into place NOTE When the paper size is changed in a paper tray the size of the paper must be entered as described on page 8...

Страница 83: ... tray holds up to 500 sheets of 80 g m2 21 lb paper Do not load paper above the maximum height line 5 Push the paper tray firmly back into the copier If the paper size is changed in steps 3 and 4 place the paper size card in the front of the paper tray to indicate the selected paper size Proceed to the next section Maximum height line Paper size card EXTRA B4 A4 A4 A3 R B5 A5 R B5 8 1 2 x11 81 2x1...

Страница 84: ...ing screen will appear NOTE If an optional paper feed unit is installed use the and keys to select the paper tray for which the paper size is being changed and then press the key 3 Use the and keys to select the paper size that has been set When an optional paper feed unit is installed to change the size of another paper tray press the key and then repeat NOTE in step 2 and step 3 SPECIAL FUNCTION...

Страница 85: ... GENERAL INFORMATION 6 4 Press the OK key A confirmation message for paper size setting will appear 5 Press the OK key The specified paper size will be registered and the display will return to the basic screen ...

Страница 86: ...ssage Toner replenishment in progress may appear even though there is toner remaining and the copier will suspend the copying job whilst it replenishes its toner supply This can take up to 2 minutes after which the START key indicator will light up Press the START key to resume copying 1 Gently open the front cover 2 Push the toner cartridge lock release lever and pull the toner cartridge out Remo...

Страница 87: ... the cartridge by the shutter Be sure to only shake the cartridge before the tape is removed 4 Gently insert the toner cartridge along the guides until it clicks in place while pushing the lock release lever NOTE If dirt or dust is adhered to the toner cartridge remove it before installing the cartridge 5 Remove the tape from the shutter Pull the shutter out of the toner cartridge as shown in the ...

Страница 88: ...ng is indicated in 5 levels Use this indicator as a guideline for replacement of the toner cartridge Refer to the table below for the relation between the indicator level and the amount of toner remaining When the toner level falls below 25 obtain a replacement toner cartridge as soon as possible For more information consult your dealer NOTE The amount of toner used will vary depending on conditio...

Страница 89: ...r Stains or dirt on the platen glass or platen cover will also be copied Wipe the platen glass and platen cover with a soft clean cloth If necessary dampen the cloth with water Do not use thinner benzene or similar volatile cleaning agents If an optional SPF or RSPF is installed wipe the platen cover portion of the SPF or RSPF and the scanning window on the platen glass ...

Страница 90: ...ER FEED ROLLER If misfeeds occur frequently when feeding postcards envelopes thick paper etc through the bypass tray wipe the paper feed roller at the feed slot of the bypass tray with a soft clean cloth dampened with alcohol or water Paper feed roller ...

Страница 91: ...the and keys to select DISPLAY CONTRAST and press the OK key The screen for contrast setting will appear 3 Use the and keys to adjust the contrast To reset the contrast to the default setting press the CLEAR C key 4 Press the SPECIAL FUNCTION key The display will return to the basic screen SPECIAL FUNCTION SPECIAL MODES ORIG SIZE ENTER PAPER SIZE SET DISPLAY CONTRAST DISPLAY CONTRAST ...

Страница 92: ...e 1 Store the supplies in a location that is clean and dry at a stable temperature not exposed to direct sunlight 2 Store copy paper in the wrapper and lying flat Paper stored in packages standing up or out of the wrapper may curl or become damp resulting in paper misfeeds For best copying results be sure to use only SHARP products Only genuine SHARP consumables carry the Genuine Supplies label GE...

Страница 93: ...7 95 100 121 129 141 200 400 When the optional dual function board is not installed and the optional SPF or RSPF is not being used Exposure system Moving optical source slit exposure stationary platen with automatic exposure function Copy paper feed One paper tray with automatic feed 500 sheets one bypass tray with automatic feed 100 sheets Fusing system Heat rollers Developer system Magnetic brus...

Страница 94: ... to 86 F Humidity 20 to 85 Noise level Sound Power Level LWA Copying 6 3 B Standby 3 9 B Sound Pressure Level LPA bystander positions Copying 49 dB A Standby 24 dB A Noise emission measurement in accordance with ISO 7779 Emission concentration measurement according to RAL UZ 62 Ozone 0 02 mg m3 or less Dust 0 075 mg m3 or less Styrene 0 07 mg m3 or less Optional equipment Single pass feeder AR SP4...

Страница 95: ...E PASS FEEDER AR RP3N 95 Part names 95 Specifications 96 Acceptable originals 96 Unacceptable originals 96 Using the SPF or the RSPF 97 Misfeed removal 103 FINISHER AR FN5N 105 Part names 105 Specifications 106 Supplies 106 Finisher functions 107 Staple sort 108 Staple cartridge replacement 111 Staple jam removal 112 Misfeed removal 114 500 SHEET PAPER FEED UNIT AR D11N 2x500 SHEET PAPER FEED UNIT...

Страница 96: ...Reversing single pass feeder AR RP3N Some options may not be available in some countries Dual function board AR EB6 Memory can be expanded to 272 MB addition of 256 MB by installing a combination of commercially available 32 64 or 128 MB memory modules 168 pin SDRAM DIMM in the two DIMM slots Printer expansion kit AR P11N PS3 expansion kit AR PK1N Barcode font kit AR PF1 Job separator tray kit AR ...

Страница 97: ...PF can automatically feed multi page documents If the RSPF is installed two sided originals can be copied automatically without having to manually turn them over Part names Exit area Reversing tray Right side cover AR SP4N AR RP3N Exit area Original guides Document feeder tray Feeding roller cover Original guides Document feeder tray Feeding roller cover ...

Страница 98: ...ls which have binding holes punched into them insert them so that the holes are positioned to the right or along the original guides In this case the settings for margin shift may need to be changed See page 60 Unacceptable originals The following types of paper cannot be used as originals Special papers including transparency film photographs and tracing paper Damaged or crumpled originals Paper ...

Страница 99: ... paper size will be automatically selected KEY OPERATOR The auto paper select function can be disabled using a key operator program If this function has been disabled use the PAPER SELECT key to select the desired paper tray See page 134 To copy onto a different size paper use the PAPER SELECT key to make the selection Stream feeding mode If the stream feeding mode has been enabled using a key ope...

Страница 100: ...o sided copies from one sided originals Paper sizes that can be used in the 2 sided copy mode are A5 B5 B5R A4 and A4R 8 1 2 x 11 and 8 1 2 x 11 R If a dual function board is installed paper sizes that can be used are A5 B5 B5R A4 A4R B4 and A3 8 1 2 x 11 8 1 2 x 11 R 8 1 2 x 13 8 1 2 x 14 and 11 x 17 1 Ensure that no original is left on the platen glass Adjust the original guides to the size of t...

Страница 101: ...ided copy mode 4 Use the or key to select binding change if desired Then press the OK key The image of one side can be rotated 180 using the image rotation feature This feature can be useful depending on the orientation of the original image and the desired binding position 5 Set the number of copies and press the START key Press the CLEAR C key to stop copying in the middle of a run COPY MODE 1 t...

Страница 102: ...A4 A4R B4 and A3 8 1 2 x 11 8 1 2 x 11 R 8 1 2 x 13 8 1 2 x 14 and 11 x 17 1 Ensure that no original is left on the platen glass Adjust the original guides to the size of the originals and set the originals face up in the document feeder tray 5 1 2 x 8 1 2 size originals cannot be used 2 Press the 2 SIDED COPY key The 2 sided copy mode selection screen will appear 3 Use the and keys to select two ...

Страница 103: ...ided copies from two sided originals To copy in the two sided to one sided copy mode an RSPF must be installed 1 Ensure that no original is left on the platen glass Adjust the original guides to the size of the originals and set the originals face up in the document feeder tray 5 1 2 x 8 1 2 size originals cannot be used 2 Press the 2 SIDED COPY key The 2 sided copy mode selection screen will appe...

Страница 104: ...ne side can be rotated 180 using the image rotation feature This feature can be useful depending on the orientation of the original image and the desired binding position 5 Set the number of copies and press the START key Press the CLEAR C key to stop copying in the middle of a run Be sure not to touch the originals as they move on the reversing tray This may cause misfeeds COPY MODE 2 1 2 2 2 1 1...

Страница 105: ...ove the misfed originals Location A Open the feeding roller cover and pull the misfed original gently to the left and out from the document feeder tray Close the feeding roller cover Location B Open the document feeder cover rotate the rollers in the direction indicated by the arrow to feed the misfed paper and then gently remove the misfed original after closing the document feeder cover A C B Fe...

Страница 106: ...t feeder tray to remove the original With the RSPF pull out the reversing tray to remove the misfed original NOTE With the RSPF after removing the misfed original from the exit area be sure to insert the reversing tray into the exit area until it locks in place 2 Open and close the document feeder cover to cancel the misfeed display You can also cancel the misfeed display by opening and closing th...

Страница 107: ... copies by original When an optional finisher AR FN5N is installed the copier can automatically staple the sorted copies Each collated set of copies or group of copies can be stacked offset from the previous set Part names NOTE To use the finisher AR FN5N an optional dual function board AR EB6 is required Stapler compiler cover Offset tray Top tray Top cover Stapler cover ...

Страница 108: ...ay capacity Top tray 100 sheets Offset tray 1 000 sheets 500 sheets for sizes larger than A4 8 1 2 x 11 Paper size Top tray A5 to A3 5 1 2 x 8 1 2 to 11 x 17 Offset tray B5 to A3 8 1 2 x 11 to 11 x 17 Paper weight Top tray 56 to 80 g m2 15 lbs to 21 lbs Offset tray 56 to 80 g m2 15 lbs to 21 lbs Offset Approx 25 mm 1 inch Paper sizes that can be stapled B5 A4 A4R B4 A3 8 1 2 x 11 8 1 2 x 11 R 8 1 ...

Страница 109: ...ed as the default setting Sort mode Each set of copies will be sequentially delivered Each collated set of copies will be stacked offset from the previous set unless the offset stack function is disabled Group mode All copies of the same original will be grouped Copies will be offset and stacked in groups of multiple copies from the same original unless the offset stack function is disabled Staple...

Страница 110: ...face down on the platen glass with the corner to be stapled to the upper right position If the number of copies in one set is more than 30 the copies will not be stapled If the orientation of the original does not match that of the copy paper the image of the original will be rotated The stapling position varies with the orientation of the original When copying B4 8 1 2 x 14 or A3 11 x 17 size ori...

Страница 111: ...original with the next original and press the START key after it lights up Repeat this step until all originals have been scanned 6 After all originals have been scanned press the READ END key Copying will start and each set of completed copies will be automatically stapled and delivered to the offset tray If the message Can not continue Remove paper from the offset tray appears in the display rem...

Страница 112: ...ill be rotated The stapling position varies with the orientation of the original When copying B4 8 1 2 x 14 or A3 11 x 17 size originals with portrait orientation images copies will be stapled at the position shown below 2 Press the OUTPUT key The output mode selection screen will appear 3 Use the and keys to select STAPLE SORT and press the OK key Also the OUTPUT key can be used to select an outp...

Страница 113: ...s will be automatically stapled and delivered to the offset tray Staple cartridge replacement When the message Add staples appears replace the staple cartridge as follows 1 Open the stapler cover 2 Grasp the green portion of the staple box and remove the staple box from the stapler 3 Remove the staple cartridge from inside the staple box ...

Страница 114: ... the cartridge locks in place by pulling it slightly A cartridge holds 3 000 staples 5 Remove the tape from the cartridge 6 Insert the staple box into the stapler unit until it clicks into place 7 Close the stapler cover Staple jam removal If staples become jammed in the stapler the message Check stapler or staple jam will appear Remove the jammed staples in the manner described below 1 Open the s...

Страница 115: ...e staple box and remove the staple box from the stapler 3 Raise the lever at the end of the staple box and remove the jammed staples 4 Return the lever to its original position 5 Insert the staple box into the stapler unit until it clicks into place 6 Close the stapler cover ...

Страница 116: ...g with a display of paper misfeed locations When a misfeed is indicated for the finisher follow the procedure below 1 Pull the handle of the stapler compiler cover and open the cover 2 Remove any misfed paper from the transport area 3 If staple sort copying is being done open the paper guide and remove any misfed paper from the stapler compiler ...

Страница 117: ...e stapler compiler cover 5 If the offset tray is being used remove any misfed paper from the offset tray 6 If the top tray is being used open the top cover remove any misfed paper and close the top cover Confirm that the misfeed display has been cleared ...

Страница 118: ...thout prior notice The performance specification figures indicated are nominal values of production units and there may be some deviations from these values in individual units AR D11N AR D12N Copy paper size B5 to A3 8 1 2 x 11 to 11 x 17 Paper weight 56 to 80 g m2 15 lbs to 21 lbs Paper capacity One paper tray with capacity for 500 sheets of 80 g m2 21 lb paper Two paper trays with capacity for ...

Страница 119: ...in the tray The method of changing the copy paper size is the same as for the paper trays in the copier See page 82 Misfeed removal The copier will stop when a misfeed occurs The message Clear paper path will appear along with a display of paper misfeed locations 1 Open the side cover of the paper tray which was in use and remove the misfed paper Be sure to perform this step before pulling out the...

Страница 120: ...ER FEED UNIT AR D12N 118 OPTIONAL EQUIPMENT 2 If the misfed paper is not seen in step 1 pull out the paper tray which was in use 3 Remove any misfed paper 4 Close the paper tray 5 Close the side cover Confirm that the misfeed display has been cleared ...

Страница 121: ... can only be accessed after a key operator code number has been entered Please familiarise yourself with this chapter and refer to it for the information you need to keep the copier operating smoothly Page REGISTERING THE KEY OPERATOR CODE NUMBER 120 LIST OF KEY OPERATOR PROGRAMS 123 USING THE KEY OPERATOR PROGRAMS 126 KEY OPERATOR PROGRAMS 128 Function setting 128 Timer setting 132 Enable disable...

Страница 122: ...PRG and press the OK key The following display will appear 3 Enter your key operator code number using the numeric keys When registering the key operator code number for the first time enter the number that was set at the factory See page 145 As the code number is entered the dashes in the display will change to asterisks The MODE SELECT screen will appear with COPIER highlighted 4 Press the OK ke...

Страница 123: ...highlighted 6 Press the OK key 7 Choose a new 5 digit code number and enter it using the numeric keys 8 Press the OK key The code number will change from the previous to the new setting This new setting will remain in effect until it is changed by the procedure above To change the number again the current registered number must be used in step 3 ...

Страница 124: ...OR S GUIDE 9 To continue with other key operator programs use the and keys to select another program To select a program of another category press the BACK key and select the desired category To exit the key operator program mode press the CLEAR ALL CA key ...

Страница 125: ... Feeding Enables the stream feeding mode for copying from an SPF or RSPF This program can be used only if an optional SPF or RSPF is installed 129 Rotation Copy Enables disables rotation of original images This program can be used only if an optional dual function board is installed 129 Sort Auto Select Sets the sort copy as default output mode This program can be used only if an optional SPF or R...

Страница 126: ...itching between the paper trays 134 Disable Job Program Changing Prevents stored programs from being replaced or deleted 134 Disable SPF RSPF Prevents the use of an SPF or RSPF when it malfunctions This program can be used only if an optional SPF or RSPF is installed 135 Disable 2 Sided Copy Temporarily prevents the duplex system from operating when it malfunctions Allows the use of the copier but...

Страница 127: ... number of copies made against account numbers 137 Reset Account Resets all audit accounts or selectively resets individual accounts 138 Account Number Control Registers accounts deletes accounts or changes an account number 138 Account Number Security Guards against trial and error entering of audit account numbers 139 Other program Total Count Recalls the total counts including counts of the cop...

Страница 128: ... and press the OK key The following display will appear 3 Enter the key operator code number The dashes in the display will change to asterisks The MODE SELECT screen will appear with COPIER highlighted 4 Press the OK key The COPIER MODE screen will appear SPECIAL FUNCTION SPECIAL MODES ORIG SIZE ENTER PAPER SIZE SET DISPLAY CONTRAST Enter key operator code KEY OPERATOR CODE ...

Страница 129: ... left of the program name If the OK key is pressed a check mark will appear and the program will be set If the OK key is pressed again the check mark will disappear and the program will be cancelled Proceed to step 8 For other programs the setting screen of the program will appear when the OK key is pressed 7 Follow instructions for the program 8 To continue with other key operator programs use th...

Страница 130: ...he factory setting is level 3 When EXPOSURE ADJUST is selected and the OK key is pressed the following display will appear 1 Use the and keys to select the PLATEN platen glass or SPF RSPF 2 Adjust the exposure using the and keys 3 Repeat steps 1 and 2 to adjust the other exposure level 4 Press the OK key Margin Default Set the initial margin shift value with this program When MARGIN DEFAULT is sel...

Страница 131: ...m feeding mode highlight STREAM FEEDING and press the OK key to display a check mark in the check box To disable this function select this program and press the OK key again to clear the check mark in the check box Rotation Copy If this program is set the image of originals will rotate when the orientation of the originals does not match that of the copy paper Rotation copy will function only when...

Страница 132: ...y is pressed the following display will appear Example The following display is shown for a copier equipped with a dual function board a facsimile expansion kit and a job separator tray kit 1 Use the and keys to select the desired pattern of output trays 2 Press the OK key Offset Function If the offset function is enabled each set of copies will be stacked offset from the previous set in the sort ...

Страница 133: ...t the desired percentage 2 Press the OK key NOTE The memory capacity for storing original images and print data is 16 MB The memory can be extended to a maximum of 272 MB by adding commercially available memory modules Toner Save Mode The toner save mode will reduce toner consumption by approximately 10 in the automatic text and text photo exposure modes Copies will be lighter but still adequate f...

Страница 134: ...nction as shipped from the factory The default time can be changed optionally within the prescribed range of time We suggest you set the most appropriate time according to your usage pattern The time until auto power shut off occurs can be set to 10 30 60 90 120 or 240 minutes When AUTO POWER OFF is selected and the OK key is pressed the following display will appear 1 Select the desired time inte...

Страница 135: ...nd the OK key is pressed the following display will appear 1 Select the desired time interval using the and keys 2 Press the OK key Time Out Setting If a copy job is started while a print or fax job is being run the print or fax job will be interrupted This program is used to adjust the time that elapses before the print or fax job resumes after the copy job is completed If a print or fax job is s...

Страница 136: ...he check box Disable Auto Tray Switching This program prevents automatic switching between the paper trays If automatic tray switching is enabled when paper runs out during copying any tray with paper of the same size in the same orientation will be automatically selected and copying will continue To disable auto tray switching highlight DISABLE AUTO TRAY SWITCHING and press the OK key to display ...

Страница 137: ... the check mark in the check box Disable Stapler This program is used to enable or disable the stapler of a finisher If the stapler malfunctions it can be disabled to prevent further malfunction or possible damage to the stapler until it is serviced To disable the stapler highlight DISABLE STAPLER and press the OK key to display a check mark in the check box To enable the stapler select this progr...

Страница 138: ...m and press the OK key again to clear the check mark in the check box Disable Beep at Key Touch This program is used to enable or disable the beep function If this function is enabled a beep sound will be produced when you press a key on the operation panel To disable the beep function highlight DISABLE BEEP AT KEY TOUCH and press the OK key to display a check mark in the check box To enable the b...

Страница 139: ...5 digit account numbers can be assigned Use key operator program Account Number Control page 138 to assign account numbers To enable the auditing mode highlight AUDITING MODE and press the OK key to display a check mark in the check box To disable the auditing mode select this program and press the OK key again to clear the check mark in the check box Copies per Account This program is used to dis...

Страница 140: ...K key repeatedly to exit the program Account Number Control This program is used to register accounts delete accounts or change an account number When ACC CONTROL is selected and the OK key is pressed the following display will appear To register accounts 1 Use the and keys to select ENTER and press the OK key If 50 accounts have already been registered the message The account register is full 50 ...

Страница 141: ... account number to be changed using the numeric keys 3 Enter a new account number 4 Press the OK key If a number that is already registered is entered the message This number is already used Enter another number will appear 5 To change other account numbers repeat steps 2 to 4 Press the BACK key repeatedly to exit the program NOTES When entering an account number be sure to input five digits If no...

Страница 142: ...ing counts will be displayed if the relevant features are installed An A3 or 11 x 17 sheet is counted as two sheets A two sided copy is also counted as two sheets The sheets printed with the self print function of the printer and facsimile features are included in OTHERS When TOTAL COUNT is selected and the OK key is pressed the following display will appear The total counts for all units in use w...

Страница 143: ...KEY OPERATOR PROGRAMS 141 KEY OPERATOR S GUIDE 8 ...

Страница 144: ...py paper 35 80 Copy quantity 25 Copy ratio 31 D Display 15 Display contrast adjustment 89 Dual page copy 42 E Edge erase 62 Enable disable setting 134 Enlargement 31 Erase 62 Exposure adjustment 29 Exterior 12 F Features 10 Finisher 105 Function icons 18 Function review 19 Function setting 128 Fusing unit release levers 72 G Group 57 107 I Initial settings 17 Interior 13 Interrupt 38 J Job memory ...

Страница 145: ...Reversing single pass feeder RSPF 95 Rotation copying 56 RSPF 95 S Single pass feeder SPF 95 Sort 57 107 Special paper 35 Specifications 500 sheet paper feed unit 2x500 sheet paper feed unit 116 copier 91 finisher 106 paper 35 80 SPF RSPF 96 SPF 95 Staple cartridge replacement 111 Staple jam removal 112 Staple sort 108 Status messages 68 Storage of supplies 90 Stream feeding mode 97 Supplies 90 Sy...

Страница 146: ...144 LUOKAN 1 LASERLAITE KLASS 1 LASERAPPARAT CLASS 1 LASER PRODUCT LASER KLASSE 1 ...

Страница 147: ...ntered when accessing the Key Operator Program for the first time See page 120 NOTE The Key Operator Code Number is an important security number allowing the Key Operator to configure the copier s functions and auditor s settings You should register your own code number different from the factory setting above immediately after your copier is installed KEY OPERATOR Detach this page and store it in...

Страница 148: ......

Страница 149: ......

Страница 150: ......

Страница 151: ......

Страница 152: ...SHARP CORPORATION PRINTED IN CHINA 2003B KS TINSE0903QSZZ Printed on 100 post consumer recycled paper AR 215 ...

Отзывы: