Sharp Aquous 4T-B70CJ1U Скачать руководство пользователя страница 12


10 


  Main Board and WIFI board 


1.- Disconnect the connection of the cable from the MB and WIFI board (Red 

rectangle).   


2.- Detach the I/O cover from the MB 

Содержание Aquous 4T-B70CJ1U

Страница 1: ...SHARP SERVICE MANUAL 4K ULTRA HD TV MODEL 4T B70CJ1U ...

Страница 2: ...33 CHAPTER 6 BLOCK DIAGRAM WIRING DIAGRAM 43 1 BLOCK DIAGRAM 43 2 POWER MANAGEMENT BLOCK DIAGRAM 44 3 WIRING DIAGRAM 44 CHAPTER 7 PRINTED WIRING DIAGRAM 1 MAIN LED UNIT PRINTED WIRING BOARD 45 2 POWER UNIT PRINTED WIRING BOARD 3 KEY UNIT PRINTED WIRING BOARD 4 IR UNIT PRINTED WIRING BOARD 49 CHAPTER 8 SCHEMATIC DIAGRAM 50 1 MAIN SCHEMATIC DIAGRAM 50 2 POWER SCHEMATIC DIAGRAM 3 IR LED ALS DRIVER SC...

Страница 3: ...00 1 Backlight Zones Viewing Angle H V 176 176 Picture Local dimming HDR Film Mode 1080 24P Picture Mode O Color Temperature Adjustment O Video Noise reduction O Audio Dolby Digital Decoder MS11 Surround sound Sound Output 20W 10W 10W TV SoC RealTek RTD2991 Memory DRAM Flash 1GB 4GB Broadcast System ATSC QAM WiFi 802 11ac Dual band 2x2 Bluetooth User Operation Remote control 7 key Keypad LED Indic...

Страница 4: ...rk Auto Network Mechanical Package VESA Hole Pitch WxH 400x400 mm Unit Dimension w o Stand WxHxD 1568 5 x 904 9 x 72 3 mm Unit Dimension w i Stand WxHxD 1568 5 x 976 4 x 286 9 mm Net Weight w o Stand 25 2 kg Net Weight w i Stand 25 7 kg Carton Structure C Type Carton Printing Waterbased print Carton Dimension Outer WxHxD 1665 x 1021 x 200 mm Gross Weight 34 5kg Accessory Power Cord Detachable two ...

Страница 5: ... Energy Saving NRCan CEC 2 DIMENSIONS Model A B C D E F G H Bezel Width T R L Bottom BM T S Bottom 4T B70CJ1U 1568 48 904 92 976 92 56 09 286 9 72 29 72 1390 07 14 22 0 8 0 8 2 5 TV screen size Inches VESA compatible wall bracket millimeters W H Screw type 70 400x400mm Metric 6 12mm ...

Страница 6: ...4 CHAPTER 2 Removing of Major Parts 1 Removing of Major Parts STAND FEET REMOVAL 1 Remove the screw M5X14 2 per stand feet ...

Страница 7: ... Take the stand and slide out downwards from the TV set Note Repeat operation in the 2nd stand UNSCREW THE REAR COVER ASSY 1 Remove the 4 screw 3X4 5and 2 screw T3x9 around the I O cover area and AC INLET ...

Страница 8: ...6 2 Remove the 4 VESAscrews M6X12 3 Remove the 19 screws M3X8 at the rear cover area ...

Страница 9: ... to pull rear cover and create GAP at corner area 2 Pull the Rear Cover from the bottom area and side area The outer periphery of the front cover and CAB B are fitted with hook lift while pushing slightly inward Remove the key unit wire connector ...

Страница 10: ...8 3 Finally use team job to remove the Rear Cover completely REMOVE SPEAKERS MAIN Board Power Board KEY Board T CON Board WIFI Board and Speakers ...

Страница 11: ...9 Speakers 1 Disconnect the cable of speaker 2 Slide out the stud 3 Repeat operation in the 2nd speaker ...

Страница 12: ...10 Main Board and WIFI board 1 Disconnect the connection of the cable from the MB and WIFI board Red rectangle 2 Detach the I O cover from the MB ...

Страница 13: ...11 3 Remove 5 screws M3X6 in the main area Redcircle ...

Страница 14: ...12 4 Unlock the hook Red rectangle and remove the WIFI board 5 Remove the screws 1pcs PSW M3X8 Red circle and remove the WIFI holder ...

Страница 15: ...13 PSU 1 Disconnect the connection of the cable from the PSU Red circle 2 To remove the PSU unscrew 5 screws M3X6 Red circle and 2 screws M3X8 Blue circle ...

Страница 16: ...oard 1 Disconnect the connection of the cable from the T con red rectangle 2 To remove the board unscrew 6 screws M3X6 Yellow circle Key pad 1 Disconnect the connection of the cable from the key pad red rectangle ...

Страница 17: ...15 2 To remove the key board unscrew 2 screws T3X6 Yellow rectangle and 2 screws red rectangle IR Board 1 Disconnect the connection of the cable from the IR board red rectangle ...

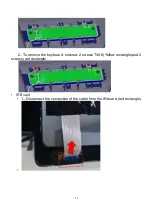
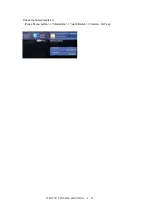
Страница 18: ...16 2 Pull open the hook of IR Lens then take IR Board out WIRE DRESSING LAY OUT ...

Страница 19: ...ol 3 REMOTE CONTROLLER KEY OPERATION OF DISPLAY IN ADJUSTMENT PROCESS MODE 1 Keyoperation Remote controller key Main unit key Function CH CH Remote controller key Moving an item line by one UP DOWN Main unit key Moving a page by one UP DOWN VOL VOL Changing a selected item setting Remote controller ley 1 1 Main unit key 10 10 Cursor Turning a page PREVIOUS NEXT Cursor Changing a selected line sett...

Страница 20: ...ARD MOVIE GAME USER PC IN POINT HIGH Standard value High R LEVEL LOW WB adjustment Point Low R adjustment value G LEVEL LOW WB adjustment Point Low G adjustment value B LEVEL LOW WB adjustment Point Low B adjustment value R LEVEL HIGH WB adjustment Point High R adjustment value G LEVEL HIGH WB adjustment Point High G adjustment value B LEVEL HIGH WB adjustment Point High B adjustment value R LEVEL...

Страница 21: ...alue of RSSI 5GHz WIFI TIME 2 4GHz Display the time out of WiFi 2 4GHz check sec WIFI TIME 5GHz Display the time out of WiFi 5GHz check sec WIFI RSSI TEST 2 4GHz 5GHz RSSI Level test WIFI RSSI RESULT Display the RSSI Level test result 5 ADJUSTMENT ITEM WHITE BALANCE ADJUSTMENT The white balance adjustment value is used to correct variations in each LCD panel When the LCD panel is not changed take ...

Страница 22: ... LOW 584 619 625 B LEVEL LOW 593 668 739 R LEVEL HIGH 3427 3388 3193 G LEVEL HIGH 3436 3356 3356 B LEVEL HIGH 3580 3640 3607 R LEVEL MAX 3915 3828 3588 G LEVEL MAX 3926 3792 3772 B LEVEL MAX 4080 4080 4054 VCOM ADJUSTMENT When replacing the T CON unit perform the VCOM adjustment 1 Enter service mode key and go to 5 7 PANEL Page 2 Press Enter key at VCOMADJ 3 Adjust the flicker effect by pressing V...

Страница 23: ...TION PROCEDURE Factory setting Complete the setting by pulling out the AC cord Enter Factory mode then select Factory lnit in page 2 7 and push Enter Key by remote Confirm the green screen on the display Turn off the TV with AC plug off Confirm US displayed when factory init The followings are initialized to factory setting 1 Usersetting 2 Channel data e g broadcastfrequencies 3 Manufacturer s opt...

Страница 24: ... FAT32supports Use the USB memory without other functions lock and memory reader etc 3 HOW TO UPGRADE THE SOFTWARE Caution Do not remove the USB memory device or unplug the AC cord while the software is beingupdated Besuretoproperlyfollowthewholeproceduredescribedbelow stepbystep Otherwise forexample theTVca nnotreadthedatain the USB memory device and software updating will fail Never POWER OFF th...

Страница 25: ...vice are displayed If the USB memory device is not properly installed or the correct update file cannot be found on the USB memory device an error message is displayed Check the file on the USB memory device and then reinsert the USB memory device correctly 2 When the software is successfully updated a screen is displayed indicating that the update process is completed After this screen is display...

Страница 26: ...4T B70CJ1 TROUBLE SHOOTING 4 24 Check the firmwareversion Press Menu button Information Identification Version SW x xx ...

Страница 27: ...justments such as picture size madecorrectly Strange color light color or color misalignment Adjust the picturetone Is the room too bright The picture may look dark in a room that is toobright Power is suddenly turned off Is the sleep timerset Check the power controlsettings The unit s internal temperature has increased Remove any objects blocking vent orclean No picture Is connection to other com...

Страница 28: ...setting of the backlight is set to the setting other than the maximum setting 16 and the display screen is seen through the camera the flicker appears The symptom occurs because the factory setting Standard mode of the backlight is 8 The backlight control is controlled by PWM dimming pulse dimming and if the setting of the backlight is lowered the period of the pulse decreases and it interferes wi...

Страница 29: ...1 8V IC9601 4 CPU D1 0V IC9604 5 CORE D1 0V IC9603 6 D1 5V IC9608 7 BU 5V IC9610 8 BU 3 3V IC9605 9 BU1 0V IC9609 10 PNL 12V 60 70 Q3804 80 Q3801 NO Check the DC DC converters and the control lines Replace defective parts as required Check FFC cable LCD controller incl panel and their peripheral circuits No video in the UHF VHF reception Are the wire harnesses and other cables properly connected i...

Страница 30: ...n the input select menu screen Select INPUT 3 on the input select menu screen to pick up the right input signal Is there the video signal input at pin F1 of IC3301 Check the line between pin 3 of J502 and pin F1 of IC3301 Are there the signal outputs pin of IC3301 to SC3801 Check IC3301 and its peripheral circuits to SC3801 Is HDMI 1 HDMI2 selected on the menu screen Select HDMI1 HDMI2 select menu...

Страница 31: ...and their peripheral circuits No sound in the UHF VHF reception Is the IF output from the tuner pin 6 7 8 9 of TU1102 as specified Check TU1102 and its peripheral circuits Is there IF input at pin K1 K2 of IC3301 Check the circuit between TU1102 IC3301 Is there audio signal input at pin 1 2 3 4 of IC1702 Check connection between IC3301 and IC1702 and its peripheral circuits Are the audio signal L ...

Страница 32: ...put at pin 8 9 12 13 of IC1702 normal Is the R ch audio signal output at pin 18 19 22 23 of IC1702 normal NO Check IC1702 and its peripheral circuits Check speakers and their peripheral circuits Is there the signal output at pin AL28 AL27 AK28 AM27 of IC3301 Check IC3301 and its peripheral circuits Is there signal input at pin 1 2 3 4 of IC1702 Check connection between IC3301 and IC1702 and its pe...

Страница 33: ...DMI sound heard HDMI1 HDMI2 HDMI1 HDMI 2 is digital audio Does the HDMI image appear on screen Refer to HDMI1 HDMI2 is no external input video screen HDMI No audio output from HDMI1 HDMI 2 Check it if EDID is written or not Are waveforms output from each HDMI pin normally Check peripheral circuits Is there I2S signal input at pin 1 2 3 4 of IC1702 Check connection between IC3301 and IC1702 and its...

Страница 34: ... new full wave rectifier diode to check the output voltage Is the voltage of 13V applied to pin 11 14 15 of CN201 Does the standby circuit normal Q1 T1 D201 D4 the circuit around the U1 and protection circuit ect is checked YES Does the U101 Q101 T101 D103and the circuit around IC U101 Check them NO NO NO NO Is VLED output 35V 39Vas for power on off switch when is on Does the U301 T301 Q301 Q302 D...

Страница 35: ...4T B70CJ1 TROUBLE SHOOTING 4 33 CHAPTER 5 MAJOR IC INFORMATIONS 1 MAJOR IC INFORMATIONS IC3301 RH IXE078WJQZQ RealTek RTD2991 Soc ...

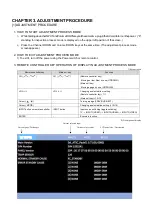
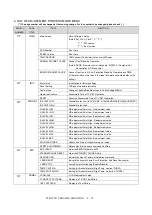
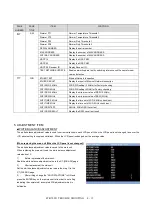
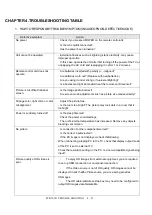
Страница 36: ...4T B70CJ1 TROUBLE SHOOTING 4 34 ...

Страница 37: ...4T B70CJ1 TROUBLE SHOOTING 4 35 ...

Страница 38: ...4T B70CJ1 TROUBLE SHOOTING 4 36 IC1702 VHIBD28623M 1Y Rohm BD28623MUV S out IC504 VHITPA6139A 1Y TI TPA6139A HP out ...

Страница 39: ...4T B70CJ1 TROUBLE SHOOTING 4 37 IC502 VHIM3221EIP 1Y TI MAX3221EIPWR 232c IC8101 9604 9607 9608 VHITPS56320 1Y TI TPS563200DDCR Power ...

Страница 40: ...4T B70CJ1 TROUBLE SHOOTING 4 38 IC3501 3502 RH IXE098WJQZQ SAMSUNG K4B2G1646F BYMA DDR ...

Страница 41: ...4T B70CJ1 TROUBLE SHOOTING 4 39 IC3101 RH IXE112WJQZQ SAMSUMG KLM4G1FETE B041 eMMC ...

Страница 42: ...4T B70CJ1 TROUBLE SHOOTING 4 40 IC8102 RH IXE211WJQZY DIALOG AS3824E1 ZQFT LED Drive ...

Страница 43: ...4T B70CJ1 TROUBLE SHOOTING 4 41 ...

Страница 44: ...4T B70CJ1 TROUBLE SHOOTING 4 42 Q8101 8108 RH TXA102WJQZY Rohm SH8KA4TB ...

Страница 45: ...4T B70CJ1 TROUBLE SHOOTING 4 43 CHAPTER 6 BLOCK DIAGRAM WIRING DIAGRAM 1 BLOCK DIAGRAM ...

Страница 46: ...e layer board There are 2 outputs in the power board one is 13V interface signals for M B system the other 35V is converter output for LCM 3 WIRING DIAGRAM AC INPUT DCM PFC IC FAN7930B Fly back Standby IC TEA18363 Converter LED OUTPUT IC HR1001C PQ38 EE5013 DC output 13V T con 13V AUDIO 13V Regulation DC output 35V ...

Страница 47: ...4T B70CJ1 TROUBLE SHOOTING 4 45 CHAPTER 7 PRINTED WIRING DIAGRAM 1 MAIN LED UNIT PRINTED WIRING BOARD MAIN TOP ...

Страница 48: ...4T B70CJ1 TROUBLE SHOOTING 4 46 MAIN BOTTOM ...

Страница 49: ...4T B70CJ1 TROUBLE SHOOTING 4 47 2 POWER UNIT PRINTED WIRING BOARD POWER TOP ...

Страница 50: ...4T B70CJ1 TROUBLE SHOOTING 4 48 POWERBOTTOM ...

Страница 51: ...4T B70CJ1 TROUBLE SHOOTING 4 49 3 KEY UNIT PRINTED WIRING BOARD Keypad Board Top Keypad Board Bottom 4 IR UNIT PRINTED WIRING BOARD IR Board Top IR Board Bottom ...

Страница 52: ...4T B70CJ1 TROUBLE SHOOTING 4 50 CHAPTER 8 SCHEMATIC DIAGRAM 1 MAIN SCHEMATIC DIAGRAM ...

Страница 53: ...4T B70CJ1 TROUBLE SHOOTING 4 51 ...

Страница 54: ...4T B70CJ1 TROUBLE SHOOTING 4 52 ...

Страница 55: ...4T B70CJ1 TROUBLE SHOOTING 4 53 2 POWER SCHEMATIC DIAGRAM 3 IR LED ALS DRIVER SCHEMATIC DIAGRAM ...

Страница 56: ...4T B70CJ1 TROUBLE SHOOTING 4 54 4 KEY SCHEMATIC DIAGRAM ...

Страница 57: ... DE 70 1 2 025 0001 7155 VESA_BKT_CAP06 ROHS 4 3 006 0001 1723 MYLAR POWER BOARD DE 1 4 7B328U600 GB2 G Y19_SHARP_NA_B2B_IO_COVER_SIDE 1 5 7B328U500 GB2 G Y19_SHARP_NA_B2B_IO_COVER_BTM 1 6 1A314AS00 GB2 G Y19_SHARP_NA_B2B_70_RC_ASSY 1 7 006 0002 1703 STAND BRACKET L DE70 1 8 006 0002 1722 STAND BRACKET R DE70 1 9 7B1301L00 GB2 G KEY BUTTON CAP0L 1 10 01 70CAR0XF 00 4T B70CJ1U CAR0X Mother Board 1 ...

Страница 58: ... Power harness 1 20 351128300 0H5 G MB to T CON unit harness LVDS 1 351128200 52F G 351128100 GWV G 21 35105HU00 33T G MB to Key unit harness A 1 22 35105HV00 33T G MB to Key unit harness B 1 23 35111N000 GWV G MB to LED IR unit harness 1 24 351062A00 33T G MB to Speaker box harness 1 25 351062H00 33T G MB to WiFi unit harness 1 351062B00 28T G 26 025 0001 8181 Screw for stand unit 1 ...

Страница 59: ...4T B70CJ1 TROUBLE SHOOTING 4 57 2 CABINET PARTS ...

Страница 60: ...4T B70CJ1 TROUBLE SHOOTING 4 58 3 SUPPLIED ACCESSORIES ...

Страница 61: ...4T B70CJ1 TROUBLE SHOOTING 4 59 4 PACKING PARTS ...

Страница 62: ...4T B70CJ1 TROUBLE SHOOTING 4 60 ...

Страница 63: ...4T B70CJ1 TROUBLE SHOOTING 4 61 ...

Отзывы: