background image


Page - 6 - 

 
6.


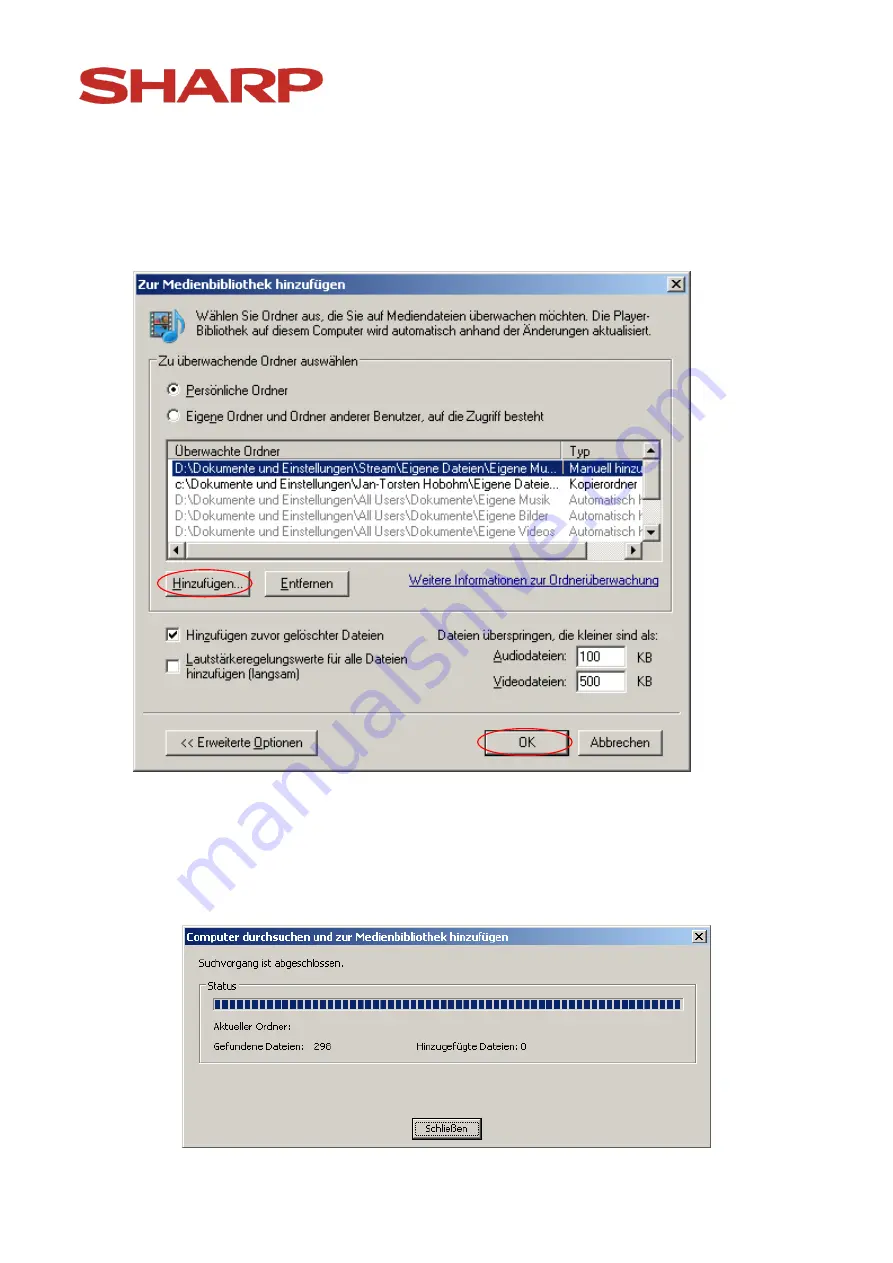
Click "Add" and choose the folders which contain photos or music in order 
to add them. 


After confirming with "OK" the folders will be automatically added by 
Windows. In case at an earlier point in time this choice was already made the 
number of just added files will be displayed as "0". 


Содержание AQUOS LE814

Страница 1: ...Page 1 DLNA Installation Guide for LAN connections ENGLISH Experience Reality AQUOS LCD TVs Spring Summer 2011 ...

Страница 2: ...ove mentioned device series Preparation of the LCD TV device Connect the PC and the LCD TV to the router with a LAN cable and run a software update on the LCD TV You can find latest software in the service section of www sharp de website on the Internet After updating software start the installation of the TV again In order to do so choose the menu Set up After entering the menu highlight Reset an...

Страница 3: ...or PC s with Windows XP and Mediaplayer version 11 or higher 1 Launch Mediaplayer version 11 or higher and switch on the LCD TV Choose Extras and later Options 2 The following notice will appear Choose the tab Media Library ...

Страница 4: ...Page 4 Click Set up enabling 3 Now choose Settings the number of displayed devices may vary ...

Страница 5: ...eld Enable media as The name will later appear on the TV Now tick the points Mdia types and Automatically allow new devices and computers 5 In the end it is necessary to choose multimedia folders for enabling Click File and later Add to the library ...

Страница 6: ...hich contain photos or music in order to add them After confirming with OK the folders will be automatically added by Windows In case at an earlier point in time this choice was already made the number of just added files will be displayed as 0 ...

Страница 7: ...l settings can be taken over Afterwards you can continue the setting up of the LCD TV Preparation of the LCD TV device 1 Switch on the TV and use the selector button to choose the point home network 2 Afterwards press the menu button Setup Ethernet Settings and after that the OK button ...

Страница 8: ...hange 4 In case your router is set on DHCP in the point Obtain IP address automatically choose Yes and later Continue Note that automatic acquisition of the address is not possible when your router is configured so that access is granted only to particular MAC addresses ...

Страница 9: ... point Obtain DNS IP Address automatically choose Yes and later choose Continue 6 Confirm Conduct Advanced Set up with Yes 7 In Ethernet Connection Speed choose Automatic Identification confirm it and choose Continue ...

Страница 10: ...matically obtain the IP address after checking you can finalize this point with Completed 9 The current configuration will appear as confirmation Exit this view by using the Menu Button End 10 Now you should be able to choose both photos and music files from the media library of the PC connected over the router ...

Страница 11: ...choose Images and then e g All Images and later the corresponding photograph 12 If the server in photo or music mode is not recognized rightaway choose using the button the network menu and with the button run a new search DLNA set up is now finished ...

Страница 12: ...mputers printers etc connected to the local network LAN Currently transfer rates of 10 Megabit s 100 Megabit s Fast Ethernet 1 Gigabit s Gigabit Ethernet up to 10 Gigabit s are specified In its orgiginal meaning LAN covers the area of a single building but nowadays through optical fibers Ethernet connects also devices located far from each other DHCP Dynamic Host Configuration Protocol enables the...

Страница 13: ... of the most important services in the network Its main task is answering inquiries about name resolution Router is a network device which connects or disconnects depending on the point of view numerous computer networks In the process the router analyses incoming data packages according to their target addresses and blocks them or transmits them ...

Отзывы: