background image

55

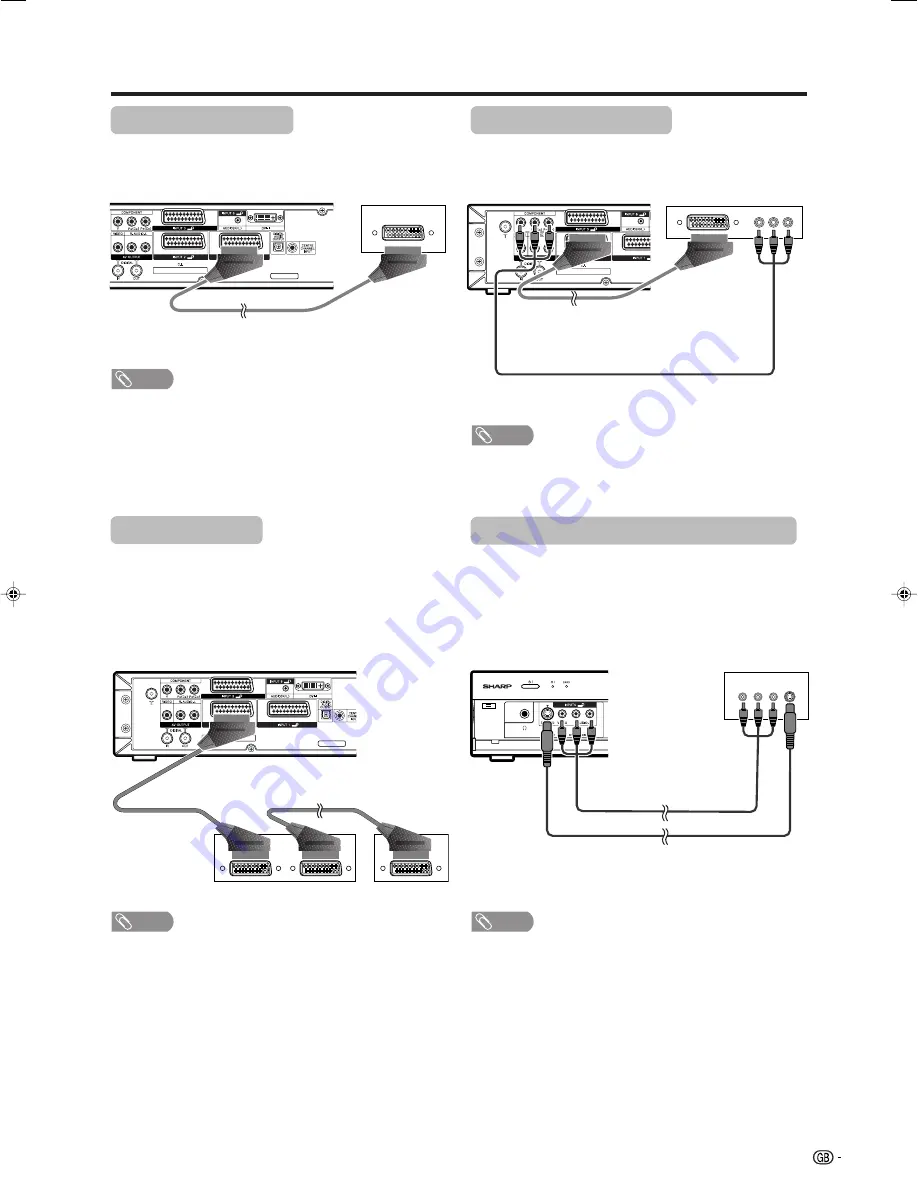
Using external equipment

AVC System (rear view)

SCART cable
(commercially available)

Connecting a VCR

You can use the INPUT 2 terminal when connecting a
VCR and other audiovisual equipment.
If your VCR supports TV-VCR advanced “AV Link”
systems (see page 56), you can connect the VCR to
the INPUT 2 terminal on the AVC System using the
fully-wired SCART cable.

AVC System (rear view)

VCR

Decoder

SCART cable
(commercially available)

Decoder

Connecting a DVD player

You can use the INPUT 3 terminal when connecting to
a DVD player and other audiovisual equipment.

AVC System (rear view)

DVD player

Component cable
(commercially available)

SCART cable
(commercially available)

Connecting a game console or camcorder

A game console, camcorder and some other
audiovisual equipment are conveniently connected
using the INPUT 4 terminals.

AVC System (front view)

Game console/

Camcorder

Composite video cable
(commercially available)

S-video cable
(commercially available)

NOTE

• In cases when the decoder needs to receive signal from

the System, make sure to set “Decoder” to “INPUT1” in
the Programme Setup “Manual Adjust” menu. (See page
25.)

NOTE

• TV-VCR advanced “AV Link” systems may not be

compatible with some external sources.

• It is recommended to connect to the INPUT 2 terminal

when using a decoder for ground wave signal input with
a VCR. If INPUT 2 signals preset in auto installation or
programme setup, make sure to set “Decoder” to
“INPUT2” in the Programme Setup “Manual Adjust” menu.
(See page 25.)

Connecting a decoder

You can use the INPUT 1 terminal when connecting a
decoder and other audiovisual equipment.

NOTE

• When using component cable, select “COMPONENT”

from “Input Select” in the menu. (See page 59.)

NOTE

• The S-video terminal has priority over the video terminals.
• You can also connect the game console to INPUT 1 or 3

terminals to enjoy clearer picture.

LC-65GD1E(E)-i

05.9.21, 7:33 AM

55

Содержание Aquos LC-65GD1E

Страница 1: ...RI LCD OPERATION MANUAL BEDIENUNGSANLEITUNG MODE D EMPLOI MANUALE DI ISTRUZIONI ENGLISH LC 65GD1E TU 65GD1E FRANÇAIS DEUTSCH OPERATION MANUAL MODE D EMPLOI BEDIENUNGSANLEITUNG MANUALE DI ISTRUZIONI LC 65GD1E DISPLAY DISPLAY ÉCRAN SCHERMO TU 65GD1E AVC SYSTEM AVC GERÄT SYSTÈME AVC SISTEMA AVC C096WJZZ ITALIANO 1 ...

Страница 2: ...a serious electric shock may occur To fit an appropriate plug to the mains lead follow the instructions below IMPORTANT The wires in the mains lead are coloured in accordance with the following code Blue Neutral Brown Live As the colours of the wires in the mains lead of this product may not correspond with the coloured markings identifying the terminals in your plug proceed as follows The wire wh...

Страница 3: ... 23 Programme setup 23 Auto search 23 Manual setting for each channel 24 Fine tuning 24 Colour system 24 Sound system Broadcasting system 24 Labelling channels 25 Skipping channels 25 Setting the decoder 25 Setting the child lock 25 Setting the booster 25 Sort 26 Erase Programme 26 Basic adjustment settings Digital 27 DTV input mode menu items 27 Selecting DTV mode 27 About colour buttons 27 Icons...

Страница 4: ...quipment image 54 Displaying a DVD image Example 54 Connecting a decoder 55 Connecting a VCR 55 Connecting a DVD player 55 Connecting a game console or camcorder 55 Connecting a PC 56 Using Digital Audio Output 56 Using AV Link function 56 Speaker Setup 57 Connecting external speakers 57 Selecting speakers 57 External Audio Bypass 57 Useful adjustment settings 58 Image position for TV AV input mod...

Страница 5: ...t internal parts For the same reason do not spill water or liquid on the product 10 Servicing Do not attempt to service the product yourself Removing covers can expose you to high voltage and other dangerous conditions Request a qualified service person to perform servicing 11 Repair If any of the following conditions occurs unplug the AC cord from the AC outlet and request a qualified service per...

Страница 6: ...lace the product in an enclosed place such as a bookcase or rack unless proper ventilation is provided or the manufacturer s instructions are followed The LCD panel used in this product is made of glass Therefore it can break when the product is dropped or impact applied If the LCD panel is broken be careful not to be injured by broken glass Heat sources Keep the product away from heat sources suc...

Страница 7: ... AVC System Remote control unit g1 Pages 11 and 17 AAA size battery g2 Page 11 System cable g1 Page 7 Stand unit for AVC System g1 Stand g1 Stand cushion g4 Stand spacer g4 Stand screw g2 Page 9 Cable tie g1 Antenna cable g1 Page 12 Product shape varies in some countries Page 7 AC cord g1 Display Stand hole cover g2 Page 10 Page 7 Operation manual LC 65GD1E TU 65GD1E ...

Страница 8: ...and speaker from the Display unless using an optional bracket to mount it Keep enough space above and behind the Display When you move the System carry it by two or more people When you move the Display hold the rear handle of the Display not the LCD panel Handling the AVC System CAUTION Do not put a VCR or other device on the AVC System Keep enough space above and on the sides of the AVC System D...

Страница 9: ...AUTION TO PREVENT RISK OF ELECTRIC SHOCK DO NOT TOUCH UN INSULATED PARTS OF ANY CABLES WITH THE AC CORD CONNECTED To comply with the requirements of the CE regulation rules make sure to attach the terminal cover to the rear of the display with all the system cables connected before you use this product NOTE When you unplug the WHITE system cable make sure you unscrew the screws thoroughly before u...

Страница 10: ...uting the cables on the right side use the holder on the right Fit the band around system cables 1 Pass the end of the band through the hole 2 Pull the band toward you and fasten to the tab 5 Cable clamp Insert the cable clamp in the hole on the Display as shown Fix the system cables firmly to the Display as shown If routing the cables on the right side use the holder on the right ...

Страница 11: ...ttom Insert the stand into the AVC System making sure that the thick and thin bulges of the stand align with the big and small holes on the AVC System Stand spacer Bulge Stand cushion Bulge Hole 4 Attach the stand using the stand screws as shown Stand screw The AVC System installed vertically with the stand Attaching point Attaching point Bulge Setting the Display on the wall CAUTION Installing th...

Страница 12: ...n the eight screws used to secure the stand in place 1 Unfasten the four screws used to secure the bracket in place 3 Detach the stand from the Display Hold the stand so it will not drop from the edge of the base area 4 Attach the stand hole covers supplied with the product Removing speakers NOTE To attach the speakers perform the steps in reverse order Perform the same steps for the left section ...

Страница 13: ...d new batteries Mixing old and new batteries can shorten the life of new batteries or cause chemical leakage in old batteries Remove batteries as soon as they have worn out Chemicals that leak from batteries can cause a rash If you find any chemical leakage wipe thoroughly with a cloth The batteries supplied with this product may have a shorter life expectancy due to storage conditions If you will...

Страница 14: ...nto the DIGITAL IN terminal at the rear of the AVC System Connecting to the power outlet Before connecting the AC cords make sure to connect the system cable first Product shape varies in some countries Antenna cable supplied For viewing only digital broadcasts you do not need to connect the antenna cable supplied ex For viewing both analogue and digital broadcasts ex For viewing analogue broadcas...

Страница 15: ...mation is provided the System only displays the channel number leaving the channel name blank Automatic channel searching Channel auto search finds all channels viewable in your area NOTE If no channel is found No programme found displays And the auto installation finishes Preset download When auto sorting finishes the System automatically downloads and stores each sorted channel from VCR When a V...

Страница 16: ...scan and then press OK Search screen displays Search Press OK and Search finds all the digital broadcasting channels viewable in your area The Search menu disappears and you can watch the programme Press DTV to switch to the DTV mode 1 For viewing digital broadcasts please follow the procedure below to setup In DTV mode some menu items displayed in black cannot be selected NOTE If you exit DTV mod...

Страница 17: ...by On indicator Main Power button a OPC sensor Display Input button b Volume buttons ik l Programme channel buttons Pr s Remote control sensor OPC Optical Picture Control See page 41 Remote Control indicator OPC indicator ...

Страница 18: ...PIN when you know it See page 76 for initialising to the factory preset values when you forget your PIN Antenna Input Part names AVC System DISPLAY OUTPUT 2 Front view Rear view DC OUTPUT DIGITAL AUDIO OUTPUT SPEAKER B DIGITAL ANTENNA INPUT DIGITAL ANTENNA OUTPUT Connect a digital audio equipment Provided for command from PC see page 72 The AVC System is shipped with a terminal cover on INPUT 5 te...

Страница 19: ...lect the sound multiplex mode See page 20 12 ik il VOLUME Set the volume See page 20 13 e MUTE Mute the sound See page 20 14 GUIDE DTV input mode To display EPG Electronic Programme Guide screen 15 DTV MENU DTV input mode Display the digital TV menu screen 16 EXIT Turn off the On Screen Display 17 SLEEP Set the Sleep timer See page 58 18 p DISPLAY INFORMATION Display the programme information 19 A...

Страница 20: ...g or channel information may not be memorised Watching TV Press Main Power a a a a a on the Display Standby On indicator Green The System is on After a few seconds programme information appears with sound Standby On indicator Red The System is in standby Go to step 2 Use any of the methods below to power on Powering on changes the LED from red to green Press Power B B B B B on the AVC System Press...

Страница 21: ... to 9 Using Flashback A on the remote control unit Press A to switch the currently tuned channel to the previously tuned channel Press A again to switch back to the currently tuned channel Press A to toggle between the currently selected input source and the previously selected one Press A to return to the previous page in TELETEXT mode Channel display changes approximately after 3 seconds as show...

Страница 22: ...ng the methods below Pressing ie e e e e if f f f f or e can also cancel the mute Mute will be cancelled after 30 minutes have elapsed However the System will not suddenly output a loud sound as the volume level is set to 0 automatically ik k k k k l l l l l To increase the volume press ik k k k k To decrease the volume press il l l l l 1 2 Within 30 minutes press e again to cancel the mute Before...

Страница 23: ...This indicates the current setting for the item 3 Item displayed in white This indicates an item can be selected 4 Item displayed in grey This indicates the item cannot be selected There are various reasons why items cannot be selected but the main reasons are as follows 1 Nothing is connected to the selected input terminal 2 The function is not compatible with the current input signal NOTE Menu o...

Страница 24: ... 43 Dolby Virtual Page 43 Audio Only Page 58 3D NR Page 64 Mosquito Noise Reduction Page 64 Input Select Page 59 Audio Out Page 66 Quick Shoot Page 64 Colour System Page 60 Centre Channel Input Page 66 Standby Recording Page 66 Audio Power Control Setup Option PC input mode menu items List of PC menu items to help you with operations OPC Page 41 Backlight Page 40 Contrast Page 40 Brightness Page 4...

Страница 25: ... Channels can be tuned automatically or manually Press MENU and the MENU screen displays Press c d to select Setup 1 2 3 4 Press a b to select Programme Setup and then press OK If you already set the PIN enter it here If not enter the factory preset PIN 1234 See page 65 for setting PIN NOTE See page 13 for details Do not turn off the System while the message Programme set up completed is displayed...

Страница 26: ...enter the factory preset PIN 1234 See page 65 for setting PIN Press c d to adjust the frequency and then press OK Adjust while checking the background picture as a reference MENU Setup Programme Setup Manual Adjust Fine Colour sys Sound sys Label Skip Decoder Lock 179 25 AUTO B G Off SAT 1 Off Off Booster Off 179 25 MHz a 179 25 MHz Press 1 s 7 s 9 s 2 s 5 49 25 MHz Press 4 s 9 s 2 s 5 s OK Press ...

Страница 27: ...T1 is the recommended selection Channels with Skip set to On are passed over when using Pr Ps even if selected while watching the image from the TV Press a b to set Decoder to INPUT1 INPUT2 or INPUT3 and then press OK Terminal inputs information displays Off INPUT1 INPUT2 INPUT3 Skipping channels NOTE See page 65 for setting PIN When Lock is set to On for a channel Child lock has been activated di...

Страница 28: ...ready set the PIN enter it here If not enter the factory preset PIN 1234 See page 65 for setting PIN Erase Programme The individual programme can be erased Erase programme menus 01 06 07 08 09 10 11 12 13 14 15 16 17 18 19 20 SAT 1 01 SAT 1 Pro7 02 KABEL 03 04 05 Next 02 Pro7 Next 01 SAT 1 03 KABEL Pro7 02 06 07 08 09 10 11 12 13 14 15 16 17 18 19 20 04 05 Next 01 SAT 1 02 KABEL 06 07 08 09 10 11 ...

Страница 29: ... 37 Access restrictions Maturity rating 32 TV services 32 Radio services 32 Audio lang 35 Subtitle lang 35 List of DTV menu items to help you with operations Numbers within brackets indicate the page where the topic is explained NOTE mark indicates in some cases PIN input may be required The illustrations and on screen displays in this manual are for explanation purposes and may vary slightly from...

Страница 30: ... Setup Preference Search If you already set the PIN enter it here If not enter the factory preset PIN 1234 See page 65 for setting PIN Time Zone GMT 1 00 Amsterdam Berlin Bern GMT Lisbon London GMT 1 00 Brussels Copenhagen GMT 1 00 Luxembourg Madrid Oslo GMT 1 00 Paris Rome Stockholm Vienna 3 2 4 5 Icons 1 2 6 1 General EPG icon 2 Indicates that at least one theme is selected 3 Indicates that addi...

Страница 31: ...TWO 1 BBC ONE 7 BBC CHOICE 10 BBC TEXT 11 BBC NEWS 24 Found radio services 999 BBC PARLMNT 5 2 Repeat steps 1 to 4 in Found TV Services 1 Store Store all found services NOTE This item can only be selected after performing Search or Reinstall all services Press a b to select Store and then press OK Press c d to select Yes and then press OK Repeat steps 1 to 4 in Found TV Services 1 Discard Discard ...

Страница 32: ... to download the info banner data While the info banner is displaying press p again to display the detailed programme information Press p to turn off the info banner and the detailed programme information Repeat steps 1 to 3 in Banner duration 1 Audio Select the default audio language for all services Press a b to select Languages and then press OK Press a b to select Audio and then press OK 3 2 P...

Страница 33: ...sh Euskara Français Galego Reinstall all services Cancel all channel information then download and install again Press a b to select Reinstall all services and then press OK If you already set the PIN enter it here If not enter the factory preset PIN 1234 See page 65 for setting PIN Press c d to select Yes and then press OK Reinstall all services Yes No After Reinstall all services is finished pre...

Страница 34: ...viewing Press a b to select TV services and then press OK If you already set the PIN enter it here If not enter the factory preset PIN 1234 See page 65 for setting PIN Press a b to select the TV services you want to restrict then press c d to select the programme and then press OK TV services 2 BBC TWO 1 BBC ONE 7 BBC CHOICE 10 BBC TEXT 11 BBC NEWS 24 Radio services To perform Radio services selec...

Страница 35: ...rs Committee 11 BBC NEW BBC News 14 00 BBC World News 10 BBC TEXT Mona the Vampire 13 45 Neighbours 7 BBC CHOICE Newsround 13 45 House Invaders 2 BBC TWO Anthony Ant 13 45 UGetMe 1 BBC ONE Trading Treasures 13 45 Passport To The Sun Movie General News Entertainment Sports Now Next 999 ZDF Discovery Theme Mode 14 00 Heute Sport 999 ZDFdok National Geographic 14 00 Streit um Drei 997 ZDFinfo Gesun d...

Страница 36: ...PG screen without selecting a programme Press RETURN to return to the screen in step 1 Some countries and service stations do not support 7 days EPG If this is the case the screen with appears No information will be refreshed if the country or service station does not support 7 days EPG Press a b c d to select a desired programme and then press OK Press a b to select programme c d to select the pr...

Страница 37: ...uage You can select the preferred subtitle language from the list Press a b to select the desired language and then press OK Languages listed may be different for each programme If you select None no subtitles will be displayed This setting is disabled if the channel is changed or the programme is finished For details about the language list see page 31 Press the GREEN button to display the Subtit...

Страница 38: ...ition by pressing a b and then press c d Repeat the steps 6 and 7 until all desired channels are arranged 3 Repeat steps 1 to 3 in Rearrange TV Services 1 2 New TV services Displays a list with all new installed TV services Press a b to select TV service lists and then press OK Press a b to select the New TV services and then press OK Rearrange TV services New TV services Installed TV services Uni...

Страница 39: ... explained in Uninstalled TV services 3 2 Press a b to select Installation and then press OK Country Select the country where you are located Press a b to select Country and then press OK If you already set the PIN enter it here If not enter the factory preset PIN 1234 See page 65 for setting PIN Press a b to select the country where you are located and then press OK NOTE The following information...

Страница 40: ...message appears each time when the power is turned on with DTV input mode selected We recommend that you select Accept this software and perform the update If you select Reject this software and press OK this version update will not be available again for download Update Information for this version will not appear again However the Over Air Download notification will automatically appear again wh...

Страница 41: ... now shows the time of next software update Software download Press OK to accept Press OK to return to normal screen DO NOT turn off the power using Main Power a a a a a on the Display while software update is in progress This may lead to serious damage NOTE If the message prompts you to turn the System off once and then on to start the update press B to enter standby and press B again to turn bac...

Страница 42: ... then press OK to set C M S Hue C M S Saturation C M S Value Colour Temp Sharpness Enhancement Automatic Contrast I P Setting Film Mode 3D Y C or Monochrome See pages 41 and 42 dbutton The screen brightens For more contrast For more brightness For more colour intensity Skin tones become greenish For more sharpness cbutton The screen dims For less contrast For less brightness For weaker red For wea...

Страница 43: ... 3 Press a b to select Advanced and then press OK 4 Press a b to select a specific adjustment item You can select C M S Hue C M S Saturation C M S Value Colour Temp Sharpness Enhancement Automatic Contrast I P Setting Film Mode 3D Y C or Monochrome Some items are not selectable depending on the input mode 5 Press a b or c d to select the desired parameter See the table for the selectable parameter...

Страница 44: ...source Selected item Off On I P Setting Adjusting the image and input signal can give you a more beautiful picture NOTE I P Setting is set to Slow when Film Mode is On Sharpness Enhancement Provides sharper images with more depth by adjusting background sharpness NOTE The higher the number of the level the more sharpness and depth you will get in images However this may also add more background no...

Страница 45: ... when Audio output is variable or when headphones are in use Balance is greyed out when Dolby Virtual is set to On Press c d to select Audio 2 Press MENU and the MENU screen displays 1 Press c d to select On and then press OK 4 3 Press a b to select Dolby Virtual and then press OK NOTE Audio menu items are greyed out when Audio output is variable or when headphones are in use External Audio Bypass...

Страница 46: ...plays 1 Power control Power control setting allows you to save energy Power control for AV source Power control for PC source Power control setting allows you to save energy Power management When set the power will automatically shut down Press a b to select Power Management and then press OK Press a b to select Mode1 or Mode2 and then press OK 3 4 Description No power management Factory preset va...

Страница 47: ...rsions as this constitutes a violation of the copy right laws possible exposing the user to demands for compensation for damages Therefore be sure to strictly observe the existing copyright laws In addition when using image data that includes third parties since the use of such images without prior permis sion may constitute an intrusion on the privacy of third parties be sure to refrain from such...

Страница 48: ...he following when using memory cards and PC card adapters to avoid corruption of data or malfunction of the LCD TV set If you use memory cards other than those shown above recording or playing back pictures are not guaranteed Some PC card adapters have restrictions of memory card capacity Refer to the relevant operation manual for such restrictions Some pictures which have been created modified or...

Страница 49: ...s when playing back PC image data on the LCD TV Recording formats of image data When recording image data on the LCD TV the recording formats are as follows When recording motion pictures The SD_VIDEO folder is created and the data is stored in When playing the card the SD_VIDEO recording format is recognised When recording still pictures The DCIM folder is created and the data is stored in When p...

Страница 50: ... 3 Take out the PC card adapter Inserting a PC card adapter Press in the EJECT button if it is popped out Insert a memory card to a PC card adapter beforehand See page 46 Insert the PC card adapter slowly CARD indicator lights up green when the card is inserted PC CARD slot CARD indicator NOTE When Card is not inserted is displayed eject the PC card adapter and then insert the PC card adapter slow...

Страница 51: ... pause the slideshow and press H to return to the index screen CARD STILL 0001 0045 ORDER NORMAL PREV SLIDE SHOW STOP NEXT REPEAT OFF NOTE See page 47 for operation panel function You cannot rotate the image during slide show Stop slide show to rotate the image Description Set the frame interval for a slideshow Set the frame order for a slideshow See My Programme for details If set to On the slide...

Страница 52: ...in slide show Press a b to select My Programme and then press OK Press c d to select Setup and then press OK Press a b c d to select the files and then press OK To cancel My Programme setting Repeat the operation in step 7 You can select up to 32 files After selecting all the files you want press RETURN to return to MENU Press a b c d to select the file you want to protect and then press OK Protec...

Страница 53: ...re recording Press E to start recording CARD indicator lights up red Recording information displays in the lower right corner of the screen 1 2 Press E to stop recording To display the remaining record time Press p while not recording Remaining record time displays in the lower right corner of the screen NOTE Do not press a on the display while recording Recording cannot finish properly and may da...

Страница 54: ...d 4 Press a b to select Video Setup and then press OK Rec Mode Pre recording Repeat Edit SP LP EP Press a b to select the desired mode and then press OK Press CARD and the card mode screen displays 1 Pre recording You can record the picture slightly before the point where you pressed the record button enabling you to record just the scene you wanted Press a b to select Pre recording and then press...

Страница 55: ...out a card when deleting a file The card may malfunction Press c d to select Yes and then press OK Repeat the operations in steps 3 and 4 above After deleting the images you no longer need press RETURN to return to MENU Deleting all motion picture files Press a b to select Delete All and then press OK Format 5 Press c d to select Yes and then press OK Press MENU and the MENU screen displays 2 3 Pr...

Страница 56: ...al type Displaying an external equipment image Explanation here is for the setting when connecting DVD to INPUT3 terminal Displaying a DVD image Example To watch a DVD image select INPUT3 from INPUT SOURCE menu using b on the remote control unit or on the Display Select the desired signal type on Input Select in the Option menu See page 59 The setting is stored and can be selected on the INPUT SOU...

Страница 57: ...rminals AVC System front view Game console Camcorder Composite video cable commercially available S video cable commercially available NOTE In cases when the decoder needs to receive signal from the System make sure to set Decoder to INPUT1 in the Programme Setup Manual Adjust menu See page 25 NOTE TV VCR advanced AV Link systems may not be compatible with some external sources It is recommended t...

Страница 58: ...ted to the INPUT 2 terminal on the AVC System with AV Link via a fully wired SCART One Touch Play While the System is in standby mode it automatically turns on and plays back the image from the audiovisual source e g VCR DVD System Standby When the connected audiovisual equipment e g VCR DVD enters standby mode so does the System WYSIWYR WhatYou See Is WhatYou Record When the remote control unit o...

Страница 59: ...kers Repeat steps 1 to 3 in Selecting speakers above 1 2 Press c d to select Yes or No and then press OK 3 Press a b to select External Audio Bypass and then press OK NOTE External Audio Bypass is greyed out when Dolby Virtual is set to On External Audio Bypass is greyed out when Centre Channel Input is set to On When using external speakers SPEAKER B make sure to set External Audio Bypass to Yes ...

Страница 60: ... item On Off 1 2 Auto Sync adjustment PC input mode only For automatically adjusting the PC image Press MENU and the MENU screen displays 3 Press a b to select Auto Sync and then press OK Press c d to select Yes and then press OK Auto Sync starts and Adjusting the image displays NOTE When Auto Sync is successful Auto Sync completed successfully displays If not Auto Sync failed Auto Sync may fail e...

Страница 61: ...ess a b to select the specific adjustment item Input Select Selecting input source Can use for selecting the input source Press MENU and the MENU screen displays 1 2 4 3 Press c d to select Option Press a b to select Input Select and then press OK Press a b c d to select a signal type you want to set and then press OK If the selected signal type is incorrect an image does not display or no colour ...

Страница 62: ...r TV AV input mode You can change the colour system to one that is compatible with the image on the screen Press MENU and the MENU screen displays 1 2 4 3 Press c d to select Option Press a b to select Colour System and then press OK Press a b to select a compatible video signal system of your equipment and then press OK NTSC 3 58 cannot be selected in TV tuner mode AUTO PAL SECAM NTSC 3 58 NTSC 4...

Страница 63: ...emphasising high contrast for sports viewing Selected item STANDARD MOVIE GAME USER DYNAMIC Wide screen signalling WSS for TV AV input mode WSS allows a television to switch automatically among the different screen formats Press MENU and the MENU screen displays 1 2 Press a b to select WSS and then press OK 3 Press c d to select Setup Press c d to select On or Off and then press OK 4 NOTE Try to s...

Страница 64: ... f The WIDE MODE menu displays The menu lists the wide mode options selectable for the type of video signal currently received Auto Selection If you set WSS and 4 3 Mode in the Setup menu on page 61 the optimum WIDE mode is automatically chosen for every broadcast containing the WSS information WSS menu To enable Auto Selection set WSS in the Setup menu to On See page 61 4 3 Mode menu To set the t...

Страница 65: ...ot by Dot Full Cinema 640g480 Keeps the original aspect ratio in a full screen display Keeps the original aspect ratio in a full screen display The top and bottom of the images are slightly cropped Detects the resolution of the signal and displays an image with the same number of pixels on the screen An image fully fills the screen NOTE Connect the PC before making adjustments See page 56 Selectab...

Страница 66: ... press OK Press a b to select the desired level Off High Low and then press OK 4 1 Repeat steps 1 to 2 in 3D NR Press a b to select Quick Shoot and then press OK Press c d to select On and then press OK NOTE Quick Shoot may cause image noise If this occurs turn the function Off Quick Shoot Improves LCD response when viewing fast moving images The effect is greater at low room temperatures at or be...

Страница 67: ...ay the PIN input window Press c d to select Setup Useful adjustment settings Resetting the PIN Allows you to reset your PIN Press a b to select Child Lock and then press OK Press a b to select Reset and then press OK Press c d to select Yes and then press OK Press MENU and the MENU screen displays Press c d to select Setup NOTE As a precautionary measure make a note of your PIN on the back of this...

Страница 68: ...to select Standby Recording and then press OK Press c d to select On and then press OK Description AV signals output from the System even in the standby mode No AV signals output from the System in the standby mode Selected item On Off Audio out Allows you to select what controls the audio output NOTE This setting is available only in TV input mode Repeat steps 1 to 2 in Centre Channel Input Press...

Страница 69: ...played on the right side screen Press SELECT to set either screen to be active z displays on the active screen which has sound output Press b to select another input source on the active screen A selected image displays Press c to exit dual screen 4 1 FREEZE Press d A moving image displays on the left screen and a still image displays on the right screen The still image is one frame captured from ...

Страница 70: ...ress m the screen switches as shown upper right If you select a programme with no Teletext signal No Teletext available displays The same message displays during dual screen or other modes if no Teletext signal is available 1 TELETEXT TELETEXT 2 3 RED GREEN YELLOW BLUE TELETEXT May appear in DTV input mode When viewing the Teletext information Press Pr to increase the page number Press Ps to decre...

Страница 71: ...d when the service does not contain the subtitle information Time display You can display the time information included in the DTV and Teletext broadcasts Select a TV channel providing Teletext information The time information is automatically captured 1 2 3 4 Press p The channel display will appear on the Display Press p again within the three second interval the channel display is on the screen ...

Страница 72: ...t Check the colour system setting See pages 24 and 60 Check the input signal setting See page 59 The unit s internal temperature has increased Remove any objects blocking vent or clean Check the power control setting See page 44 Is sleep timer set See page 58 Is connection to other components correct See pages 55 to 56 Has input signal setup been done correctly after connection See page 59 Is the ...

Страница 73: ... earth for audio 5 Earth for blue 6 Audio left input 7 Blue input 8 Audio video control 9 Earth for green 10 Not used 11 Green input 12 Not used 13 Earth for red 14 Not used 15 Red input 16 Red Green Blue control 17 Earth for video 18 Earth for Red Green Blue control 19 Video output TV Monitor out 20 Video input 21 Plug shield SCART INPUT 2 1 Audio right output 2 Audio right input 3 Audio left out...

Страница 74: ...ated in brackets under CONTROL CONTENTS P I I I I I D C C D D D I I I I I I I I I I I I I I I A A A A A A V H H V V C P W W W W W W W W W W W M M M A A A T T A O O O O O O T T D POWER OFF STANDBY INPUT SWITCHING TOGGLE TV CHANNEL FIXED DTV CHANNEL FIXED INPUT1 5 1 5 CARD TV DIRECT CHANNEL 1 99 CHANNEL UP CHANNEL DOWN DTV DIRECT CHANNEL 1 999 DTV CHANNEL UP DTV CHANNEL DOWN INPUT1 CVBS INPUT1 RGB I...

Страница 75: ...PUT 1 Front AV OUTPUT RCA pin AV output Audio Variable Fixed DC OUTPUT DC9V 7W MAX UHF VHF 75 q Din type Analogue ANTENNA IN SCART AV input output Y C input AV Link ANTENNA IN SPEAKER B External speaker output terminal L and R Digital AUDIO OUTPUT Square type optical digital audio connector S PDIF INPUT 5 Ø 3 5 mm jack Audio input DVI I DVI I input OSD language English German French Italian Spanis...

Страница 76: ...74 Dimensional drawings 150 435 900 1572 440 1431 4 806 4 699 923 1045 115 1160 325 650 165 6 Unit mm Display AVC System 365 303 220 49 5 2 430 95 303 Unit mm ...

Страница 77: ...ich could otherwise arise due to inappropriate waste handling 2 In other Countries outside the EU If you wish to discard this product please contact your local authorities and ask for the correct method of disposal For Switzerland Used electrical or electronic equipment can be returned free of charge to the dealer even if you don t purchase a new product Further collection facilities are listed on...

Страница 78: ...ain by using the following steps 1 Turn on the power of the Display and the AVC System 2 Press MENU Make sure the menu screen displays 3 Press c d to select Setup 4 Press a b to select Auto Installation and then press OK 5 The PIN setting screen displays you need to enter the factory preset PIN 1234 6 Press c d to select Yes and then press OK 4 Rating 5 6 7 8 9 10 11 12 13 14 15 16 17 18 AGE Unive...

Страница 79: ...t auf 100 wiederverwertungs Papier Imprimé sur 100 de papier recyclé Stampato su carta riciclata al 100 Printed in Japan Gedruckt in Japan Imprimé au Japon Stampato in Giappone TINS C096WJZZ 05P11 JA KG OPERATION MANUAL MODE D EMPLOI BEDIENUNGSANLEITUNG MANUALE DI ISTRUZIONI C096WJZZ 1 PIN ...

Отзывы: