background image

Wall Mount Kit Specifications

Appendix

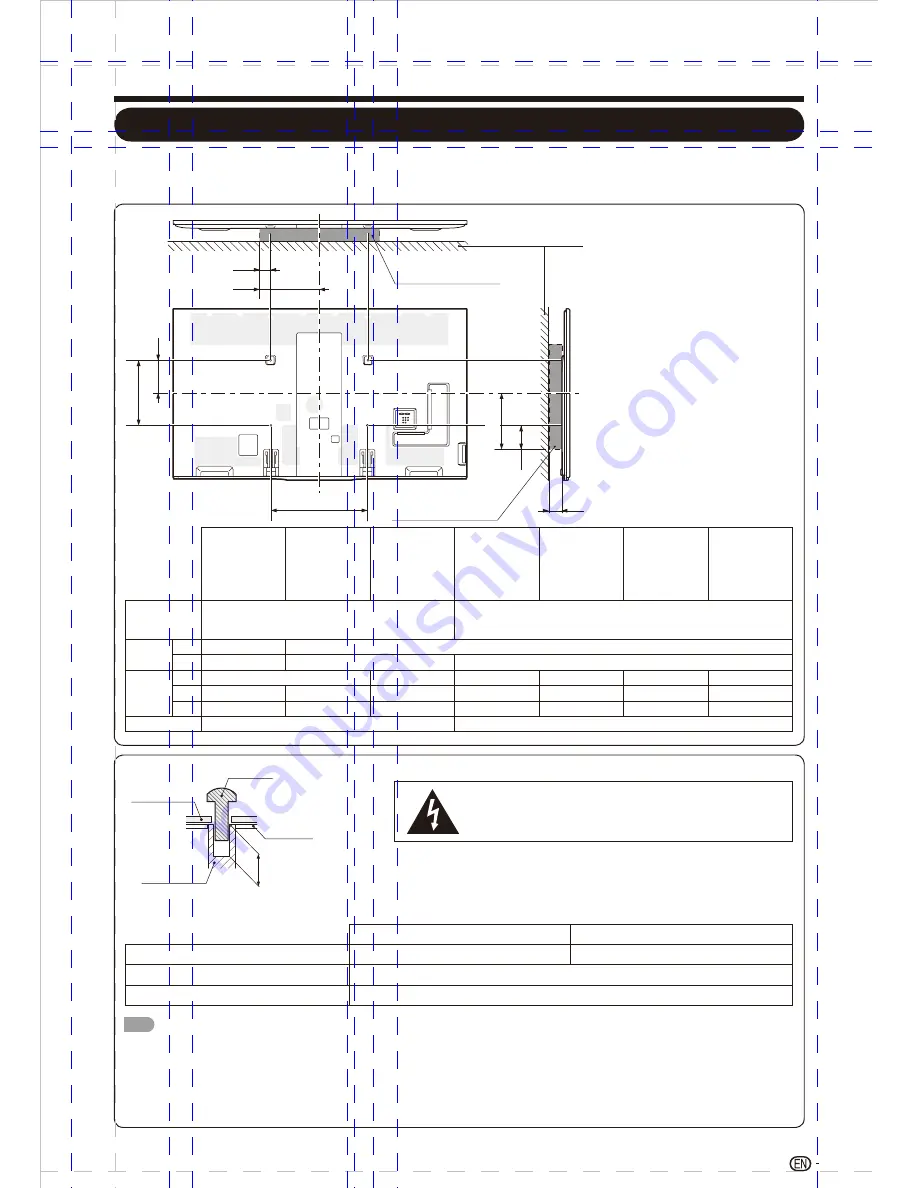
Standard dimensions for wall mount kits are shown below.

( The illustration is based on the LC-80LE857U model as an example )

A

b1

B

b3

c1

b2

a2

a1

WALL MOUNT KIT 

WALL MOUNT KIT 

WALL

LC-90LE657U

LC-80LE857U/
LC-80LE757U

LC-80LE657U/
LC-80LE650U/
LC-80C6500U

LC-70LE857U/
LC-70LE757U/
LC-70LE755U/
LC-70C7500U

LC-70LE657U/
LC-70LE655U/
LC-70LE650U/
LC-70C6500U

LC-60LE857U/

LC-60C7500U/
LC-60LE452U/

LC-60LE757U/
LC-60LE755U/

LC-60LE450U

LC-60LE657U/
LC-60LE655U/
LC-60LE650U/
LC-60C6500U

VESA screw 
hole specs 
(A-B)

5

3

23 /

(600) ?15 /

(400)

3

3

15 /

(400) ?15 /

(400)

Width

a1

a2

Height

b1

b2

b3

c1

a1:  Maximum distance
        from the mounting hole

a2:  Maximum distance
        from the TV's center

b1:  Distance between the TV's
        center and the mounting hole

b2:  Maximum distance
        from the TV's center

b3:  Maximum distance
        from the mounting hole

c1:  Minimum gap

Do not install the wall mount kit while your TV is turned on. 
It may result in personal injury due to electric shock.

DEPTH OF
MOUNTING HOLES

SCREW

WALL MOUNT 
UNIT

MOUNTING
HOLES

CABINET

For the screws, refer to the table shown below.

Length(Depth of mounting holes)

Standard screws

M8 (Use 1.25 pitch screws)

90/80 inch models

70/60 inch models

M6 (Use 1.0 pitch screws)

Quantity

4 pcs.

NOTE

• Do not mount the TV at a tilt.
• To use this TV mounted on a wall, remove the cable tie as needed.
• Do not use screws that do not comply with the VESA standard screw specifi cations.
• Do not use screws that are longer than the standard length. Screws that are too long may cause damage to the inside of the TV.
• Do not fasten the screws too fi rmly or loosely. This may damage the product or cause the product to fall, leading to personal injury. SHARP is not liable for these

   kinds of accidents.

• SHARP is not liable for product damage or personal injury when a non-VESA or non-specifi ed wall mount is used or the consumer fails to follow the product

37

1 /

64 

(40)

   installation instructions.

5

3 /

32 

(80)

49

2 /

64 

(70)

25

13 /

64 

(340)

49

14 /

64 

(375)

41

10 /

64 

(270)

15

/

32 

(12)

19

13 /

32 

(345)

1

11 /

32 

(280)

49

14 /

64 

(375)

57

6 /

64 

(175)

23

5 /

32 

(145)

59

5 /

64 

(150)

27

10 /

32 

(275)

7

7 /

(200)

7

7 /

(200)

1

9 /

16 

(230)

31

7 /

64 

(190)

5

6 /

16 

(160)

47

4 /

64 

(120)

3

2 /

(60)

3

2 /

(60)

11

14 /

64 

(360)

39

12 /

64 

(320)

1

9 /

16 

(230)

41

10 /

64 

(270)

7

7 /

(200)

61

2 /

64 

(75)

37

Содержание Aquos LC-60LE450U

Страница 1: ...ation manual before starting operating the equipment IMPORTANTE Lea este manual de operación antes de comenzar a operar el equipo IMPORTANT Veuillez lire ce mode demploi avant de commencer utilliser lappareil LC 60LE452U LC 60LE450U ...

Страница 2: ......

Страница 3: ... and serial numbers in the space provided The numbers are located at the rear of the TV Model No Serial No LIQUID CRYSTAL TELEVISION ENGLISH IMPORTANT INFORMATION WARNING TO REDUCE THE RISK OF FIRE OR ELECTRIC SHOCK DO NOT EXPOSE THIS PRODUCT TO RAIN OR MOISTURE ENGLISH 1 1 LC 60LE450U LC 60LE452U ...

Страница 4: ...lar specifies that the cable ground shall be connected to the grounding system of the building as close to the point of cable entry as practical The terms HDMI and HDMI High Definition Multimedia Interface and the HDMI Logo are trademarks or registered trademarks of HDMI Licensing LLC in the United States and other countries Manufactured under license from Dolby Laboratories Dolby and the double D...

Страница 5: ...3 ...

Страница 6: ...lug or an appliance coupler is used as the disconnect device the disconnect device shall remain readily operable Water and Moisture Do not use this product near water for example near a bath tub wash bowl kitchen sink or laundry tub in a wet basement or near a swimming pool and the like Stand Do not place the product on an unstable cart stand tripod or table Placing the product on an unstable base...

Страница 7: ...rry it by holding or otherwise putting pressure onto the display Be sure to always carry the TV by two people holding it with two hands one hand on each side of the TV Caring for the Cabinet Use a soft cloth cotton flannel etc and gently wipe the surface of the cabinet Using a chemical cloth wet dry sheet type cloth etc may deform the components of the main unit cabinet or cause cracking Wiping wi...

Страница 8: ... chest of drawers Remember that children can become excited while watching a program especially on a larger than life flat panel display Care should be taken to place or install the display where it cannot be pushed pulled over or knocked down Care should be taken to route all cords and cables connected to the flat panel display so that they cannot be pulled or grabbed by curious children WALL MOU...

Страница 9: ...ill prevent it from being damaged CAUTION Attach the stand in the correct direction Be sure to follow the instructions Incorrect installation of the stand may result in the TV falling over 1 Put the TV face down on a safe surface that is covered by a soft and smooth cloth Show in diagram 1 2 Fix the TV stand support to the stand base fasten the screws by using a cross head screwdriver Not supplied...

Страница 10: ...AC plug for the television into the AC outlet Place the TV close to the AC outlet and keep the power plug within reach TO PREVENT RISK OF ELECTRIC SHOCK DO NOT TOUCH UN INSULATED PARTS OF ANY CABLES WITH THE AC CORD CONNECTED 3 When turningon the TVfor the first time press POWER on the television Speakers cannot be detached from the TV The TV angle cannot be adjusted POWER indicator ...

Страница 11: ...STALLATION STEPS IF YOU STILL ENCOUNTER NO POWER PLEASE CONTACT US AT 1 800 BE SHARP Cautions regarding the remote control unit Do not expose the remote control unit to shock In addition do not expose the remote control unit to liquids and do not place in an area with high humidity Do not install or place the remote control unit under direct sunlight The heat may cause deformation of the remote co...

Страница 12: ...ly available 300 75 ohm adapter commercially available 300 ohm twin lead cable at 75 ohm coaxial cable round Cable TV lead In Cable without a CATV converter 1 Coaxial cable commercially available Coaxial cable commercially available Home Antenna terminal 75 ohm Home Antenna terminal 75 ohm or or VHF UHF antenna 2 Combination VHF UHF antenna 3 Separate VHF UHF antenna 4 To TV antenna terminal 1 2 3...

Страница 13: ...n cause a rash If you find any chemical leakage wipe thoroughly with a cloth The batteries supplied with this product may have a shorter life expectancy due to storage conditions If you will not be using the remote control unit for an extended period of time remove batteries from it The batteries batteries installed shall not be exposed to excessive heat such as sunshine fire or the like 1 Open th...

Страница 14: ...ment 15 Connecting a Blu ray Disc DVD Player or HD Cable Satellite Set top Box 15 Connecting a Game Console VCR Camcorder or Cable Satellite Set top Box 12 16 Connecting an Audio Amplifier 17 Connecting anAV Amplifier 17 Connecting a PC 18 Watching TV 19 Turning On Off the Power 19 Setup Wizard 19 Direct Button Operation 21 On Screen Display Menu 25 On Screen Display Menu Operation 25 Menu Operati...

Страница 15: ...16 17 and 18 for external equipment connection 2 See pages 14 19 21 and 27 for button operations The illustrations in this operation manual are for explanation purposes and may vary slightly from the actual operations 13 2 Headphone USB terminal USB ...

Страница 16: ... images check the output terminals of your external equipment and use its appropriate terminals for higher quality images For connecting the TV to external equipment use commercially available cables The illustrations of the terminals are for explanation purposes and may vary slightly from the actual products AV YPBPR HDMI1 HDMI2 HDMI3 PC 1 PressINPUT The Input Sourcelist screen displays 2 Press t...

Страница 17: ...h resolution video input Blu ray disc player DVD player HD cable satellite set top box To enjoy 1080p display capability connect your external equipment using an HDMI certied cable or a component cable and set the equipment to 1080p output Supported Audio format Linear PCM sampling rate 32 44 1 48kHz When using DVI HDMI conversion cable HDMI 1 2 3 or PC Blu ray disc player DVD player HD cable sate...

Страница 18: ...Blu ray disc player DVD player or an HD cable satellite set top box to the HDMI terminal When using Composite cable AV Game console VCR Camcorder Cable Satellite set top box Connecting to External Equipment AV cable AV cable 16 AUDIO L White AUDIO R Red VIDEO Yellow AUDIO R Red VIDEO Yellow AUDIO L White Connecting a Game Console VCR Camcorder or Cable Satellite Set top Box COMPONENT OUT Audio cab...

Страница 19: ...mplifier If the image is not in sync with the audio check the settings of the connected surround system Letting the TV output the audio to an AV amplifier HDMI OUT HDMI IN HDMI OUT HDMI certified cable HD Cable Satellite set top box Digital Audio output is not available when using an HDMI input Connecting to External Equipment DIGITAL AUDIO INPUT OPTICAL Optical ber cable 17 ...

Страница 20: ...ing an HDMI input When using analog RGB cable PC IN When using an analog RGB cable input the audio signal to the AUDIO PC IN HDMI terminal of PC IN Connecting to External Equipment AUDIO RGB Analog RGB cable D sub 15 pin cable or VGA cable DVI OUT AUDIO DVI HDMI conversion cable HDMI OUT HDMI certied cable 3 5 mm stereo minijack cable 18 3 5 mm stereo minijack cable Using analog audio connection b...

Страница 21: ...the first use Press to select Picture Mode 19 TV Location Select Home or Store for the location where you plan to install the TV This product qualies for ENERGY STAR in Home mode default setting Selecting this Setting Does not conform to Energy Star Are you sure you want Store Mode Are you sure you want Home Mode energy efficiency Please note if you select Home Mode the picture will be darker This...

Страница 22: ...mong AUTO STD IRC or HRC Setup Wizard Move MENU Select Return Menu Language English Air Cable Cable Cable System AUTO Auto Scan Setup Wizard Move MENU Select Return Menu Language English Air Cable Cable Cable System AUTO Auto Scan Setup Wizard Move MENU Select Return Menu Language English Air Cable Cable Cable System AUTO Auto Scan Setup Wizard Move MENU Select Return Menu Language English Air Cab...

Страница 23: ...Direct Button Operation 21 5 10 15 30 240 180 60 45 Off 120 90 24 25 22 23 ...

Страница 24: ...Direct Button Operation 22 HDMI2 HDMI3 PC TV AV YPBPR HDMI1 USB 3 Press ENTER to confirm Press CC CC on Mute Displays the closed caption when TV s sound is muted ...

Страница 25: ...Direct Button Operation 23 50 22 23 24 25 Press to skip between chapters Press to adjust the playback speed Press to pause or resume the playback Press to stop the playback and clear the existing memory ...

Страница 26: ...Direct Button Operation 24 ...

Страница 27: ...o select the desired menu 2 Press to select the desired menu Press to select a specific adjustment item Operations vary depending on the function or item Refer to the guide display corresponding to the menu setting screen for button operations 3 PressMENU to exit Example 1 2 3 Example 25 Setup Wizard Move MENU Select Return Menu Language English Air Cable Cable Cable System AUTO Auto Scan AUDIO SE...

Страница 28: ...ted item button button Contrast For less contrast For more contrast Brightness For less brightness For more brightness Color For less color intensity For more color intensity Tint Skin tones become reddish Skin tones become greenish Sharpness For less sharpness For more sharpness Adjusts the picture to your preference with the following picture setting 26 For a better white balance use color tempe...

Страница 29: ...ystem AUTO Auto Scan AUDIO SETTING Move MENU Select Return Sound Mode Bass Treble Balance Surround SPDIF Type Audio Language 50 Standard 50 0 English PCM On Press to select the Standard Music Movie User Setup Wizard Move MENU Select Return Menu Language English Air Cable Cable Cable System AUTO Auto Scan TIME SETTING Move MENU Select Return Sleep Timer Time Zone Daylight Saving Time 180 Min Off Pa...

Страница 30: ...elect a desired level for viewing a clearer video image Off No adjustment Advanced ADVANCED Move MENU Adjust Return Auto H POS 50 V POS 50 Clock 50 Phase 50 V Pos Centers the image by moving it up or down Clock Adjust when the image flickers with vertical stripes Phase Adjust when characters have low contrast or when the image flickers The default cursor position may not be in the center because t...

Страница 31: ...he factory preset values The Channel Setup settings will not be changed The Language settings will not be changed The Secret number settings will not be changed The TV Location settings will not be changed Lock Setting Allows you to use a secret number to protect certain settings from being accidentally changed Example 1 Press MENU to display the MENU screen and then press to select Lock and then ...

Страница 32: ... used for original movies rated by the MotionPicture Association of America as broadcasted on cable TV and not edited for television G General audiences All ages admitted PG Parental guidance suggested Some material may not be suitable for children PG 13 Parents strongly cautioned Some material may be inappropriate for children under 13 R Restricted Under 17 requires accompanying parent or adult g...

Страница 33: ...ublic audience but could contain scenes disturbing to children under 8 who cannot distinguish between imaginary and real situations Recommended for viewing with parent 13ans Over 13 years Could contain scenes of frequent violent scenes and therefore recommended for viewing with parent 16ans Over 16 years Could contain frequent violent scenes and intense violence 18ans Over 18 years Only for adult ...

Страница 34: ...ER change Return Channel Channel Name Favorite 50 1 KOCE HD 50 2 KOCE SD 50 13 KOCE LB Show Hide Allows you to Show or Hide the channel Press the to select Show Hide item then press the to enter into the menu Press the to select the desired channel then press the ENTER to show or hide the channel FAVORITE Move MENU Press OK change Return Channel Channel Name Add Delete 50 1 KOCE HD 50 2 KOCE SD 50...

Страница 35: ...d then press Enter button Watching Movie Press the INPUT button on the main unit or on the remote control then press the buttons to select the USB mode and then press ENTER button Press the buttons to select MOVIE and then press ENTER button PARIS Mp4 PARIS Mp4 london Mp4 guilin Mp4 jpg jpeg bmg png mp3 wma m4a aac avi mp4 ts trp mpg mkv mov dat vob rm rmvb view picture When selecting a movie file...

Страница 36: ...look dark in a room that is too bright Power is suddenly turned off The unit s internal temperature has increased Remove any objects blocking vent No picture No sound Have you pressed MUTE on the remote control unit The TV sometimes makes a cracking sound This is not a malfunction This happens when the cabinet slightly expands and contracts according to change in temperature This does not affect t...

Страница 37: ...Requirement 157 W 0 5W Standby with AC 120V Power Consumption Weight TV stand 69 lbs 32 kg TV only 60 6 lbs 28 kg Dimension W x H x D 2 TV stand 5425 32 x 35 12 32 x13 inch TV only 5425 32 x 32 x4 5 32 22 32 inch Operating temperature 32 F to 104 F 0 C to 40 C ANALOG RGB PC in 15 pin mini D sub female connector Audio in Ø 3 5 mm stereo jack Cautions regarding use in high and low temperature enviro...

Страница 38: ...7 5 kHz 75 0 Hz O SVGA 800 x 600 37 9 kHz 60 0 Hz O 48 1 kHz 72 0 Hz O 46 9 kHz 75 0 Hz O XGA 1024 x 768 48 4 kHz 60 0 Hz O 56 5 kHz 70 0 Hz O 60 0 kHz 75 0 Hz O WXGA 1366 x 768 47 7 kHz 60 0 Hz O Appendix SXGA 1280 x 1024 64 0 kHz 60 0 Hz O SXGA 1400 x 1050 65 3 kHz 60 0 Hz O UXGA 1600 x 1200 75 0 kHz 60 0 Hz O 1080p 1920 x 1080 67 5 kHz 60 0 Hz VGA and XGA are registerd trademarks of Internatioa...

Страница 39: ...IT MOUNTING HOLES CABINET For the screws refer to the table shown below Length Depth of mounting holes Standard screws M8 Use 1 25 pitch screws 90 80 inch models 70 60 inch models M6 Use 1 0 pitch screws Quantity 4 pcs NOTE Do not mount the TV at a tilt To use this TV mounted on a wall remove the cable tie as needed Do not use screws that do not comply with the VESA standard screw specifi cations D...

Страница 40: ...radio or television reception which can be determined by turning the equipment off and on the user is encouraged to try to correct the interference by one or more of the following measures Reorient or relocate the receiving antenna Increase the separation between the equipment and receiver Connect the equipment into an outlet on a circuit different from that to which the receiver is connected Cons...

Страница 41: ...LC 60LE450U LC 60LE452U 39 ...

Страница 42: ...40 ...

Отзывы: