background image

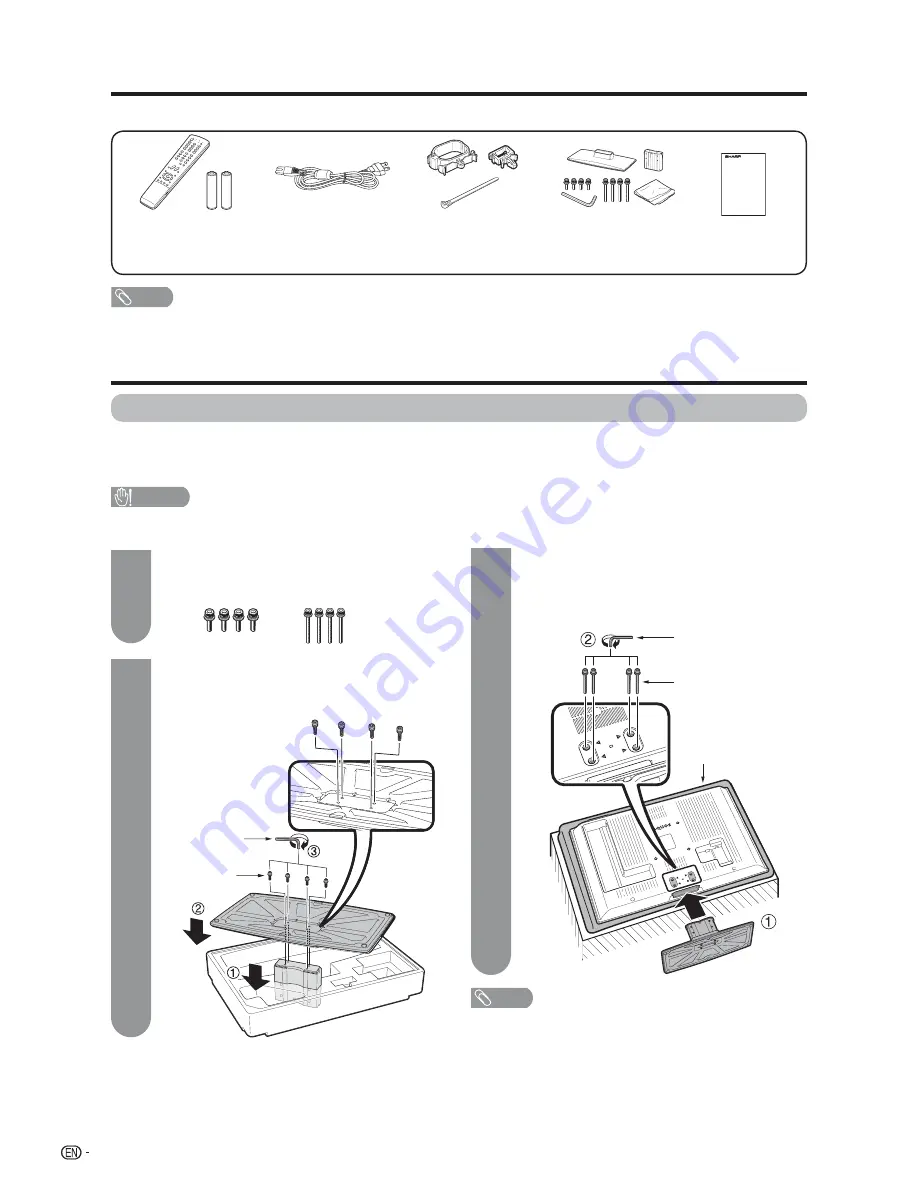
Supplied accessories

Make sure the following accessories are provided with the product.

NOTE

•  Always use the AC cord supplied with the TV.

QUICK REFERENCE

Remote control unit (

g

1)

“AAA” size battery (

g

2)

Page 8

AC cord

(

g

1)

Page 7

Stand unit

(

g

1)

Page 6

Cable Clamp (

g

2)

Cable tie (

g

1)

Page 7

Attaching the stand

• Before attaching (or detaching) the stand, unplug the AC cord from the AC INPUT terminal.
• Before performing work spread cushioning over the base area to lay the TV on. This will prevent it from being 

damaged.

Operation manual 

(

g

1)

NOTE

•  To detach the stand, perform the steps in reverse order.

Attach the supporting post for the stand unit 
onto the base using the box for the stand unit 
as shown below.

1

  Insert the stand into the openings on the 

bottom of the TV.

2

  Insert and tighten the 4 long screws into 

the 4 holes on the rear of the TV.

Hex key

Long screw

CAUTION

• 

Attach the stand in the correct direction.

• 

Be sure to follow the instructions. Incorrect installation of the stand may result in the TV falling over.


2

3

1

Confi rm that there are 8 screws (4 short 
screws and 4 long screws) supplied with the 
stand unit.

Soft cushion

Short screw

Hex key

6

Содержание Aquos LC-42D72U

Страница 1: ...ting the equipment IMPORTANTE Lea este manual de operación antes de comenzar a operar el equipo LC 42D72U LIQUID CRYSTAL TELEVISION TÉLÉVISEUR ACL TELEVISOR CON PANTALLA DE CRISTAL LÍQUIDO ENGLISH FRAN Ç AIS ESPAÑOL OPERATION MANUAL MODE D EMPLOI MANUAL DE OPERACIÓN ...

Страница 2: ......

Страница 3: ...ons in the literature accompanying the product CAUTION RISK OF ELECTRIC SHOCK DO NOT OPEN CAUTION TO REDUCE THE RISK OF ELECTRIC SHOCK DO NOT REMOVE COVER OR BACK NO USER SERVICEABLE PARTS INSIDE REFER SERVICING TO QUALIFIED SERVICE PERSONNEL 1 LC 42D72U OPERATION MANUAL The illustrations and on screen displays in this operation manual are for explanation purposes and may vary slightly from the ac...

Страница 4: ...r in a particular installation If this equipment does cause harmful interference to radio or television reception which can be determined by turning the equipment off and on the user is encouraged to try to correct the interference by one or more of the following measures Reorient or relocate the receiving antenna Increase the separation between the equipment and receiver Connect the equipment int...

Страница 5: ...tion 15 Power Sources This product should be operated only from the type of power source indicated on the marking label If you are not sure of the type of power supply to your home consult your product dealer or local power company For products intended to operate from battery power or other sources refer to the operating instructions 16 Overloading Do not overload wall outlets extension cords or ...

Страница 6: ...ces such as radiators heat registers stoves or other products including amplifiers that produce heat The Liquid Crystal panel is a very high technology product with 6 220 800 thin film transistors giving you fine picture details Occasionally a few non active pixels may appear on the screen as a fixed point of blue green or red Please note that this does not affect the performance of your product Preca...

Страница 7: ...th liquids such as vases should be placed on the product To prevent fire or shock hazard do not place the AC cord under the TV set or other heavy items Turn off the main power and unplug the AC cord from the wall outlet before handling Use a soft cloth and gently wipe the surface of the display panel Using a hard cloth may scratch the panel surface Use a soft damp cloth to gently wipe the panel whe...

Страница 8: ...ll prevent it from being damaged Operation manual g1 NOTE To detach the stand perform the steps in reverse order Attach the supporting post for the stand unit onto the base using the box for the stand unit as shown below 1 Insert the stand into the openings on the bottom of the TV 2 Insert and tighten the 4 long screws into the 4 holes on the rear of the TV Hex key Long screw CAUTION Attach the st...

Страница 9: ...ol cleaners The screen is glass and can be scratched or broken when dropped or impacted QUICK INSTALLATION TIPS Attach your antenna to the back of the AQUOS television See page 12 NOTE TO PREVENT RISK OF ELECTRIC SHOCK DO NOT TOUCH UN INSULATED PARTS OF ANY CABLES WITH THE AC CORD CONNECTED Place the Ferrite core in the space indicated in the below figure and bundle the cords properly with cable cl...

Страница 10: ...ughly with a cloth The batteries supplied with this product may have a shorter life expectancy due to storage conditions If you will not be using the remote control unit for an extended period of time remove batteries from it Remote control sensor 2 Insert two AAA size batteries supplied with the product 3 Close the battery cover IMPORTANT The POWER indicator on the AQUOS television should light G...

Страница 11: ...e 27 Film Mode 3 2 pull down 27 Range of OPC 27 Sound adjustment 28 Surround 28 Power Control 29 Digital Setup 29 Audio Setup 29 Using external equipment 30 Displaying an external equipment image 30 Input Select 30 Displaying an image from HDMI equipment 32 Input Skip 32 Useful adjustment settings 33 Auto Sync adjustment for Analog PC input mode only 33 Fine Sync adjustment for DVI input mode only...

Страница 12: ...indicator SLEEP indicator TV Rear POWER button Channel buttons CHs r Volume buttons VOLl k INPUT button HDMI terminal INPUT 4 INPUT 3 terminals AUDIO OUTPUT terminals HDMI terminal INPUT 5 DIGITAL AUDIO OUTPUT terminal Antenna Cable in INPUT 1 terminals AC INPUT terminal AUDIO terminals INPUT 4 INPUT 2 terminals DVI I terminal INPUT 6 AUDIO terminal INPUT 6 ...

Страница 13: ...LAY at the same time 15 LIGHT D When pressed all buttons on the remote control unit will light The lighting will turn off if no operations are performed within about 5 seconds This button is used for performing operations in low light situations 16 VIEW MODE Select the screen size See pages 36 and 37 17 ENT Jumps to a channel after selecting with the 0 9 buttons 18 FLASHBACK Return to the previous...

Страница 14: ...nge the angle of the lighting or the TV or operate the remote control unit closer to the remote control sensor Antennas To enjoy a clearer picture use an outdoor antenna The following is a brief explanation of the types of connections that are used for a coaxial cable If your outdoor antenna uses a 75 ohm coaxial cable with an F type connector plug it into the antenna terminal at the rear of the T...

Страница 15: ...ment Blu ray disc player HD DVD player DVD player Digital TV STB When using component cable INPUT 1 or 2 When using composite cable INPUT 1 2 or 3 Component video cable commercially available Audio cable commercially available Blu ray disc player HD DVD player DVD player Digital TV STB You can connect many types of external equipment to your TV like a Blu ray disc player HD DVD player DVD player V...

Страница 16: ...e NOTE The S VIDEO terminal takes priority over the video terminals INPUT 3 only When using composite cable VCR Game console Camcorder HDMI equipment HDMI cable commercially available Connecting HDMI equipment You can use the INPUT 4 or INPUT 5 terminal when connecting HDMI equipment NOTE When using an HDMI DVI conversion cable input the audio signal to AUDIO terminal of INPUT 4 To enjoy the AQUOS...

Страница 17: ...z 60 Hz 72 Hz 75 Hz 56 Hz 60 Hz 72 Hz 75 Hz 60 Hz 70 Hz 75 Hz 60 Hz 60 Hz O O O O O O O O O O O O 64 0 kHz SXGA 1400 x 1050 60 Hz O 75 0 kHz UXGA 1600 x 1200 60 Hz O DDC is a registered trademark of Video Electronics Standards Association Power Management is a registered trademark of Sun Microsystems Inc VGA and XGA are registered trademarks of International Business Machines Co Inc PC Horizontal ...

Страница 18: ...te control unit The TV enters standby and the image on the screen disappears The POWER indicator on the TV turns off NOTE If you are not going to use this TV for a long period of time be sure to remove the AC cord from the AC outlet Weak electric power is still consumed even when POWER is turned off Watching TV POWER TV status indicator POWER ON Lighting Green Lights off Standby Off is selected in...

Страница 19: ...s where you live Perform the following steps before you press TV POWER on the remote control unit 1 Insert the batteries into the remote control unit See page 8 2 Connect the antenna cable to the TV See page 12 3 Plug in the AC cord to the AC outlet See page 7 Language setting Select from among 3 languages English French and Spanish Press a b to select the desired language listed on the screen and...

Страница 20: ... enter 0 9 only channel selection will be made if there is no operation within a few seconds If you push 0 by itself nothing will happen Complete the above steps within a few seconds When you enter 0 9 and DOT channel selection will be made if there is no operation within a few seconds Method 1 Using CH r s on the remote control unit or on the TV Method 2 1 Press FLASHBACK to switch to the previou...

Страница 21: ...ROUND produces Surround effect from the speakers Each time you press SURROUND the mode changes between On and Off Surround sound options On Makes it possible to enjoy natural realistic surround sound Off Outputs the normal sound Using MUTE on the remote control unit Mutes the current sound output NOTE Within 30 minutes of pressing MUTE mute can be canceled by using one of the methods below Mute wi...

Страница 22: ...d SAP broadcasts Receive TV broadcasts in either MAIN or SAP sound MAIN sound The normal program soundtrack either in mono or stereo SAP sound Listen to a second language supplementary commentary or other information SAP is mono sound If stereo sound is difficult to hear Obtain a clearer sound by manually switching to fixed mono sound mode NOTE MTS only operates while in TV mode You can change MTS a...

Страница 23: ...selected input modes but the operating procedures are the same The screens in the operation manual are for explanation purposes some are enlarged others cropped and may vary slightly from the actual screens Example Option Audio Only Digital Noise Reduction Input Select Color System Off VIDEO Output select Fixed Auto No Program Title Display Caption Setup 3 4 2 1 Basic adjustment settings Menu oper...

Страница 24: ...n Page 27 Monochrome Page 27 Film Mode Page 27 Range of OPC Page 27 Reset Page 26 Treble Page 28 Bass Page 28 Balance Page 28 Surround Page 28 Reset Page 28 No Signal Off Page 29 No Operation Off Page 29 EZ Setup Page 23 CH Setup Page 23 Antenna Setup DIGITAL Page 24 Input Skip Page 32 Input Label Page 35 Parental CTRL Pages 42 47 Position Page 34 Language Page 34 Reset Page 34 Audio Only Page 38 ...

Страница 25: ...secret number here See page 42 for setting a secret number Press c d to select Air or Cable Press ENTER to enter the setting Press a b to select Air Cable and then press ENTER Channel search Channel auto search makes the TV look for all channels viewable in the set area Repeat steps 1 and 2 in Antenna setting in Channel Setup Press a b to select CH Search and then press ENTER NOTE If no channel is...

Страница 26: ...n Press MENU to display the MENU screen and then press c d to select Setup Press a b to select CH Setup and then press ENTER If you already set the Secret No input the 4 digit secret number here See page 42 for setting a secret number Press a b to select CH Memory and then press ENTER Channel memory setting Press MENU to display the MENU screen and then press c d to select Setup Press a b to selec...

Страница 27: ...nd then press ENTER Press c d to select Yes and then press ENTER 1 2 4 3 1 2 4 3 Air 3 A B C D Using FAVORITE CH on the remote control unit Using Favorite CH on the menu screen You can also set your favorite channels in Option on the MENU screen Select the channel you want to register as a favorite channel 1 Press MENU to display the MENU screen and then press c d to select Option Press a b to sel...

Страница 28: ...y to sense surrounding light When set to On Display OPC effect displays on the screen while the OPC adjusts the screen brightness Press a b to select a specific adjustment item Press c d to adjust the item to the desired level Press MENU to display the MENU screen and then press c d to select Picture Press MENU to display the MENU screen and then press c d to select Picture Press a b to select OPC ...

Страница 29: ... Selected item High Mid High Middle Mid Low Low Description White with Bluish tone White with Reddish tone Selected item On Off Description For high detail in black portions No adjustment Selected item Standard Fast Slow Description Normal adjustment For moving images For still images Selected item On Off Description For viewing in monochrome Normal color Selected item On Off Description Detects a...

Страница 30: ...Press a b to select a specific adjustment item 1 2 3 Selected item Treble Bass Balance cbutton For weaker treble For weaker bass Decrease audio from the right speaker dbutton For stronger treble For stronger bass Decrease audio from the left speaker Press MENU to exit 4 NOTE You can choose Surround by pressing SURROUND on the remote control unit See page 19 Audio menu is grayed out when Output Sele...

Страница 31: ...e and then press ENTER Five minutes before the power shuts down the remaining time displays every minute No operation off When set to Enable the power will automatically shut down if there is no operation for 3 hours Press MENU to display the MENU screen and then press c d to select Power Control Press a b to select No Operation Off and then press ENTER Press c d to select Enable and then press EN...

Страница 32: ...sing a b If the corresponding input is not plugged in you cannot change the input Be sure to connect the equipment beforehand Press a b to select the signal type you want to set and then press ENTER If the selected signal type is incorrect images are not displayed or displayed without any color Press MENU to display the MENU screen and then press c d to select Option Press a b to select Input Sele...

Страница 33: ...PUT6 Option Input Select Output Select Audio Only Digital Noise Reduction Fixed Off Auto Auto DIGITAL ANALOG Press a b to select the equipment connected to INPUT 6 terminal and then press ENTER Press a b to select Input Select and then press ENTER Press MENU to display the MENU screen and then press c d to select Option 2 3 4 Press MENU to exit 5 ...

Страница 34: ...press ENTER Press MENU to display the MENU screen and then press c d to select Setup 1 2 Press MENU to exit Press a b to select the Input INPUT 4 INPUT 5 INPUT 6 you wish to skip and then press ENTER Press c d to select Yes and then press ENTER 3 4 5 RGB YCbCr 4 4 4 YCbCr 4 2 2 Enable Disable Digital Analog Select the video signal type from the HDMI terminal Set whether or not to use View Mode bas...

Страница 35: ...y adjust the picture as necessary to change image position using Auto Sync In some cases however manual adjustment is needed to optimize the image Useful adjustment settings 1 3 2 30 Press MENU to exit 4 NOTE For resetting all Fine Sync adjustment items to the factory preset values press a b to select Reset and then press ENTER It is not necessary to adjust the Clock or Phase when a digital signal...

Страница 36: ... screen will have returned to its original settings 4 NOTE The Channel Setup settings will not be changed The Language settings will not be changed The Secret number settings will not be changed Reset H Pos a10 b10 V Pos a20 b20 0 0 Press a b to select the desired language listed on the screen and then press ENTER Press MENU to display the MENU screen and then press c d to select Setup Press a b t...

Страница 37: ...down If you want to adjust the sleep timer you can press SLEEP twice then change the time setting Five minutes before the time expires the remaining time displays every minute 1 2 INPUT SOURCE TV DVD INPUT2 INPUT3 INPUT4 INPUT5 INPUT6 Input Label Lets you set the input terminal displayed when using the INPUT SOURCE menu or channel display Useful adjustment settings Press a b c d to select the new ...

Страница 38: ...e for stretching 4 3 programs to fill the screen Zoom Suitable for viewing wide screen 2 35 1 anamorphic DVDs in full screen 1 2 View Mode for HD Programs The following modes are available for HD programs Stretch Suitable for viewing wide screen 1 78 1 aspect ratio program stretch mode will still show very thin black bands at the top and bottom of the screen Dot by Dot 1080i p only Detects the reso...

Страница 39: ... Screen size images Input signal Normal Zoom Dot by Dot Stretch Keeps the original aspect ratio in a full screen display For viewing wide screen programs The top and bottom of the image is cropped Detects the resolution of the signal and displays an image with the same number of pixels on the screen An image fully fills the screen View Mode Normal Zoom Stretch Dot by Dot 4 3 Detects the resolution ...

Страница 40: ...oy audio only Press a b to select a specific adjustment item and then press ENTER 3 2 Selected item On Off Description Audio is output without screen image Both screen images and audio are output NOTE The screen image will return to normal when a button except those for audio adjustment such as VOL MUTE SURROUND AUDIO is pressed Press MENU to exit Skip this step for Audio Only 4 Selected item Off H...

Страница 41: ...to choose from to best match the surrounding environment of the TV which can vary due to factors like room brightness type of program watched or the type of image input from external equipment Press AV MODE again before the mode displayed on the screen disappears The mode changes as shown below Press AV MODE Current AV MODE displays 1 2 NOTE You can select a different AV MODE item for each input m...

Страница 42: ... of two services Example If a program has three services Digital CC ENG CC1 and Text1 the closed caption display will toggle in this sequence The CC button keeps a record of the last service selected in its memory If the last closed caption mode e g 1 3ENG you selected is not available for the next program or on another channel the closed caption service that is available is automatically selected...

Страница 43: ...r NOTE For resetting adjustments to the factory preset values press a b to select Reset and then press ENTER The default value depends on the broadcasting station Selectable items available for Font Style Press MENU to display the MENU screen and then press c d to select Option Press a b to select Caption Setup and then press ENTER Useful adjustment settings 1 3 4 2 Selected item Default Type 0 Ty...

Страница 44: ...o select Secret No and then press ENTER Select New Secret No and then press ENTER Input the new 4 digit secret number by using 0 9 Press RETURN to start configuring the V Chip settings See pages 45 and 47 for details Press a b to select Status and then press ENTER Repeat steps 1 and 2 in Setting a secret number The secret number setting menu displays Input the 4 digit secret number by using 0 9 Set...

Страница 45: ...ret No Clear and then press ENTER Repeat steps 1 and 2 in Setting a secret number The secret number setting menu displays Changing the secret number Allows you to change your current secret number Input the 4 digit secret number by using 0 9 Clearing the secret number Allows you to clear your secret number Repeat steps 1 and 2 in Setting a secret number The secret number setting menu displays Inpu...

Страница 46: ... secret number See page 42 for Secret number setting for parental control The U S has two rating systems for viewing content TV Parental Guidelines and movie ratings The TV Parental Guidelines work in conjunction with the V CHIP to help parents screen out inappropriate television shows from their children Movie ratings are used for original movies rated by the Motion Picture Association of America...

Страница 47: ...lock it is removed Repeat the same steps for the other items 3 Press c or RETURN to register after all individual content rating items are set TV Parental Guidelines TV Guidelines Repeat steps 1 to 4 in Voluntary movie rating system MPAA Press a b to select TV Guidelines and then press ENTER Press a b to adjust the item to your desired position indicates the item is blocked The setting automatical...

Страница 48: ...e physical verbal or emotional Parental Guidance Intended for a general audience but may not be suitable for younger children under the age of 8 because it could contain controversial themes or issues Over 14 Years Could contain themes where violence is one of the dominant elements of the storyline but it must be integral to the development of plot or character Language usage could be profane and ...

Страница 49: ...ngs Canadian French ratings Input the 4 digit secret number by using 0 9 Press a b to select Parental CTRL and then press ENTER Secret number setting menu displays only when Secret No is set See page 42 V Chip and Status will not be selectable from the menu if you do not first configure your secret number See page 42 Press a b to select V Chip and then press ENTER Press MENU to display the MENU scre...

Страница 50: ...t Press FREEZE again to cancel the function Other viewing options Freezing images Allows you to capture and freeze a moving image that you are watching Press FREEZE A moving image is captured Presetting manufacturer codes After the LED for your device lights up press FUNCTION and DISPLAY at the same time to enter the code registration mode The LED will blink Press FUNCTION until the LED for your d...

Страница 51: ...TROL CODE NUMBER Other viewing options VCR BRAND REMOTE CONTROL CODE NUMBER DVD LD BRAND REMOTE CONTROL CODE NUMBER CATV SAT BRAND NOTE Numbers marked with are SAT codes all others are CATV codes AUDIO BRAND REMOTE CONTROL CODE NUMBER ...

Страница 52: ...hing immediately before 4 CH r s Press CHr or CHs to tune in a higher or lower channel Some manufacturers do not preset FLASHBACK NOTE CABLE and SAT cannot be selected at the same time SAT control buttons 1 SOURCE POWER Turns the cable converter power on and off 2 0 9 DOT Press a button or buttons that corresponds to the channel that you wish to watch 3 ENTER a b c d ENTER Press to activate the se...

Страница 53: ... of the remote control unit is set to DVD Press INPUT until the input connected to the DVD player is selected The following 1 to 10 can be used to control the DVD player 1 L Pressing quickly once takes you to the start of the next chapter Each time you press it you move ahead to the start of the next chapter 2 K Pressing quickly once takes you to the start of the chapter currently playing Each tim...

Страница 54: ...e serious injuries Installing the TV requires special skill that should only be performed by qualified service personnel Customers should not attempt to do the work themselves SHARP bears no responsibility for improper mounting or mounting that results in accident or injury Using an optional bracket to mount the TV You can ask a qualified service professional about using an optional AN 37AG2 AN 52AG...

Страница 55: ... made correctly See pages 36 and 37 Adjust the picture tone See pages 26 and 27 Is the room too bright The picture may look dark in a room that is too bright Check the input signal setting See page 39 Is the sleep timer set See page 35 Check the power control settings See page 29 The unit s internal temperature has increased Remove any objects blocking vent or clean Is connection to other componen...

Страница 56: ...r product improvement without prior notice The performance specification figures indicated are nominal values of production units There may be some deviations from these values in individual units Optional accessory The listed optional accessory is available for the Liquid Crystal Television Please purchase it at your nearest shop Additional optional accessories may be available in the near future W...

Страница 57: ...et the secret number clear the secret number using the following procedure Press and hold both CHr and VOLk on the TV simultaneously until the message appears on the screen Press MENU to display the MENU screen and then press c d to select Setup Press a b to select EZ Setup CH Setup Parental CTRL or Reset and the Secret number input screen displays 1 3 2 Setup Option Secret No a a a a ...

Страница 58: ... warranties described herein shall be the sole and exclusive warranties granted by Sharp and shall be the sole and exclusive remedy available to the purchaser Correction of defects in the manner and for the period of time described herein shall constitute complete fulfillment of all liabilities and responsibilities of Sharp to the purchaser with respect to the Product and shall constitute full sat...

Страница 59: ...57 ...

Страница 60: ...58 NOTE ...

Страница 61: ...77 8 200 2117 64 540 4019 32 1031 3647 64 933 0 16 37 64 421 59 32 134 325 32 96 111 2 292 26 37 64 675 2 9 32 58 28 7 8 733 7 7 8 200 3 23 64 85 20 23 32 526 0 Dimensional drawings Unit inch mm ...

Страница 62: ...SHARP ELECTRONICS CORPORATION Sharp Plaza Mahwah New Jersey 07430 2135 SHARP CORPORATION Printed in Mexico Imprimé au Mexique Impreso en México TINS D010WJZZ 07P02 MX NG ...

Отзывы: