background image

44

Using external equipment

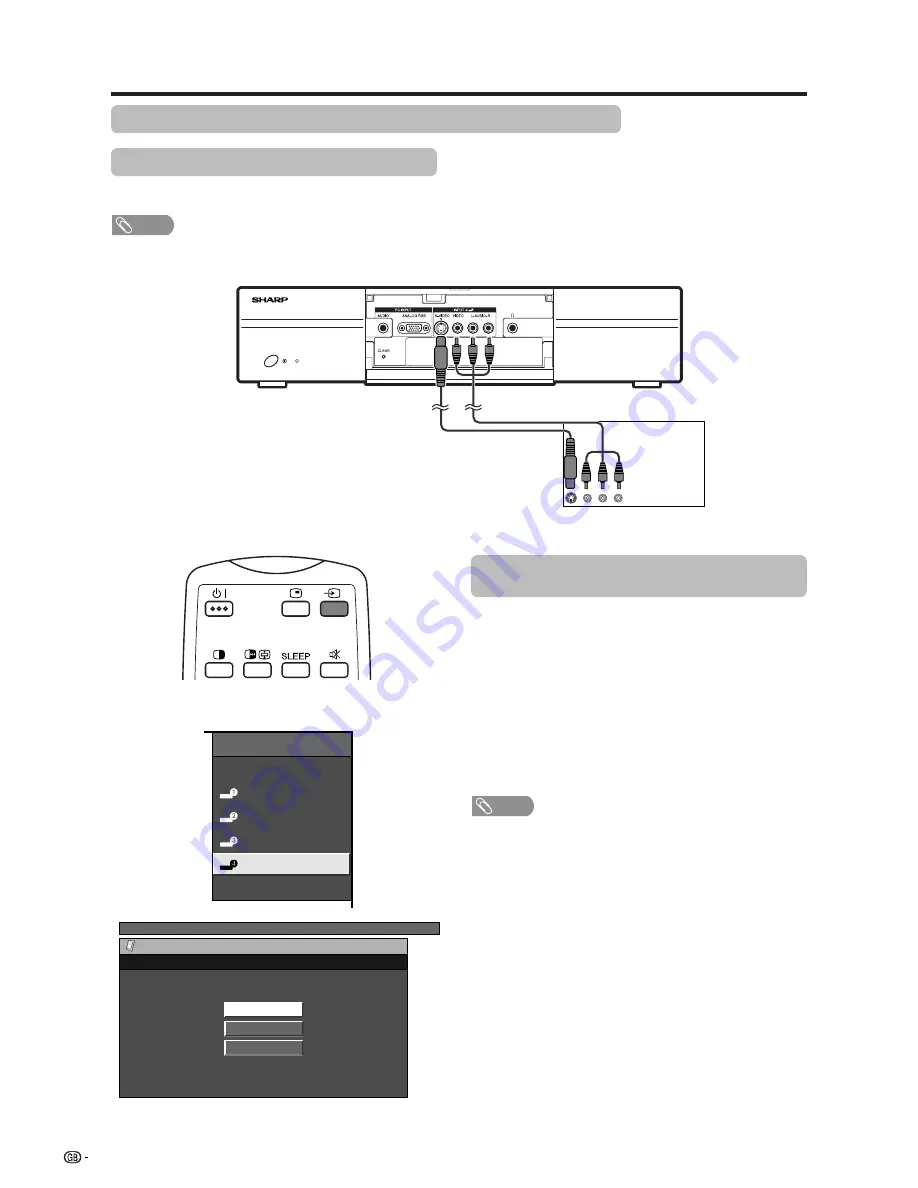
AVC System (front view)

Game console/Camcorder

AV cable
(commercially available)

S-video cable
(commercially available)

Enjoying a game console and viewing camcorder images

Connecting a game console or camcorder

A game console, camcorder and some other audiovisual equipment are conveniently connected using the
INPUT 4 terminals.

NOTE

• The S-video terminal has priority over the video terminals.

Displaying an image of the game console or
camcorder

To connect a game console or view a camcorder, select
“INPUT4” from the “INPUT SOURCE” menu using  

b

on the remote control unit or 

INPUT

 on the Display.

Then select “INPUT4” on “Input Select” in the menu to
set the correct input signal type. (See page 51.)

The setting is stored and can be selected on the
“INPUT SOURCE” menu.

NOTE

• Each time 

b

 is pressed, the input source toggles.

INPUT SOURCE

TV

INPUT1

INPUT2

INPUT3

INPUT4

PC

TV MENU

Option

Input Select

AUTO

S-Video

Video

(For INPUT4 signal)

Содержание AQUOS LC-37HV4M

Страница 1: ...LCD COLOUR TELEVISION OPERATION MANUAL LC 37HV4M ENGLISH Printed in Japan TINS A642WJZZ ...

Страница 2: ... 36 Power Control 37 Power Control for AV source 37 Power Control for PC source 39 Using external equipment 40 Watching a DVD image 41 Connecting a DVD player 41 Displaying a DVD image 41 Watching a VCR image 42 Connecting a VCR 42 Displaying a VCR image 42 Watching broadcasts via an HDTV tuner 43 Connecting an HDTV tuner 43 Displaying broadcasts via an HDTV tuner 43 Enjoying a game console and vi...

Страница 3: ... do not spill water or liquid on the product 10 Servicing Do not attempt to service the product yourself Removing covers can expose you to high voltage and other dangerous conditions Request a qualified service person to perform servicing 11 Repair If any of the following conditions occurs unplug the AC cord from the AC outlet and request a qualified service person to perform repairs a When the AC...

Страница 4: ... life of the product Do not place the product on a bed sofa rug or other similar surface since they can block ventilation openings This product is not designed for built in installation do not place the product in an enclosed place such as a bookcase or rack unless proper ventilation is provided or the manufacturer s instructions are followed The LCD panel used in this product is made of glass The...

Страница 5: ...em g1 System cable g1 Cable clamp Large g1 Small g2 Operation manual Page 11 Page 11 Page 9 Page 8 Stand g1 Stand cushion g4 Stand spacer g4 Stand screw g2 Page 10 Speaker unit g1 Speaker screw g4 Page 5 Speaker Lg1 Rg1 AC cord g2 Page 8 Stand stability unit g1 To prevent from overturning Page 6 Antenna cable g1 Page 15 Clamp g2 Clamp screw g2 Clamp band g1 Clamp band screw g1 ...

Страница 6: ...he Display Do not handle or move the Display by the speakers NOTE Perform the same steps for both left and right speakers To detach the speakers perform the above steps in reverse order You can connect your own amplifier speakers to the Display See page 46 for connecting external speakers Insert the speaker plug into the terminal on the Display Make sure that the speaker plug is inserted completel...

Страница 7: ... 3 4 Lift up the Display place it on a secure platform or floor and align the position Use wooden screws commercially available to secure the metal fixtures to the platform or floor NOTE The Display is heavy so be sure when placing on a platform strong enough to bear the weight Also be sure the platform width and depth is big enough so that the Display cannot be easily overturned Top view Hook com...

Страница 8: ... put a VCR or other device on the AVC System Keep enough space above and on the sides of the AVC System Do not block the ventilation openings on the top and left side and the exhaust fan on the right side Do not spread a thick cloth beneath the AVC System or cover it with one as this can cause overheating and result in malfunction System cable Display AVC System If you want to keep a longer distan...

Страница 9: ...and the AVC System in place connect the system cables and AC cords Use the cable clamps for bundling the cables Preparation Press down the two upper hooks to remove the cover toward you Connecting the system cable and the AC cord to the Display 1 2 3 Removing the terminal cover Connecting the system cable and the AC cord to the AVC System CAUTION TO PREVENT RISK OF ELECTRIC SHOCK DO NOT TOUCH UN I...

Страница 10: ...l cover Cable clamp Large Insert the cable clamp in the hole on the Display leg as shown Cable clamp Small Peel off the seal on the back and attach as shown Display rear view NOTE The small clamp on the right is used for bundling external speakers See page 46 Cables come out from the small opening ...

Страница 11: ...ng the stand unit Use the supplied stand unit for installing the AVC System vertically in an upright position Stick each spacer to the stand as shown Peel each spacer away from the paper and attach to the four bulging areas on the stand 2 Attach each cushion to the stand as shown 3 Fit the stand to the AVC System Peel each cushion away from the paper and attach to the four areas at the bottom Inse...

Страница 12: ...pectancy due to storage conditions If you will not be using the remote control unit for an extended period of time remove the batteries from it Inserting the batteries Before using the System for the first time insert two LR6 AA size Alkaline batteries supplied When the batteries become depleted and the remote control fails to operate replace the batteries with new LR6 AA size Alkaline batteries U...

Страница 13: ...OPC indicator STANDBY ON indicator X MAIN POWER button OPC sensor Display B STANDBY ON button INPUT button i buttons VOLl k CHANNEL buttons CHs r Remote control sensor OPC Optical Picture Control See Pages 37 and 39 ...

Страница 14: ...e 60 for clearing the password when you know it See page 73 for initialising to the factory preset values when you forget your password Part names AVC System STANDBY ON indicator INPUT 4 terminal VIDEO How to open the door Front view Rear view Headphone When connecting headphones the sound from the speakers is muted ANTENNA INPUT terminal INPUT 3 terminal S VIDEO INPUT 3 terminal VIDEO INPUT 3 COM...

Страница 15: ...MENU Display the MENU screen 13 C CHANNEL INFORMATION Display the channel information and time See page 65 for details on the time display 14 b INPUT SOURCE Select an input source TV INPUT 1 INPUT 2 INPUT 3 INPUT 4 PC See pages 41 45 and 51 15 SLEEP Set the Sleep timer See page 58 16 e MUTE Mute the sound See page 18 17 0 9 TV External input mode Set the channel TELETEXT mode Set the page 18 o Dig...

Страница 16: ...cable Antenna cable If your outdoor antenna uses a 75 ohm coaxial cable with a standard DIN45325 plug IEC 169 2 plug it into the ANTENNA INPUT terminal at the rear of the AVC System Connecting to the power outlet Display rear view AVC System rear view NOTE Always turn off the main power of Display and AVC System when connecting the AC cords Disconnect the AC cords from the AC outlet Display and AV...

Страница 17: ...N indicator on the AVC System turns off and the one on the Display flashes red Press X MAIN POWER on the Display The STANDBY ON indicator on the Display gradually turns off When turning the AVC System on first Press X POWER on the AVC System The STANDBY ON indicator on the AVC System lights up red Press X MAIN POWER on the Display The System turns the power on The STANDBY ON indicator on the Displ...

Страница 18: ...is indicated and the picture does not change press o to switch over to the 1 digit select mode and press 2 again To select a 2 digit channel e g channel 12 Press o to set the 2 digit select mode Press 1 followed by 2 NOTE Complete this procedure within 3 seconds otherwise the selection will not be made on the 2 digit channel mode Using Flashback A on the remote control unit Press A to switch the c...

Страница 19: ...nt sound output Press e e has been displayed on the screen for 30 minutes and the sound is silenced Mute 20 0 NOTE Within 30 minutes of pressing e mute can be cancelled by using one of the two methods below Pressing if f f f f ie e e e e SOUND CHa a a a a CHb b b b b 0 9 b or A can also cancel the mute Changing channels can also cancel the mute Mute will be cancelled after 30 minutes have elapsed ...

Страница 20: ...l System Creates more a natural sound retrieving the spatial information from any stereo recording and restoring the original three dimensional sound field FOCUS Repositions a sound image from two speakers to a more optimal listening position or height without moving them FOCUSeSRS Produces both SRS and FOCUS effects OFF Outputs the normal sound NOTE You can have the same settings by choosing Surr...

Страница 21: ...ICAM MONO 99 BBC2 MONO 99 BBC2 Stereo mode Bilingual mode Monaural mode 99 BBC2 MONO 99 BBC2 STEREO CH A 99 BBC2 CH B 99 BBC2 CH AB 99 BBC2 MONO 99 BBC2 When receiving a bilingual signal Each time you press SOUND the mode switches among NICAM CH A NICAM CH B NICAM CH AB and MONO When receiving a monaural signal Each time you press SOUND the mode switches between NICAM MONO and MONO When receiving ...

Страница 22: ...Page 56 Rotate Page 57 Language Page 30 Text Lang Page 62 Treble Page 36 Bass Page 36 Balance Page 36 Surround Page 36 Speaker Page 47 Input Select Page 51 Audio Out Page 58 Cool Climate Page 59 Colour System Page 52 Audio Power Control Setup Option PC input mode menu items List of PC menu items to help you with operations Contrast Page 31 Brightness Page 31 Red Page 31 Green Page 31 Blue Page 31 ...

Страница 23: ...Programme Setup Position WSS 4 3 Mode Normal Off English Normal Language West Europe Text Lang Rotate Press a b to select Password and then press ENTER 5 Press c d to select Yes and then press ENTER TV MENU Setup Auto Installation No Yes 6 Press a b to select the desired language listed on the screen and then press ENTER TV MENU Setup Auto Installation Language English After this setting auto sear...

Страница 24: ...ing Channel auto search finds all channels viewable in your area NOTE If no channel is found No programme found displays And the auto installation finishes TV MENU Setup Auto Installation Programme Setup Auto 01 55 25 02 85 25 03 102 25 TV MENU Setup Auto Installation Programme Setup Auto 01 SAT 1 02 PR07 03 KABEL Automatic channel sorting When channel auto labelling finishes the System starts sor...

Страница 25: ...page 23 for details TV MENU Setup Option Child Lock Auto Installation Programme Setup Position WSS 4 3 Mode Normal Off English Normal Language West Europe Text Lang Rotate TV MENU Setup Programme Setup Auto Search Manual Adjust Sort Yes No 5 Press c d to select Yes and then press ENTER Auto search starts with the following order 1 Automatic channel searching 2 Automatic channel labelling 3 Automat...

Страница 26: ...ss ENTER TV MENU Setup Option Child Lock Auto Installation Programme Setup Position WSS 4 3 Mode Normal Off English Normal Language West Europe Text Lang Rotate TV MENU Setup Programme Setup Auto Search Manual Adjust Sort Yes No 5 Press c d to select Yes and then press ENTER You can select one of the following settings 1 Search See page 26 2 Fine See page 26 3 Colour system See page 27 4 Sound sys...

Страница 27: ...ress 4 s 9 s 2 s 5 s ENTER Instead of the above you can also set by directly entering the frequency number of the channel with 0 9 Manual setting for each channel continued Fine tuning 1 2 Search tuning Press a b c d to select the channel you want to edit and then press ENTER The selected channel information displays Press a b to select Search and then press ENTER TV MENU Setup Programme Setup Man...

Страница 28: ... a b to select the optimum sound system and then press ENTER Sound menu TV MENU Setup Programme Setup Manual Fine Search Colour sys Sound sys Label Skip Lock 179 25 AUTO B G Off SAT 1 Off B G D K I M 3 2 TV MENU Setup Programme Setup Manual Fine Colour sys Sound sys Label Skip Lock 179 25 Search AUTO B G Off SAT 1 Off A BACK CLEAR END K U B L V C M W D N X E O Y F P Z G Q H R _ I S J T 0 1 2 3 4 5...

Страница 29: ...n it will not work if a password has not been set See page 60 for details on password setting When Lock is set to On for a channel Child Lock Has Been Activated displays and the image and sound of the channel is blocked When pressing ENTER while Child Lock Has Been Activated displays password input menu will display Inputting the correct password lifts the child lock temporarily until the power is...

Страница 30: ...d 3 on page 22 Press a b to select Programme Setup and then press ENTER 1 2 3 TV MENU Setup Option Child Lock Auto Installation Programme Setup Position WSS 4 3 Mode Normal Off English Normal Language West Europe Text Lang Rotate Press a b to select Sort and then press ENTER The channels are listed Black ones are set Skip to Off and blue are set Skip to On 4 6 7 Press c d to select Yes and then pr...

Страница 31: ...ion WSS 4 3 Mode Normal Off English Normal Language West Europe Text Lang Rotate TV MENU Setup Language English PC MENU Setup Option Fine Sync Input Signal Auto Sync English Normal Language Rotate 3 Press MENU and the PC MENU screen displays 1 Press a b to select Language and then press ENTER Press a b to select the desired language listed on the screen and then press ENTER AV Input mode PC Input ...

Страница 32: ...pness Selected item Contrast Brightness Colour Tint Sharpness Adjustments items for AV source PC MENU Picture Audio USER Contrast Brightness Red Green Blue C M S Reset 30 0 0 0 0 0 30 30 30 30 40 30 40 30 30 30 TV MENU Picture Audio USER Contrast Brightness Colour Tint Sharpness Advanced Reset 30 0 0 0 0 0 30 30 30 10 40 30 40 30 30 10 NOTE Select Advanced and then press ENTER to set C M S Colour ...

Страница 33: ... TV MENU Picture Advanced USER C M S R Y G C B M Reset 0 0 0 0 30 30 30 30 30 30 30 30 0 30 30 0 30 30 Changing reds closer to magenta or yellow Press c d to adjust the item to your desired position 6 NOTE For resetting all adjustment items to the factory preset values press a b to select Reset and then press ENTER AV input mode PC input mode Press MENU and the PC MENU screen displays 1 2 Press c ...

Страница 34: ...nced USER C M S Colour Temp Black Monochrome Film Mode I P Setting DNR High Mid High Mid Mid Low Low Black Allows you to select a level for automatic adjustment of a black areas of the image to suit viewing conditions Press a b to select the desired level and then press ENTER TV MENU Picture Advanced USER C M S Colour Temp Black Monochrome Film Mode I P Setting DNR Off High Low 5 Press a b to sele...

Страница 35: ... encoded at 24 frames second analyses it then recreates each still film frame for high definition picture quality NOTE Set the Film Mode to On manually to detect a film based source originally encoded 24 frames second when input source has vertical frequency of 50 Hz e g PAL SECAM etc 4 5 Press a b to select Film Mode and then press ENTER Some items may be greyed out They are not selectable Press ...

Страница 36: ...rogressive Monochrome Film Mode I P Setting DNR DNR Digital Noise Reduction Produces a clearer video image Press a b to select DNR and then press ENTER Some items may be greyed out They are not selectable Press a b to select the desired level and then press ENTER 4 5 Press MENU and the TV MENU screen displays 1 2 Press c d to select Picture Picture menu displays 3 Press a b to select Advanced and ...

Страница 37: ...ble Bass Balance Surround Speaker Detachable Off Reset 0 0 0 15 15 L 15 15 R NOTE For resetting all adjustment items to factory preset values press a b to select Reset press ENTER press c d to select Yes and then press ENTER Press c d to select Audio Audio menu displays 2 Press MENU and the TV MENU PC MENU screen displays 1 Press a b to select the desired level and then press ENTER 4 3 Press a b t...

Страница 38: ...acklight brightness Make sure no object obstructs the OPC sensor which could affect its ability to sense surrounding light Power Save can be set differently for AV input mode and PC input mode Press c d to select Power Control Power control menu displays Power control for AV source Power save When set to Manual or Auto power consumption is reduced by decreasing backlight brightness Press MENU and ...

Страница 39: ...reen displays 1 TV MENU Power Control Setup No Signal Off Power Save No Operation Off Disable Disable Manual TV MENU Power Control No Signal Off Disable Enable No operation Off When set to Enable the power will automatically shut down if there is no operation for 3 hours Press a b to select No Operation Off and then press ENTER Press c d to select Enable and then press ENTER 3 4 Five minutes befor...

Страница 40: ... Save can be set differently for AV input mode and PC input mode Power management When set the power will automatically shut down Press a b to select Power Management and then press ENTER Press a b to select Mode1 or Mode2 and then press ENTER 3 4 Description No power management Factory preset value If no signal inputs for 8 minutes the power shuts down Even if you start using the PC and the signa...

Страница 41: ...layer HDTV tuner PC game console and camcorder To view external source images select the input source from b on the remote control unit or INPUT on the Display CAUTION To protect all equipment always turn off the AVC System before connecting to a VCR DVD player HDTV tuner PC game console camcorder or other external equipment NOTE Please refer to the relevant operation manual DVD player PC etc care...

Страница 42: ...SOURCE menu using b on the remote control unit or INPUT on the Display Then select INPUT1 on Input Select in the menu to set the correct input signal type See page 51 The setting is stored and can be selected in the INPUT SOURCE menu NOTE Each time b is pressed the input source toggles If the DVD image does not come in clearly you may need to change the input signal type setting on the Input Selec...

Страница 43: ...put Select in the menu to set the correct input signal type See page 51 The setting is stored and can be selected in the INPUT SOURCE menu NOTE Each time b is pressed the input source toggles If the VCR image does not come in clearly you may need to change the input signal type setting on the Input Select menu Refer to your VCR operation manual for the signal type S video cable commercially availa...

Страница 44: ...he HDTV tuner image does not come in clearly you may need to change the input signal type setting on the Input Select menu For INPUT3 signal TV MENU Option Input Select AUTO COMPONENT S Video Video INPUT SOURCE TV INPUT1 INPUT2 INPUT3 INPUT4 PC AVC System rear view HDTV tuner Watching broadcasts via an HDTV tuner Connecting an HDTV tuner You can use the INPUT 3 terminal when connecting an HDTV tun...

Страница 45: ...rminal has priority over the video terminals Displaying an image of the game console or camcorder To connect a game console or view a camcorder select INPUT4 from the INPUT SOURCE menu using b on the remote control unit or INPUT on the Display Then select INPUT4 on Input Select in the menu to set the correct input signal type See page 51 The setting is stored and can be selected on the INPUT SOURC...

Страница 46: ...are DDC1 2B compatible Refer to page 67 for a list of PC signals compatible with the System Signal names for 15 pin mini D sub connecter NOTE Macintosh adaptor may be required for use for some Macintosh computers Displaying an image from a PC To view an image from a PC select PC from the INPUT SOURCE menu using b on the remote control unit or INPUT on the Display When connecting to a PC the correc...

Страница 47: ... the left right speakers be sure to connect the plus minus jacks with the correct cables NOTE See page 9 for bundling the cables of the external speakers Unplug the AC cord from the AC outlet before installing the speakers How to connect the speaker cable Pull up the lid Insert the edge of the cable 1 1 1 1 1 2 2 2 2 2 3 3 3 3 3 Put the lid back down Bundle the cables of the external speakers with...

Страница 48: ...and then press ENTER 4 Press MENU and the TV MENU PC MENU screen displays Press c d to select Audio Audio menu displays Press a b to select Speaker and then press ENTER 1 2 3 TV MENU Audio Power Control USER Treble Bass Balance Surround Speaker Reset 0 0 0 15 15 L 15 15 R Detachable Off TV MENU Audio Speaker Detachable External Using external equipment ...

Страница 49: ... 3 Press a b to select Position and then press ENTER Press a b to select H Pos or V Pos TV MENU Setup Option Child Lock Auto Installation Programme Setup Position WSS 4 3 Mode Normal Off English Normal Language West Europe Text Lang Rotate Setup Position Reset H Pos 0 10 10 V Pos 0 30 30 Press c d to adjust the item to your desired position NOTE For resetting all adjustment items to the factory pr...

Страница 50: ...annot be stored Once the System shuts down or enters standby mode the setting is erased To move the picture around the screen again you must perform the above procedure again The image position setting using the steps on page 48 can be stored Select either according to your objectives TV INPUT1 INPUT2 INPUT3 and INPUT4 can each adjust the image position setting on this page The same for WIDE modes...

Страница 51: ...e only Ordinarily you can easily adjust the picture as necessary to change image position using Auto Sync In some cases however manual adjustment is needed to optimise the image 1 2 Press MENU and the PC MENU screen displays Press c d to select Setup If password is already set you are asked to enter it Follow the same step as explained in Language setting for on screen display PC input mode See st...

Страница 52: ...e Check the operation manual of the external equipment for the signal type TV MENU Option Input Select AUTO COMPONENT S Video Video TV MENU Option Input Select AUTO S Video Video TV MENU Option Input Select AUTO S Video Video Press b on the remote control unit or INPUT on the Display INPUT SOURCE menu displays Press b on the remote control unit or INPUT on the Display to select the input source An...

Страница 53: ...mage does not display clearly select another colour system e g PAL NTSC 4 43 AV mode selection AV mode gives you five viewing options to choose from to best match the system environment which can vary due to factors like room brightness type of programme watched or the type of image input from external equipment AV MODE STANDARD AV MODE DYNAMIC AV MODE MOVIE AV MODE GAME AV MODE USER AV MODE STAND...

Страница 54: ...e top and bottom with some programmes WIDE MODE Normal Full 14 9 Zoom 14 9 Panorama Full Cinema 16 9 Cinema 14 9 WIDE mode for AV input mode Manual Selection Press f The WIDE MODE menu displays The menu lists the wide mode options selectable for the type of video signal currently received Auto Selection If you set WSS and 4 3 Mode in the Setup menu on page 56 the optimum WIDE mode is automatically...

Страница 55: ...n display An image fully fills the screen Keeps the original aspect ratio in a full screen display The top and bottom of the image is slightly cropped Detects the resolution of the signal and displays an image with the same number of pixels on the screen 1024g768 NOTE Connect the PC before making adjustments See page 45 Selectable screen size may vary with input signal type a Screen size images An...

Страница 56: ...ignal resolution is input again Press MENU and the PC MENU screen displays 1 Press a b to select Input Signal and then press ENTER PC MENU Setup Option Fine Sync Input Signal Auto Sync English Normal Language Rotate Press a b to select the desired input signal on the display PC MENU Setup Input Signal 640 x 480 848 x 480 Example 720g400 848g480 1280g768 640g400 640g480 1024g768 NOTE You can only s...

Страница 57: ... When the broadcast signal contains no WSS information the function will not work even if enabled See page 53 Picture aspect ratio AV input mode only The WSS signal has 4 3 auto switching that allows you to select between Normal and Panorama Press MENU and the TV MENU screen displays 1 2 Press a b to select 4 3 Mode and then press ENTER 3 Press c d to select Normal or Panorama and then press ENTER...

Страница 58: ...nd the TV MENU screen displays 1 2 Press c d to select Setup If password is already set you are asked to enter it Follow the same steps as explained in Auto installation See steps 2 and 3 on page 22 Press a b to select Rotate and then press ENTER TV MENU Setup Option Child Lock Auto Installation Programme Setup Position WSS 4 3 Mode Normal Off English Normal Language West Europe Text Lang Rotate 3...

Страница 59: ...tem Fixed Variable Press c d to select Option Option menu displays TV MENU Option Audio Out Input Select Cool Climate Colour System Off Fixed AUTO TV MENU Option Audio Out Variable Fixed Sleep timer Allows you to set a time when the TV automatically switches to standby 30 60 90 120 0 minutes Each time you press SLEEP the remaining time switches as shown below When the time has been set countdown a...

Страница 60: ... d to select On and then press ENTER NOTE Cool climate may cause image noise If this occurs turn the function Off Cool Climate can be set differently for AV input mode and PC input mode AV input mode 1 2 3 Press MENU and the PC MENU screen displays Press c d to select Option Option menu displays Press a b to select Cool Climate and then press ENTER PC MENU Option Cool Climate Audio Out Off Fixed P...

Страница 61: ...ck and then press ENTER Press a b to select Password Clear and then press ENTER Press c d to select Yes and then press ENTER Your password is cleared Press MENU and the TV MENU screen displays Press c d to select Setup You are asked to enter the password Follow the same steps as explained in Auto installation See steps 2 and 3 on page 22 NOTE As a precautionary measure make a note of your password...

Страница 62: ...n does not work under the following input conditions 1PC INPUT mode 2Two pictures from the same source e g INPUT 1 and INPUT 1 3Two pictures with different vertical frequency e g PAL and PAL 60 When this function is not available No dual screen display available will display Press c d to set either screen to be active z displays on the active screen which has sound output z Press b to select anoth...

Страница 63: ... from among 4 kinds of language tables West Europe East Europe Greek Turkish Cyrillic Each table is compatible with the Teletext languages listed below 1 2 Press MENU and the TV MENU screen displays Press c d to select Setup If password is already set you are asked to enter it Follow the same steps as explained in Auto installation See steps 2 and 3 on page 22 4 3 Press a b to select Text Lang and...

Страница 64: ...lable 1 TELETEXT TELETEXT 2 3 RED GREEN YELLOW BLUE TELETEXT When viewing the Teletext information Press CHa a a a a w to increase the page number Press CHb b b b b x to decrease the page number Button functions Colour RED GREEN YELLOW BLUE You can select a group or block of pages displayed in the coloured brackets at the bottom of the screen by pressing the corresponding Colour RED GREEN YELLOW B...

Страница 65: ...page as shown below 1 2 3 Select the desired subpage by using c d RED GREEN 0 9 directly selects the desired subpage Press j to exit the subpage screen If you press w x CHa a a a a CHb b b b b the present page will change to the next previous page and simultaneously exit the subpage screen Displaying TOP Overview When receiving TOP Teletext you can read a TOP text overview 4 Press m to display Tel...

Страница 66: ...ar on the Display Press C again within the three second interval the channel display is on the screen Time information will display on the lower left of the screen for about three seconds Even when you change the TV channel you can display the time information with steps 2 3 above NOTE The time is not captured when a selected channel has no Teletext information NOTE The time display cannot be stor...

Страница 67: ...ur system setting See pages 27 and 52 Check the input signal setting See page 51 The unit s internal temperature has increased Remove any objects blocking vent or clean Check the power control setting See pages 37 to 39 Check the sleep timer setting See page 58 Is connection to other components correct See pages 40 to 45 Is correct input signal source selected after connection See page 51 Is the c...

Страница 68: ...024 60 Hz PC compatibility chart Remarks Macintosh 13 67 Hz Macintosh 16 Macintosh 19 Resolution Frequency Apple and Macintosh are registered trademarks of Apple Computer Inc DDC is a registered trademark of Video Electronics Standards Association Power Management is a registered trademark of Sun Microsystems Inc VGA and XGA are registered trademarks of International Business Machines Co Inc ...

Страница 69: ...ity bit Data length Stop bit Flow control 9 600 bps 8 bits None 1 bit None Appendix Command format Communication procedure Send the control commands from the PC via the RS 232C connector The Display operates according to the received command and sends a response message to the PC Do not send multiple commands at the same time Wait until the PC receives the OK response before sending the next comma...

Страница 70: ... _ _ _ _ _ _ _ _ _ _ _ _ _ _ _ _ _ _ _ _ _ _ _ _ _ _ _ _ _ _ _ _ _ _ CONTROL ITEM COMMAND PARAMETER CONTROL CONTENTS W W W W W W W W W W W W S S S S S T T D C C T T D TOGGLE NORMAL FULL 14 9 ZOOM 14 9 PANORAMA FULL CINEMA 16 9 CINEMA 14 9 NORMAL FULL DOT BY DOT CINEMA TOGGLE OFF SRS FOCUS SRS FOCUS DUAL SCREEN OFF DUAL SCREEN ON DIRECT CHANNEL 1 99 CHANNEL UP CHANNEL DOWN TEXT OFF TEXT ON TOGGLE D...

Страница 71: ...d Super View BLACK TFT LCD Number of dots 3 147 264 dots 1366 g 768 g 3 dots Brightness 430 cd m2 Backlight 60 000 hours at Manual 0 position Viewing angles H 170 V 170 Audio amplifier 10W g 2 Speakers Ø 8 cm 2pcs AVC System MONITOR OUTPUT Audio Variable Fixed S VIDEO out VIDEO out Headphones Ø 3 5mm jack AVC System Display AVC System Display 132 W 0 8W Standby 16 5 kg Display only 19 9 kg with Di...

Страница 72: ...71 Dimensional drawings 545 82 87 5 305 545 305 87 5 948 117 5 117 5 587 697 110 200 183 5 200 408 5 1184 460 8 819 6 Unit mm Display ...

Страница 73: ...72 Dimensional drawings 365 430 250 5 180 95 183 Unit mm AVC System ...

Страница 74: ...n run the Auto Installation again by using the following steps 1 Turn on the power of the Display and the AVC System 2 Press MENU Make sure the menu screen displays 3 Press c d to select Setup 4 Press ENTER NOTE If the password setting screen displays you need to enter your password If you forget your password refer to HOW TO SET THE FACTORY PRESETS above 5 Press a b to select Auto Installation 6 ...

Страница 75: ...SHARP CORPORATION ...

Отзывы: