background image


10

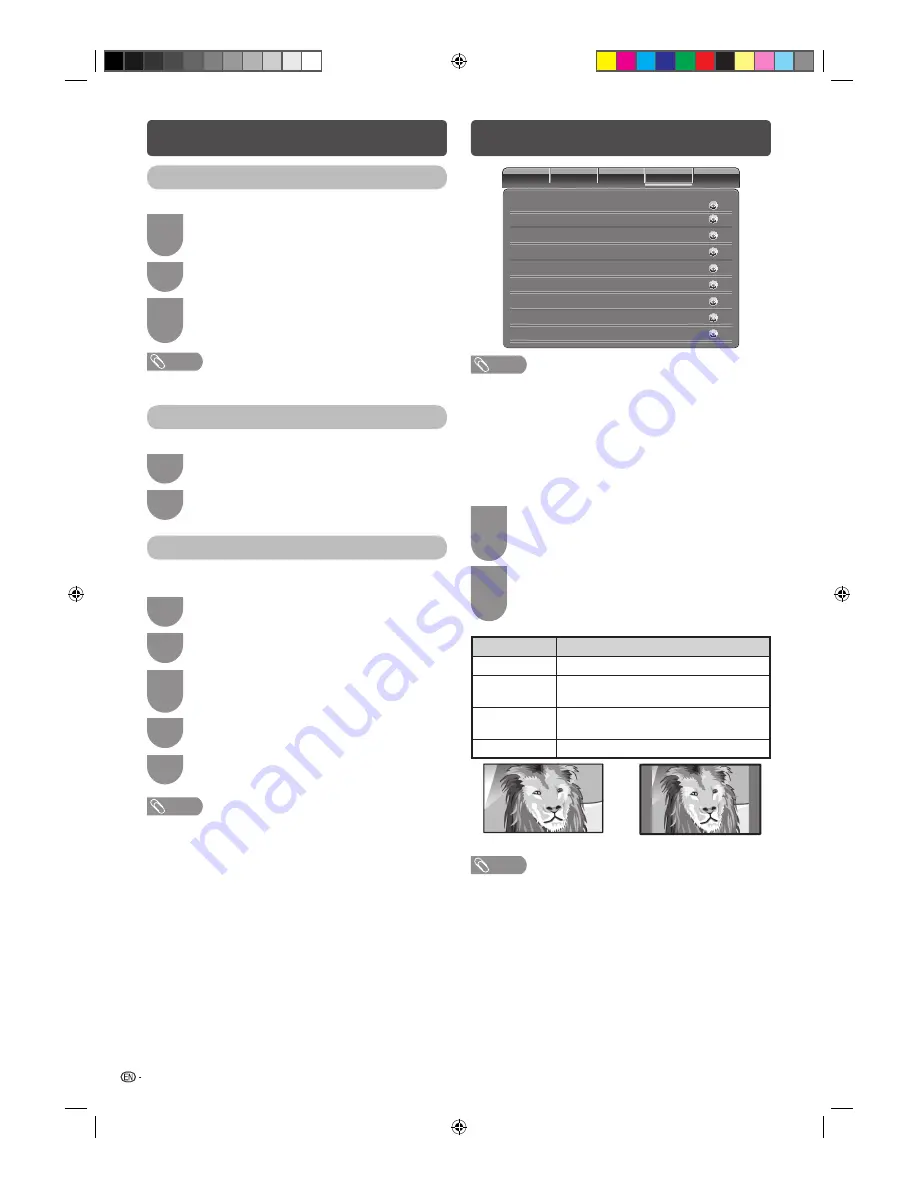
Setup menu

C

h

annels

Video

Audio

TV

Setup

Parental

Normal

On

Off

Disable

Screen Mode

DPMS

Blue Mute

No signal off

30min.

No operation off

Auto

Time Setup

Input Select

Off

PAP/PIP

English

OSD Language

NOTE 

• The displayed menu items in Setup menu are different, 

depending on the input or signal source.

H

 OSD Language

Select from among 4 languages: English, Simplifi ed 
Chinese, Persian and Arabic.

H

 Screen Mode

You can select different picture sizes that account for 
the kind of each picture.

1

Press 

WIDE

.

• The SCREEN MODE menu displays.
• The menu lists the wide mode options selectable 

for the type of video signal currently received.

2

Press 

WIDE

 or 

c

/

d

 while the Screen Mode 

menu displays on the screen.

• As you toggle down the options, each mode is 

immediately refl ected on the TV.

Selected item

Description

Full

Full screen for both 4:3 and 16:9 pictures.

Normal

Available for 4:3 pictures only. A side bar 
appears on each side.

Panorama

In this mode the picture is progressively 
stretched toward each side of the screen.

Auto

Automatically adjusts the picture size.

4:3 picture on “Panorama”

4:3 picture on “Normal”

NOTE 

• Some picture sizes may not be displayable depending on 

the input signal.

H

 PAP/PIP

You can display dual pictures on the screen at one 
time. You can select either dual picture mode the “PAP”
(Picture And Picture) or “PIP” (Picture In Picture).

H

 DPMS (Display Power Management Signals)

You can set the TV to automatically power off when no 
image is displayed on PC. (On, Off)
If no signal inputs for approximately 40 seconds, the 
power off.
When you start using the PC and the signal inputs 
again, the TV turns on.

TV menu (Continued)

Analogue Channel Fine Tune

You can adjust the frequency to your desired position.

1

Go to “MENU” > “TV” > “Channels” > 
“Analogue Channel Fine Tune”, and then press 

ENTER

.

2

Press 

a

/

b

 to select the channel you want

to fi ne tune, and then press 

ENTER

3

Adjust the frequency by pressing 

c

/

d


while checking the background picture as a 
reference, and then press 

ENTER 

to set. 

NOTE 

• Analogue Channel Fine Tune is grayed out and unselectable 

in DTV mode.

Clear Channel List

Channel list will be reset to clear.

1

Go to “MENU” > “TV” > “Channels” > “Clear 
Channel List”, and then press 

ENTER

.

2

Press 

c

/

d

 to select “OK”, and then press 

ENTER

.

Colour System (ATV only)

You can change the colour system to one that is 
compatible with the image on the screen.

1

Go to “MENU” > “TV” > “Channels”> “Channel 
Scan”, and then press 

ENTER

.

2

Press 

a

/

b

 to select “Colour System”.

3

Press 

c

/

d

 to select the optimum colour 

system to receive. (Auto, PAL, SECAM, 
NTSC3.58, NTSC4.43, PAL-60)

4

Press 

ENTER

.

5

Press 

c

/

d

 to select “OK”, and then press 

ENTER

.

NOTE 

• If “Auto” is selected, colour system for each channel is 

automatically set. If an image does not display clearly, select 
another colour system (e.g. PAL, NTSC4.43).

LC24LE430X_EN.indb   10

LC24LE430X_EN.indb   10

7/19/2011   9:38:13 AM

7/19/2011   9:38:13 AM

Содержание Aquos LC-24LE430X

Страница 1: ...MODEL LC 24LE430X LC 32LE430X LCD COLOUR TELEVISION OPERATION MANUAL Only for LC 24LE430X LC24LE430X_EN indb 1 LC24LE430X_EN indb 1 7 19 2011 9 38 04 AM 7 19 2011 9 38 04 AM ...

Страница 2: ...LC24LE430X_EN indb 2 LC24LE430X_EN indb 2 7 19 2011 9 38 04 AM 7 19 2011 9 38 04 AM ...

Страница 3: ...set Picture Mode 7 Menu operation 7 Page Video menu 7 Audio menu 8 TV menu 9 Setup menu 10 Parental menu 12 ATV Analogue DTV buttons 13 EPG 14 Teletext function 15 PC compatibility chart 15 USB Media Player 16 Controlling HDMI devices 18 Appendix 19 Specifications 20 Protection against overturning 21 Dear SHARP customer Thank you for your purchase of the SHARP LCD colour TV product To ensure safet...

Страница 4: ...t overturns Take special care near children and pets The LCD panel is a very high technology product with 1 049 088 only for LC 32LE430X 2 073 600 only for LC 24LE430X pixels giving you fine picture details Due to the very large number of pixels occasionally a few non active pixels may appear on the screen as a fixed point of blue green or red This is within product specifications and does not consti...

Страница 5: ...g the antenna cable To enjoy a clearer picture use an outdoor antenna VHF UHF antenna or VHF UHF antenna 300 ohm twin lead flat feeder not supplied 75 ohm impedance converter not supplied Standard DIN45325 plug IEC 169 2 75 ohm coaxial cable round cable not supplied To antenna terminal If your outdoor antenna uses a 75 ohm coaxial cable with a standard DIN45325 plug IEC 169 2 plug it into the anten...

Страница 6: ...u can use the INPUT 1 INPUT 2 INPUT 3 HDMI INPUT 5 terminals when connecting to a DVD player Digital TV STB Set Top Box and other audiovisual equipment When using component cable commercially available When using HDMI certified cable commercially available L R Y PB CB PR CR DVD player Digital TV STB Set Top Box DVD player Digital TV STB Set Top Box Connecting a PC Using Digital Audio Output You can...

Страница 7: ...al equipment with CEC control function and USB Media Player 1 e Mute Press e s Mutes sound Press e again s Restores sound 2 0 9 Set the channel TELETEXT mode Set the page See page 15 3 A Flashback Press A to return to the previous selected channel or external input mode 4 ATV Press to access ATV mode See page 13 5 DTV Press to access DTV mode See page 13 6 VOLk VOLl Set the volume VOLk Increase th...

Страница 8: ... 5 terminal 15 INPUT 6 PC terminals 16 INPUT 2 HDMI terminal USB terminal use for USB Media Player See page 16 Usually do not connect anything to this terminal as it is reserved only for service personnel The illustrations in this operation manual are for explanation purposes and may vary slightly from the actual operations The illustrations used throughout this manual are based on LC 32LE430X Tur...

Страница 9: ...ch the mode in the Picture Mode menu on the Video menu screen Selected item Description STANDARD For a highly defined image in a normally bright room MOVIE For a movie GAME For game play USER Allows the user to customise settings as desired You can set the mode for each input source DYNAMIC For a clear cut image emphasising high contrast for sports viewing NOTE You can select a different Picture Mo...

Страница 10: ... Treble SRS TS HD Off Balance Equalizer Off Digital Audio Output PCM Auto Volume Control Off H Audio adjustments Selected item c button d button Balance Decrease audio from the right speaker Decrease audio from the left speaker Bass For weaker bass For stronger bass Treble For weaker treble For stronger treble H SRS TruSurround TS HDTM You can enjoy SRS TruSurround HDTM sound the same as you were ...

Страница 11: ...e RF Scan Digital only Select RF Channel that you want to scan by pressing c d then press ENTER to start scanning When channel programmes are found the Signal Level and Signal Quality will be displayed Channel Skip Selected channels are passed over when using CH a b even if selected while watching the image from the TV 1 Go to MENU TV Channels Channel Skip and then press ENTER 2 Press a b to selec...

Страница 12: ... or PIP Picture In Picture H DPMS Display Power Management Signals You can set the TV to automatically power off when no image is displayed on PC On Off If no signal inputs for approximately 40 seconds the power off When you start using the PC and the signal inputs again the TV turns on TV menu Continued Analogue Channel Fine Tune You can adjust the frequency to your desired position 1 Go to MENU ...

Страница 13: ... DivX VOD Setup menu Continued H Blue Mute Automatically turns the screen blue if a broadcast signal is not received On Off H No signal off You can set the TV to automatically power off in about 15 minutes after the TV goes into a state of receiving no programme signals such as the end of a broadcast day Enable Disable NOTE Disable is the factory preset value When a TV programme finishes and the TV...

Страница 14: ...ng a USB device You must update the software through the USB terminal 1 Insert the USB device containing the software update file and the TV will switch to USB input automatically 2 Press INPUT to switch to other input go to Menu Setup Version Up and then press ENTER 3 The TV displays a confirmation screen while checking the data in the inserted USB device CAUTION If the data is not compatible with ...

Страница 15: ...t source you must enter the password While Channel Locked or Input Locked is displayed press ENTER to display the password input window Inputting the correct password lifts the Parental block temporarily until the power is turned off H Change Password Register a four digit password number to use the Password function 1 Press a b to select Change Password and then press ENTER 2 Enter the four digit...

Страница 16: ...l broadcasting signal The EPG enables you to search for a programme and view the programme schedule in detail Basic Operation H Display the EPG screen 1 Press EPG Saturday 27 August 2011 3 46 26 27 08 2011 02 ABC TV Sydney Play School Play School 18 00 19 00 Sat 27 Aug Programme description 1 2 Play School People Dimensions Australia Wide Play School 03 ABC HDTV 04 ABC2 05 ABCTV 18 00 19 00 Prev d...

Страница 17: ...lour Red Green Yellow Blue on the remote control unit 0 9 Directly select any page from 100 to 899 by using 0 9 v Top Bottom Full Switch the Teletext image to Top Bottom or Full k Reveal hidden TELETEXT To reveal hidden information such as an answer to a quiz 3 Hold To stop updating Teletext pages automatically or release the hold mode Subtitle for TELETEXT Display the subtitle during Teletext pag...

Страница 18: ...edia Player Connecting a USB device Connect a USB device to the TV as shown below The TV automatically switches to the USB mode when a USB device is inserted in the USB terminal Depending on the USB device the TV may not be able to recognise the contained data File names with many characters may vary depending on character set may not be displayed Do not disconnect a USB device or memory card from...

Страница 19: ...ext slide NOTE You cannot select Picture Mode AV MODE for USB Media Player mode USB Media Player Continued Video mode 1 Press c d to select Video and then press ENTER 2 Press a b c d to select the desired video and then press ENTER Press MENU to display the video menu Menu Description Pause Play Pause Play the video Repeat Repeat video playback Show Info Show video information Picture Mode Select ...

Страница 20: ...recognizes the connected HDMI device and you can control the TV and the devices as if using a universal remote control NOTE Point the remote control toward the TV not to the connected HDMI device Video noise may occur depending on the type of HDMI cable used Make sure to use a certified HDMI cable These operations affect the HDMI device selected as the current input source If the device does not op...

Страница 21: ...bright The picture may look dark in a room that is too bright Check the colour system setting See page 10 Power is suddenly turned off The unit s internal temperature has increased Remove any objects blocking the vent or clean Check the Setup setting See page 10 Is the sleep timer set See page 5 No picture Is the connection to external equipment correct See page 4 Is the Picture Mode adjustment co...

Страница 22: ...o music and video RS 232C 9 pin D sub male connector SPDIF Optical Digital Audio output Headphone Audio out φ 3 5 mm jack Line out Audio out RCA jack g 2 OSD language English Simplified Chinese Persian Arabic Power Requirement AC 110 240 V 50 60 Hz Power Consumption 37 W 0 5 W Standby 66 W 0 5 W Standby Dimensions without stand mm 579 7 W g 375 H g 55 D 768 8 W g 488 5 H g 67 8 D with stand mm 579 ...

Страница 23: ...the bottom of the TV stand The band should be aligned flat on the table and perpendicular to the stand 2 Fix the TV to the table by a screw commercially available Use the screw of M4 x L12 min whose shape is compatible with the band CAUTION As this product is heavy use a table that is wide enough to support the product and capable of withstanding the product s weight The table should be set where i...

Страница 24: ...Memo LC24LE430X_EN indb 22 LC24LE430X_EN indb 22 7 19 2011 9 38 17 AM 7 19 2011 9 38 17 AM ...

Страница 25: ...Memo LC24LE430X_EN indb 23 LC24LE430X_EN indb 23 7 19 2011 9 38 17 AM 7 19 2011 9 38 17 AM ...

Страница 26: ...Memo LC24LE430X_EN indb 24 LC24LE430X_EN indb 24 7 19 2011 9 38 17 AM 7 19 2011 9 38 17 AM ...

Страница 27: ...LC24LE430X_EN indb 25 LC24LE430X_EN indb 25 7 19 2011 9 38 17 AM 7 19 2011 9 38 17 AM ...

Страница 28: ...Printed in China 11P07 MA NP LC24LE430X_EN indb 26 LC24LE430X_EN indb 26 7 19 2011 9 38 17 AM 7 19 2011 9 38 17 AM ...

Отзывы: