Initial Settings
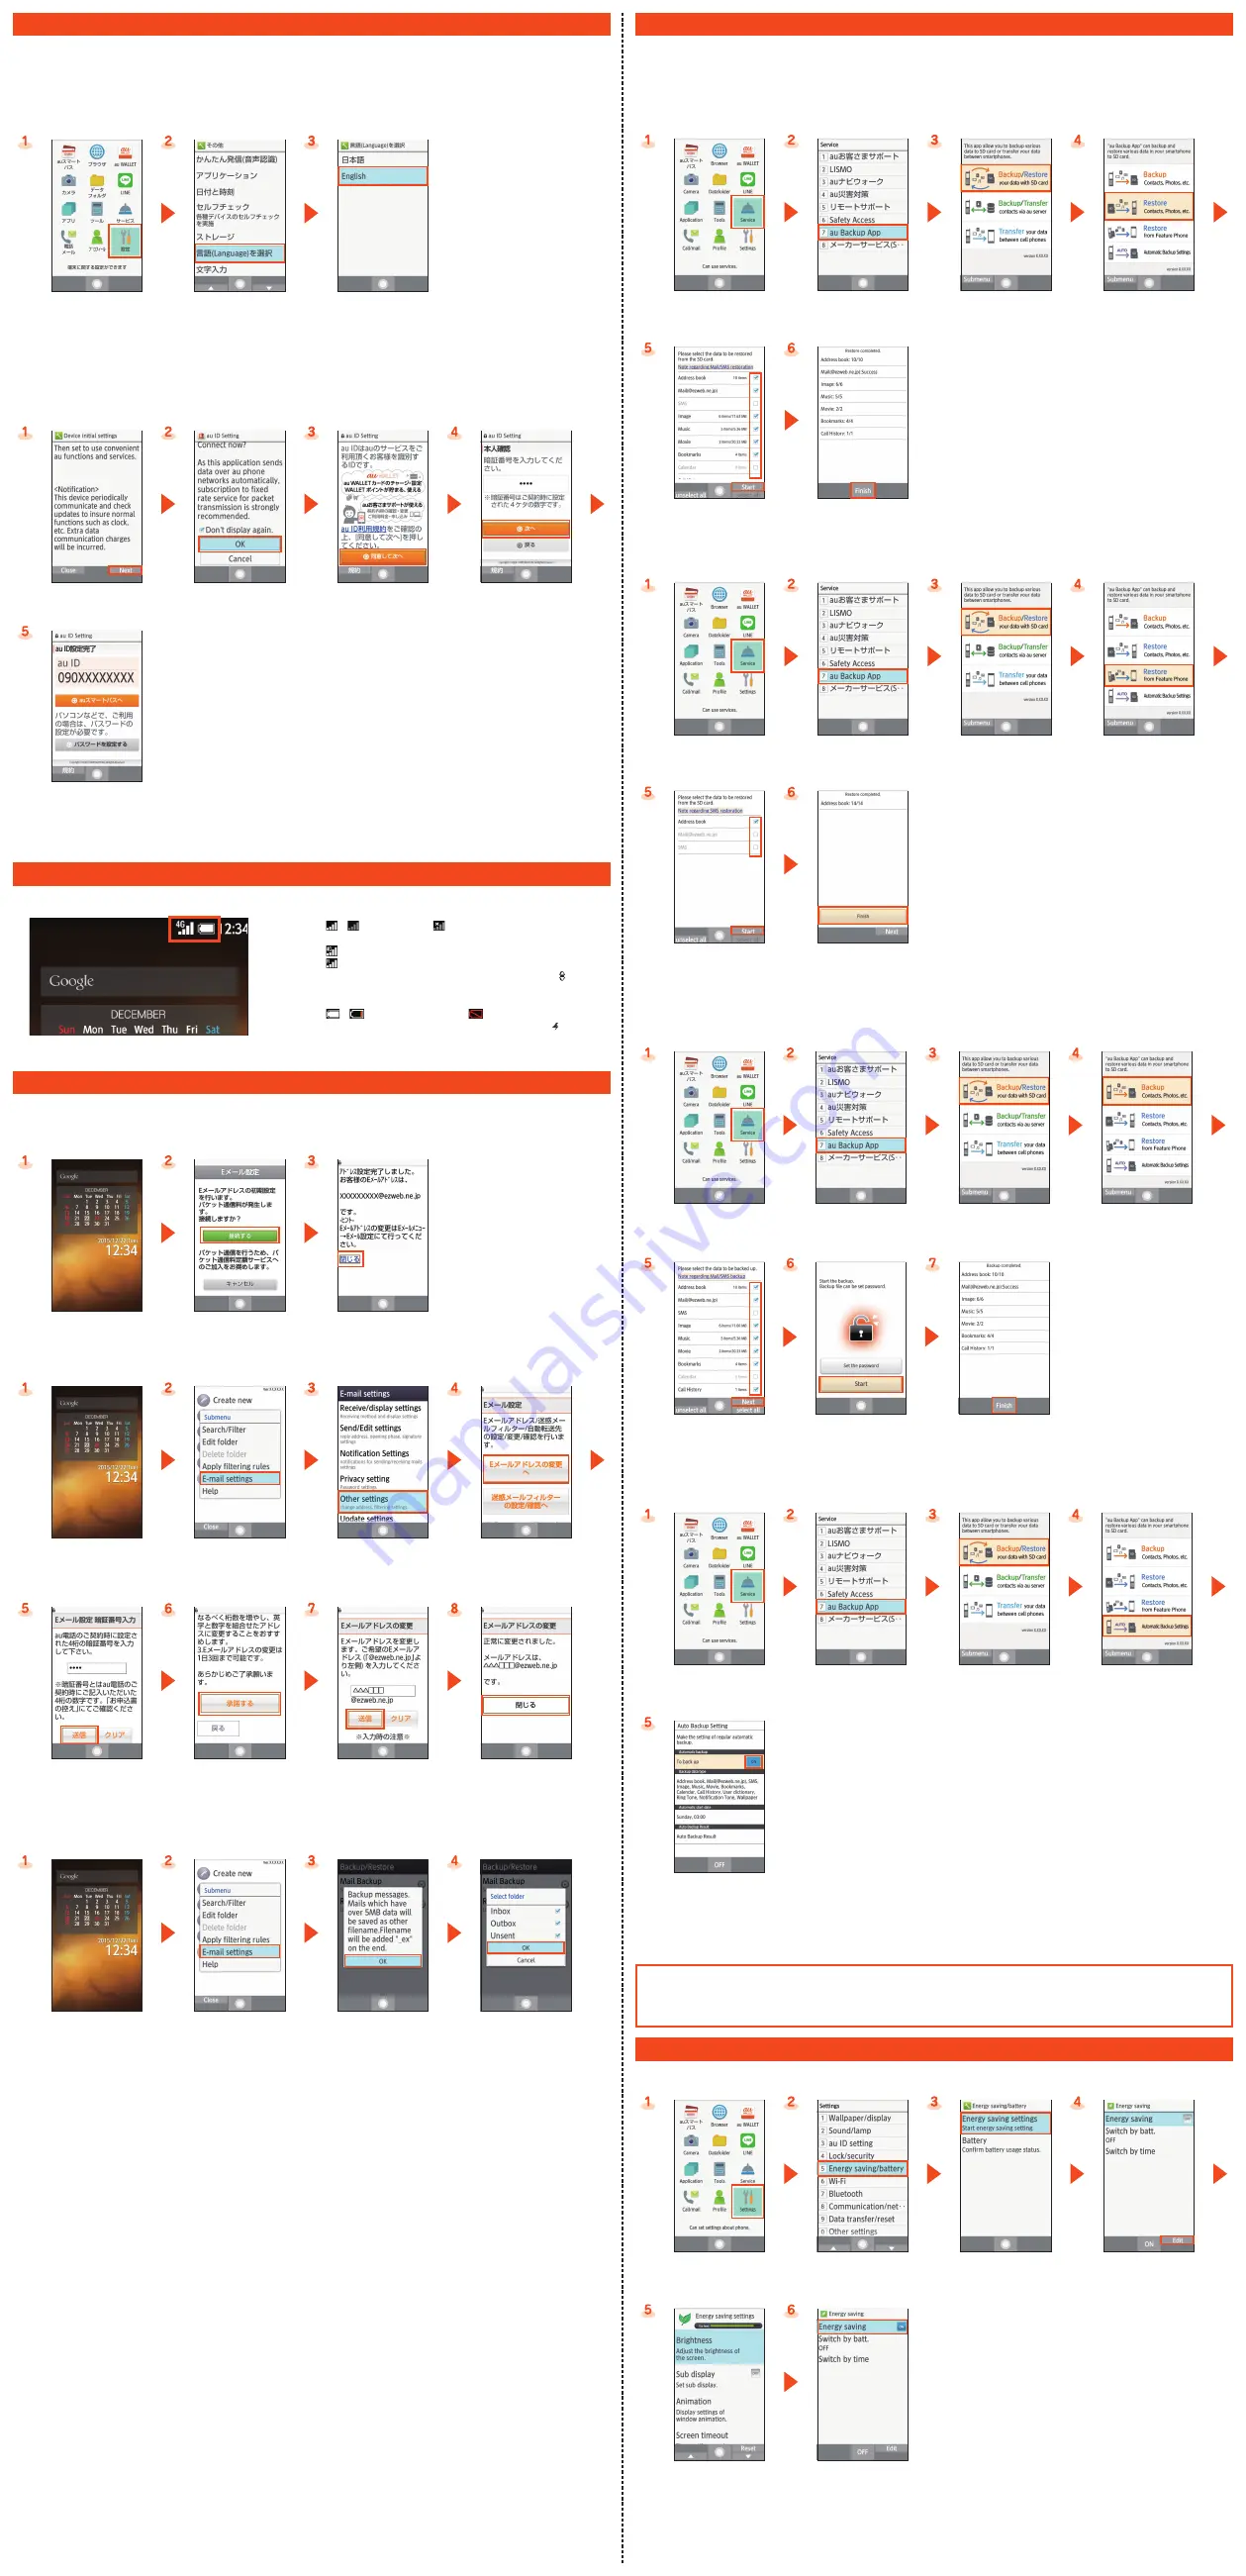
The first time the power is turned on, a screen for making initial settings is displayed, and you can set an au ID.
●
To make initial settings in English, press
.
→
[
はい
] (Yes) once the "
端末初期設定
" (Device initial settings) screen is displayed, cancel
initial settings, and then switch to English display. After switching to English display, restart the product, and an English screen for
making initial settings will be displayed.
■
Switching the Display Language to English
You can switch the display language for function names and other items to English.
When the standby screen is
displayed, press
k
→
[
設定
] (Settings).
[
その他
] (Other settings)
→
[
言語
(Language)
を選択
]
(Select language).
[English].
■
au ID setting
An au ID is an identifier for customers using au services. Register your au phone number as an au ID.
By setting an au ID, you can use various services provided by au such as au
スマートパス
(au Smart Pass), au
お客さまサポート
(au
Customer Support), and au WALLET.
●
Alternatively, when the standby screen is displayed, press
k
→
[Settings]
→
[au ID setting].
o
(Next).
Confirm the contents
→
[OK].
Confirm the contents
→
[
同意
して次へ
] (Agree and Next).
Enter the security code
→
[
次へ
] (Next).
*
au ID setting is complete.
Press
.
→
[Yes] to return to
the standby screen.
* The security code is the 4-digit number set at subscription.
Checking Onscreen Status
Check the signal strength and battery level onscreen.
①
Signal strength (Receiving electric field)
– : Level display
: Out of service area
•
The icon indicating network is displayed at the upper left.
: 4G (LTE) available
: Roaming
•
During a communication, the icon is displayed with
superimposed.
②
Battery level
–
: Battery level display
: No battery
•
While charging, the battery icon is displayed with
superimposed.
E-mail Settings
E-mail (@ezweb.ne.jp) is a service which enables you to exchange e-mails with other cell phones which support e-mail and with PCs. An
e-mail address is set automatically in the initial settings. You can change the e-mail address set in the initial settings.
■
Initial Settings
When the standby screen is
displayed, press
j
.
Confirm the contents
→
[
接続する
] (Connect).
Confirm the contents
→
[
閉じる
] (Close).
■
Changing E-mail Address
When the standby screen is
displayed, press
j
.
u
(Submenu)
→
[E-mail settings].
[Other settings].
Confirm the contents
→
[
接続する
] (Connect)
→
[E
メールアドレスの変更へ
]
(To change e-mail address).
Enter the security code
→
[
送信
] (Send).
*
Confirm the contents
→
[
承諾する
] (Accept).
Enter an e-mail address
→
[
送信
] (Send).
[OK]
→
[
閉じる
] (Close).
* The security code is the 4-digit number set at subscription.
■
Backing Up E-mail
●
If a microSD memory card is inserted into the product, e-mails are saved on the card. If not, they are saved on the internal memory.
When the standby screen is
displayed, press
j
.
u
(Submenu)
→
[E-mail settings].
[Backup/Restore]
→
[Mail Backup]
→
[OK].
Select the character code
→
[OK]
→
Select folders to
back up
→
[OK].
Transferring Data with the au Backup App
You can copy data to the product from a previously used au phone using a microSD memory card. Also, you can back up data on the
product to a microSD memory card.
●
To return data using a microSD memory card, save the data from the old au phone to the microSD memory card beforehand.
* For a smartphone, back up data with the au Backup App. For a cell phone, back up contacts with the microSD menu.
■
How to Copy/Restore Data with the au Backup App
●
Restoring contacts, photos, etc.
When the standby screen is
displayed, press
k
→
[Service].
[au Backup App]
*
.
[Backup/Restore your data
with SD card].
[Restore Contacts, Photos,
etc.].
Select data to restore
→
o
(Start).
*
k
(Finish).
* If a confirmation screen, etc. is displayed, follow the onscreen instructions.
●
Copying cell phone data
When the standby screen is
displayed, press
k
→
[Service].
[au Backup App]
*
.
[Backup/Restore your data
with SD card].
[Restore from Feature Phone].
Select data to copy
→
o
(Start).
*
[Finish].
* If a confirmation screen, etc. is displayed, follow the onscreen instructions.
■
How to Save Data from the au Backup App
●
Saving data to a microSD memory card manually
When the standby screen is
displayed, press
k
→
[Service].
[au Backup App]
*1
.
[Backup/Restore your data
with SD card].
[Backup Contacts, Photos,
etc.].
Select data to back up
→
o
(Next).
[Start]
*2
.
k
(Finish).
*1 If a confirmation screen, etc. is displayed, follow the onscreen instructions.
*2 Selecting “Set the password” allows you to set a password for data being backed up.
●
Setting automatic backup
When the standby screen is
displayed, press
k
→
[Service].
[au Backup App]
*
.
[Backup/Restore your data
with SD card].
[Automatic Backup Settings].
Select “To back up”
→
k
(ON) to set “ON”
→
Set “Backup data type” and
“Automatic start date”.
* If a confirmation screen, etc. is displayed, follow the onscreen instructions.
Viewing/Playing data
You can view/play data on the product by the following operations.
●
When the standby screen is displayed, press
k
→
[Datafolder]
→
Select the category
→
k
→
Select the data to display
→
k
* Alternatively, you can select
u
(Submenu)
→
[Move/copy] while data is selected to move or copy data to a microSD memory card.
Reducing Battery Consumption
You can reduce battery consumption by enabling energy saving.
●
Enabling energy saving may prevent some applications from operating properly.
When the standby screen is
displayed, press
k
→
[Settings].
[Energy saving/battery].
[Energy saving settings].
o
(Edit).
Set each item
→
,
.
Select “Energy saving”
→
k
(ON) to set “ON”.


