background image

AY/AE-A079E
AY/AE-A099E

15

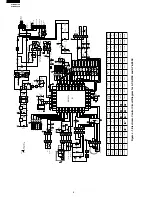
Table Y-6 [AY-A079E]

Step 

1

2

3

4

5

6

7

8

9

10

11

12

13

14

15

16

17

18

19

20

21

22

Output for outdoor unit 

Lamps

RED

YELLOW

Indoor

Fan motor

Louver

OFF 

Compressor 

Reverse Valve 

Outdoor Fan Motor

OFF 

OFF 

OFF 

OFF 

OFF 

OFF 

OFF 

OFF 

OFF 

OFF 

OFF 

OFF 

OFF 

OFF 

OFF 

OFF 

OFF 

OFF 

OFF 

OPEN 

ON 

D

OFF 

Flickering

OFF 

OFF 

ON 

ON 

CLOSE 

ON

OFF 

OFF 

OFF

UL

OFF 

OFF

OFF 

OFF 

OFF 

OFF

M

OFF 

OFF 

OFF 

OFF 

OFF 

ON 

OFF 

OFF 

OFF 

OFF 

OFF 

OFF 

ON

OFF

OFF 

OFF 

OFF 

OFF 

OFF 

OFF 

ON 

ON 

OFF 

OFF 

ON

ON 

OFF 

OFF 

ON 

OFF 

OFF 

OFF 

OFF 

OFF 

OFF 

OFF 

OFF

OFF 

OFF 

OFF 

OFF 

OFF 

OFF 

OFF 

ON 

OFF 

OFF 

OFF 

OFF

ON 

OFF 

OFF 

ON 

ON 

OFF 

OFF 

23

OFF 

OFF 

OFF 

OFF 

OFF

(Back to step 1)

ON 

1

3

4

1

2

3

: 7˚C      Room temp.      42˚C

         ON     

: 7˚C     (Room temp.) or (Room temp.)      42˚C

                      OFF  

: –2˚C     Pipe temp.     42˚C

         ON

: –2˚C     (Pipe temp.) or (Pipe temp.)      42˚C

         OFF

: 0.1V     (P57 input voltage)      0.45V                                                                 ON
: 0.1V     (P57 input voltage) or (P57 input voltage      0.45V)

        OFF

4

: When Power on start is effective, Timer LED(yellow) is ON.

Содержание AE-A079E

Страница 1: ...RANT PIPE AINSTALLATION WORKS 24 DISASSEMBLING PROCEDURE 25 REPLACEMENT PARTS LIST 29 TABLE OF CONTENTS SERVICE MANUAL S2915AYA099E SHARP CORPORATION SPLIT SYSTEM ROOM AIR CONDITIONERS INDOOR UNIT AY A079E AY A099E AE A079E AE A099E In the interests of user safety Required by safety regulations in some countries the set should be restored to its original condition and only parts identical to those...

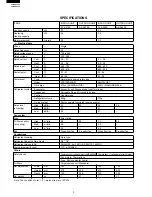
Страница 2: ... and Grooved tube type Control Capillary tube Refrigerant volume 690g 730g De lce system Micro computer controled reverse sysetm Noise level High dB A 33 43 38 43 at cooling Med dB A 29 31 Low dB A 26 27 Fan system Drive Direct drive Air flow quantity High m3 min 5 8 20 7 1 20 at cooling Med m3 min 4 9 5 3 Low m3 min 4 3 4 4 Fan Cross flow fan Propeller fan Cross flow fan Propeller fan Connections...

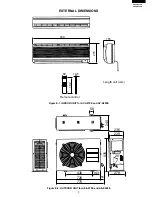
Страница 3: ...9E 3 270 790 155 Remote control 58 19 5 182 Length unit mm EXTERNAL DIMENSIONS Figure E 1 INDOOR UNIT for AY A079E and AY A099E Figure E 2 OUTDOOR UNIT for AE A079E and AE E099E 430 720 775 143 55 245 535 278 236 228 20 58 ...

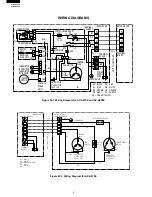
Страница 4: ...BK OR PU BL 250V FUSE T2 5A INDOOR UNIT TERMINAL BOARD 2 OUTDOOR UNIT TERMINAL BOARD EVAPORATOR THERMAL FUSE TERMINAL BOARD 1 POWER SUPPLY CORD BR BL G Y N L G Y G Y G Y N 1 2 3 UNIT TO UNIT CORD BL BR BL BK BL BR GR G Y RE WH OR PU BLACK BLUE BROWN GRAY GREEN YELLOW RED WHITE ORANGE PURPLE N 5 7 1 2 1 2 3 5 3 1 INDOOR UNIT TERMINAL BOARD 2 TERMINAL BORAD 1 U N I T T O U N I T C O R D OUTDOOR UNIT...

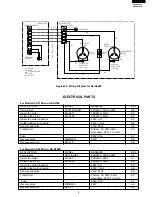
Страница 5: ...RH174VHET 220 240V 50Hz 800W AE Indoor fan motor ML A411 220 240V 50Hz AY Outdoor fan motor ML A592 220 240V 50Hz AE Indoor fan motor capacitor 400V 1µF AY Outdoor fan motor capacitor 400V 1 5µF AE Running capacitor 370V 25µF AE Transformer Primary AC 220V 50Hz AY Secondary AC16 1V 50Hz Fuse 250V 2 5A AY Reverse valve MMB 26A 240V AE Reverse valve coil RSV 10 AE Figure W 3 Wiring Diagram for AE A0...

Страница 6: ...OR A IN OUT RY1 E RY2 CNR1 CNR2 F RY3 POWER SUPPLY TERMINAL BOARD 3P GREEN YELLOW EARTH LINE NEUTRAL LINE COMPRESSOR VALVE COIL OUT DOOR UNIT FAN MOTOR BCN2 BCN1 CN2 CN2 Q3 3 1 2 CN1 12V TR 12V Q2 2 1 3 IC4 9 8 12V BCN1 SSR CN101 CN201 CN7 CN6 PHOTO DETECTOR UNIT AUX TEST RUN YELLOW LED102 RED LED101 2 3 BCN2 CN3 CN4 BCN1 BCN2 LOUVER MOTOR FUNCTION 12H 24H IC1 PIN NO 19 P41 SYMBOL JP10 AY A079E X ...

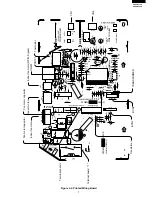
Страница 7: ...JBE0 QPWBFA652JBE0 OPERATION RED TIMER YELLOW JP3 JP2 JP6 R36 R34 R32 R31 MODEL A MODEL B FAN H FAN M FAN L WIRELESSL D FAN OFF 12H 24H OFF WIDEH DEICE B DEICE A RPM PULSE SWEAT CN7 C5 C3 CN1 FAN LOUVER IN OUT MOTOR RPM SIGNAL THERMISTOR MOTOR GRAY B S S R R6 D4 1 1 8 2 5 7 2 7 13 11 51 1 3 1 1 1 4 5 8 19 52 64 33 1 6 9 8 1 I C 4 D2 D1 CN2 BCN1 TRANSFORMER L C1 NR FAN MOTOR CAPACITOR D CNR1 CNR2 V...

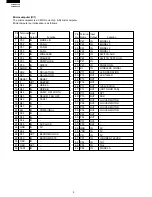
Страница 8: ...0 VR IN 5V 61 P57 IN CURRENT LEVEL 62 P56 IN TH1 63 P55 IN TH2 64 P54 IN MODEL A Microcomputer IC1 The microcomputer is a CMOS one chip 8 bit microcomputer Microcomputer port allocation is as follows Pin Terminal Input No Name Output Function 1 P53 IN MODEL B 2 P52 IN FAN H 3 P51 IN FAN M 4 P50 IN FAN L 5 P33 IN WIRELESS 6 P32 IN PREHEAT 7 P31 IN PRM PLUSE 8 P30 IN SWEAT 9 AGND IN 0V 10 CK2 IN OSI...

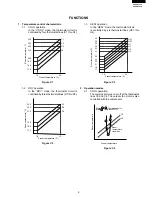
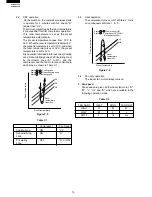
Страница 9: ... D3 Figure Y 3 2 Operation modes 2 1 COOL operation The compressor turns on or off at the thermostat lines C3 and C4 The outdoor fan motor is also controlled with the compressor Figure Y 4 Figure Y 2 Preset temperature C H4 H3 H2 H1 H02 H01 17 19 21 22 24 26 31 33 35 36 38 40 18 32 Room temperature C Room temperature Preset temperature Room temperature transition C3 C4 States 1 3 Compressor ON Sta...

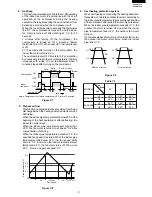
Страница 10: ... the room temperature 2 minutes after this first compressor operation This room temperature is set as the preset temperature automatically The preset temperature ranges from 18 C to 32 C Whentheroomtemperatureisbelow18 C the preset temperature is set to 18 C and when the room temperature is over 32 C the preset temperature is set to 32 C Dryoperationisdividedintothreezones Cooling zone Dehumidifyi...

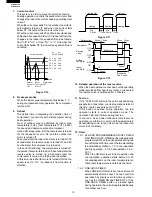
Страница 11: ...3 minutes after turning off the compressor the compressor is turned on for 3 minutes below thermostat line H01 While over H01 the compressor is off At 10 seconds after turning on the compressor the indoor fan motor is turned on The next compressor OFF time is for 3 8 or more than 8 minutes according to the room temperature the time increases with a rise of room temperature when 3 minutes elapse af...

Страница 12: ...ation of the reverse valve When the heat operation is shut down or the operating mode is switched from heat to cool or dry or vice versa the reverse valve is switched after 3 minutes 11 Test run If the TEST RUN button in the unit is pushed during suspension of operation cool test operation starts At this time the fan speed is set to AUTO If this button is pushed during operation the test operation...

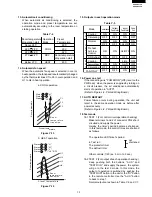
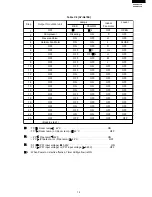
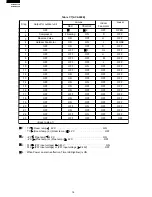
Страница 13: ...nd TEST RUN and supply the power the system will go to the test 2 mode In this mode the output of operation is switched by pushing the TEST RUN button in the unit or the OI button in the remote controller Use the AUX button to back to step 1 Normal outputs are shown in Table Y 6 and Y 7 14 Automatic fan speed When the automatic fan speed is selected in cool or heat operation the fan speed is autom...

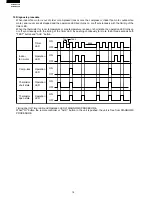
Страница 14: ... or short state the operation LED turns on or off syncrnoously with the timing of the timer LED by pushing continously for more than three seconds both TEST button and AUX button Timing chart of Timer LED and Operation LED of DIAGNOSIS PROCEDURE When OI button the remote controller or AUX button in the unit is pushed the unit is free from DIAGNOSIS PROCEDURE Indoor fan motor Comp lock Thermistor s...

Страница 15: ...F UL OFF OFF OFF H OFF OFF OFF M OFF OFF OFF L OFF OFF ON OFF OFF OFF OFF OFF OFF ON OFF OFF OFF OFF OFF OFF OFF ON ON OFF OFF ON ON OFF OFF ON OFF OFF OFF OFF OFF OFF OFF OFF OFF OFF OFF OFF OFF OFF OFF ON OFF OFF OFF OFF ON OFF OFF ON ON OFF OFF 23 OFF OFF OFF OFF OFF Back to step 1 ON 1 2 3 4 1 2 3 7 C Room temp 42 C ON 7 C Room temp or Room temp 42 C OFF 2 C Pipe temp 42 C ON 2 C Pipe temp or ...

Страница 16: ...FF UL OFF OFF OFF H OFF OFF OFF M OFF OFF OFF L OFF OFF ON OFF OFF OFF OFF OFF OFF ON OFF OFF OFF ON OFF OFF OFF ON ON OFF OFF ON OFF OFF OFF ON OFF OFF OFF OFF OFF OFF OFF ON OFF OFF OFF ON OFF OFF OFF OFF ON OFF OFF ON OFF OFF OFF OFF ON OFF OFF 23 OFF OFF OFF OFF OFF Back to step 1 ON 1 2 3 1 2 3 7 C Room temp 42 C ON 7 C Room temp or Room temp 42 C OFF 2 C Pipe temp 42 C ON 2 C Pipe temp or Pi...

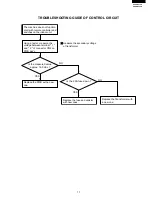
Страница 17: ...es not function at all with remote controller and switches on the indoor unit Using a tester measure the voltage between terminal 1 and 2 of connector CN2 on PWB ass y Is the measured value approx 16 0 Vac Replace the PWB with a new one Is the 2 5A fuse down Replace the fuse and varistor with new ones Replace the ftransformer with a new one ...

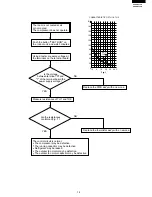
Страница 18: ...r unit Does connector CN101 CN6 connect in place Using a tester measure the voltage between terminals of resistor R15 on the PWB ass y Push the button OI Are batteries of the wireless remote controller proper Replace the batteries with new ones Replace the wireless remote controller When the signal is received does the voltage change Replace the PWB with a new one PWB is normal Inspect the outdoor...

Страница 19: ...tive The outdoor fan motor capacitor may be defective Push the button TEST RUN on the indoor unit and wait 3 minutes Is the voltage between terminal N and 1 of the terminal board the power supply voltage Are the resistances conformed Fig 1 Replace the thermistor ass y with a new one NO YES YES NO Replace the PWB ass y with a new one 0 20 40 60 80 100 120 140 160 180 K 0 10 20 30 40 C 10 CHARACTERI...

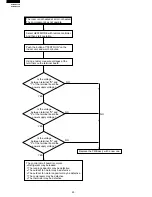
Страница 20: ...may be defective Is the voltage between terminal N and 1 of the terminal board the power supply voltage NO Replace the PWB ass y with a new one Push the button of TEST RUN on the indoor unit and wait 3 minutes Using a tester measure voltages at the terminals on the terminal board Select HEAT MODE with remote controller And then start operation Is the voltage between terminal N and 2 of the termina...

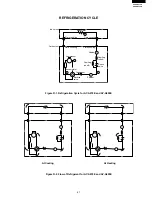
Страница 21: ...99E Figure R 2 Flow of Refrigerant for AY A079E and AY A099E At Cooling At Heating Indoor unit Outdoor unit Flare coupling Evaporator Strainer Condenser Accumulator Compressor Reverse valve Check valve Capillary tube B Strainer Capillary tube A Flare coupling Flare coupling Flare coupling 1 4 2 3 S S ...

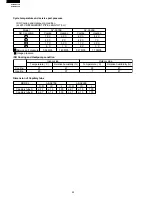
Страница 22: ...B MODEL ø 2 7 ø 1 5 ø 1 4 800 600 ø 2 7 O D I D AE A079E AE A099E L ø 2 7 ø 1 5 ø 1 5 700 700 ø 2 7 AY A079E 78 C 65 C 43 C 2 C 11 C 33 C 8 C 1 C 0 52MPa 1 49MPa AY A099E 80 C 84 C Cooling Heating Cooling Heating 44 C 1 C 11 C 35 C 6 C 3 C 0 47MPa 1 75MPa Service port pressure Model NO Condition 1 2 3 4 Gauge pressure Indoor side Outdoor side Temperature C Temperature C Relative humididity Relativ...

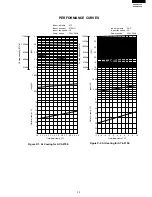
Страница 23: ... 3 3 3 4 3 5 3 6 3 7 3 8 3 9 4 0 1500 1 0 2 0 2 5 3 5 4 0 KW 1000 500 50 0 Input W Outside air temp C Outlet air temp C 3 0 1 5 45 40 35 30 25 20 10 8 6 4 2 0 2 4 6 8 10 5100 6800 8500 10200 11900 Cooling capacity BTU h 3400 13600 Cooling capacity BTU h 11900 10200 8500 6800 5100 Indoor air temp 27 C 47RH Hi Indoor humidity Indoor fan speed Power source 220V 50Hz Indoor air temp 20 C Hi Indoor fan...

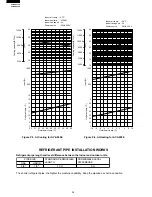
Страница 24: ...ed Hi 5100 6800 8500 10200 11900 Cooling capacity BTU h 1000 1 5 2 0 2 5 3 0 3 5 KW 500 15 14 Input W 13 12 11 10 9 8 7 Outside air temp C Outlet air temp C 3 0 3 1 3 2 3 3 3 4 3 5 3 6 3 7 3 8 3 9 4 0 Power source 50Hz 220V Indoor air temp 20 C Indoor fan speed Hi 6800 5100 3400 8500 10200 11900 13600 Cooling capacity BTU h 1000 4 0 3 5 3 0 2 5 2 0 1 5 1 0 KW 500 0 Input W 50 45 40 35 30 25 2 Outs...

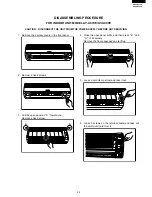
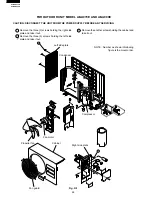
Страница 25: ...ve the 2 screw covers in the front panel 4 Close the open panel softly and then press B and C of it securely Remove the front panel ass y as to lift up 3 Pull the open panel at A toward you Remove a fixed screw 2 Removr 2 fixed screws 5 Loose a cord clamp screw and take it out 6 Loose 3 screws on the terminal board and take out the unit to unit cord from it A A B B C ...

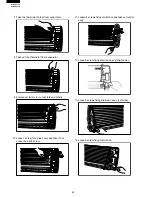
Страница 26: ...ake out control ass y 8 Take out the thermistor from evaporator 9 Disconnect fan motor connectors and others 10 Loose 1 screw for a pipe cover and take it out Loose the earth screw 12 Loose a screw fixing drain pan ass y Right side 13 Loose 2 screws fixing drain pan ass y Left side 14 Loose a screw fixing drain hose ...

Страница 27: ...o the drain hose 16 Take out the drain pan ass y 17 Loose a screw fixing cross flow fan to motor 20 Take out the fan bearing ass y 21 Take out the cross flow fan while slightly lifting the evaporator 18 Slide the cross fan leftward to depart from the motor shaft and take out fan motor O ring O ring Drain hose Section ...

Страница 28: ...ee 3 screws holding the right side plate and take it out 2 Remove the three 3 screws holding the left side plate and take it out 3 Remove the another screws holding the cabinet and take it out NOTE Number as shown in following figure is the moval order Fig D 1 Left side plate Condenser Right side plate Cabinet Fan motor Propeller fan Compressor Fan guard 2 1 ...

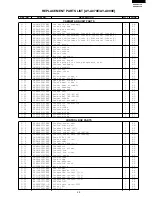
Страница 29: ...er seal 1 AB 1 32 TSPC C981JBRA Name label AY A079E 1 AD 1 32 TSPC C955JBRA Name label AY A099E 1 AD 1 33 PGUMSA046JBE0 Damper rubber 1 AD 1 34 CPNL A084JBK0 Open panel assembly 1 AV 1 35 PFPFPB074JBE0 Thermistor insulation 1 AB 1 36 PHOS A015JBE0 Drain hose 1 AL 1 37 LHLD A204JBF0 Motor holder 1 AE 1 38 PSEL B417JBE0 Aluminum tape 1 AC 1 39 PSEL B418JBE0 Aluminum tape 1 AD 1 40 PSEL B494JBE0 Alum...

Страница 30: ...elay RY2 RY3 2 AN CYCLE PARTS 3 1 CPIPCA612JBK0 Pipe assembly 1 AZ 3 2 PEVA A244JBE0 Evaporator 1 BS ACCESSORY PARTS 4 1 LX NZ0247JBE0 Wall plug fixing Mounting plate 7 AB 4 2 XTTSD45P30000 Screw for Wall plug 6 AA 4 3 CRMC A489JBE0 Wireless remote controller 1 BG 4 4 LX BZA106JBE0 Special screw 1 AD 4 5 TINS A563JBR0 Installation manual 1 AD 4 6 TINSEA220JBR0 Operation manual 1 AP 4 7 PPLTNA022JB...

Страница 31: ...2 14 2 15 2 3 2 13 2 2 2 18 2 1 2 7 2 12 2 9 4 2 4 1 4 6 4 4 4 3 4 9 2 20 1 3 1 10 1 8 1 12 1 7 1 36 1 9 1 6 2 10 1 4 1 17 2 11 6 1 1 14 1 37 1 5 1 31 1 29 1 33 1 21 1 32 2 17 6 2 1 13 1 11 1 25 1 27 1 20 1 1 1 28 1 26 1 24 1 22 1 34 1 23 2 4 2 8 2 5 2 16 1 41 2 19 1 35 4 5 4 8 1 40 1 39 1 38 4 10 INDOOR UNIT FOR AY A079E AND AY A099E ...

Страница 32: ... Capacitor cover 1 AF 2 9 PCOV A471JBP0 Terminal cover 1 AR 2 10 TLABCA662JBR0 Wiring diagram AE A079E 1 AB 2 10 TLABCB152JBR0 Wiring diagram AE A099E 1 AC CYCLE PARTS 3 1 PCMPRA177JBE0 Compressor AE A079E 1 CM 3 1 PCMPRA289JBE0 Compressor AE A099E 1 CG 3 2 PCON A263JBP0 Condenser AE A079E 1 BY 3 2 PCON A407JBP0 Condenser AE A099E 1 BY 3 3 DVLV A189JBK0 2 Way valve assembly 1 BA 3 4 PSEN A004JBK0 ...

Страница 33: ...X BZA075JBE0 Special screw 1 AA 6 4 LX BZA127JBE0 Special screw 1 AC 6 5 LX NZA030JBE0 Special nut 1 AB 6 6 LX CZA038JBE0 Special screw 2 AB 6 7 LX BZA076JBE0 Special screw 4 AA 6 8 XTTUW40P16000 Tapping screw 2 AB REF NO PART NO DESCRIPTION Q TY CODE HOW TO ORDER REPLACEMENT PARTS 1 MODEL NUMBER 2 REF NO 3 PART NO 4 DESCRIPTION ...

Страница 34: ... 3 21 3 18 3 6 2 1 2 3 1 16 1 18 1 4 1 18 1 3 6 5 6 1 1 2 1 9 1 1 1 8 2 8 1 7 2 4 2 5 2 9 2 6 2 7 1 15 1 10 1 11 1 20 1 5 1 17 3 14 3 16 3 20 1 12 3 15 3 17 3 11 3 12 3 22 3 10 3 19 1 13 6 4 2 10 1 14 2 2 3 8 3 24 3 24 3 4 3 3 6 2 6 2 6 2 6 2 3 5 3 5 3 9 3 7 OUTDOOR UNIT FOR AE A079E AND AE A099E ...

Страница 35: ...AY AE A079E AY AE A099E 35 ...

Страница 36: ...AY AE A079E AY AE A099E 36 99 SHARP CORP 2U0 70E Printed in Netherlands ...

Отзывы: