background image

E-18

Listening to 

Bluetooth 

enabled devices


Bluetooth

Bluetooth

 wireless technology is a short-range radio technol-

ogy that enables wireless communication between various 

types of digital devices, such as mobile phone or computer. 

It operates within a range of about 10 meters without the 

hassle of having to use cables to connect these devices.

This unit supports the following:

Communication System: 

Bluetooth

 Specification version 2.1 

Bluetooth

 + Enhanced Data Rate (EDR).

Support Profile : A2DP (Advanced Audio Distribution Profile) 

and AVRCP (Audio/Video Remote Control Profile)

Notes when using unit with a mobile phone


This unit cannot be used to talk over the telephone even 

when there is a 

Bluetooth

 connection made to a mobile 

phone.


Please refer to the operating manual supplied with the mo-

bile phone for details on operation of your mobile phone 

while transmitting the sound using a 

Bluetooth

 connection.


Pairing 

Bluetooth

 devices

Bluetooth

  devices  need  to  be  initially  paired  first  before 

they can exchange data. This unit can memorise up to a 

maximum of 8 devices. Once paired, it is not necessary to 

pair them again unless:


pairing is made with more than 8 devices. Pairing can 

only be made one device at a time. If subsequent de-

vice is paired, the oldest device paired will be deleted 

and replaced with the new one.


this unit is reset. All pairing information is deleted when 

unit is reset.

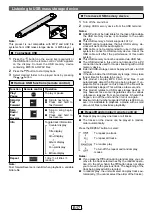
Indicators on the sound bar:

Sound Bar display

Bluetooth 

status

PAIRING appears

In waiting or pairing mode

PAIRED appears

Connected

However,  the  indication  status  is  not  displayed  during 

Bluetooth

 standby mode.


Pairing with 

Bluetooth

 source devices

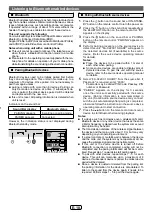
Press the 


button on the sound bar or ON-STAND-

BY button on the remote control to turn the power on.

Press the   button on the sound bar repeatedly or 

the BLUETOOTH button on the remote control. “BT” 

appears on the display.

Press  the    button  on  the  sound  bar  or  PAIRING 

button on the remote control. “PAIRING” appears on 

the display.

Perform pairing procedure on the source device to 

detect this unit. “8A-C22CX1 SHARP” will appear in 

the detected devices list (if available) in the source 

device. (Refer the source device operating manual 

for details).

Notes:


Place  the  devices  to  be  paired  within  1  meter  of 

each other when pairing.


Some source devices are unable to display lists of 

detected devices. To pair this unit with the source 

device, refer to the source device operating manual 

for details.

Select “8A-C22CX1 SHARP” from the source list. If 

Passcode* is required, enter “0000”.

Passcode may be called PIN Code, Passkey, PIN 

number or Password.

“PAIRED”  appears  on  the  display  for  3  seconds 

once the unit is successfully paired with the source 

device.  (Pairing  information  is  now  memorised  in 

the unit.) Some audio source devices may connect 

with the unit automatically after pairing is completed, 

otherwise follow the instructions in the source device 

operating manual to start connection.

Press the  /  button on the remote control or source 

device to start Bluetooth streaming playback.

Notes:


If a device such as microwave oven, wireless LAN card, 

Bluetooth

 device or any other device that uses the same 

2.4 GHz frequency is placed near the system some sound 

interruption may be heard.


The transmission distance of the wireless signal between 

the device and the main unit is about 10 m, but may vary 

depending on your operating environment.


If a steel concrete or metallic wall is between the device 

and the main unit, the system may not operate at all, be-

cause the wireless signal cannot penetrate metal.


If  this  unit  or  the  source  device  is  turned  off  before 

Bluetooth

  connection  is  completed,  pairing  will  not  be 

completed and the pairing information will not be memo-

rised. Repeat step 1 onwards to start pairing again.


To  pair  with  other  devices,  repeat  steps  1  -  5  for  each 

device. This  unit  can  memorise  up  to  a  maximum  of  8 

devices. If subsequent device is paired, the oldest device 

paired will be deleted.


Once a device is ousted or deleted from the pairing list, 

the pairing information for the device is also deleted. To 

listen to the sound from the device again, it needs to be 

re-paired. Perform steps 1 - 5 to pair the device again.

Содержание 8A-C22CX1

Страница 1: ...l carefully It will guide you in operating your SHARP product 8A C22CX1 consisting of Sound Bar Home Theater System Sound Bar and CP SW22C1 Active Subwoofer System Note This product is recommended for 60 or larger flat panel TV LED LCD and Plasma 20H R AS 1 TINSEA558AWZZ oft barcodesoft com mbology Code 93 Font Facename Code93MHr ode TINSEA558AWZZ TINSEA558AWZZX 0 TINSEA558AWZZX ...

Страница 2: ...not convey a license nor imply any right to distribute content created with this product in revenue generating broadcast systems terrestrial satellite cable and or other distribution channels revenue generating streaming applications via Internet intranets and or other networks other revenue generating content distribution systems pay audio or audio on demand applications and the like or on revenu...

Страница 3: ...rm unplug the unit for safety Hold the AC power plug by the head when removing it from the wall socket as pulling the lead can damage internal wires The AC power plug is used as a disconnect device and shall always remain readily operable Do not remove the outer cover as this may result in electric shock Refer internal service to your lo cal SHARP service facility This unit should only be used wit...

Страница 4: ...rs 1 Remote Sensor 2 Display 3 Left Front Speakers 4 Right Front Speakers 5 On Standby Button 6 Volume Down Up Buttons 7 Input Button 8 On Standby indicator 9 Pairing Button 10 3D Surround Button 1 2 3 4 5 6 7 8 9 10 Front view Top view ...

Страница 5: ... IN Terminal 4 Audio IN Terminal 5 USB Terminal 6 IR OUT Terminal 7 Optical IN Terminal 8 HDMI OUT TV ARC Terminal 1 2 3 4 5 6 7 8 1 Power Subwoofer Link Indicator 2 Bass Reflect Duct 3 SW Link Subwoofer Link button 4 Woofer 5 AC Power Lead Subwoofer 1 2 3 5 4 Front view Rear view ...

Страница 6: ... Button 7 Volume Up Down Buttons 8 Up Down Buttons 9 Mute Button 10 Dimmer Button 11 Repeat Button 12 APC Button 13 Remote Control Transmitter 14 TV SB Speaker Select Button 15 Bluetooth Pairing Button 16 Sound Mode CINEMA Button MUSIC Button NEWS Button NIGHT Button OUTDOOR SPORT Button DIRECT Button INDOOR SPORT Button 17 Treble Button 18 Audio Button 19 Info Button 20 SW Subwoofer Level Up Down...

Страница 7: ...ion direction when the sound bar is turned on Do not stand or sit on the sound bar and subwoofer as you may be injured Do not allow any objects to fall into or to be placed in the bass reflex duct Installation image TV Sound Bar Digital Tuner BD player Subwoofer Place the system as shown Placing the subwoofer cushion Stick the subwoofer cushion as shown 1 When attaching the subwoofer cushion place...

Страница 8: ...the legs of the front speakers are short and the TV stand interferes with this unit you can increase the height by replacing it with the included long stand 2 Tighten all the stand as shown When removing the stand from sound bar place the sound bar on a cushion or soft cloth to avoid damage 1 Remove the stand as shown Note In case the stand is too tight to be removed please use a suitable cloth to...

Страница 9: ...Point the TV s remote control at the sound bar remote sensor and operate the TV You may need to move the IR transmitter until the TV operates correctly 4 Then secure the IR transmitter onto the sound bar using the double sided tape provided Note Do not use the IR transmitter if the TV s remote control sensor is not blocked by the sound bar The IR transmitter does not work during AC power off The I...

Страница 10: ...e model may not be able to perform above operation For detail refer to the operation manual of the respective component DIGITAL AUDIO OUTPUT OPTICAL HDMI IN ARC 1 Method 1 This connection is for HDMI TV with ARC Audio Return Channel To HDMI OUT TV ARC output terminal Blu ray DVD disc player or similar HDMI cable commercially available To HDMI TV ARC input terminal HDMI cable commercially available...

Страница 11: ...ch and enable the CEC Different brands may have different naming for the CEC For SHARP LCD TV it is named as AQUOS LINK The system will automatically power off if TV or similar component which supports HDMI CEC is turned off CEC is not available during Low power consumption mode Eco mode on To listen to the sound from this system you will need to press refer page 16 or adjust the speaker output se...

Страница 12: ...e output from both left or right front speaker Comments on the HDMI cable If a protective cap is attached to the connector please make sure to remove the cap before connecting Please purchase a commercially available HDMI cable When using commercially available HDMI cable please purchase the HDMI cable compatible with Ethernet standard high speed type with HDMI logo of a length 2 m or less to prev...

Страница 13: ...E 12 System connections continued Make sure to unplug the AC power lead before making any connections Wall socket 220 240 V 50 60Hz Sound Bar Subwoofer Wall socket 220 240 V 50 60Hz ...

Страница 14: ...en making HDMI connection For details refer to the opera tion manual of the TV To turn the power on Press the ON STANDBY button on the sound bar or remote control On sound bar The power turns on and the indicator lights off WELCOME appears on the display On Subwoofer The Power Subwoofer link indicator turns blue Notes The system will automatically power on if TV or similar component which supports...

Страница 15: ...ug in the power supply for sub woofer and then press and hold the SW LINK button at back of the subwoofer for more than 5 seconds z z During pairing process On sound bar SW LINK will blink On subwoofer indicator will blink in blue z z When pairing is successful On sound bar SW LINK disappears On subwoofer indicator turns red Notes If a device such as microwave oven wireless LAN card Bluetooth devi...

Страница 16: ...hing it outdoors Add surround and height speaker channel audio to create a immersive sound DOLBY SURROUND 3D OFF OPSODIS 1 OPSODIS 2 3D sound effect off Notes 3D surround mode may change to match the sound mode Volume control Press the VOLUME button to increase the volume and the VOLUME button for decreasing 0 100 2 99 1 Notes When the volume is set to 50 or more and the power is turned off the vo...

Страница 17: ...n to the voice of a person more clearly Function selection Press the button on the sound bar repeatedly or the HDMI IN ARC OPTICAL AUDIO IN BLUETOOTH USB button on the remote control to select the desired input source Select the device connected to the HDMI IN input terminal Select the device connected to the HDMI OUT terminal Select the device connected to the OPTICAL terminal Select the device c...

Страница 18: ...dia with a small amount of files to maximise playability Repeat Random play remote control Repeat play can play one track or all tracks The tracks on the device can be played in random order automatically Press the REPEAT button to select To repeat one track To repeat all tracks To random play To turn off the repeat and random play modes Notes If you press the button during random play you can mov...

Страница 19: ... pairing procedure on the source device to detect this unit 8A C22CX1 SHARP will appear in the detected devices list if available in the source device Refer the source device operating manual for details Notes Place the devices to be paired within 1 meter of each other when pairing Some source devices are unable to display lists of detected devices To pair this unit with the source device refer to...

Страница 20: ... Forward z z Skip to next song z z Press and hold to fast forward Skip Down Fast Reverse z z Skip to song beginning z z Press and hold to fast reverse Info Display title artist album name if available Note Fast forward reverse is invalid depends on the device connected About various decoders Various decoders compatible with Dolby method of digital broadcasting PCM method are carried in this produc...

Страница 21: ...ch each ear from both left and right speakers making it difficult to convey spatial information Special technology that does not mix sounds Sound mixes Right ear speaker sound Left ear speaker sound Right ear Left ear Right ear speaker sound Left ear speaker sound Both ears OPSODIS is a three dimensional audio technology jointly developed by Kajima Corporation and the University of Southampton Kaj...

Страница 22: ...ection from a TV set Blu ray DVD Disc Player z z Please change to HDMI ARC or headphone terminal from TV Set Blu ray DVD Disc Player This effect may occur depending on TV Blu ray DVD Disc Player Brand model and age and it is not the sound bar problem z z Wireless connection cannot be established z z Check the distance between the sound bar and subwoofer less than 10 metres 32 feet z z Make sure th...

Страница 23: ...wer on Factory reset clearing all memory Make sure to disconnect all output and input cables attached to the sound bar before performing the factory reset 1 Press the button on the sound bar to enter the standby mode Sound bar indication light up in red 2 While pressing the 3D SURROUND button on sound bar press the button 3 RESET appears on the display Caution This operation will erase all data st...

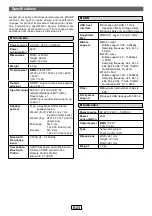
Страница 24: ...cs Mid range 8Ω 2 cm 1 pcs Ch total 2 pcs Tweeter 8Ω 2 cm 1 pcs Ch total 2 pcs Bluetooth Frequency band 2 400GHz 2 480GHz Compatible Bluetooth Profile A2DP Advanced Audio Distribution Profile AVRCP Audio Video Remote Control Profile Bluetooth 2 1 EDR USB USB host interface Complies with USB 1 1 Full Speed 2 0 Mass Storage Class Support Bulk only and CBI protocol Supported files MPEG 1 Layer 3 FLAC...

Отзывы: