background image

IMPORTANT SAFETY INSTRUCTIONS


4

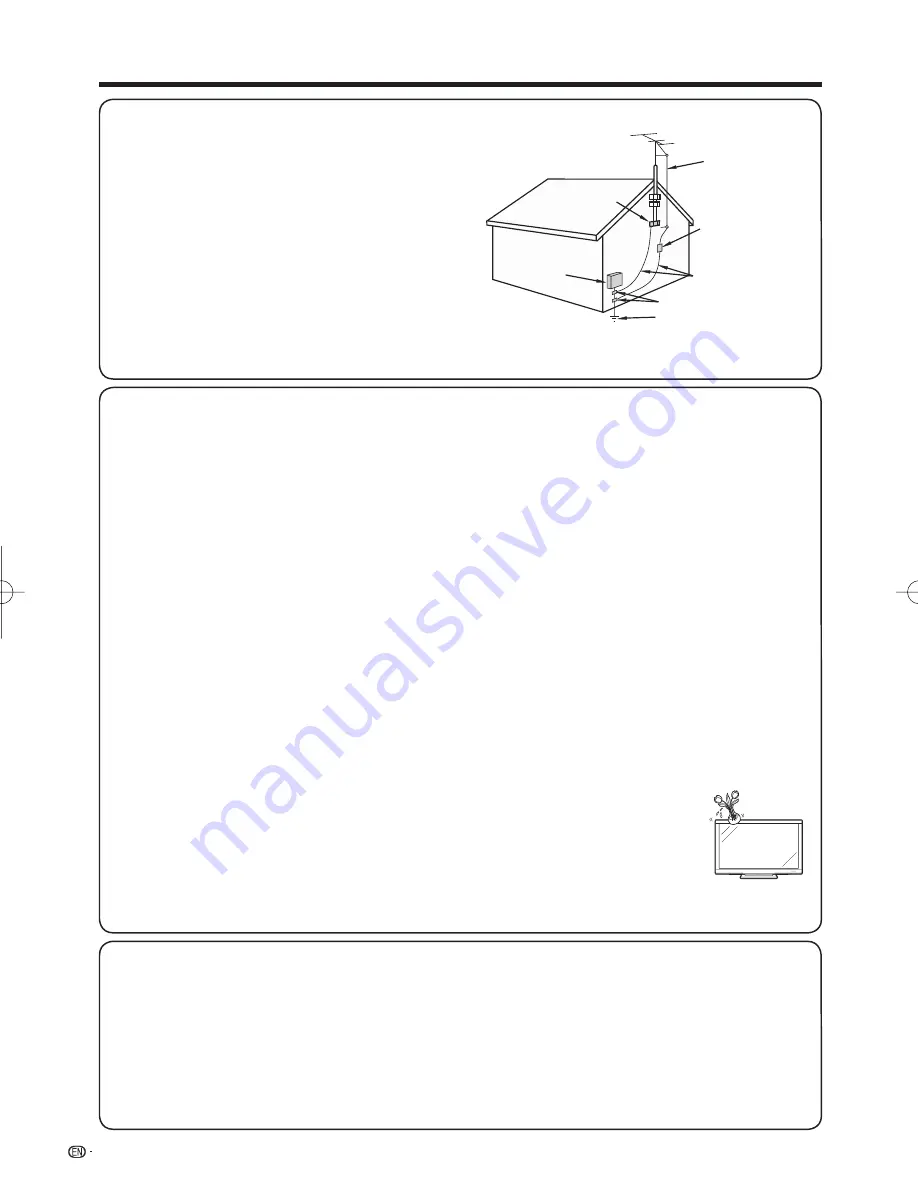
•  Outdoor Antenna Grounding — If an outside antenna is 

connected to the television equipment, be sure the antenna 
system is grounded so as to provide some protection against 
voltage surges and built-up static charges.

  Article 810 of the National Electrical Code, ANSI/NFPA 70, 

provides information with regard to proper grounding of the 
mast and supporting structure, grounding of the lead-in wire 
to an antenna discharge unit, size of grounding conductors, 
location of antenna-discharge unit, connection to grounding 
electrodes, and requirements for the grounding electrode.

EXAMPLE OF ANTENNA GROUNDING AS PER 
NATIONAL ELECTRICAL CODE, ANSI/NFPA 70

ANTENNA 
LEAD IN WIRE

GROUND 
CLAMP

NEC — NATIONAL ELECTRICAL CODE

GROUNDING 
CONDUCTORS
(NEC SECTION 810-21)

GROUND CLAMPS

POWER SERVICE GROUNDING 
ELECTRODE SYSTEM
(NEC ART 250, PART H)

ELECTRIC 
SERVICE 
EQUIPMENT

ANTENNA
DISCHARGE UNIT
(NEC SECTION 810-20)

•  Water and Moisture — Do not use this product near water - for example, near a bath tub, wash bowl, kitchen sink, or 

laundry tub; in a wet basement; or near a swimming pool; and the like.

•  Stand — Do not place the product on an unstable cart, stand, tripod or table. Placing the product on an unstable base 

can cause the product to fall, resulting in serious personal injuries as well as damage to the product. Use only a cart, 
stand, tripod, bracket or table recommended by the manufacturer or sold with the product. When mounting the product 
on a wall, be sure to follow the manufacturer's instructions. Use only the mounting hardware recommended by the 
manufacturer.

•  Selecting the location — Select a place with no direct sunlight and good ventilation.
•  Ventilation — The vents and other openings in the cabinet are designed for ventilation. Do not cover or block these vents 

and openings since insuffi cient ventilation can cause overheating and/or shorten the life of the product. Do not place 
the product on a bed, sofa, rug or other similar surface, since they can block ventilation openings. This product is not 
designed for built-in installation; do not place the product in an enclosed place such as a bookcase or rack, unless proper 
ventilation is provided or the manufacturer's instructions are followed.

•  The Liquid Crystal panel used in this product is made of glass. Therefore, it can break when the product is dropped or 

applied with impact. Be careful not to be injured by broken glass pieces in case the panel breaks.

•  Heat — The product should be situated away from heat sources such as radiators, heat registers, stoves, or other 

products (including amplifi ers) that produce heat.

•  The Liquid Crystal panel is a very high technology product with 2,073,600 pixels, giving you fi ne picture details.
  Occasionally, a few non-active pixels may appear on the screen as a fi xed point of blue, green or red. Please note that 

this does not affect the performance of your product.

•  Lightning — For added protection for this television equipment during a lightning storm, or when it is left unattended and 

unused for long periods of time, unplug it from the wall outlet and disconnect the antenna. This will prevent damage to 
the equipment due to lightning and power-line surges.

•  Power Lines — An outside antenna system should not be located in the vicinity of overhead power lines or other electric 

light or power circuits, or where it can fall into such power lines or circuits. When installing an outside antenna system, 
extreme care should be taken to keep from touching such power lines or circuits as contact with them might be fatal.

•  To prevent fi re, never place any type of candle or fl ames on the top or near the TV set.
•  To prevent fi re or shock hazard, do not place the AC cord under the TV set or other heavy items.
•  Do not display a still picture for a long time, as this could cause an afterimage to remain.
•  To prevent fi re or shock hazard, do not expose this product to dripping or splashing.
  No objects fi lled with liquids, such as vases, should be placed on the product.
• Do not insert foreign objects into the product. Inserting objects in the air vents or other openings may 

result in fi re or electric shock. Exercise special caution when using the product around children.

Precautions when transporting the TV

•  When transporting the TV, never carry it by holding or otherwise putting pressure onto the display. Be sure to always 

carry the TV by two people holding it with two hands — one hand on each side of the TV.

Caring for the Cabinet

•  Use a soft cloth (cotton, fl annel, etc.) and gently wipe the surface of the display panel.
  Using a chemical cloth (wet/dry sheet type cloth, etc.) may deform the components of the main unit cabinet or cause 

cracking.

•  Wiping with a hard cloth or using strong force may scratch the panel surface.
•  If the cabinet is very dirty, wipe with a soft cloth (cotton, fl annel, etc.) soaked in neutral detergent diluted with water and 

thoroughly wrung out, and then wipe with a soft dry cloth.

•  The cabinet is primarily made of plastic. Avoid using benzene, thinner, and other solvents, as these may deform the 

cabinet and cause the paint to peel off.

•  Do not apply insecticides or other volatile liquids. 
  Also, do not allow the cabinet to remain in contact with rubber or vinyl products for a long period of time. Plasticizers 

inside the plastic may cause the cabinet to deform and cause the paint to peel off.

LC-65E77UM̲E.indb   4

LC-65E77UM̲E.indb   4

2009/07/27   13:27:38

2009/07/27   13:27:38

Содержание 60E77UM - LC - 60" LCD TV

Страница 1: ...tiliser l appareil IMPORTANTE Lea este manual de operación antes de comenzar a operar el equipo LC 60E77UN LC 65E77UM ENGLISH FRANÇAIS ESPAÑOL OPERATION MANUAL MODE D EMPLOI MANUAL DE OPERACIÓN LIQUID CRYSTAL TELEVISION TÉLÉVISEUR ACL TELEVISOR CON PANTALLA DE CRISTAL LÍQUIDO ENGLISH FRANÇAIS ESPAÑOL LC 60E77UN LC 65E77UM OPERATION MANUAL MODE D EMPLOI MANUAL DE OPERACIÓN ...

Страница 2: ......

Страница 3: ...ting and maintenance servicing instructions in the literature accompanying the product CAUTION RISK OF ELECTRIC SHOCK DO NOT OPEN CAUTION TO REDUCE THE RISK OF ELECTRIC SHOCK DO NOT REMOVE COVER OR BACK NO USER SERVICEABLE PARTS INSIDE REFER SERVICING TO QUALIFIED SERVICE PERSONNEL TO PREVENT ELECTRIC SHOCK MATCH WIDE BLADE OF PLUG TO WIDE SLOT FULLY INSERT CAUTION LC 60E77UN only 1 OPERATION MANU...

Страница 4: ...0 of the National Electrical Code that provides guidelines for proper grounding and in particular specifies that the cable ground shall be connected to the grounding system of the building as close to the point of cable entry as practical CAUTION This product satisfies FCC regulations when shielded cables and connectors are used to connect the unit to other equipment To prevent electromagnetic int...

Страница 5: ...tion 15 Power Sources This product should be operated only from the type of power source indicated on the marking label If you are not sure of the type of power supply to your home consult your product dealer or local power company For products intended to operate from battery power or other sources refer to the operating instructions 16 Overloading Do not overload wall outlets extension cords or ...

Страница 6: ...ing amplifiers that produce heat The Liquid Crystal panel is a very high technology product with 2 073 600 pixels giving you fine picture details Occasionally a few non active pixels may appear on the screen as a fixed point of blue green or red Please note that this does not affect the performance of your product Lightning For added protection for this television equipment during a lightning stor...

Страница 7: ... TUNE INTO SAFETY One size does NOT fit all Follow the manufacturer s recommendations for the safe installation and use of your flat panel display Carefully read and understand all enclosed instructions for proper use of this product Don t allow children to climb on or play with furniture and television sets Don t place flat panel displays on furniture that can easily be used as steps such as a ch...

Страница 8: ...23 Audio Menu 24 Power Control Menu 24 Setup Menu 25 28 Option Menu 29 30 Digital Setup Menu 31 32 Other Viewing Options Presetting Remote Control Function 33 Operating the Connected Equipment 33 Using AQUOS LINK Controlling HDMI Equipment Using AQUOS LINK 35 37 AQUOS LINK Menu 37 38 Using a PC Displaying a PC Image on the Screen 39 Adjusting the PC Image 40 Setting Audio Input 40 PC Compatibility...

Страница 9: ... to the television If the POWER indicator on the television still does not light up press TV POWER on the remote control to turn the power on IMPORTANT IF THE UNIT DOES NOT POWER ON UNPLUG THE TELEVISION FROM THE OUTLET AND REPEAT THE INSTALLATION STEPS IF YOU STILL ENCOUNTER NO POWER PLEASE CONTACT US AT 1 800 BE SHARP Attach your antenna to the back of the television See page 8 Bundle the cords ...

Страница 10: ... terminal 75 ohm or or F type connector should be finger tightened only CAUTION Improper use of batteries can result in chemical leakage or explosion Be sure to follow the instructions below Do not mix batteries of different types Different types of batteries have different characteristics Do not mix old and new batteries Mixing old and new batteries can shorten the life of new batteries or cause ...

Страница 11: ...ntenna Cable in INPUT 1 terminals INPUT 2 terminals AUDIO OUTPUT terminals LC 60E77UN LC 65E77UM AC INPUT terminal INPUT 3 terminals SERVICE terminal INPUT 5 terminal HDMI 1 2 3 1 1 See pages 11 12 13 14 and 35 for external equipment connection 2 See page 20 for button operations 3 See page 7 for connecting the AC cord 4 See page 40 for details on the PC Audio Select function The illustrations in ...

Страница 12: ...Indicator lights up for the current mode See pages 33 to 34 for details To enter the code registration mode you need to press FUNCTION and DISPLAY at the same time 18 LIGHT D When this button is pressed some buttons for example VOLk l and CHr s on the remote control unit will light The lighting will turn off if no operations are performed within about 5 seconds This button is used for performing o...

Страница 13: ...face that enables a connection for audio and video signals using a single cable The HDMI terminal supports high resolution video input HDMI OUT Rear of the TV Side Panel Blu ray disc player DVD player HD Cable Satellite set top box HDMI certified cable To enjoy 1080p display capability connect your external equipment using an HDMI certified cable or a component cable and set the equipment to 1080p...

Страница 14: ...lu ray disc player DVD player or an HD cable satellite set top box to the HDMI terminal The COMPONENT terminals take priority over the VIDEO INPUT 1 and S VIDEO INPUT 2 terminals Connecting a VCR Game Console Camcorder or Cable Satellite Set top Box When using S VIDEO cable INPUT 2 Game console Camcorder VCR Rear of the TV AUDIO R Red AUDIO L White S VIDEO cable Audio cable The COMPONENT terminals...

Страница 15: ...ble with the TV When using HDMI cable INPUT 5 6 7 or 8 Depending on the board only video signals may be output In this case in addition to connecting an HDMI certified cable to the INPUT 6 HDMI terminal connect an audio cable to the AUDIO terminal and set PC Audio Select to Input 6 HDMI See page 40 The HDMI terminals only support digital signal DIGITAL AUDIO INPUT OPTICAL Rear of the TV Optical fi...

Страница 16: ... terminal connect an audio cable to the AUDIO terminal and set PC Audio Select to Input 6 HDMI See page 40 When using analog RGB cable AUDIO RGB Rear of the TV Ø 3 5 mm stereo minijack cable RGB cable When using an analog RGB cable input the audio signal to the AUDIO terminal of INPUT 4 When connecting a PC to the INPUT 4 set PC Audio Select to Input 4 PC See page 40 When using RS 232C serial cont...

Страница 17: ...he remote control unit 1 Insert the batteries into the remote control unit See page 8 2 Connect the antenna cable to the TV See page 8 3 Plug in the AC cord to the AC outlet See page 7 Language Language setting Select from among 3 languages English French and Spanish 1 Press a b to select the desired language listed on the screen and then press ENTER CH Search Channel search Channel auto search ma...

Страница 18: ...urce using INPUT on the remote control unit or on the TV 1 Press INPUT A list of selectable sources appears 2 Press INPUT again or press a b to select the input source An image from the selected source automatically displays Each time INPUT is pressed the input source toggles If the corresponding input is not plugged in you cannot change the input Be sure to connect the equipment beforehand See pa...

Страница 19: ...reo mode The TV has a feature that allows reception of sound other than the main audio for the program This feature is called Multi channel Television Sound MTS The TV with MTS can receive mono sound stereo sound and Secondary Audio Programs SAP The SAP feature allows a TV station to broadcast other information which could be audio in another language or something completely different like weather...

Страница 20: ...displayed 1 2 means the first of two services Example If a program has three services Digital CC ENG CC1 and Text1 the closed caption display will toggle in this sequence The CC button keeps a record of the last service selected in its memory If the last closed caption mode e g 1 3 ENG you selected is not available for the next program or on another channel the closed caption service that is avail...

Страница 21: ...full screen This mode is useful for 1 78 1 DVDs When viewing 1 85 1 DVDs stretch mode will still show very thin black bands at the top and bottom of the screen For HD programs Stretch Suitable for viewing wide screen 1 78 1 aspect ratio program stretch mode will still show very thin black bands at the top and bottom of the screen Dot by Dot 1080i p only Detects the resolution of the signal and dis...

Страница 22: ...en Example Menu Operation Buttons Using the control panel of the main unit You can also operate the menu with the control panel of the main unit Button operations on the control panel correspond to the ones on the remote control as shown below Using the remote control Use the following buttons on the remote control to operate the menu MENU MENU on the remote control INPUT ENTER on the remote contr...

Страница 23: ...Page 22 C M S Saturation Page 22 C M S Value Page 22 Color Temp Page 22 Fine Motion Enhanced Page 23 Active Contrast Page 23 Gamma Adjustment Page 23 Black Level Page 23 Film Mode Page 23 Digital Noise Reduction Page 23 3D Y C Page 23 1 Monochrome Page 23 Range of OPC Page 23 Reset Page 22 Audio Menu Treble Page 24 Bass Page 24 Balance Page 24 Surround Page 24 Bass Enhancer Page 24 Reset Page 24 P...

Страница 24: ... tone Mid High Middle Mid Low Low White with reddish tone White balance can be adjusted between a maximum of 30 and a minimum of 30 for each color temperature R Gain LO HI 30 through 30 G Gain LO HI 30 through 30 B Gain LO HI 30 through 30 For resetting all adjustment items to the factory preset values press a b to select Reset and then press ENTER Picture Menu Adjusts the picture to your preferen...

Страница 25: ...you set AV MODE to GAME Standard does not function when channel display shows an input signal resolution of 480p 720p or 1080p Film Mode is not available during PC format input On Screen Display Menu Digital Noise Reduction Produces a clearer video image Auto Automatically adjusts the level of noise reduction High Middle Low Select a desired level for viewing a clearer video image Off No adjustmen...

Страница 26: ... MENU screen and then press c d to select Power Control 2 Press a b to select a specific adjustment item and then press ENTER 3 Press a b or c d to select the desired setting and then press ENTER 4 Press MENU to exit Power Saving This function allows you to set the Power Saving level in order to decrease the power consumption and increase the backlight lifespan Standard Optimizes power reduction b...

Страница 27: ...setup does not memorize all the channels in your region follow the instructions below to manually memorize the channels Air Cable Make sure what kind of connection is made with your TV when selecting Air or Cable CH Search Channel auto search makes the TV look for all channels viewable in the set area CH Memory You can select the channels to skip in each ANALOG Air ANALOG Cable DIGITAL Air and DIG...

Страница 28: ...ttings will not be changed The Secret number settings will not be changed The TV Location settings will not be changed Parental CTRL Parental Control Setting Secret No Allows you to use a secret number to protect certain settings from being accidentally changed IMPORTANT Three conditions must be met to enable the V Chip see pages 27 to 28 1 Secret No is registered 2 V Chip V Chip DTV Only settings...

Страница 29: ...for children PG 13 Parents strongly cautioned Some material may be inappropriate for children under 13 R Restricted Under 17 requires accompanying parent or adult guardian age varies in some jurisdictions NC 17 No one 17 and under admitted X X is an older rating that is unified with NC 17 but may be encoded in the data of older movies Voluntary movie rating system only uses an age based rating TV ...

Страница 30: ...ting systems in Canada are based on the Canadian Radio Television and Telecommunications Commission CRTC policy on violence in television programming While violence is the most important content element to be rated the structure developed takes into consideration other program content like language nudity sexuality and mature themes When setting the V CHIP on the Canadian system you can choose eit...

Страница 31: ... signal type from the list below Auto COMPONENT VIDEO INPUT 2 Select the input signal type from the list below Auto COMPONENT S TERMINAL If the selected signal type is incorrect images are not displayed at all or are displayed without any color Refer to your external equipment operation manual for the signal type If you set INPUT 1 or 2 to Auto the TV will automatically select the input signal Set...

Страница 32: ...l input mode Off No adjustment On Screen Display Menu Operation Lock Out This function locks the operation buttons on the TV and the remote control Off No adjustment RC Control Lock All buttons on the remote control are locked Button Control Lock All buttons on the TV except POWER are locked To unlock the buttons on the remote control by using the control panel of the main unit see page 20 1 Press...

Страница 33: ...s a b to select Software Update and then press ENTER If you have already set the Secret No go to step 4 Audio Setup Software Update Identification PCM Digital Setup 3 Input the 4 digit secret number by using 0 9 Digital Setup Secret No a a a a 4 1 Press MENU to display the MENU screen and then press c d to select Digital Setup 2 Press a b to select a specific adjustment item and then press ENTER 3...

Страница 34: ...k for a while until the update screen can be displayed Please wait for the update screen to appear Do not unplug the AC cord The picture will temporarily go dark until the Software Update display appears Wait several minutes and do not unplug the AC cord OK Example 30 Now updating Do not unplug AC cord Update Version UXXXXXX2 7 When the software is successfully updated a screen is displayed indica...

Страница 35: ...R Hold down to go in reverse DVD 3 REC Starts recording VCR 4 K Pressing quickly once takes you to the start of the chapter currently playing Each time you press it you move back to the start of the previous chapter DVD 5 0 9 CBL SAT DOT SAT Press a button or buttons that corresponds to the channel that you wish to watch 6 I Starts playback VCR DVD 7 J Rapidly advances the tape and allows picture ...

Страница 36: ...NTROL CODE NUMBER Other Viewing Options VCR BRAND REMOTE CONTROL CODE NUMBER DVD BD LD BRAND REMOTE CONTROL CODE NUMBER CATV SAT BRAND Numbers marked with are SAT codes all others are CATV codes AUDIO BRAND REMOTE CONTROL CODE NUMBER ...

Страница 37: ...NCTION of the remote control unit is set to TV REC STOP and OPTION buttons will function only when AQUOS LINK is used One Touch Play While the TV is in standby mode it automatically turns on and plays back the image from the HDMI source One Touch Recording Press REC while you are viewing a broadcast received with the AQUOS LINK compatible recorder The AQUOS LINK automatically recognizes the connec...

Страница 38: ...Input Location Selecting Recorder Auto Power On AQUOS LINK Control Example when connecting AQUOS LINK compatible recorder via AQUOS LINK compatible Audio system When an AQUOS LINK compatible audio system or other equipment is connected between the TV and recorder Sub is displayed INPUT5 5WD INPUT6 1 1 0 0 2 0 0 0 Input Location Selecting Recorder Auto Power On AQUOS LINK Control One Touch Recordin...

Страница 39: ...LINK One Touch Playback AQUOS LINK allows you to operate the HDMI connected equipment with one remote control Press d to start playing back a title The last played program is played back You can use the following buttons during broadcast viewing Buttons Description SOURCE POWER Turns the power of the HDMI connected devices on and off G Hold down to go in reverse I Starts playback J Hold down to fa...

Страница 40: ... screen 2 Press a b to select By AQUOS AUDIO SP and then press ENTER The sound from the TV speaker is muted and only the sound from the AQUOS LINK compatible audio system is audible You can use VOLk l and MUTE Select By AQUOS SP and then press ENTER to listen to the TV sound Manually Changing AQUOS AUDIO Speaker System s Sound Mode 1 Press OPTION to display the AQUOS LINK MENU screen 2 Press a b t...

Страница 41: ... 14 Selectable screen size may vary with input signal type Example Screen size images Input signal Normal Zoom Stretch Dot by Dot 4 3 Keeps the original aspect ratio in a full screen display For viewing widescreen programs The top and bottom of the image is cropped An image fully fills the screen Detects the resolution of the signal and displays an image with the same number of pixels on the scree...

Страница 42: ...t necessary to adjust the Clock or Phase when a digital signal is being input so it cannot be selected The default cursor position may not be in the center because the screen position variable ranges may be asymmetrical The screen position variable ranges depend on the View Mode or the signal type The ranges can be seen on the position setting screen Setting Audio Input PC Audio Select Determines ...

Страница 43: ... signal type The ranges can be seen on the position setting screen 0 Although it can choose now it is toggle operation in inside 1 Only available when 4 3 signal is being input 5 6 Only available when 4 3 signal is being input 8 PC Available except when UXGA is being input AV Only available when 1080i p is being input 9 Only available when 720p is being input Toggle Input terminal number 1 8 0 Aut...

Страница 44: ...ll only with the wall mount bracket AN 52AG4 SHARP for LC 60E77UN or AN 65AG1 SHARP for LC 65E77UM The use of other wall mount brackets may result in an unstable installation and may cause serious injuries Installing the TV requires special skill that should only be performed by qualified service personnel Customers should not attempt to do the work themselves SHARP bears no responsibility for imp...

Страница 45: ... Check the audio output of the connected external equipment Is the volume too low or muted When external equipment is connected via an HDMI cable you may need to configure the audio to be output through the HDMI cable When audio is not output from external equipment connected to the INPUT 4 or INPUT 6 terminal check the PC Audio Select setting Page 40 Even when external equipment is connected usin...

Страница 46: ...erformance Troubleshooting Digital Broadcasting The error message about reception of broadcast The example of an error message displayed on a screen Error code Possible Solution Failed to receive broadcast E202 Check the antenna cable Check that the antenna is correctly setup No broadcast now E203 Check the broadcast time in the program guide Cautions regarding use in high and low temperature envi...

Страница 47: ...lish French Spanish Power Requirement AC 120 V 60 Hz Power Consumption 390 W 0 4 W Standby with AC 120 V 525 W 0 4 W Standby with AC 120 V Weight TV stand 92 6 lbs 42 0 kg 110 2 lbs 50 0 kg TV only 81 6 lbs 37 0 kg 99 2 lbs 45 0 kg Dimension 2 W g H g D TV stand 56 5 8 g 37 29 64 g 17 9 16 inch 60 3 4 g 39 27 32 g 17 9 16 inch TV only 56 5 8 g 35 11 64 g 4 45 64 inch 60 3 4 g 37 39 64 g 4 45 64 in...

Страница 48: ... of the open source software licensors require the distributor to provide the source code with the executable software components GPL and LGPL include similar requirements For information on obtaining the source code for the open source software and for obtaining the GPL LGPL and other license agreement information visit the following website http www sharpusa com gpl We are unable to answer any q...

Страница 49: ... constitute full satisfaction of all claims whether based on contract negligence strict liability or otherwise Sharp does not warrant nor shall Sharp be liable or in any way responsible for Products which have been subject to abuse including but not limited to improper voltage accident misuse negligence lack of reasonable care alteration modification tampering misuse improper operation or maintena...

Страница 50: ...5 32 37 2 41 64 67 7 21 64 186 17 9 16 446 15 3 4 400 15 3 4 400 3 15 32 88 52 17 32 1334 29 5 8 752 20 41 64 524 24 21 32 626 56 5 8 1438 35 11 64 893 2 9 32 58 37 29 64 951 AN 52AG4 17 21 64 440 25 19 32 650 12 11 64 309 60 3 4 1543 56 13 32 1432 6 31 49 64 806 6 21 25 32 553 37 39 64 955 2 1 4 57 39 27 32 1012 24 21 32 626 17 9 16 446 4 45 64 119 AN 65AG1 ...

Страница 51: ...RPORATION Sharp Plaza Mahwah New Jersey 07495 1163 SHARP CORPORATION Printed in Mexico Imprimé au Mexique Impreso en México TINS E339WJZZ 09P09 MX NM LC 60E77UN LC 65E77UM OPERATION MANUAL MODE D EMPLOI MANUAL DE OPERACIÓN ...

Отзывы: