background image

16

E

Caution

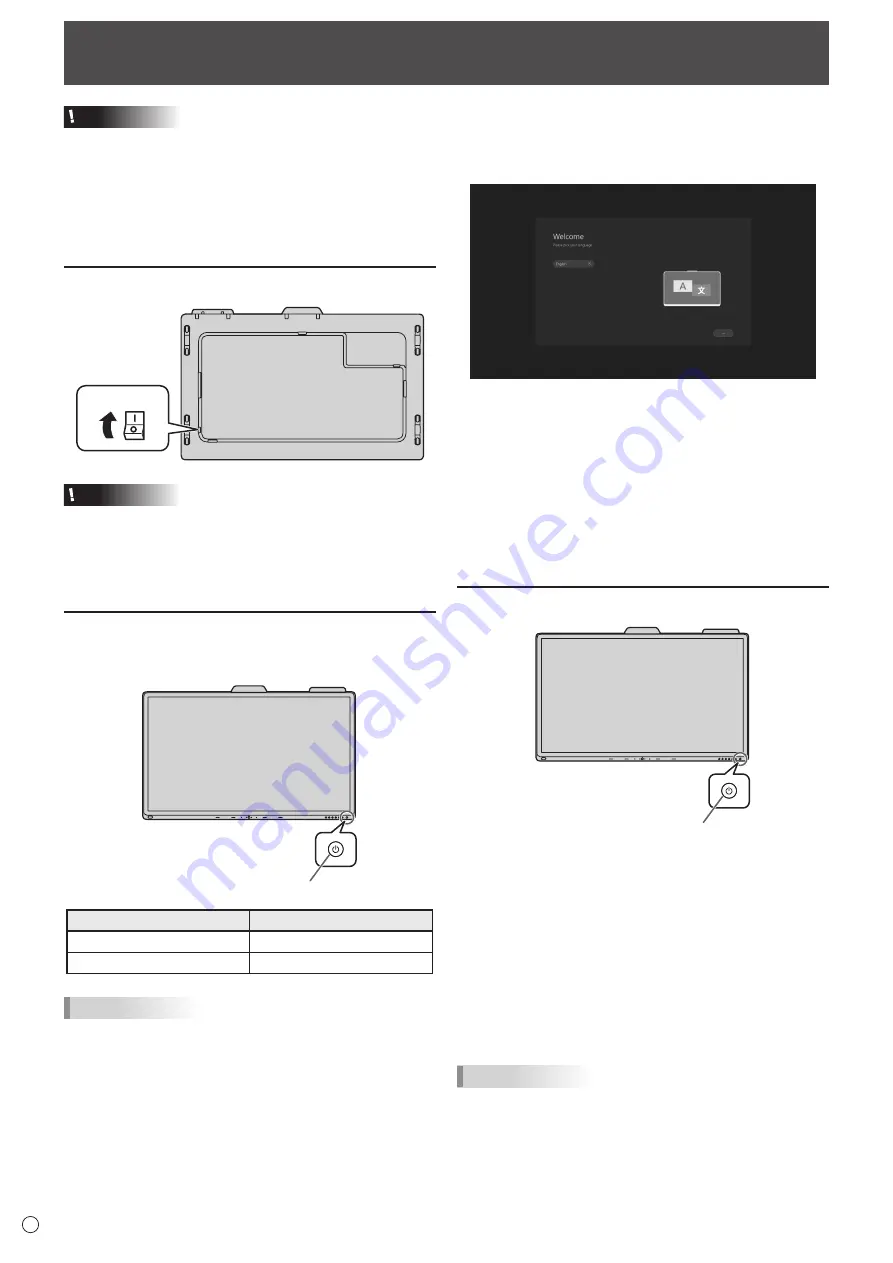
•  Turn on the monitor first before turning on the computer or 

playback device.

•  When switching the main power switch or the POWER 

button off and back on, always wait for at least 5 seconds. 

A short interval may result in a malfunction.

•  To keep the performance, put the monitor in the Power off 

state once a day.

Turning on the main power

Main power switch

Caution

•  The main power must be turned on/off with the main power 

switch. Do not connect/disconnect the power cord or turn 

the breaker on/off while the main power switch is on.

•  For a complete electrical disconnection, pull out the main 

plug.

Turning power on

Press the POWER button on this monitor to turn the power 

ON.

Power LED / POWER button

Status

Status of the monitor

White lit

Power on

Amber lit

Power off

TIPS

•  You can turn on the power automatically in response to the 

people motions.  

(When “In Device Motion Sensor” is set to “On”.) 

The operating range is approx. 32.8 feet (10 m).

Turning Power On/Off

n

Operations after first power-on

When the monitor is turned on for the first time after being 

shipped from the factory, the setting screen will be displayed.

Configure the settings according to the screen.

About Operation Mode

Mode1:

•  This monitor goes into standby mode when there is no 

operation for 4 hours.

•  Power consumption in standby mode is also minimized.

Mode2:

•  Will perform standard operation.

•  This monitor does not go into standby mode even if no 

operation continues.

•  Power consumption in standby mode increases.

Turning power off

Power LED / POWER button

When “Operation Mode” is set to “Mode1”

Press the POWER button to turn the power OFF (standby 

mode).

When “Operation Mode” is set to “Mode2”

When you press the POWER button, the brightness will be 

reduced.
To turn the power OFF (standby mode):

1.  Long press the POWER button.

  The recognition screen appears.

2.  Touch [STANDBY].

  The power is turned off (standby mode).

TIPS

•  When the main power switch is off, the monitor cannot be 

turned on.

Содержание 60005523

Страница 1: ...PN CD701 LCD MONITOR OPERATION MANUAL ...

Страница 2: ... dealer and ask for the correct method of disposal ONLY FOR USERS IN THE EUROPEAN UNION AND SOME OTHER COUNTRIES FOR INSTANCE NORWAY AND SWITZERLAND Your participation in separate collection is requested by law The symbol shown above appears on electrical and electronic equipment and batteries or the packaging to remind users of this If Hg or Pb appears below the symbol this means that the battery...

Страница 3: ...ains lead are coloured in accordance with the following code GREEN AND YELLOW Earth BLUE Neutral BROWN Live As the colours of the wires in the mains lead of this apparatus may not correspond with the coloured markings identifying the terminals in your plug proceed as follows The wire which is coloured GREEN AND YELLOW must be connected to the terminal in the plug which is marked by the letter E or...

Страница 4: ...t people from stepping on them or objects from resting on them 10 The screen used in this product is made of glass Therefore it can break when the product is dropped or applied with impact Be careful not to be injured by broken glass pieces in case the screen breaks 11 Overloading Do not overload power outlets or extension cords Overloading can cause fire or electric shock 12 Entering of objects a...

Страница 5: ...s A product In a domestic environment this product may cause radio interference in which case the user may be required to take adequate measures An apparatus with CLASS I construction shall be connected to a MAIN socket outlet with a protective earthing connection STABILITY HAZARD If a monitor is not positioned in a sufficiently stable location it can be potentially hazardous due to falling Many i...

Страница 6: ...he monitor power off and then on Do not operate the screen with a hard or pointed object such as a fingernail or pencil Depending on the application used the touch pen may not function If another USB device is connected to the computer to which the touch panel is connected do not operate the USB device during touch panel input Input may not take place correctly Do not allow a cable to come near th...

Страница 7: ...een unit corner or speaker This may cause product damage failure or injury This monitor should be used at an ambient temperature between 41 F 5 C and 95 F 35 C Be careful of high temperatures in the surrounding area If it is difficult to provide sufficient space for any reason such as the installation of the monitor inside a housing or if the ambient temperature may be outside of the range of 41 F...

Страница 8: ...tteries 15 Remote control operation range 15 Turning Power On Off 16 Turning on the main power 16 Turning power on 16 Turning power off 16 Touch Pen 17 Touch action 18 Touch action 18 Other functions 20 Cautionary points 20 Basic Operation 21 Button Operation 21 IoT accessories Operation 21 Using the remote control unit option 22 Menu Items 23 Displaying the menu 23 Main function in Action Panel 2...

Страница 9: ...de power to the connected computer Contact your local electrical contractor before running the supplied cable under carpets behind walls or over ceiling tiles as regulations may vary TIPS When the Information Display Downloader is installed you can check and download the most recent versions of the software programs USB A to B cable for touch back 1 Cable clamp 1 Camera 1 Knurled screw M3 2 USB A ...

Страница 10: ...6 3 5 mm jack for service See page 13 17 USB port for camera 2 See page 13 18 Optical audio input terminal S PDIF See page 13 19 USB port for camera 1 See page 13 20 USB port for external source USB 3 0 compliant See page 13 21 USB Type C 1 input terminal See page 12 22 USB Type C 2 input terminal See page 12 23 USB Type B input terminal for touch back pair with HDMI input terminal See page 12 8 I...

Страница 11: ...h See page 16 28 USB Type C output terminal See page 13 29 USB port for storage expansion USB 3 0 compliant See page 13 30 LAN 2 terminal See page 13 31 Line out Audio output terminal See page 12 32 LAN 1 terminal See page 13 33 USB port for IoT sensor hub USB devices See page 12 34 USB port for IoT sensor hub USB devices See page 12 35 Mounting points for IoT sensor hub See page 14 36 Mounting po...

Страница 12: ...or other devices If the computer is connected to this monitor with a USB Type C cable the device recognition sound of OS may sound several times 1 USB Type C 1 input terminal 2 USB Type C 2 input terminal Use the USB Type C cable supplied You can connect a device that supports DisplayPort alternate mode In order to supply power to connected devices it is necessary to support the Power delivery sta...

Страница 13: ...a a commercially available Type C cable that support DisplayPort 12 Optical audio input terminal S PDIF This terminal is reserved for the hardware echo cancellation feature supported by the camera supplied Connect the optical audio output from the camera and this optical audio input terminal via an S PDIF cable supplied 13 USB port for camera 1 Connect the camera to this terminal with the USB A to...

Страница 14: ...screws M3 x2 The IoT sensor hub mounting brackets fit into the recess of this monitor Mounting a camera It is possible to mount a camera in the following position 3 5 mm mini jack to USB A cable supplied USB A to B cable supplied S PDIF cable supplied 1 Attach the supplied camera with the supplied knurled screws M3 x2 The camera can be tilted downward TIPS The cable clamp supplied can be used to c...

Страница 15: ...nit and the remote control sensor may prevent proper operation Replace the batteries when they run low as this may shorten the remote control s operation range If a fluorescent light is illuminated near the remote control unit it may interfere with proper operation Do not use it with the remote control of other equipment such as air conditioner stereo components etc Installing the batteries 1 Plac...

Страница 16: ... Motion Sensor is set to On The operating range is approx 32 8 feet 10 m Turning Power On Off nOperations after first power on When the monitor is turned on for the first time after being shipped from the factory the setting screen will be displayed Configure the settings according to the screen About Operation Mode Mode1 This monitor goes into standby mode when there is no operation for 4 hours P...

Страница 17: ...s may break When touched simultaneously When touch pens are moved near each other Do not press the pen tip on other than the screen This may cause malfunctioning If the pen tip becomes worn or damaged replace the touch pen To purchase a new touch pen consult your dealer Support Windows Ink Support pen eraser finger mode The supplied touch pen is attached to this monitor TIPS Do not attach anything...

Страница 18: ... pen TIPS On the Mac the actions are the equivalent mouse actions Single touch only nCommon finger and touch pen actions Single tap Same action as left clicking a mouse Touch with your finger touch pen Double tap Same action as double clicking a mouse Quickly touch twice with your finger touch pen When double tapping with your finger be sure to lift your finger sufficiently off the screen after th...

Страница 19: ...r finger touch pen and then lift your finger touch pen from the screen Slide to pan With your finger touch pen touching the screen move it up and down to scroll the screen nFinger actions Zoom Use in a screen that is capable of enlargement reduction Touch the screen with two fingers and move your fingers closer together to reduce the view or apart to enlarge the view Reduction Enlargement Press an...

Страница 20: ...osoft Office can be used Handwritten comments can be written and handwriting can be recognized For details see Microsoft Office Help Cautionary points Note the following when touching by finger Do not touch with a wet finger Touch with the ball of your finger Touch with your bare finger The screen will not respond if you are wearing a glove Do not use the touch pen for any purpose other than touch...

Страница 21: ...ton Controlling input device mic volume mute button LED lights red Windows only Must be connected with a USB cable 5 MENU button Pressing the MENU button to quick launch the menu 6 INPUT button Pressing the INPUT button to quick open the Inputs menu IoT accessories Operation 1 Camera module Camera module build with camera and Mic array Which provide conference video function Camera IoT sensor Hub ...

Страница 22: ...E Volume adjustment Pressing or displays the VOLUME menu Press or to adjust the volume 4 INPUT Input mode selection Each time you press this button the input mode changes 5 MENU Displays and turns off the menu screen 6 Cursor These buttons are used to perform operations such as selecting items changing adjustment values and moving the cursor 7 ENTER Confirms the setting 8 RETURN Returns to the pre...

Страница 23: ...information Settings Button The Settings button will open up the Settings panel and allow the user to change device settings Dashboard Button Displays the measurement results of the IoT sensor Temperature Humidity CO2 Levels TVOC Levels Motion Home Button The Home button can be tapped at any time to get the user back to the home screen Back Button It will allow users to go back inside apps and als...

Страница 24: ...s Instructions Windows 10 Android The wireless section will show you the status of each wireless connections within each of the boxes If the Wireless LAN icon has a green status then that means that the connection is active If you want further instructions on how to connect to each of the wireless types you can simply click into the box Depending on the operating system used the procedure may diff...

Страница 25: ...10 Android system device with Single source or Muti sources wireless casting and PbyP display Main function in Action Panel The Action Panel can be controlled all panel setting which including OSD functions and input source switching The below documentation links provide deeper dive into each button s expanded content 1 Inputs The Input Button opens up the Inputs Panel and allow the user to switch...

Страница 26: ... 3 steps 24 Hour Time On Off Set Automatically On Off Date Time When Set Automatically is set to Off Time Zone Select Idle Screen Time 1 minute 3 minutes 5 minutes 10 minutes 15 minutes 30 minutes 1 hour Never Can not be set longer than Power Saving Timeout Power Saving Timeout 5 minutes 30 minutes 1 hour 3 hours 6 hours 12 hours Never Language English Español Français Deutsch Italiano Русский USB...

Страница 27: ...sscode Change Change Admin Passcode Change OTA Firmware Updates Update USB Firmware Updates Update Automatic Updates On Off Firmware Update Window Start Time End Time All Reset Reset Reset Wireless LAN Reset Smart Switcher On Off LAN1 always on connection On Off Wireless Casting On Off Wake On LAN On Off IoT Sensor Hub Always On On Off In Device Motion Sensor On Off When Operation Mode is set to M...

Страница 28: ...d to this monitor 2 3 Network Network menu is setting the LAN connection between this monitor and external devices 2 4 System System menu is focus on this monitor adjustment which including High Contrast Font Size Time setting and language 2 5 Sensor Hub Enable sensor data user can see the sensor value below 2 6 Administration Admin For others setting admin collects other setting items User can al...

Страница 29: ...DNS 1 5 Subnet Mask If the TCP IP is set to Manual specify a subnet mask 1 6 MAC Address Show the MAC Address 2 Proxy If your LAN has a proxy server and you wish to use it change this setting to Manual otherwise set to None 2 1 Proxy Hostname If the Proxy is set to Manual specify a proxy hostname 2 2 Proxy Port If the Proxy is set to Manual specify a proxy port TIPS This monitor supports applicati...

Страница 30: ...connected properly Unstable video The signal may be incompatible The video from the HDMI input terminal does not appear properly Use the supplied HDMI cable If using a commercially available cable does the HDMI cable support 4K and is it HDMI standard compliant The monitor will not work with cables that are not standard compliant Is the input signal compatible with this monitor See page 33 Control...

Страница 31: ...idity 3 20 to 80 no condensation Power consumption Standby mode 4 370 W 0 5 W Dimensions excluding protrusions inch mm Approx 63 15 16 W x 3 9 16 D x 38 7 16 H 1623 5 x 90 0 x 976 5 Weight lbs kg Approx 143 3 65 1 Brightness will depend on input mode and other picture settings Brightness level will decrease over time Due to the nature of the equipment it is not possible to precisely maintain a con...

Страница 32: ...ure to use a wall mount bracket that complies with the VESA compatible mounting method SHARP recommends using M6 screws and tighten the screws Note that screw hole depth of the monitor is 3 8 inch 10 mm Loose mounting may cause the product to fall resulting in serious personal injuries as well as damage to the product The screw and hole should come together with over 5 16 inch 8 mm length of threa...

Страница 33: ...s 1280 960 60Hz Yes Yes 1280 1024 60Hz Yes Yes 75Hz Yes Yes 1360 768 60Hz Yes Yes 1400 1050 60Hz Yes Yes 1440 900 60Hz Yes Yes 1600 1200 60Hz Yes Yes 1680 1050 60Hz Yes Yes 1920 1200 60Hz Yes Yes Wide 3840 2160 24Hz Yes Yes 25Hz Yes Yes 30Hz Yes Yes 50Hz Yes Yes 60Hz Yes Yes 1280 720 60Hz Yes Yes 1920 1080 60Hz Yes Yes Depending on the connected computer images may not be displayed properly even i...

Страница 34: ...EE802 11b g n 1 13ch 2412 2472MHz IEEE802 11ac a n 36 40 44 48ch 5180 5240MHz AUSTRALIA MALAYSIA NEW ZEALAND TAIWAN IEEE802 11b g n 1 13ch 2412 2472MHz IEEE802 11ac a n 36 40 44 48ch 5180 5240MHz 149 153 157 161 165ch 5745 5825MHz INDONESIA IEEE802 11b g n 1 13ch 2412 2472MHz IEEE802 11ac a n 149 153 157 161ch 5745 5805MHz QATAR IEEE802 11b g n 1 13ch 2412 2472MHz IEEE802 11ac a n 149 153 157 161 ...

Страница 35: ...e components whose copyrights are held by third parties These include software components covered by a GNU General Public License hereafter GPL a GNU Lesser General Public License hereafter LGPL or other license agreement Obtaining source code Some of the open source software licensors require the distributor to provide the source code with the executable software components GPL and LGPL include s...

Страница 36: ...hat are 5 16 inch 8 mm to 3 8 inch 10 mm longer than the thickness of the mounting bracket Screws M6 Mounting bracket Monitor mounting 5 16 3 8 inch 8 10 mm Do not use an impact driver After mounting please carefully ensure the monitor is secure and not able to come loose from the wall or mount Do not use any screw holes other than those for mounting brackets located on the rear of the monitor for...

Страница 37: ...PN CD701 Me EN20A 2 ...

Отзывы: