background image

ENGLISH   

- 20 -

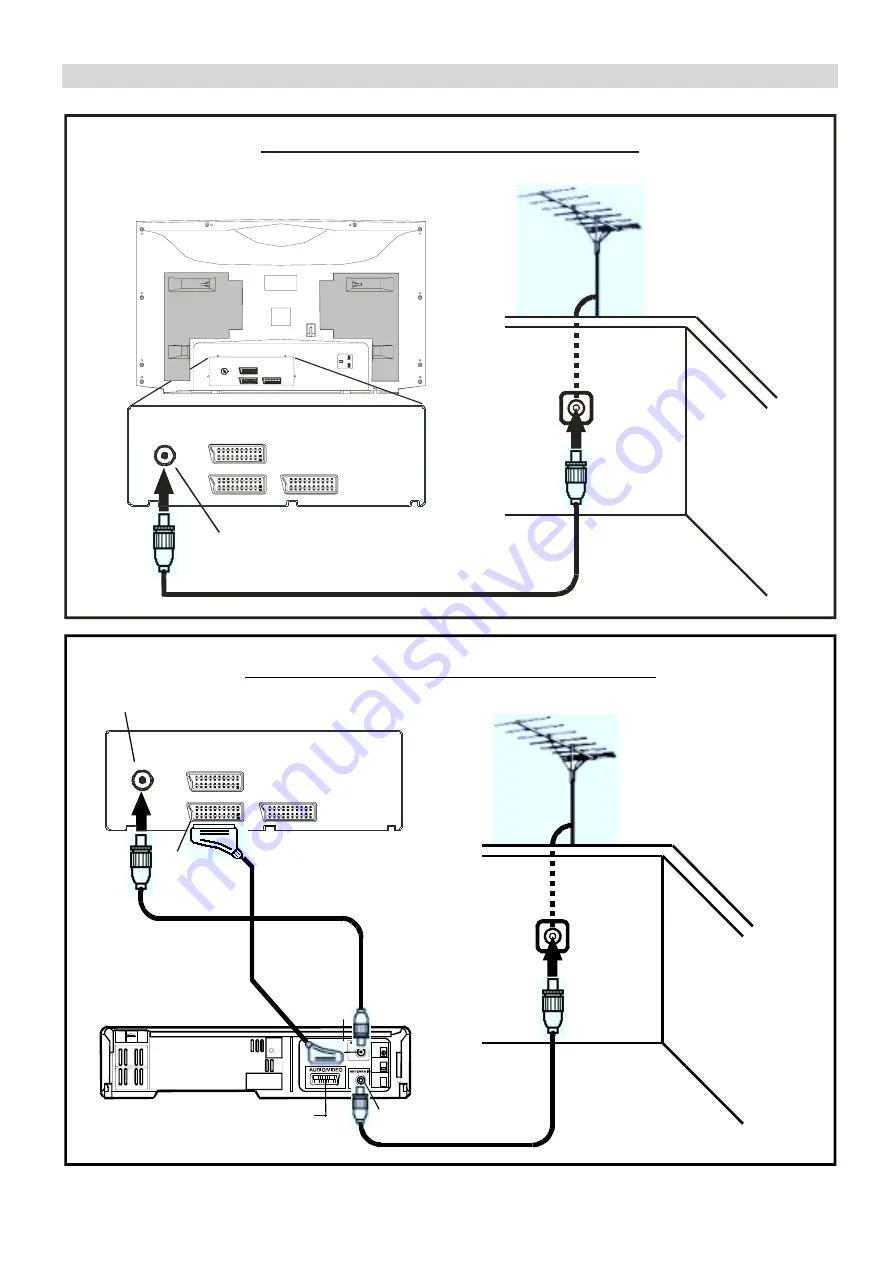
Typical Connections

Note:

 For further details, please refer to operation manual of your VCR.

$HULDOFRQQHFWLRQ79VHWRQO\

$HULDO,1

%$&.2)79

$HULDO
1RWVXSSOLHG

$HULDO/HDG
1RWVXSSOLHG

$17

(;7

(;7

(;7

$1 7

( ;7 

( ;7 

( ;7

$HULDO&RQQHFWLRQV79DQG9&5

$HULDO
1RWVXSSOLHG

$HULDO/HDG
1RWVXSSOLHG

$17

(;7

(;7

(;7

$HULDO/HDG
1RWVXSSOLHG

6FDUW/HDG

1RWVXSSOLHG

%$&.2)79

$HULDO,1

%$&.2)9&5

$XGLR9LGHR

5)287

$97(50,1$/

(;7

$HULDO,1

Downloaded from: 

http://www.usersmanualguide.com/

Содержание 28LF-96EC

Страница 1: ... carefully before using the colour television Prosíme pøeètìte si pozornì tento návod k pou ití pøed pou itím barevné televize Pred pou itím si pozorne preèítajte túto príruèku Ïðocüáà âíèìàòåëüíî îçíàêîìèòüñÿ ñ íàñòîÿùèì Ðóêîâîäñòâîì ïåðåä âêëþ åíèeì òåëåâèçîðà Gondosan olvassa el a Használati útmutatót mielõtt használná a színes televíziót Prosimy uwa nie przeczytaæ ten podrêcznik obs ugi przed ...

Страница 2: ...Typical Connections Continued 25 21 pin Euro SCART and 21 pin Audio Video 26 Troubleshooting 27 Specifications 28 Safety Precautions 2 Supplied Accessories 4 Remote Control Buttons 5 Control Panel Buttons 6 Antenna Connections 6 Preparation 7 Features 7 Before Switching on your TV 7 Power connection 7 Aerial Connections 7 How to connect external equipment 7 Remote Control Battery Installation 7 Sw...

Страница 3: ...ilt in cabinet Television equipment and cart combination should be moved with care Quick stops excessive force and uneven surfaces may cause the equipment and cart combination to overturn To prevent electrical shock do not subject the AC power cord to damage by bending or twisting it or by placing heavy items on top of it and do not place the AC power cord under the TV set If the AC power cord bec...

Страница 4: ...en TV set and the stand table or track The tube of your TV has a special coating Do not knock or rub on the tube face with sharp or hard surfaces otherwise you will damage the coating To prevent damaging the surface of the television screen remove finger prints only with a soft cloth dampened with glass cleaner Do not use any abrasive cleaners Do not use thinner benzene or other strong chemical cl...

Страница 5: ...LV RSHUDWLRQ PDQX DO FDUHIX OO EHIR UH XVLQJ W KH FROR XU WHOHYLVLR Q 3URVLP XZD Q LH SU HF WDü WHQ S RGU F Q LN RE VáXJ L S U HG UR SRF FLHP NRU VWDQ LD WHOHZL RUD 5HVSHFW WKH HQYLURQPHQW DQG SXW XVHG EDWWHULHV LQ D FRQWDLQHU WKDW LV HVSHFLDOO GHVLJQHG IRU WKLV SXUSRVH 7 SH 5 U DWWHULHV Downloaded from http www usersmanualguide com ...

Страница 6: ...perating and maintenance servicing instructions in the literature accompanying the appliance Stand By Cursor Up Cursor Right OK Store Still Picture Info Program Table 0 9 Direct Program Double Digit Screen Format button P CH Program Up Volume Up TV Quit Menu 7 EXT button EXT 1 EXT 2 EXT 3 S VHS S VHS EXT2 or FRONT AV Yellow Feature Menu Blue Installation Menu Hold Update Index Page PIP Program Up ...

Страница 7: ...onnections VIDEO AUDIO L L S G I Audio left AUDIO R R D D D Audio right Headphone 3 6 mm Ø Speakers left right Power On Off Volume CH Program S VIDEO 6 9 2 9 2 6 5 8 2 6 9 2 9 2 6 5 8 2 FRONT PANEL Downloaded from http www usersmanualguide com ...

Страница 8: ... Automatic VCR detection Digital Scan 100 Hz Line Flicker Reduction Graphic Equalizer AVL Automatic Volume Limiting Tilt adjustment Tint Control DNR Digital Noise reduction Still function Before Switching on your TV Power connection Important The TV set is designed to operate on 220 240V AC 50 Hz After unpacking allow the TV set to reach the ambient room temperature before you connect the set to t...

Страница 9: ...is finalized the PRO GRAM TABLE appears To cancel APS press the button 87 21 36 36 6 5811 1 3 6 7 352 5 66 11 79 1 FKDQJH GHOHWH 79 L 7 Moving cursor to four direction you can reach 30 pro grammes in the same page By scrolling the pages up or down by pressing the navigation buttons you can select all the programmes By cursor action programme selection is done automatical ly Programme Number is bet...

Страница 10: ...ss M button Menu Red button Sound menu Green button Picture menu Yellow button Feature menu Blue button Installation menu button Program Table When you press M button the following menu appears on the screen Press or button to select a menu title and then or OK button to enter the menu Sound menu First icon belongs to the sound menu By pressing or OK button Sound menu appears on the screen You can...

Страница 11: ...to move headphone balance rightward Press but ton to move headphone balance leftward Sound Mode By pressing or button select Sound Mode You can change the headphones sound mode to MONO STEREO NICAM STEREO DUAL 1 NICAM 1 or DUAL 2 NICAM 2 by pressing or button Turbo Sound Turbo Sound is used to increase bass effect of the TV set By pressing or button select Turbo Sound You can set the turbo sound t...

Страница 12: ...7 17 15 Setting Hue In AV mode only During Playback NTSC system this will appear in AV mode only when NTSC video source is applied Otherwise HUE option is invisible in Picture menu Using or button select Hue Press button to increase hue level Press button to decrease hue level 3 785 7 17 15 6 5 1 250 7 3 785 60 57 1250 21 872 3 5621 8 Screen Format By pressing or button select Screen Format You ca...

Страница 13: ...ode thereby getting rid of the black borders PANORAMIC This stretches the left and right sides of a normal picture 4 3 aspect ratio to fill the screen without making the pic ture appear unnatural The top and bottom of the picture are slightly cut off SUBTITLE Adapts up to the wide picture 16 9 aspect ratio with subtitle to the full screen 68 7 7 Adjusting the visible area of the picture If subtitl...

Страница 14: ...tive The Blue Screen feature can be set by or button to either ON or OFF 785 6 3 7 0 5 2 2 2 79 2 8 6 5 1 7 287387 EXT2 Output You can use this menu to select the internal or external source that will be output at EXT 2 terminal In the Feature menu select EXT2 Output using or button Then select the source you want to be output at EXT 2 pressing or button one of the sources TV EXT 1 EXT 3 FRONT AV ...

Страница 15: ...nge the channel num ber Band By pressing or button select Band By pressing or button you can change the Band to C or S To Store the Settings Press OK button to store Search menu settings STORED will be displayed To exit the Search menu press M button Fine Tuning By pressing or button select Fine Tuning By pressing or button you can fine tune the program manually 352 5 00 1 1 0 2 25 1250 872 67 1 5...

Страница 16: ...tched into AUTO NORMAL FULL 14 9 CINEMA PANORAMA or SUBTITLE Mode 872 250 7 1250 250 7 8 250 7 250 7 1 0 250 7 3 12 250 7 68 7 7 250 7 No Signal Timer Indicator It is displayed in the middle of the screen when no valid sig nal detected It shows the remained time for the switching to the Stand By mode it will take 5 minutes The indicator is displayed in 3 seconds when there is no valid signal After...

Страница 17: ...u 79 or M button has to be pressed 3 3 0 18 6285 6 3 326 7 21 7 60 Source By selecting SOURCE item you can select the PIP source among EXT 1 EXT 2 EXT 3 S VHS S EXT2 or FRONT by pressing or button In AV mode PIP source can be EXT 1 EXT 2 EXT 3 S VHS S EXT2 FRONT or TV In AV mode if Source is selected as TV PIP program can be changed by or buttons Size You can select the PIP size as SMALL or LARGE ...

Страница 18: ... page to be displayed in double height text Press button once more for the full page of normal height text To Reveal concealed Information Pressing button once will reveal answers on a quiz or games page Pressing button again will conceal the revealed an swers To Stop Automatic Page Change The teletext page you have selected may contain more in formation than can be displayed on one screen in such...

Страница 19: ... See your equipment s booklet to check if your equipment has such feature Via the ANT aerial socket If your equipment does not have an Euroconnector or RCA jacks connect it to the TV with an aerial cable For details see the manual provided with the equipment To store the test signal that comes from the equipment see Installation Menu on page 13 and store it to the programme number 0 You can watch ...

Страница 20: ...ctor 21 pin SCART Video input S VIDEO Y C input and Audio L R inputs are available Video and Audio L R outputs are available see EXT2 Output on page 13 EXT 3 EXT 3 terminal Euroconnector 21 pin SCART Video input Audio L R inputs are available TV broadcast outputs Video and Audio L R are available FRONT AV terminal RCA connectors x 3 Video input and Audio L R inputs are available S VHS terminal S V...

Страница 21: ...WLRQ 79 VHW RQO HULDO 1 2 79 HULDO 1RW VXSSOLHG HULDO HDG 1RW VXSSOLHG 17 7 7 7 1 7 7 7 7 HULDO RQQHFWLRQV 79 DQG 9 5 HULDO 1RW VXSSOLHG HULDO HDG 1RW VXSSOLHG 17 7 7 7 HULDO HDG 1RW VXSSOLHG 6FDUW HDG 1RW VXSSOLHG 2 79 HULDO 1 2 9 5 XGLR 9LGHR 5 287 9 7 50 1 7 HULDO 1 Downloaded from http www usersmanualguide com ...

Страница 22: ...ER and VCR RQQHFWLRQV 79 9 3OD HU 2 5 DQG 9 5 9LGHRUHFRUGHU 9 7 50 1 7 2 79 9 3 5 2 5 6FDUW HDG 1RW VXSSOLHG 6FDUW HDG 1RW VXSSOLHG 9 7 50 1 7 6FDUW HDG 1RW VXSSOLHG HULDO HDG 1RW VXSSOLHG HULDO 1RW VXSSOLHG HULDO HDG 1RW VXSSOLHG HULDO 1 XGLR 9LGHR 2 9 5 5 287 HULDO 1 1 7 7 7 7 Downloaded from http www usersmanualguide com ...

Страница 23: ...p Box RQQHFWLRQV 79 9 3OD HU DQG LJLWDO 6HW 7RS R 2 79 17 7 7 7 9 3 5 6FDUW HDG 1RW VXSSOLHG 9 7 50 1 7 HULDO 1 HULDO 1RW VXSSOLHG 6DWHOOLWH GLVK 1RW VXSSOLHG LVK HDG 1RW VXSSOLHG HULDO HDG 1RW VXSSOLHG 6FDUW HDG 1RW VXSSOLHG HULDO HDG 1RW VXSSOLHG 7 6 7 723 2 5 287 5 1 79 6 57 6 1 1 7 7 7 7 Downloaded from http www usersmanualguide com ...

Страница 24: ...JLWDO 6HW 7RS R 2 79 17 7 7 7 9 3 5 6FDUW HDG 1RW VXSSOLHG HULDO 1 9 7 50 1 7 HULDO 1RW VXSSOLHG 6DWHOOLWH GLVK 1RW VXSSOLHG LVK HDG 1RW VXSSOLHG HULDO HDG 1RW VXSSOLHG 6FDUW HDG 1RW VXSSOLHG 7 6 7 723 2 2 9 5 HULDO HDG 1RW VXSSOLHG 6FDUW HDG 1RW VXSSOLHG 5 287 HULDO 1 XGLR 9LGHR HULDO HDG 1RW VXSSOLHG 5 287 5 1 79 6 57 6 1 17 7 7 7 Downloaded from http www usersmanualguide com ...

Страница 25: ... For further details please refer to operation manual of your Video Camera 1 7 7 7 7 2 79 0 25 5 1 287 1 287 XGLR 9LGHR OHDG 1RW VXSSOLHG RQQHFWLRQV 79 DQG 9LGHR FDPHUD URQW FRQQHFWLRQV 79 DQG 9LGHR FDPHUD 1RWH RU IXUWKHU GHWDLOV SOHDVH UHIHU WR RSHUDWLRQ PDQXDO RI RXU 9LGHR DPHUD Downloaded from http www usersmanualguide com ...

Страница 26: ...Video input PAL SECAM NTSC 7 Blue input 14 Not used 21 Plug shield 21 pin Audio Video with S Video Input EXT 2 1 Audio right output 8 Audio video control 15 Chroma S Video input 2 Audio right input 9 Earth 16 Not used 3 Audio left output 10 Not used 17 Earth for video 4 Common earth for audio 11 Not used 18 Earth 5 Earth 12 Not used 19 Video output 6 Audio left input 13 Earth 20 Video input PAL SE...

Страница 27: ...FKDQQHOV 7U D QHZ FKDQQHO WR FKHFN IRU SRVVLEOH VWDWLRQ WURXEOH HULDO QRW FRQQHFWHG WR WHUPLQDO DW WKH EDFN RI WKH 79 VHW I RXWVLGH DHULDO LV XVHG FKHFN IRU EURNHQ ZLUHV KHFN IRU ORFDO LQWHUIHUHQFH GMXVW 2 285 FRQWURO 7U ILQH WXQLQJ WR FRUUHFW 6RXQG 2 SRRU SLFWXUH KHFN LI WKH ULJKWQHVV RU RQWUDVW VHWWLQJ LQ WKH SLFWXUH VHWWLQJ PRGH PLJKW EH DOO WKH ZD WR WKH PLQXV VLGH 7U D QHZ FKDQQHO WR FKHFN IR...

Страница 28: ... DIMENSIONS DxLxH mm 32LF 96EC HLJKW NJ 0 16 216 Cleaning The Screen Your TV is fitted with a True Flat picture tube The sur face of the screen is covered with a foil Under no cir cumstances may this be damaged To clean Clean the laminated screen with a soft cotton cloth Only non alkaline thinned soapsuds on a basis of water or alkohol be used to moisten the cloth Rub the surface gently with the c...

Страница 29: ...R SHARP CORPORATION 50053183 07 04 50053183 Downloaded from http www usersmanualguide com ...

Страница 30: ... tv dvd and othes Manual users user manuals user guide manual owners manual instruction manual manual owner manual owner s manual guide manual operation operating manual user s manual operating instructions manual operators manual operator manual product documentation manual user maintenance brochure user reference pdf manual Downloaded from http www usersmanualguide com ...

Отзывы: