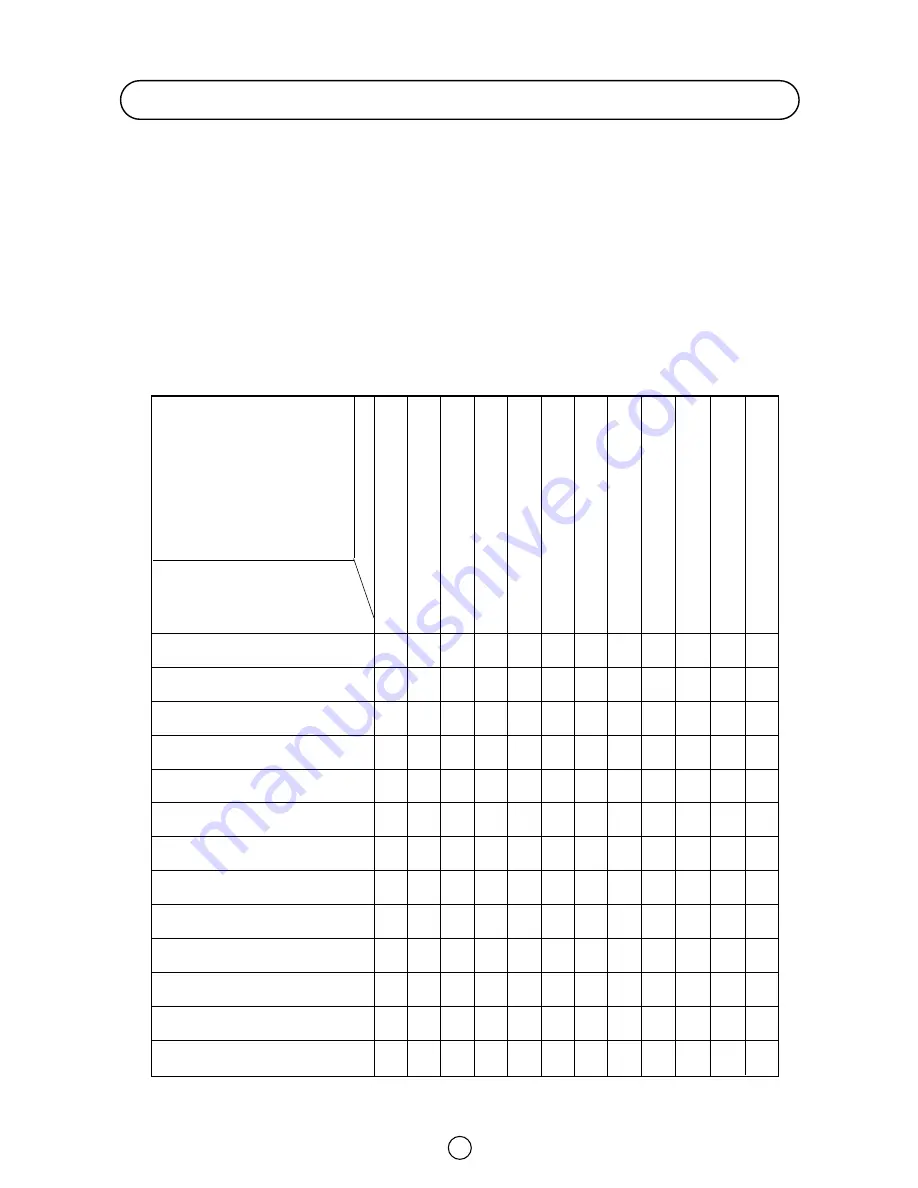
background image

34

Quick
Service
Check List

Problems

Remote control does not work 

● ●

Bars on screen

Picture distorted

Picture rolls vertically

No colour

Poor reception on some channels 

Picture weak

Picture lines or streaks

Picture ghosting

Picture blurred

Sound OK, picture poor

Picture OK, sound poor

No picture or sound

● ●

Try a new channel to check

for possible station trouble

Possible Causes/Remedies

TV not plugged in Outlet power OFF

Main power button of TV not ON

Antenna not connected to terminal

at the back of the TV set

If outside antenna is used,

check for broken wires

Check for local interference

Turn OFF using the Main Power button,

then turn ON again after a minute

Adjust COLOUR control

Check batteries in the Remote Control

Try fine tuning to correct

Check if the Brightness or Contrast setting in the picture

setting mode might be all the way to the minus side

Increase the volume

If the fault cannot be corrected by using this guide, remove the mains plug from the wall socket and contact the dealer
or supplier from whom it was purchased. Where this is not possible, please visit our web-site at
www.sharp.co.uk/support. Customers without Internet access may telephone 08705 274277 (or (01) 676 0648 if
telephoning from Ireland) during office hours.

Certain replacement parts and accessories may be obtained from our Main Parts Distributor, who can be contacted on
the following numbers:

Willow Vale Electronics Ltd.
0121 766 5414 and 0161 205 7531

In the unlikely event of this equipment requiring repair during the guarantee period, you will need to provide proof of the
date of purchase to the repairing company. Please keep your invoice or Receipt, which is supplied at the time of
purchasing.

Troubleshooting

Содержание 28JW-73H

Страница 1: ...28JW 73H 32JW 73H COLOUR TELEVISION OPERATION MANUAL PRINTED ON ENVIRONMENTALLY FRIENDLY PAPER ...

Страница 2: ... with the equipment or any attempt at adjustment or repair other than by an approved Service Facility 4 In the unlikely event of that your equipment should require repair please contact the dealer or supplier from whom it was purchased 5 The cost of carriage to and from the Dealer Supplier or Sharp approved Service Facility shall be borne by the purchaser 6 No person has any authority to vary the ...

Страница 3: ...is equipment in a confined space such as a bookcase or a built in cabinet Television equipment and cart combination should be moved with care Quick stops excessive force and uneven surfaces may cause the equipment and cart combination to overturn Wall or shelf mounting should follow the manufacturer s instructions and should use a mounting kit approved by the manufacturer To prevent electrical sho...

Страница 4: ...Setting Mode 22 Child Lock Channel Block 23 Postcode 25 VCR Mode 26 Other Features 27 TELETEXT Mode 28 21 pin Euro SCART and 21 pin Audio Video 31 Typical Connections 32 Troubleshooting 34 General Specifications for Television Receiver 35 Index 36 Remote control R 6 AA size dry batteries Operation manual Before using the TV set for the first time install the supplied dry batteries in the remote co...

Страница 5: ...TV VIDEO button 20 Channel Call button 21 Single Double entry button Teletext 22 YELLOW button 23 BLUE button TV 24 Channel UP button 25 Volume UP button 26 Channel DOWN button 27 Wide mode button TV Teletext 28 CLOCK button TV 29 Sound mode button Teletext 30 HOLD button TV 31 Sound Mute button Teletext 32 TEXT MIX PICTURE button 33 INDEX button Video 34 Channel UP button VCR 35 Fast forward pict...

Страница 6: ...r finger inside and pull open Behind the door 1 S VIDEO input terminal 2 VIDEO input terminal PAL SECAM NTSC 3 AUDIO input terminal left 4 AUDIO input terminal right 5 Headphone jack 3 5mm 16 600 ohms REAR TV 21 pin In Out 1 21 pin Audio Video AV 2 With PAL SECAM NTSC Video Input 2 21 pin Audio Video AV 1 With PAL SECAM NTSC S Video Input 3 21 pin Euro SCART RGB With PAL SECAM NTSC Video Input RF ...

Страница 7: ...6 Aerial Connections TV set only Aerial Connections VCR and TV See on Typical connections page 32 for details of further connection possibilities Note ...

Страница 8: ... them according to technical criteria from Pr 01 of the TV to a maximum of 99 programmes This tuning system may take several minutes to perform Editing When the automatic search has been completed the list of memorised programmes appears In this menu you can change the order of the channels and change or give the channels a four letter name You may not have to follow this procedure if it has alrea...

Страница 9: ...e Volume UP button to quit the Change of Name option Go to sorting mode Use this option for sorting the channels CH into the desired programme Pr as follows 1 Select the programme Pr you wish to change using the Channel UP DOWN buttons marked with white background 2 Press the GREEN button 3 Press the Channel UP DOWN buttons to move the channel CH to the required position 4 Press the GREEN button t...

Страница 10: ...e Stand by button TV on the remote control or one of the four buttons on the TV V VCH The TV will change from Stand by mode to Program mode the Power indicator will turn green from red and an image will appear on the screen Press the Stand by button TV again and the TV will return to Stand by mode Blue background off timer If weak signal conditions in TV or VCR mode the screen will turn blue The b...

Страница 11: ...enus are as indicated below MENU button By pressing the MENU button CONTRAST COLOUR BRIGHTNESS SHARPNESS NORMALISE TINT CONTROL ECO MODE COMB FILTER NTSC HUE VOLUME BASS TREBLE BALANCE NORMALISE LOUDSPEAKERS MODE EFFECTS SOUND IDENT DYNAMIC BASS ON TIMER TIME SWITCH ON OFF TIMER OFF 120 Min 90 Min 60 Min 30 Min CHILD LOCK LOCK ALL LOCK PROGRAMME CLEAR LOCK DEMO POST CODE VOLUME BASS TREBLE BALANCE...

Страница 12: ...een completed the Stored programmes menu will appear on screen In this menu you can change the order of the channels and change or give the channels a four letter name If you wish to rename the channels or change the order refer to Stored programmes on page 8 If you wish to go out of the menu press the BLUE button CH 11 TV Channel Setting AUTO TUNE EDIT MODE F TUNE SEARCH Pr 06 CH21 CHANNEL Press ...

Страница 13: ... the MAIN menu 4 Press the BLUE button to see the TUNE menu 5 Press the Volume DOWN UP buttons to select with white letters the Channel type CH Aerial or CC Cable 6 Enter the real channel number you want to store with the 0 9 digit buttons two digit entry only 7 Press the GREEN button to memorize 8 Press the MENU button to clear the on screen display Repeat the above procedure for presetting other...

Страница 14: ...rs the Channel type CH Aerial or CC Cable 6 Press the Channel DOWN button to select SEARCH 7 Press the Volume DOWN UP buttons to start preset The tuning sequence will stop when a signal is detected if the signal is not the required channel press the Volume DOWN button or the Volume UP button to continue 8 Press the GREEN button to memorize 9 Press the MENU button to clear the on screen display Rep...

Страница 15: ...me channels as required Mode This feature allows you to select TV VCR SKIP First follow the above steps 1 2 and 3 The TUNE menu will appear on screen 1 Press the Channel DOWN button to select MODE 2 Press the Volume UP button to select TV If the TV signal is weak the image can move In this case set the MODE to TV VCR The upper part of the picture may be distorted when receiving signal from a VCR v...

Страница 16: ...igit channel number entry 0 9 digit buttons You can select channels by pressing the 0 9 digit buttons on the remote control For single and double digit entry see above Flash back button Press this button to switch the currently viewed channel to the previously viewed channel and vice versa This function is only available in programme channel selection mode I e not when AV terminals are in use Note...

Страница 17: ...NTROL and ECO MODE options 6 Select TINT CONTROL and press the Volume DOWN UP buttons to adjust your desired skin colour blue or red 7 Select ECO MODE ON to reduce contrast in areas of the picture that are excessively white 8 Select COMB FILTER ON to reduce colour interference in picture with fine details and the picture gets sharper 9 Select NTSC HUE to adjust the skin colour Green or Red during ...

Страница 18: ... V SIZE menu Press the Volume DOWN UP buttons to adjust the Vertical SIZE LARGE SMALL AUTO mode VPS code The VPS signal is sent by some broadcasting stations with information of the original size When the TV is in AUTO mode and receives the VPS signal it changes the size automatically as indicated below When the TV is receiving VPS code 16 9 the TV selects CINEMA automatically When the TV is recei...

Страница 19: ... 16 9 format while also stretching the centre of view This is an advantage for example when watching sports games where there is no real fixed centre of the picture NORMAL You can watch 4 3 programs in 4 3 format by switching to Normal Mode function ZOOM 14 9 Adapts the 14 9 broadcast cinema movies to the 14 9 Mode CINEMA 16 9 Adapts the 16 9 broadcast cinema movies to the 16 9 Mode thereby gettin...

Страница 20: ...n the TV set is receiving a STEREO programme the TV selects STEREO automatically and you can change STEREO MONO When the TV is receiving a BILINGUAL programme the TV selects DUAL CHANNEL A automatically and you can change DUAL CHANNEL A DUAL CHANNEL B DUAL CHANNEL A B MONO When the TV is receiving a MONO NICAM programme the TV set selects MONO NICAM automatically and you can change MONO NICAM MONO...

Страница 21: ...PEAKERS Mode HEADPHONES Mode EFFECTS SOUND IDENT and DYNAMIC BASS 7 Press the Channel UP DOWN buttons to select LOUDSPEAKERS or HEADPHONES Press the Volume DOWN UP buttons to change the sound mode as indicated on page 19 in the section Sound mode button 8 Select EFFECTS and press the Volume DOWN UP buttons to activate or deactivate the SPATIAL EXPANDER effect 9 Select SOUND IDENT to activate ON or...

Страница 22: ...te The SPATIAL EXPANDER effect does not work with headphones SOUND IDENT SOUND IDENT ON TV automatically identifies the sintonized audio system MONO FM STEREO NICAM or DUAL NICAM SIGNAL SOUND IDENT OFF Disqualifies the automatic identification of the audio system and forces the sound into MONO FM This mode can be convenient when the level of the signal received is extremely weak This function is i...

Страница 23: ...ITCH ON Time can be set with the 0 9 digit buttons The GREEN button is used to cancel the SWITCH ON function 8 Press the MENU button to close the menu 9 Press the Stand by button TV on the remote control to put the TV into switch on Stand by Mode LED indicator on the TV set turns RED to ORANGE during ON TIMER is activated As a safety precaution in the case of nobody being home when the television ...

Страница 24: ... 1 to 4 to see the CHILD LOCK menu 1 Press the Volume UP button to select the protection type white letters Select NONE To cancel the protection Select ALWAYS LOCKED The access to the TV will be protected throughout the day Select START STOP to block access to the TV during the desired period of time Enter the hours and minutes using the 0 9 digit buttons to set the starting and ending times of th...

Страница 25: ...tarting and ending times of the lock period 6 Press the GREEN button to memorize From this time forward whenever the protection conditions are met the screen will be blocked and the LOCKED MODE message will be displayed Press any digit button to unlock the TV Since the key for unlocking the TV is the remote control make sure you do not misplace it CLEAR LOCK This option enables you to erase all th...

Страница 26: ...ns for changing the position of the cursor and Channel UP DOWN buttons for changing the letters repeat this action for other letters numbers 8 When you have finished the eighth letter press the BLUE button to confirm the postcode 9 When the postcode has been set Press the GREEN button to activate the postcode or Press the RED button if you wish to cancel all the data Postcode If you enter and memo...

Страница 27: ...his button to turn your VCR on Fast forward picture search forward button Rewind picture search reverse button Both these buttons have the following function Fast forwarding and Rewinding 1 To move through the cassette faster press the Stop button to stop and then press the or button to fast forward or rewind the cassette 2 Press the Stop button to stop fast forward or rewind Picture Search 1 Duri...

Страница 28: ...HEADPHONE VOLUME 4 Adjust the headphone volume with the Volume DOWN UP buttons Note Note 5 Make sure that you insert the headphone plug all the way 6 Press the MENU button to close the menu The SPATIAL EXPANDER effect cannot be adjusted for the headphones Note Sub titles button h This set has a quick access function for teletext subtitles so that they can be selected by the press of one button Sim...

Страница 29: ...different systems Your SHARP TV is adjusted to receive 2 Teletext systems namely FLOF and LIST which are automatically identified by the receiver The user can easily identify them by the manner in which they appear on the screen To switch ON and switch OFF the Teletext 1 Select a TV channel which is broadcasting the Teletext programme you would like to watch 2 Press the TEXT MIX PICTURE button twi...

Страница 30: ...2 Enter 4 digits corresponding to the subpage desired E g 0021 for subpage number 21 3 Wait until the page appears You can use this button together with the CANCEL button This means that you can view the main TV picture until the subpage has been found The on screen icon at the top left side of the screen will change when the subpage has been found Press the TEXT MIX PICTURE button to view the sub...

Страница 31: ...position a total of 36 pages In programme positions 10 through 99 only one programme with 4 page numbers can be stored If you try to store more than 4 page numbers in a programme position between 10 and 99 the previously stored page numbers will be erased 1 Select the programme channel number into which you want to store Teletext page numbers 2 Press the TEXT MIX PICTURE button twice to select the...

Страница 32: ... Not used 12 Not used 13 Earth 14 Not used 15 Chroma S Video input 16 Not used 17 Earth for video 18 Earth 19 Video output 20 Video input PAL SECAM NTSC S Video 21 Plug shield 21 pin Audio Video AV 2 1 Audio right output 2 Audio right input 3 Audio left output 4 Common earth for audio 5 Earth 6 Audio left input 7 Not used 8 Audio video control 9 Earth 10 Not used 11 Not used 12 Not used 13 Earth 1...

Страница 33: ... your VCR for details Typical connection Videorecorder and TV through the RF terminal and Decoder through 21 pin Euro Scart Typical connection DVD Decoder and TV through the 21 pin Euro SCART RF in Decoder 21 pin Euro SCART TV RF in SCART AV Decoder 21 pin Euro SCART TV RF in SCART AV DVD player Video out Audio out RF out VCR ...

Страница 34: ...33 Typical connection VIDEO CAMERA and TV through the A V FRONT Note For further details please refer to operation manual of your Video camera ...

Страница 35: ...heck if the Brightness or Contrast setting in the picture setting mode might be all the way to the minus side Increase the volume If the fault cannot be corrected by using this guide remove the mains plug from the wall socket and contact the dealer or supplier from whom it was purchased Where this is not possible please visit our web site at www sharp co uk support Customers without Internet acces...

Страница 36: ...agonal measurement 66 cm 28 76 cm 32 Weight Approx 33 5 Kg 46 Kg Speaker 2 pcs 6x13 cm 6x13 cm Antenna Input Impedance VHF UHF 75 ohm Unbalanced Safety CE MARK EMC CE MARK Accessories etc a User Instruction Yes b Quick Start Guide Yes c Typical Connections Yes d Remote Control Yes e Battery 2 pcs Other Features list Digital Comb Filter Digital Stereo NICAM Auto Installation System ON OFF Timer ACS...

Страница 37: ...dit Programme 8 F Features Setting Mode 21 Fine tuning 14 FLOF Teletext 28 FRONT TV 5 G Guarantee 1 H Headphone jack 27 L LIST Teletext 28 29 30 M Main power button 9 Manual Channel Preset 12 13 Menu Structures 10 Mono 19 N NTSC HUE 16 O OFF Timer 21 ON Timer 21 Other Features 27 P Picture Adjustments 16 Postcode 24 R REAR TV 5 Remote control 4 Remote Control Battery Installation 3 S Safety Precau...

Страница 38: ...SHARP ELECTRÓNICA ESPAÑA S A SHARP ELECTRONICS U K LTD Sharp House Thorp Road Newton Heath Manchester M40 5BE PRINTED IN SPAIN TINS 7195BMN0 04 02 ...

Отзывы: