background image

 1

Dimension: 140mm x 215mm

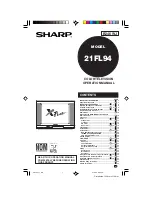
COLOR TELEVISION

OPERATION MANUAL

MODEL

21FL94

B246 WJ

READ THIS OPERATION MANUAL
COMPLETELY BEFORE OPERATING
THIS PRODUCT.

CONTENTS

PAGE

• IMPORTANT INFORMATION .........................................


0

2

• Supplied Accessories ...................................................


0

2

• IMPORTANT SAFEGUARDS ............................


0

3 ~ 


0

4

• Before Operating Your Television ................................


0

5

• Antenna Connections ......................................


0

5 ~ 


0

6

• Quick Reference Control Operation ...............


0

7 ~ 


0

8

• EZ SETUP during First Use ...........................................


0

9

• Demo Mode ....................................................................

 10

• Accessing the MAIN MENU screen without

Remote Control ..............................................................

 10

• Language ........................................................................

 11

• Timer ..................................................................

 12 ~ 

 17

Sleep Timer ................................................................

 12

Clock Set ....................................................................

 13

ON Timer .......................................................

 14 ~ 

 15

OFF Timer .....................................................

 16 ~ 

 17

• Video Adjust ...................................................................

 18

• Audio Adjust ..................................................................

 19

• Audio Select ......................................................

 20 ~ 

 21

MTS (Multichannel TV Sound) ..................................

 20

INTERNAL SPEAKER SWITCH .................................

 20

FAO (Fixed Audio Output) ........................................

 20

• Closed Caption ..............................................................

 22

• VIEW TIMER ......................................................

 23 ~ 

 25

• Ch Setup ............................................................

 26 ~ 

 31

EZ Setup .....................................................................

 26

Channel Setting ............................................

 27 ~ 

 29

Personal Preference ..................................................

 30

Universal Plus Function ...........................................

 31

• Set Up ................................................................

 32 ~ 

 34

Energy Save ...............................................................

 32

Blue Screen ................................................................

 33

Auto Input ..................................................................

 34

• Using the Video and Audio Input Terminals ...

 35 ~ 

 36

• Using the Audio Output Terminals ...............................

 37

• Operation of Remote Control ..........................

 38 ~ 

 41

• Specifications ................................................................

 42

• Before Calling for Service .............................................

 43

• Calling for Service .........................................................

 43

21FL94_01_EN

27/2/04, 8:56 am

1

Содержание 21FL94

Страница 1: ...trol 10 Language 11 Timer 12 17 Sleep Timer 12 Clock Set 13 ON Timer 14 15 OFF Timer 16 17 Video Adjust 18 Audio Adjust 19 Audio Select 20 21 MTS Multichannel TV Sound 20 INTERNAL SPEAKER SWITCH 20 FAO Fixed Audio Output 20 Closed Caption 22 VIEW TIMER 23 25 Ch Setup 26 31 EZ Setup 26 Channel Setting 27 29 Personal Preference 30 Universal Plus Function 31 Set Up 32 34 Energy Save 32 Blue Screen 33...

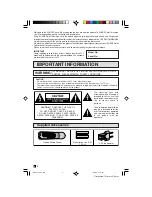
Страница 2: ...PPLIANCE TO WET LOCATIONS CAUTION TO REDUCE THE RISK OF ELECTRIC SHOCK DO NOT REMOVE COVER OR BACK NO USER SERVICEABLE PARTS INSIDE REFER SERVICING TO QUALIFIED SERVICE PERSONNEL The lightning flash with arrowhead within a triangle is intended to tell the user that parts inside the product are a risk of electric shock to persons The exclamation point within a triangle is intended to tell the user ...

Страница 3: ...ed for ventilation and to insure reliable operation of the television equipment and to protect it from overheating these openings must not be blocked or covered This television equipment should not be placed in a built in insulation such as a bookcase unless proper ventilation is provided 8 The openings should never be covered with a cloth or other material and the bottom openings should not be bl...

Страница 4: ...or other hazards Refer all servicing to qualified service personnel 19 Unplug this television equipment from the wall outlet and refer servicing to qualified service personnel under the following conditions A When the power cord or plug is damaged or frayed B If liquid has been spilled into the television equipment C If the television equipment has been exposed to rain or water D Ifthetelevisioneq...

Страница 5: ... turn the TV off AM broadcast signals may not be received due to interference from the TV L Before using the television prepare the Remote Control To use the remote control insert batteries first Insert the batteries With your thumbnail pull up the slit as indicated by the arrow to remove the back cover Insert two batteries size AA 1 5 V cc Be sure to match the battery e d terminals with the e d m...

Страница 6: ...sed If this is unknown consult your cable TV company For more specific instructions on installing cable TV consult your cable TV company One possible method of utilizing the converter descrambler provided by your cable TV company is explained below Please note RF switch equipped with position A B not provided is required A position on the RF switch not supplied You can view all unscrambled channel...

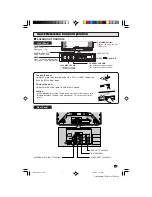
Страница 7: ... ON TIMER indicator Light up red when the ON TIMER is set To open the door Using the projection located under the PULL OPEN indication pull and lift the door open To close the door Using the projection lower the door until closed Caution When opening or closing the door do not insert your fingers into the gap between the door and front panel This may result in an injury PR PB Y IN 1 LINE OUT R L A...

Страница 8: ...FERENCE With the Personal Preference buttons you can program your favorite programs by using the 4 categories A B C and D The channels can be accessed quickly by using these buttons See page 30 VOLUME UP DOWN Increases sound Decreases sound In menu mode changes or selects the TV adjustments MENU Press Accesses MAIN MENU Press again Exits MAIN MENU MUTE Press Mutes sound Press again Restores sound ...

Страница 9: ...ted the lowest channel number memorized will be displayed Note If EZ SETUP does not memorize all the channels in your region please refer to page 27 29 for more information on manually memorizing the channels using CHANNEL SETTING It may be difficult to PRESET when the broadcast signals are weak the channel cycle frequency is incorrect or frequency jamming is occurring around the area Please refer...

Страница 10: ...8 8 8 8 and 9 9 9 9 9 or MENU on the TV set Example DEMO mode display Accessing the MAIN MENU screen without Remote Control If you misplaced your Remote Control you can still access most settings via the MAIN MENU screen when you press MENU on the TV set Some features of your TV set will not be accessible without the Remote Control If you lost your Remote Control contact a Sharp Service Center for...

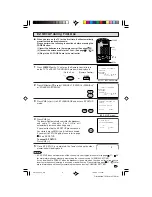
Страница 11: ...ISH or FRANCAIS FRENCH 6 Press MENU to exit Language LANGUAGE change mode MAIN MENU screen SETUP mode T I MER V I DEO AD J US T AD J US T AUD I O AUD I O SE L ECT S E TUP CAP T I ON C LOSE D R V I EW E T CH P I M SE TU MENU T I MER V I DEO AD J US T AD J US T AUD I O AUD I O S E L ECT S E TUP CAP T I ON C LOSE D R V I EW E T CH P I M SE TU MENU EN L I S G H E SP AÑ L O F RA A NC I S L ANGUAGE EN L...

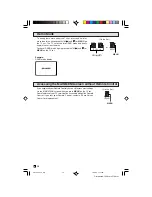
Страница 12: ...omatically in increments of 30 60 90 or 120 minutes 1 Press MENU to access the MAIN MENU screen 2 Press VOL or to access TIMER mode 3 Press VOL or to access SLEEP TIMER mode 4 Press VOL or to set a sleep time of 30 60 90 or 120 minutes 5 Press MENU to exit Note To turn off the SLEEP TIMER repeat the above SLEEP TIMER steps and select M REMAIN during step 3 While SLEEPTIMER is active the time remai...

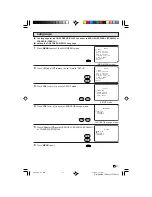
Страница 13: ... AM will appear for the first time you access CLOCK SET mode during step 5 To reset the CLOCK SET turn off and on again the AC power supply Depending on using condition time may have a small deviation TIMER mode CLOCK SET mode MAIN MENU screen T I MER V I DEO AD J US T AD J US T AUD I O AUD I O S E L ECT S E TUP CAP T I ON C LOSE D R V I EW E T CH P I M SE TU MENU T I MER S L EE P T I MER ON T I M...

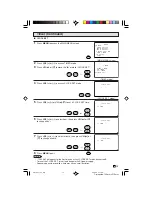
Страница 14: ...then press CH 8 or 9 to change minute 7 Press VOL again to move the a mark to STATUS position TIMER mode MAIN MENU screen T I MER V I DEO AD J US T AD J US T AUD I O AUD I O SE L ECT S E TUP CAP T I ON C LOSE D R V I EW E T CH P I M SE TU MENU MENU T I MER S L EE P T I MER ON T I MER OF F T I MER CL OCK SE T ON TIMER mode ON T I MER 1 2 0 0 AM ST A T US OF F VOL VOL VOL VOL CH 8 9 CH ON T I MER 1 ...

Страница 15: ...e ON TIMER is set 9 Press MENU to exit Note The ON TIMER cannot be set when the CLOCK is not set In this time PLEASE SET UP TIME screen will appears for approximately 2 seconds Then CLOCK SET screen will appear Repeat step 5 8 in CLOCK SET steps Please refer to page 13 on CLOCK SET If you do nothing the CLOCK SET screen will disappear If the TV set is turned on by the On Timer then the TV set will...

Страница 16: ...ect minute then press CH 8 or 9 to change minute 7 Press VOL again to move the a mark to STATUS position MAIN MENU screen T I MER V I DEO AD J US T AD J US T AUD I O AUD I O SE L ECT S E TUP CAP T I ON C LOSE D R V I EW E T CH P I M SE TU MENU MENU TIMER mode T I MER S L EE P T I MER ON T I MER OF F T I MER CL OCK SE T OFF TIMER mode OF F T I MER 1 2 0 0 AM ST A T US OF F OF F T I MER 1 1 1 0 PM S...

Страница 17: ...s not set In this time PLEASE SET UP TIME screen will appears for approximately 2 seconds Then CLOCK SET screen will appear Repeat step 5 8 in CLOCK SET steps Please refer to page 13 on CLOCK SET If you do nothing the CLOCK SET screen will disappear For the last 5 minutes the OFF TIMER will be displayed 0M REMAIN will be displayed for 10 seconds just before the OFF TIMER is complete Timer Continue...

Страница 18: ... mode VOL decrease contrast MAIN MENU screen P I C T URE 7 _ _ _ _ _ _ _ 2 P I C T URE 2 7 _ _ _ _ _ _ _ VOL increase contrast MENU T I MER V I DEO AD J US T AD J US T AUD I O AUD I O SE L ECT S E TUP CAP T I ON C LOSE D R V I EW E T CH P I M SE TU MENU VOL VOL CH 8 9 CH CH 8 9 CH VOL VOL MENU PICTURE TINT COLOR COLOR TEMP RESET CH 9 CH 8 BRIGHT SHARP Selected item VOL button VOL button PICTURE To...

Страница 19: ...NU screen 2 Press CH 8 or 9 to move the a mark to AUDIOADJUST 3 Press VOL or to access TREBLE adjust mode 4 Press CH 8 or 9 to select the desired mode Refer to the diagram below 5 Press VOL or to adjust the setting 6 Repeat steps 4 to 5 to adjust other settings 7 Press MENU to exit T I MER V I DEO AD J US T AD J US T AUD I O AUD I O SE L ECT S E TUP CAP T I ON C LOSE D R V I EW E T CH P I M SE TU ...

Страница 20: ... 4 Press CH 8 or 9 to move the a mark to MTS SPEAKER or FAO 5 Press VOL or to select STEREO SAP or MONO when the a mark is at MTS position 6 Press MENU to exit Ex Actual screen indicating ON AIR when receiving STEREO broadcasts Actual channel number ON AIR will appear next to STEREO or SAP when receiving STEREO or SAP broadcasts Audio Select MENU VOL VOL CH 8 9 CH MENU MTS STEREO SAP MONO SPEAKER ...

Страница 21: ... etc SAP sound is monaural L If stereo sound is difficult to hear You can obtain clearer sound by manually switching to the fixed monaural mode Note Once MONO mode is selected the TV sound remains monaural even if the TV set receives a stereo broadcast You must switch the mode back to STEREO if you want to hear stereo sound again MTS while in the INPUT mode does not change the type of sound in thi...

Страница 22: ...TION setting 6 Press MENU to exit Note If a broadcast has CLOSED CAPTION and the MUTE is pressed the set enters CAPTION mode automatically Pressing MUTE again will return the set to its previous condition CLOSED CAPTION may malfunction white blocks strange characters etc if signal conditions are poor or if there are problems at the broadcast source This does not necessarily indicate a problem with...

Страница 23: ...ess VOL or to set the time duration 5 Press CH 8 or 9 to select SECRET No Enter a 4 digit SECRET No using REMOTE KEYPAD 6 Press CH 8 or 9 to select STATUS Press VOL or to turn ON the VIEW TIMER If STATUS is OFF VIEW TIMER will not operate 7 Press MENU to exit MAIN MENU screen VIEW TIMER mode MENU VOL VOL CH 8 9 CH CH 8 9 CH VOL VOL CH 8 9 CH T I MER V I DEO AD J US T AD J US T AUD I O AUD I O SE L...

Страница 24: ... SECRET No is chosen SECRET No IS INCORRECT is displayed Input the SECRET No again in this case L To cancel the VIEW TIMER While the TV set is OFF but the VIEW TIMER is set 1 Turn on TV a blue screen message TIME OVER will appear If you do nothing the TV will turn off in approximately 30 seconds 2 Enter the 4 digit SECRET No using the REMOTE KEYPAD When you choose the correct SECRET No the VIEW TI...

Страница 25: ...s displayed Now you can cancel the VIEW TIMER settings or change the SECRET No while INPUT SECRET No is displayed L Notice of Remaining VIEWING TIME For every 30 minute interval the remaining time will be displayed for 4 seconds For the last 5 minutes the remaining time will be displayed every minute 0H00M REMAIN will be displayed for 10 seconds just before the VIEWING TIME is complete On the Set ...

Страница 26: ...L Search will be canceled To cancel EZ SETUP Press VOL 6 Once EZ SETUP is completed the lowest channel number memorized will be displayed Ch Setup MAIN MENU screen VOL CH 8 9 EZ SETUP mode CH SETUP mode MENU 2 PE RSONAL PR E F UN I VE RSA L P L US EZ SE T UP A I CA B L R CH MEM RY O CH SE A CH R CH P S E E TU AU TO R G G AMM I N O R P WA I T P L E E A S T AR T T S OP S 2 1 5 OR CA B L E T S AR T S...

Страница 27: ...channels of your TV set are AIR channels CABLE channels VHF 2 through 13 1 HRC and IRC mode only UHF 14 through 69 2 through 125 STD HRC and IRC MAIN MENU screen CH SETUP mode AIR CABLE mode MENU MENU PE RSONAL PR E F UN I VE RSA L P L US EZ SE T UP A I CA B L R CH MEM RY O CH SE A CH R CH P S E E TU A I R A B L E C A B L E C A B L E C C I R T D S RC H A I CA B L R E AIR CABLE STD CABLE HRC CABLE ...

Страница 28: ...To Stop Press VOL CH SEARCH will stop at the current channel and will not add any higher channels 5 Press MENU to exit Note If you press VOL again while in the CH SEARCH mode auto program will start again and the previously memorized channels will be lost PE RSONAL PR E F UN I VE RSA L P L US EZ SE T UP A I CA B L R CH MEM RY O CH SE A CH R CH P S E E TU 2 AR T TOP A I R CH S E ARCH S T S 1 MENU S...

Страница 29: ...channel to add or erase 6 Press VOL to add a channel to the TV s memory or press VOL to erase a channel from the TV s memory 7 Press MENU to exit MAIN MENU screen Ch Setup Continued CH MEMORY mode T I MER V I DEO AD J US T AD J US T AUD I O AUD I O SE L ECT S E TUP CAP T I ON C LOSE D R V I EW E T CH P I M SE TU MENU or MENU 3 2 1 6 5 4 9 8 7 100 0 ENTER CH 8 9 CH CH 8 9 CH VOL VOL VOL VOL CH 8 9 ...

Страница 30: ...teps 4 to 6 to input the next CHANNEL Number 8 Press MENU to exit To select the PERSONAL PREFERENCE channel If the channels are memorized as shown to the right press the Remote s A button to select the Channels below VOL CH 8 9 MENU MAIN MENU screen REMOTE KEYPAD PERSONAL PREFERENCE CH SETUP mode PERSONAL PREFERENCE select mode PE RSONAL PR E F UN I VE RSA L P L US EZ SE T UP A I CA B L R CH MEM R...

Страница 31: ...to the input in which your VCR or DVD is connected to If done through RF select either channel 3 or 4 to match the setting of the VCR or DVD 6 Press MENU to exit CH SETUP mode MAIN MENU screen VOL CH 8 9 MENU UNIVERSAL PLUS select mode PE RSONAL PR E F UN I VE RSA L P L US EZ SE T UP A I CA B L R CH MEM RY O CH SE A CH R CH P S E E TU VC OF F R D D V O F F UN I A L V ERS US P L MENU MENU CH 8 9 CH...

Страница 32: ... SETUP mode then press CH 8 or 9 to move the a mark to ENERGY SAVE 4 Press VOL or to access ENERGY SAVE select mode 5 Press VOL or to select ON 6 Press MENU to exit VOL VOL VOL VOL MENU CH 8 9 CH MENU CH 8 9 CH T I MER V I DEO AD J US T AD J US T AUD I O AUD I O S E L ECT S E TUP CAP T I ON C LOSE D R V I EW E T CH P I M SE TU MENU MAIN MENU screen S E U T ENERG S A V E B L UE SCRE EN AU TO I NPU ...

Страница 33: ...als or too much noise might activate the BLUE SCREEN function despite the presence of a broadcast signal To continue watching TV under these conditions switch the BLUE SCREEN OFF MENU VOL VOL VOL VOL CH 8 9 CH MENU S E U T ENERG S A V E B L UE SCRE EN AU TO I NPU T L ANGU A Y GE P BL E U S CRE E N S T A T U S OF F VOL VOL MAIN MENU screen SETUP mode BLUE SCREEN select mode T I MER V I DEO AD J US ...

Страница 34: ... access AUTO INPUT select mode 5 Press VOL or to select OFF or ON 6 You may turn off AUTO INPUT when it is not in use Press VOL or to select OFF 7 Press MENU to exit MAIN MENU screen SETUP mode AUTO INPUT select mode Set Up Continued MENU VOL VOL VOL VOL CH 8 9 CH MENU S E U T ENERG S A V E B L UE SCRE EN AU TO I NPU T L ANGU A Y GE P A T U I O NPU T S T A T U S OF F I NPU T 2 T I MER V I DEO AD J...

Страница 35: ...levision screen Connecting video device equipped with video output terminals CONNECTIONS DVD CAMCORDER TV GAME VCR Yellow To video input terminal White To audio input L terminal Red To audio input R terminal PR PB Y IN 1 LINE OUT R L AUDIO VIDEO R L COMPONENT Rear connection terminals of TV To VIDEO OUTPUT To AUDIO OUTPUT L To AUDIO OUTPUT R Front connection terminals of TV To AUDIO OUTPUT L To AU...

Страница 36: ...connecting video or audio equipment to the television be sure that the power is turned off in order to prevent damage to either the television or the equipment being connected For detailed information on the connection and use of auxiliary equipment refer to the instruction manuals of the equipment being used The connection cords can be obtained from your local video store AIR or CABLE INPUT 1 or ...

Страница 37: ...istening level 6 Control of the audio can be adjusted using the audio controls STEREO MONO SAP VOLUME MUTE and FAO from either the remote control or directly from the TV set Note For detailed information on the connection and use of auxiliary equipment refer to the operation manuals of the equipment being used When connecting monaural equipment to the AUDIO INPUT or OUTPUT of this set use an audio...

Страница 38: ...ur accessory This identify step will not have to be repeated until power to the Remote is interrupted due to a battery failure L Using your remote control with a VCR Once you make certain the Remote Control has identified your remote controlled VCR or DVD the Remote Control is ready to operate your unit The various VCR or DVD function buttons on the Remote Control will not operate your VCR or DVD ...

Страница 39: ...umber using the REMOTE KEYPAD refer to the list The remote control is now ready to send commands to your VCR Some brands have more than one remote code listed due to changes in the remote codes from early to later model years or due to format differences VHS BETA In such cases you may have to try more than one code to find the code your VCR accepts Note Depending on the model year produced brand a...

Страница 40: ...tion 1 Press CATV DVD 2 Point remote towards DVD and press POWER DVD VCR 3 Does the Remote turn the DVD ON and OFF If yes the Remote is ready to operate the DVD and no further steps are needed If no continue to the identifying section Setting Method Refer to the following steps and list to quickly find the remote control code for your accessory DVD First look up your DVD s remote control code numb...

Страница 41: ...and CH 9 enter your converter s two digit code number using REMOTE KEYPAD refer to the list The remote control is now ready to send commands to your converter Some brands have more than one remote code listed due to changes in the remote codes from early to later model years In such cases you may have to try more than one code to find the code your converter accepts Note Depending on the model yea...

Страница 42: ...l Reception PLL tuning system Antenna Input Impedance VHF UHF 75 ohm Unbalanced Screen Size 21 Diagonally Measured Visible Area 50 8 cm Terminals Audio Video input x 2 Front x 1 Rear x 1 COMPONENT IN x 1 Rear Audio Output x 1 Rear Sound Output 4 W RMS x 2 Power Source AC 110 220 V 50 60 Hz Power Consumption 90 W Dimensions 2325 64 x 1833 64 x 191 64 W x H x D 594 mm x 470 mm x 485 mm Weight approx...

Страница 43: ...Check the volume level Is SPEAKER ON X See page 20 21 Change CLOSED CAPTION mode to X OFF ENERGY SAVE mode to OFF Unplug the TV and plug it in again after X X X X X X X X X X X two minutes or longer PROBLEM No Playback of VCR and Disc Player No Picture or Sound from External Video Audio Products Remote Control Doesn t Work Bars on Screen Picture Distorted Picture Rolls Vertically No Color Poor Rec...

Страница 44: ...44 Dimension 140mm x 215mm Printed in Mexico TINS B246WJZZ 04P05 MMF SHARP CORPORATION 21FL94_42 44_EN 19 3 04 11 53 am 44 ...

Отзывы: