


9
www.sharkninjamanuals.com
1
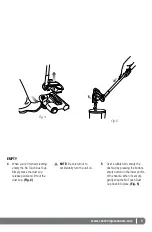
Always make sure that the unit
is turned off.
(Fig. 2)
2
Insert the charger plug into the
back of the unit then plug it into a
wall outlet. The 4 blue LED lights
will light up sequentially from 1
(Low) to 4 (high) while charging.
When all 4 lights turn solid blue,
the unit is fully charged and
ready for use. If the lights do not
illuminate when the unit’s plugged
in, press the power button
once. The lights should start the
illuminating sequence, signifying
the unit is charging.
(Fig. 3)
Fig. 4
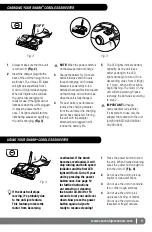
CHARGING YOUR SHARK
®
CORDLESS SWEEPER
NOTE:
When the power switch is
on the sweeper will not charge.
3
Charge the battery for 3.5 hours
before initial use and 3.5 hours
for each recharge. Our Cordless
Sweeper is powered by Li-Ion
batteries that need this time to build
up their charge. All 4 will turn blue
when the unit is fully changed.
4
For best battery performance,
remove the charging adapter
from the unit after the charging
period has completed. Storing
the unit with the adapter
attached and plugged in will
reduce the battery life.
5
The LED lights indicate battery
capacity. As the unit loses
battery strength, the LED
lights will begin to turn off in a
descending order, from 4 (High)
to 1 (Low). When all four lights
begin flashing, the motor on the
unit will stop working. Please
recharge the batteries according
to step 2.
IMPORTANT:
Although
many adapters look similar,
it’s important to use only the
adapter that came with the unit
(CHV3900BS/CHV3900EUK/
CHV3900EU).
Fig. 2
Fig. 3
If the brush roll stops
moving, it’s probably due
to the anti-jam feature.
This feature protects the
motor from becoming
USING YOUR SHARK
®
CORDLESS SWEEPER
OFF
overheated. If the brush
becomes overloaded, it will
stop turning and both speed
indicator and the first LED
light will flash. Turn off your
unit by pressing the power
button once. See page 12
for further instructions
on removing or cleaning
the brush roll. Wait for 10
seconds to let your unit cool
down. Now press the power
button again and you’re
ready to resume cleaning!
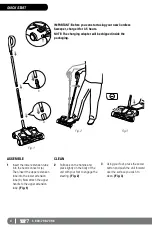
1
Press the power button to start
the unit. When finished cleaning,
press the power button again to
turn the unit off.
(Fig. 4)
2
Do not use the unit to pick up
liquids or clean wet floors.
3
Do not use the unit on concrete,
tar or other rough surfaces.
4
Do not use the unit to pick
up pieces of string or fabrics.
Do not use the unit to clean
tasselled or frayed carpets.
Содержание V3800 Series
Страница 1: ...OWNER S GUIDE V3800 Series www sharkninjamanuals com ...
Страница 13: ...13 www sharkninjamanuals com NOTES ...


