SFF time N-ATX Скачать руководство пользователя страница 20

SFF time N-ATX manual

 20

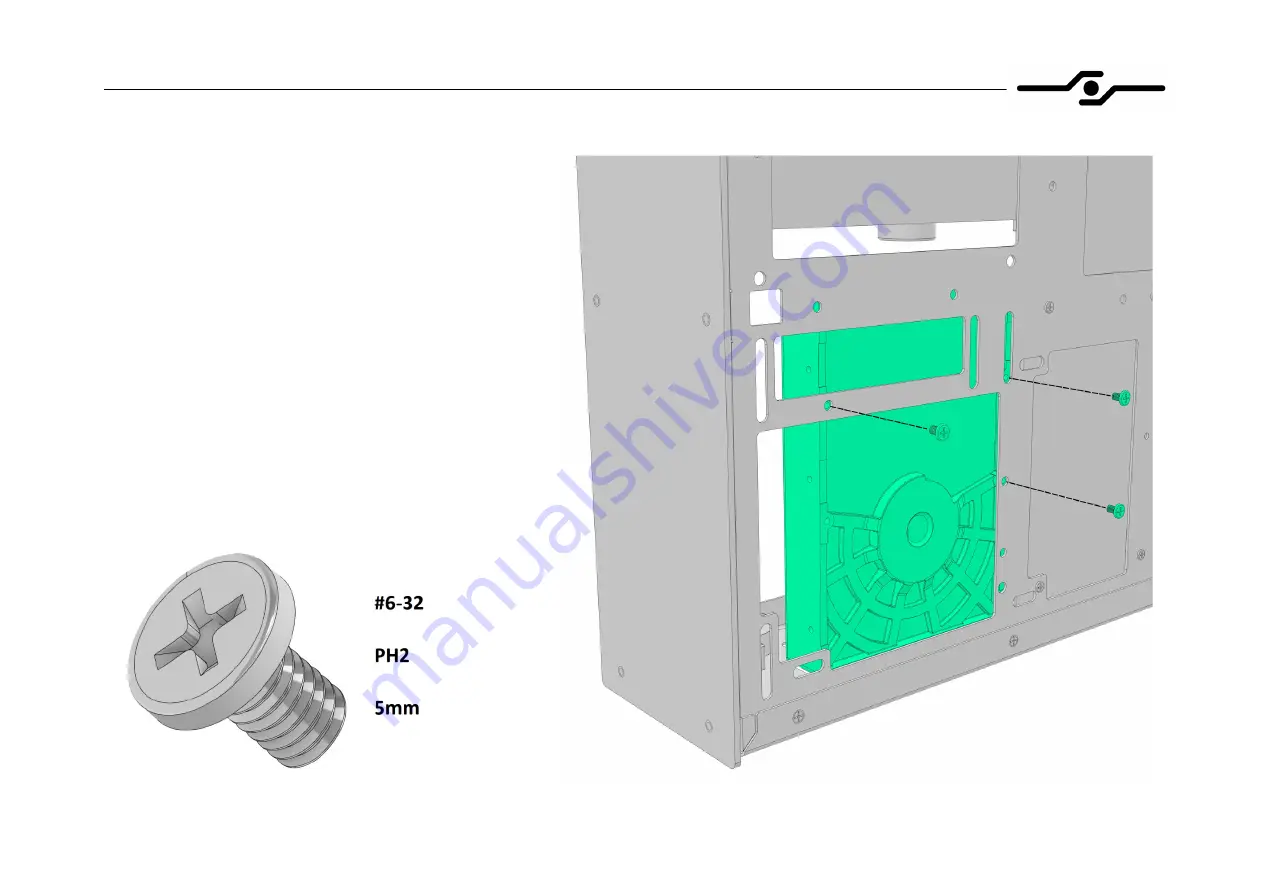
18. Installing hard drives – rear 3.5” HDD

-

if you are using a long 3 slot GPU, you can install one 
3.5” hard drive directly on the motherboard tray 

-

align the drive and screw it to the case using three 
provided silver-colored bolts

Содержание N-ATX

Страница 1: ...sfftime com If you have any doubts about choosing your components or steps in this manual please contact us via email on info sfftime com and we will be glad to assist you Important notes always use c...

Страница 2: ...SFF time N ATX manual 2 Included with case PSU bracket GPU bracket HDD side bracket PCI cover Hex tool Mounting hardware...

Страница 3: ...ng the case removing side panels part 1 your case will come with side panels and HDD bracket attached you need to remove them before putting other components into the case unscrew six bolts that hold...

Страница 4: ...SFF time N ATX manual 4 2 Preparing the case removing side panels part 2 pull side panels towards the back side of the case approximately 1 cm lift side panels upwards away from the case...

Страница 5: ...SFF time N ATX manual 5 3 Preparing the case removing HDD bracket part 1 unscrew nut that holds HDD bracket using provided tool or with 5 5 mm socket or wrench and save it for later use...

Страница 6: ...time N ATX manual 6 4 Preparing the case removing HDD bracket part 2 slide HDD bracket towards the top of the case and lift it up remove the washer that sits under the bracket and save it for later u...

Страница 7: ...r ITX or DTX motherboard If you are going to install larger motherboard please install additional standoffs see next page to install standoffs you need a standoff and bolt that holds it screw the stan...

Страница 8: ...ual 8 6 Installing the motherboard preparing standoffs part 2 following pictures show standoff configurations for different motherboard sizes always install correct standoffs otherwise you could damag...

Страница 9: ...ard is only necessary when installing 4 slot GPU taller than 135 mm you need to remove the tab at the top of the motherboard IO cutout and install four motherboard standoffs in alternative position to...

Страница 10: ...drives and CPU air cooler if using one install the IO shield align the motherboard on standoffs screw the motherboard down using provided bolts after installing the motherboard connect internal USB 3...

Страница 11: ...stall standoffs the same way as motherboard standoffs using screwdriver and provided tool position standoffs according to your GPU thickness this picture shows standoffs installed for 2 3 3 slot GPU p...

Страница 12: ...s 4 slot GPU if using 4 slot GPU install riser standoffs in the rightmost position like shown in the picture remove the PCI cover by unscrewing two bolts on the back of the case be sure to have ITX mo...

Страница 13: ...ser cable riser and bolts screw down the female end of the riser onto previously installed standoffs install the male end of the riser into the motherboard depending on your configuration you may need...

Страница 14: ...e installing the GPU you need to attach the GPU bracket to the GPU like shown in the picture put a washer under the bolt that holds the GPU bracket screw down the GPU to the GPU bracket make sure that...

Страница 15: ...SFF time N ATX manual 15 13 Installing the GPU GPU install the GPU into the riser be sure that it is fully seated...

Страница 16: ...SFF time N ATX manual 16 14 Installing the GPU bolts put a washer under the bolt that holds the GPU bracket screw down the GPU bracket to the case with two bolts...

Страница 17: ...r supply and orient PSU bracket like shown on the second picture put the power supply on a flat surface take the power supply mounting bracket and put in next to the power supply like shown in the pic...

Страница 18: ...case insert male end of the AC cable into the connector on the power supply like shown in the picture if using ATX power supply make sure that the rear side of the power supply is flush with the moth...

Страница 19: ...ower supply bolts screw the power supply bracket to the case from the front and the back side of the case using four provided countersunk screws please note that these screws are different than ones u...

Страница 20: ...18 Installing hard drives rear 3 5 HDD if you are using a long 3 slot GPU you can install one 3 5 hard drive directly on the motherboard tray align the drive and screw it to the case using three provi...

Страница 21: ...ke shown in the picture you only need to screw down 2 5 drives on one side install additional HDD side bracket if using 3 5 drives for 3 5 drives use larger silver colored screws for 2 5 drives use sm...

Страница 22: ...SFF time N ATX manual 22 20 Installing hard drives washer before installing the HDD bracket into the case put the washer on the stud like shown on picture this is the washer you removed in step 4...

Страница 23: ...rd drives installing the assembly put the HDD bracket with hard drives into the case like shown in the picture slide the assembly towards the bottom of the case making sure that both HDD bracket s tab...

Страница 24: ...nstalling hard drives nut secure the HDD bracket using the nut you removed in step 3 you can use provided tool or 5 5 mm socket if using 3 5 hard drives also secure the HDD side bracket to the case fr...

Страница 25: ...installing all the main components you can attach other cables such as PSU or SATA you can now proceed to install side panels and the stand installation of water cooling radiators and alternative lay...

Страница 26: ...anels left panel install the left side panel following instructions from step 2 but in reverse order secure the panel using two or three bolts bolt on the bottom side towards the rear of the case is r...

Страница 27: ...e panels right panel install the right side panel following instructions from step 2 but in reverse order secure the panel using two or three bolts bolt on the bottom towards rear of the case is recom...

Страница 28: ...X manual 28 26 Installing the stand rear slots lay the case on its top side align the slots on the stand to the tabs on the bottom of the case like shown in the picture push the stand towards the fron...

Страница 29: ...the bottom side of the case bend the stand by a few mm towards the front side of the case and while it s bent like that push it down towards the bottom of the case and release the pressure stand shoul...

Страница 30: ...feedback please write to us at info sfftime com be sure to check out our website sfftime com for updates and new case designs you can find instructions for mounting water cooling radiators and altern...

Страница 31: ...ater cooling radiator in the position otherwise occupied by hard drives place the radiator in the position shown in the picture and screw it to the case using three provided bolts depending on the thr...

Страница 32: ...picture and screw it to the case using seven provided bolts depending on the threads on your radiator use either provided M3 or 6 32 bolts you can also mount the radiator in front of the fans for pul...

Страница 33: ...on the right shows one of possible configurations with 360 mm radiator if using 2 slot GPU and up to 30mm thick radiator you will have to use 15 mm fans instead of 25 mm ones used with single slot GPU...

Страница 34: ...orter riser cable and mounting hardware this allows for a few alternative water cooling layouts depending on your hardware configuration please note that placing 2 slot GPU in upper position severely...

Страница 35: ...SFF time N ATX manual 35 33 Alternative GPU mount motherboard standoff part 2 install the 40 mm long standoff found in the kit using provided tool do not overtighten...

Страница 36: ...PU mount preparing the GPU assemble the GPU riser and upper GPU mounting bracket found in the kit like shown in the picture for mounting the riser to the upper GPU bracket follow instructions from ste...

Страница 37: ...manual 37 35 Alternative GPU mount installing the assembly part 1 insert the assembly from the previous step into the case line it up so that the GPU s PCI bracket enters the narrow slit on the back s...

Страница 38: ...and the motherboard standoff like shown on picture use countersunk bolts to attach the upper GPU bracket to the chassis and use flat head bolt to attach the bracket to the motherboard standoff you can...

Страница 39: ...SFF time N ATX manual 39 37 Alternative GPU mount installing the assembly part 3 put a washer under the bolt that holds the GPU bracket screw down the GPU bracket to the case with two bolts...

Страница 40: ...or this configuration requires mounting GPU to the upper position and SFX power supply in alternative position in front of ATX motherboard to mount power supply to that position you need to use altern...

Страница 41: ...time N ATX manual 41 39 Alternative PSU mount rubber feet stick two rubber feet found in the kit to the case like shown in the picture they will raise the PSU to allow the clearance for the stand s t...

Страница 42: ...PSU mount bolts place the power supply with the attached bracket in the case like shown in the picture screw it to the case using three provided M3 bolts please note that this PSU mount option is not...

Страница 43: ...shown in the picture and screw it to the case using four provided bolts depending on the threads on your radiator use either provided M3 or 6 32 bolts make sure that you insert 2 mm thick washers pro...

Страница 44: ...SFF time N ATX manual 44 42 Side mounted radiator rear view rear view of 240 mm radiator installation...

Страница 45: ...de mounted radiator complete build picture on the right shows complete build with side mounted 240 mm radiator ATX motherboard and GPU and PSU in alternative positions maximum GPU length will depend o...

Отзывы: