background image

12

13

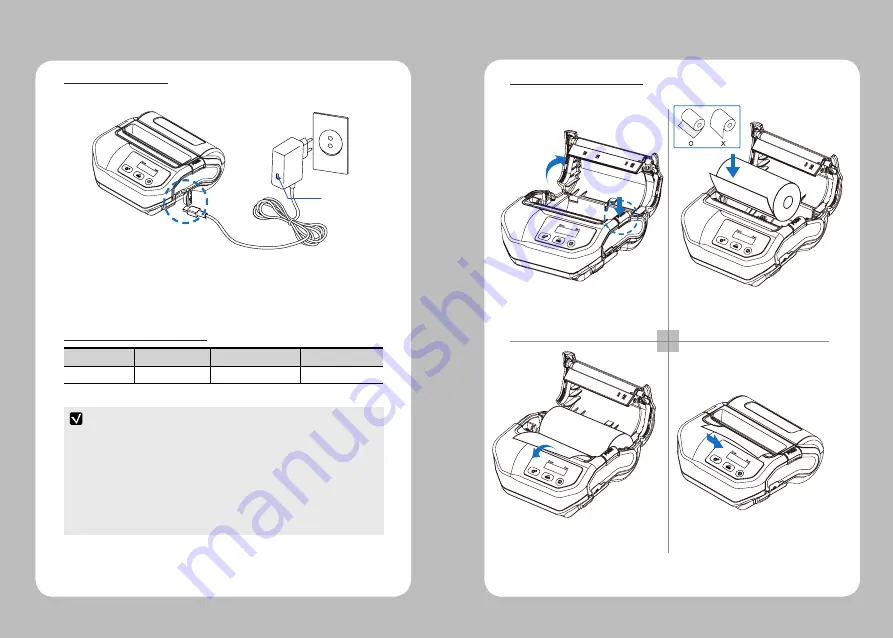
4-4 Battery charging

1. Unless the exclusive charger is used provided by the manufacturer, the printer 
    can be damaged, and the manufacturer is not liable for the consequential damage.
2. Before removing the battery, make sure that power is turned off.
3. Printer does not work in the status of being connected with charger only.
4. The battery should be installed to operate printer.
5. While charging, do not turn on the power.
6. Do not operate the print while charging the battery.
7. Do not connect the charger while the printer is operated.

1. Be sure that the printer is turned off 
2. After open the USB JACK cover, insert USB JACK into the printer.
3. Plug the power code to electrical outlet.

4-4-1 The status of lamp in charging

Status               Charging            Charging complete     Charging stand by     


Charging Lamp 

Red    

Green

Green

LED

1 2

3 4

Press the PUSH button to open the 

paper cover

Pull a short length of paper out of the 

printer and close the cover.

Insert the paper in the right direction

Tear off the additional paper using 

tear bar.

4-5 Roll paper installation

NOTE

Содержание LK-P32

Страница 1: ...ions are subject to change without notice MOBILE PRINTER MODEL LK P32 P32 Rev A 08 14 SEWOO TECH CO LTD 374 2 Gajang dong Osan si Gyeonggi do 447 210 Korea TEL 82 31 459 8200 FAX 82 31 459 8880 www mi...

Страница 2: ...tion 6 4 1 Control panel usage 6 4 2 Battery installation 10 4 3 Battery removal 11 4 4 Battery charging 12 4 5 Roll paper installation 13 4 6 Self test 14 5 Peripherals Connection 16 5 1 Bluetooth co...

Страница 3: ...overload the power plug into one outlet WARNING Failure to follow these instructions could result in fire electric shock or other injuries or property damage Failure to follow these instructions coul...

Страница 4: ...4 5 3 Product Overview Open button LCD Power button Battery USB Front Rear 2 Unpacking Paper feed button Control button Printer Printer Roll paper USB Cable Battery CD Standard Charger...

Страница 5: ...attery Full Low Battery Flat 4 1 Control panel usage Button Name function Power button This button is used to turn the printer on and off When the printer is off press this button for approximately 3...

Страница 6: ...uto setting If not wait for 3 seconds without pressing any button It will automatically go back to main menu Navigate the LCD menus by pressing button Auto Setting NOTE NOTE To do BAT Battery Calibrat...

Страница 7: ...t the time of your purchase charge the battery prior to using the printer Use Battery charger or Cradle to charge Hook 4 2 Battery installation Risk of explosion if battery is replaced by an incorrect...

Страница 8: ...Do not operate the print while charging the battery 7 Do not connect the charger while the printer is operated 1 Be sure that the printer is turned off 2 After open the USB JACK cover insert USB JACK...

Страница 9: ...self test and no issues are found you can examine other devices and software This function is working independently of devices and software Motor protection from being overheated The motor should be...

Страница 10: ...with peripheral devices via Bluetooth and cables 5 1 Bluetooth connection 5 Peripherals Connection Refer to the Bluetooth Manual for more details on connection 5 2 Interface cable connection 1 Connect...

Страница 11: ...er Paper type Thermal Paper Label Width 79 5mm 0 5mm Thickness 0 065 0 14mm External diameter Max 40mm 0 5mm Internal diameter 18mm 0 5mm Reliability TPH 50km Battery Continuous Printing 40 50min Stan...

Отзывы: