SEVIC SV071101 Скачать руководство пользователя страница 27

27

OPERATION

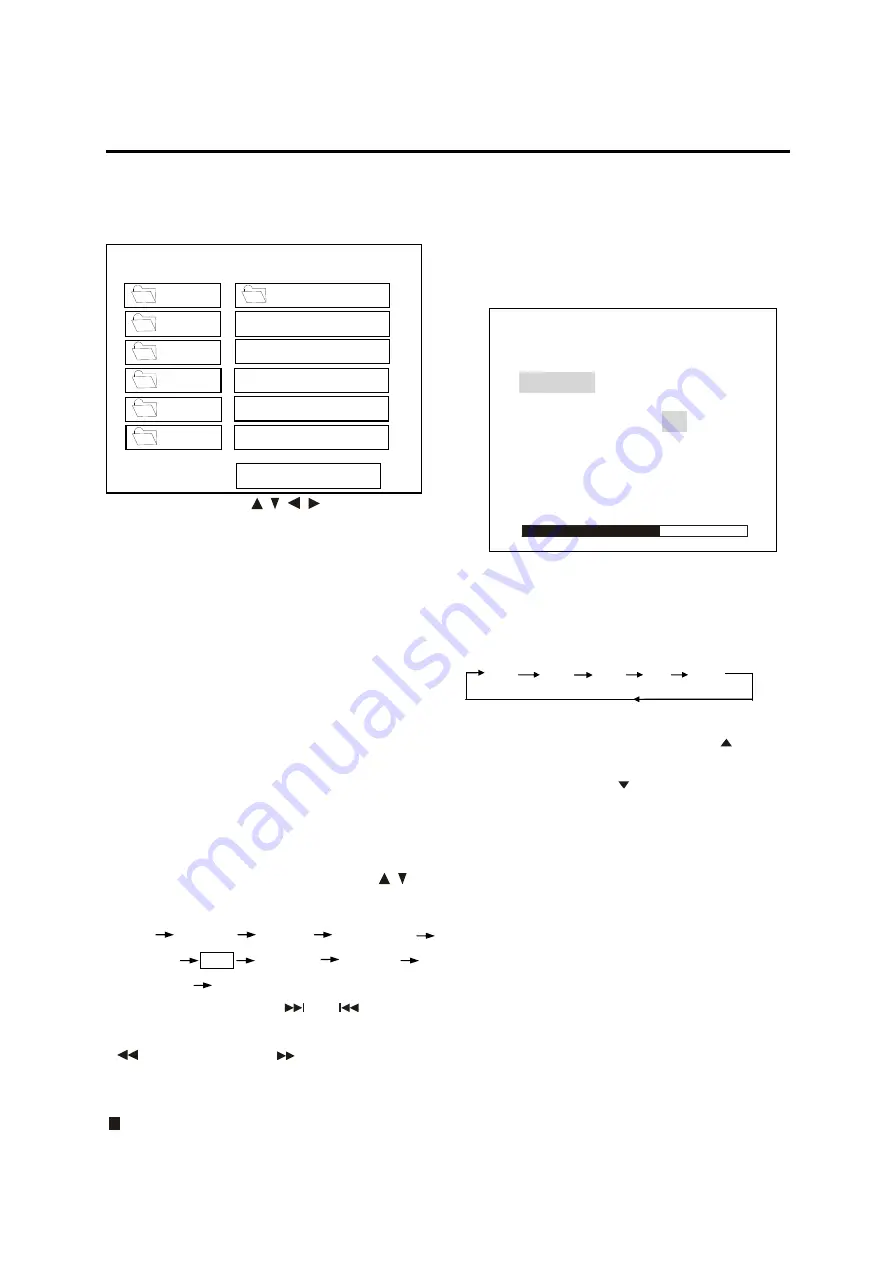
Smart navigation in MP3 Play

MP3 disc is playing as the format of

FOLDER. For example:

In stop mode, use

/

,

/

on the

remote control to select the item or folder
(such as CD01, CD02…) and
press

ENTER

button on the remote

control to confirm, then select the
desired track (such as 001 PLUMT, 002
RZID…) on the current folder to play.
Pressing

REPEAT

button repeatedly can

select three kinds of repeat play modes.
REP-ONE: Play the same song over and

again.

FOLDER REP: Play all songs in the

current directory in
sequence, over and again.

FOLDER: Play all songs in the current

directory once.

When select PLAY MODE, press

/

to

change between the following mode:

SINGLE

REP-ONE

FOLDER

FOLOER REP

DISC SCAN

DISC

DISC REP

RANDOM

SHUFFLE ON

PROGRAM PXXX

During playback, use

or

to skip

an item ahead or back.

: Rapid reverse,

: Rapid advance.

Note: The FOLDER cannot be selected
during playing. It can be selected after

(Stop) button pressed.

RADIO OPERATION

Switching to radio mode

Press

MODE

button on remote

control to select radio mode.
In radio mode, the following information
will appear on the display.

Selecting the frequency band

Press

BAND

on remote control to

select desired band. The reception
band will change in the following
order:

FM1

FM2

FM3

AM1

AM2

Selecting station

During radio mode, press

CH

button on remote control to increase
frequency or

CH

button on remote

control to decrease frequency by one
step of channel spacing. Hold the
button longer for fast tuning. The
frequency is updated correspondingly
on display.

Setting memory

Press

RADIO PRESET

buttons (1~6)

on remote control to preset stations
at radio mode. With this system, a
total of 30 stations can be stored in
the memory of six buttons. Each
band stores up to six preset stations.

The stations might be FM1, FM2,
FM3, AM1 and AM2 band. The
operation is as below:

-

Store in Memory
Press and hold desired

SMART NAVI

PLAY MODE



ROOT

DISC



CD01



CD02



CD03



CD04



CD05



MP3

001 PLUMT

MP3

002 RZID

MP3

003 ASCIS

MP3

004 DCYI

MP3

005 BFZ

FM1

98.1

MHz

MONO

VOLUME

40

M1

87.50

BASS

-2

M2

90.10

TREBLE

-

2

M3

98.10

BALANCE L-R

M4 106.10

FADER

F-R

M5 108.00

LOUD

ON

M6

87.50

EQ

POP

Содержание SV071101

Страница 1: ...1 USER MANUAL CLEAR VOLUME ZOOM PROGRAM EQ MUTE CH CH MO ST LOUD ALL IN 1 IN DASH MONITOR 6 5 SV071101 Pal BG SecamL SV071101 BG Pal BG SV071101 I Pal I...

Страница 2: ...oisture This could cause electrical shorts fire or other damage When Parked Parking in direct sunlight can produce very high temperatures inside your vehicle Give the interior a chance to cool down be...

Страница 3: ...eys 16 Preparing the Remote Control 19 Loading Ejecting a disc 20 Loading a disc 20 Ejecting a disc 20 Operation 21 Basic Operation 21 Disc DVD VCD CD MP3 Operation 23 Radio Operation 27 TV Operation...

Страница 4: ...DED ACCESSORIES THIS DEVICE IS INTENDED FOR CONTINUOUS OPERATION This product incorporates copyright protection technology that is protected by method claims of certain U S patents and other intellect...

Страница 5: ...damage Do not place discs in the following places 1 Direct sunlight 2 Dirty dusty and damp areas 3 Near car heaters 4 On the seats or dashboard Disc Cleaning Use a dry soft cloth to wipe the surface I...

Страница 6: ...isc with rough edges is used the proper setting will not be performed and the player will not play the disc Therefore remove the rough edges in advance by using a ballpoint pen or pencil as shown on t...

Страница 7: ...t or excessive vibration DIN FRONT REAR MOUNT This unit be can properly installed either from Front conventional DIN Front mount or Rear DIN Rear mount installation utilizing threaded screw holes at t...

Страница 8: ...o fit your vehicle s mounting area Then use the supplied hardware Tapping Screw 5x25mm and Plain Washer to attach the other end of metal strap to a solid metal part of the vehicle under the dashboard...

Страница 9: ...r radio mounting bracket with the factory radio mounting bracket tighten the screws 5x5mm at 2 places on each side 5 When fixing factory radio mounting bracket with the screws use a standard tipped sc...

Страница 10: ...n Position Closed Position 1 POWER 2 IR on the front panel 3 OPEN CLOSE 4 EJECT button 5 Disc Slot 6 Reset button 7 PICTURE CONTROL 8 9 10 IR on the monitor panel 11 6 5 INCH COLOR TFT MONITOR 1 2 5 4...

Страница 11: ...11 THE PLAYER BACK VIEW 12 13 PIN SOCKET 13 RGB SYSTEM 14 REMOTE SOCKET 15 AUDIO VIDEO INPUT 16 DIGITAL AUDIO 17 DC 12V IN 12 13 14 15 16 17...

Страница 12: ...12 THE RADIO BOX ONE SIDE OTHER SIDE 1 20 PIN SOCKET 2 TO MAIN UNIT 3 VIDEO OUTPUT 4 AUDIO OUTPUT 5 ANTENNA SOCKET 6 DIVERSITY ANTENNA 5 6 3 2 4 1...

Страница 13: ...13 ELECTRICAL CONNECTION METHOD A...

Страница 14: ...14 ELECTRICAL CONNECTION METHOD B...

Страница 15: ...15 ELECTRICAL CONNECTION...

Страница 16: ...16 REMOTE CONTROL LOCATION AND FUNCTION OF KEYS...

Страница 17: ...rack Chapter selected with the numeric buttons or selected with the cursor buttons on screen 15 Changing for slow forward reverse playback motion on DVD disc 16 Press to play the disc 17 Press to sear...

Страница 18: ...el downward 30 VOL Press VOL button to decrease the volume level 31 REPEAT Switch the Repeat mode of discs 32 A B MO ST A B repeat allows a passage to be repeated continuously In radio mode press it t...

Страница 19: ...ure that the positive and negative terminals of the batteries are oriented as indicated 3 Close the cover Battery Two AAA size battery Using the Remote Control Point the remote control towards the rem...

Страница 20: ...ssory position 2 Press the POWER button 1 3 Insert the disc with printed side facing up into the disc slot 2 4 The player will start playback automatically 1 2 3 Ejecting a Disc Only in DVD mode press...

Страница 21: ...on the remote control to turn the monitor angle upward or downward at small steps to get a desired viewing angle And you can rotate the monitor left and right from the central viewing position at a ce...

Страница 22: ...color TFT display can show the current state of the unit Volume Level Adjustment Press VOL buttons on the remote control to increase or decrease the volume level Mode Selection Press MODE button on th...

Страница 23: ...D Normal Playback 2X 4X 8X Pause still picture Pressing on the remote control during playback will stop play temporary To return to normal playback press on the remote control Mute Will mute the sound...

Страница 24: ...button 6 and PROGRAM P02 06 appears Press the different numeric button to select the corresponding track and then you can program tracks to your need If you want to complete program setting press butt...

Страница 25: ...Press DISPLAY for the first time 2 Press DISPLAY for the second time 3 Press DISPLAY for the third time 4 Press DISPLAY for the fourth time 5 Press DISPLAY for the fifth time Themessageonthescreenwill...

Страница 26: ...eys and select a feature with the ENTER key TITLE menu function For DVD Only If the DVD has multiple titles recorded on the disc It can select preferred title from the title menu to start playback 1 P...

Страница 27: ...Press MODE button on remote control to select radio mode In radio mode the following information will appear on the display Selecting the frequency band Press BAND on remote control to select desired...

Страница 28: ...or stereo mode You can sometimes improve reception of distant stations by selecting mono operation Mute Press MUTE button on remote control to cut down sound output Press it again to resume the previo...

Страница 29: ...ill disappear Menu Control operation in TV mode Press SEL button on remote control to enter sound menu then you can press CH buttons to select the item upward or downward Then press VOL buttons to adj...

Страница 30: ...back of the DVD unit to the corresponding RGB system then Press MODE button on remote control to select RGB mode the RGB signal will appear on the screen Note When you press MODE button to select RGB...

Страница 31: ...U d PREFERENCES SETUP This setup page includes all the configuration of support feature For details please refer to PREFERENCES SETUP MENU GENERAL SETUP GENERAL PAGE TV display setup This is to select...

Страница 32: ...red OSD On Screen Display language by using the buttons GENERAL PAGE CAPTIONS setup When playing DVD disc activate the CAPTIONS feature by selecting ON and the captions such as the actor dialogue appe...

Страница 33: ...utput Select SPDIF RAW mode to activate raw digital audio output And the digital audio format depends on the disc record format Select SPDIF PCM mode to activate PCM digital audio output AUDIO SETUP A...

Страница 34: ...yer can play discs recorded in either PAL format Select PAL format when the unit is connected to PAL TV Select AUTO format the player TV output format will be according to the DVD disc format PREFEREN...

Страница 35: ...sword The initial factory code is 3308 and key in 4 characters password now you want to use and retype again to confirm key in correctly TV TYPE ENGLISH SUBTITLE DISC MENU PARENTAL PASSWORD DEFAULTS S...

Страница 36: ...user can adjust this item according to one s need DEFAULTS TABLE General Setup TV display Normal LB PIC mode AUTO Angle mark ON OSD Language English Captions ON SCR Saver ON Speaker Setup Downmix Ster...

Страница 37: ...tor panel then press button button to increase or decrease the level of the corresponding item BRIGHT CONTRAST COLOR or TINT to proper value then you can get an optimum picture effect COMPLETELY DISTO...

Страница 38: ...r s capabilities CAN T RECEIVE TV SIGNAL OR THE PICTURE QUALITY IS POOR IN TV MODE Please confirm if the antenna is connected to the antenna socket of the RADIO BOX that connected to the DVD unit Perh...

Страница 39: ...Current Drain Version Y 15 Ampere max For High Power Version TV TV Sensitivity 45dB V CH25 in average RADIO For 2 Bands U S A FM Frequency Coverage 87 5 to 107 9 MHz Sensitivity S N 30dB 4 V Image Rej...

Страница 40: ...Specifications and design are subject to modification without notice due to improvements in technology This product incorporates copyright protection technology that is protected by method claims of...

Отзывы: