background image

SEUIC Technologies Co., Ltd.

23

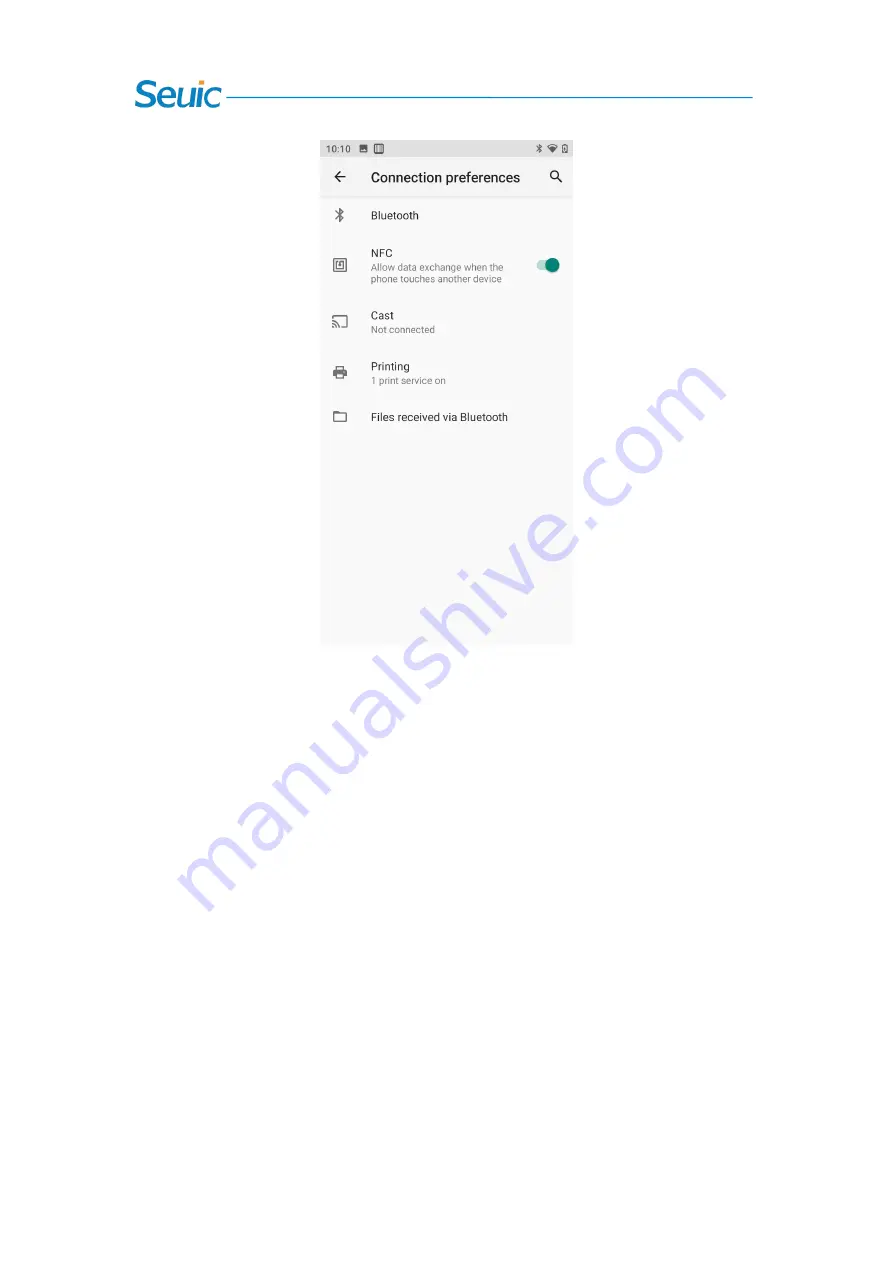
Figure 7-11 NFC Functions

7.5.3 Android Beam

After Android Beam function is switched on, files in the device can be shared through Android
Beam.

7.5.4 Network Sharing and Portable Hotspots

1. Through the portable hotspot function, this machine can be adopted as a Wi-Fi hotspot to
provide signal access for mobile phones and computers equipped with Wi-Fi modules in a certain
range around.
2. Settings ----> Network and the Internet ----> Hotspots and Network Sharing ---->WLAN Hotspot
----> Open, as shown in the figure:

Содержание CRUISE2

Страница 1: ...SEUIC Technologies Co Ltd SEUIC Reference Manual CRUISE2 Industrial Grade Smartphone Service Manual of Android System Products Version 1 1 ...

Страница 2: ...ON OF SD CARD 9 CHAPTER 5 ABOUT CHARGING 10 5 1 CHARGING TIME 10 5 2 CHARGING TEMPERATURE 10 5 3 BATTERY POWERED 10 5 4 PRECAUTIONS FOR USE OF BATTERY 11 5 5 LED INDICATOR LIGHT 12 CHAPTER 6 MAIN SCREEN 13 6 1 STATUS BAR ICONS 13 CHAPTER 7 SETTINGS 15 7 1 WLAN 15 7 2 BLUETOOTH 17 7 3 SIM CARD 20 7 4 TRAFFIC USAGE 20 7 5 MORE 21 7 5 1 Flight Mode 22 7 5 2 NFC 22 7 5 3 Android Beam 23 7 5 4 Network ...

Страница 3: ... TOOL 46 8 2 SYSTEM UPGRADE 50 8 3 MOBILE MANAGER 53 8 4 QUICK CONFIGURATION 60 8 4 1 Import 61 8 4 2 Export 64 8 5 FEATURE SETTINGS 68 8 5 1 Touch screen Glove Mode 68 8 5 2 Disable Pull down State 68 8 5 3 Masking Virtual Button 1 69 8 5 4 Masking Virtual Button 2 69 8 5 5 Masking Virtual Button 3 69 8 5 6 Disable transmission of the scan button value to the application 69 8 5 7 Show Scan Hover ...

Страница 4: ...may cause electric shock and fire Clean the device batteries and chargers with soft dry cloth Do not wipe the device with such solutions as alcohol diluent or benzene 1 3 Precautions for Maintenance This product is waterproof and dustproof but it shall not be operated at extremely high temperature extremely low temperature or in the soaked environment Please refer to the temperature and humidity s...

Страница 5: ...n the machine is used for the first time or restored after being stored the battery of the machine needs to be recharged for a long time In case of failure of machine please write down the status information and contact the maintenance personnel ...

Страница 6: ...SEUIC Technologies Co Ltd 5 Chapter 2 Appearance Figure 2 1 Six sided View ...

Страница 7: ...utton Click it to return to the previous interface or exit the application In the text input interface click it to close the on screen keyboard Power button Short press it to sleep wake the device in standby state press and hold it for 3S to start the device in shutdown state Volume button Press the top half part of the button to increase the system volume and press the lower half part of the bott...

Страница 8: ...he battery it must ensure that the battery has been contacted reliably 4 3 Power off After the device is powered on and in the non dormant state press and hold the Power button for 2s to open the option menu choose the Shutdown button and click OK to power off the device normally 4 4 Restart After the device is powered on and in the non dormant state press and hold the Power button for 2s to open ...

Страница 9: ...SEUIC Technologies Co Ltd 8 Figure 4 1 Placement of SIM Card Figure 4 2 Insertion of SIM Card ...

Страница 10: ...tructions below Put the SD card in the clamp in the direction shown in Figure 4 1 Insert clamp in the direction shown in Figure 4 2 Notes 1 This device does not support PSAM card 2 This SIM card of the device only supports NANO card 3 This device can be freely matched with SIM SIM or SIM TF cards ...

Страница 11: ...ed when the battery is fully charged the LED light constantly on green 5 2 Charging Temperature The optimum operating temperature is room temperature 18 25 The battery will not be charged at temperatures below 10 or above 55 5 3 Battery Powered If wireless network service or data acquisition program is enabled the battery power will be greatly consumed It is necessary to turn off the power of thes...

Страница 12: ...of time before the device is powered on The battery can be recharged but it is prone to being consumable If the standby time of the device is greatly reduced please replace it with a new battery The charging time of the battery varies with temperature and service conditions of the battery please charge within a reasonable temperature range When the battery power is low the device will pop up a low...

Страница 13: ...constantly on red it indicates that the battery is charging If USB charger adapter and charge connector are inserted if the light is constantly on green it indicates that the battery is fully charged The LED indicator light in the middle of the upper right of the device flashes blue in the form of breathing light it indicates that there is unread information please check it in time If the LED indi...

Страница 14: ...icons of notification and status Display area Used to place application icons desktop folders and widget toolkit Shortcut bar Click it to enter the corresponding application Application tray Click or slide it up to enter the main interface and view all programs Table 6 1 Items of Main Screen 6 1 Status Bar Icons The status icon and notification bar icon are located in the status bar at the top of ...

Страница 15: ...Downloading data Portable WLAN has been enabled Mobile network has been connected DND mode Flight mode Vibration mode Scan On Missed calls Battery charge New message Battery is fully charged Captured screen recording Low battery power Alarm clock Headphones have been plugged in Preparing microSD card Bluetooth USB debugging USB connection Table 6 2 Status Icons and Notification Bar Icons ...

Страница 16: ...s network 1 Click the WLAN On Off button to enable Wi Fi Automatically scan available wireless networks 2 The name and security settings of the found Wi Fi networks will be displayed in the list of Wi Fi networks open or encrypted networks 3 Touch one of the Wi Fi networks to connect If you select an open network the device will automatically connect to the network If you select an encrypted netwo...

Страница 17: ...hnologies Co Ltd 16 Figure 7 2 WLAN Band Touch Scan in the opened wireless Wi Fi interface The found Wi Fi network will appear in the list of Wi Fi networks Touch another Wi Fi network to connect to the network ...

Страница 18: ...pen and search for other Bluetooth devices 2 Click the device to be connected in the list of found devices for pairing 3 Click OK to connect the device after entering the PIN code in the pop up dialog box of pairing request Figure 7 3 Bluetooth Menu 4 Click the button Settings on the right to rename the device paired successfully and cancel pairing You can perform corresponding operations accordin...

Страница 19: ... share the MP3 you can choose an MP3 press and hold the MP3 to be shared and then choose the paired Bluetooth in the sharing interface An information interface appears You can click Send as shown in the following figure Figure 7 5 Bluetooth Transmission 6 When it is sent there is a mark of an up arrow at the top of the left screen You can pull it down to observe the transmission as shown in the fo...

Страница 20: ...There will be corresponding prompts after the file is sent Figure 7 7 View of Bluetooth Sharing Results 8 The paring method of the Bluetooth headset is the same as the normal Bluetooth pairing method The Bluetooth headset can be used for voice communication and multimedia playing ...

Страница 21: ...d You can set the preferred SIM card including data flow call and SMS on the SIM card interface and disable the SIM function The main display interface is shown in the Figure below Figure 7 8 Main Interface of SIM Card 7 4 Traffic Usage Find this icon Settings Networks and the Internet Traffic Usage ...

Страница 22: ...SEUIC Technologies Co Ltd 21 Figure 7 9 Traffic Usage 7 5 More Find this icon Settings Networks and the Internet Advanced ...

Страница 23: ...2 NFC After the NFC function is enabled it allows the mobile phone to exchange data when contacting other devices As long as your device is close to another NFC enabled device the content of applications on your device can be shared with each other synchronously At the same time NFC cards can be read and written through the third party NFC software installed ...

Страница 24: ...Android Beam 7 5 4 Network Sharing and Portable Hotspots 1 Through the portable hotspot function this machine can be adopted as a Wi Fi hotspot to provide signal access for mobile phones and computers equipped with Wi Fi modules in a certain range around 2 Settings Network and the Internet Hotspots and Network Sharing WLAN Hotspot Open as shown in the figure ...

Страница 25: ... VPN is opened you need to add VPN private network by yourself for example you want to access the network shared resources such as file servers of the company No matter where you are you can connect this machine to the VPN server of the company through the VPN client After obtaining the VPN account you can dial through the VPN client and then access the shared resources of the company after dial u...

Страница 26: ...SEUIC Technologies Co Ltd 25 Figure 7 13 VPN Settings 7 5 6 Mobile Networks 1 Open You can switch the machine into roaming state through data communication in the roaming environment ...

Страница 27: ...the priority of network type of the Unicom card is 2G the network type of the device will be forcibly downgraded to 2G network in 3G signal coverage area CRUISE Ge has dual SIM and dual standby function and can switch between the primary card and the secondary card in the preferred SIM card interface Figure 7 15 Network Mode Selection 3 For the name of the access point Mobile is cmnet by default U...

Страница 28: ...ant to modify or delete the added APN you can click Enter to modify it and press Menu to save or delete it Note When adding APN users can set other options according to requirements of their own access 5 Network Operator Search the network operator resources in the current environment 7 5 7 Reset of Network Settings Such settings as WLAN mobile data network and Bluetooth of the device can be reset...

Страница 29: ...data network If the enhanced 4G LTE mode is turned off manually the device will turn on the enhanced 4G LTE mode by default after the network is reset 3 The name of Bluetooth is modified and paired by default The Bluetooth name of the device will be restored and the Bluetooth pairing will be disconnected after the network is reset 7 6 Display Find this icon Settings Display 1 Brightness You can mo...

Страница 30: ...at will Gallery Pictures on photo albums or memory cards Wallpaper The system has its own pictures by default Figure 7 19 Wallpapers 3 Auto Rotate Screen After selecting the content and direction to be rotated on the screen you can switch the device between the landscape mode and portrait mode by rotating the device according to the rotation angle ...

Страница 31: ...tate Screen 4 Hibernation You can change the hibernation time of the system The system will hibernate automatically at the set time Figure 7 21 Hibernation 5 Font size You can adjust the system font size according to your own needs The font includes ...

Страница 32: ...small size default size large size and maximum size Figure 7 22 Font 6 Wake up When Picking up the Device After this function is enabled the device can be woken up when you pick up it Figure 7 23 Wake up When Picking up the Device ...

Страница 33: ...pplication permissions as shown in the figure below Figure 7 24 Notifications 7 8 Sound Find this icon Settings Sound For settings of volume mobile phone ringtone and warning tone of default notifications you can click the buttons to enable or disable the vibration when the phone is ringing the sound effect by touching the dial keyboard touch tone charge tone tone in lock screen and vibration at t...

Страница 34: ...ettings Applications and Notifications Manage Your Applications After entering the interface you can click the application you want to uninstall and then you will enter the application information interface below Click the button Uninstall to remove the application from the device ...

Страница 35: ...pplications 7 10 Storage Find this icon Settings Storage You can view the available storage space clear the memory card format the internal memory and select the option that can scan the media in the external memory card or external USB device ...

Страница 36: ...EUIC Technologies Co Ltd 35 Figure 7 27 Storage 7 11 Battery Find this icon Settings Battery You can view the current capacity of the battery open or close the status bar that shows the battery capacity ...

Страница 37: ...ure 7 28 Battery 7 12 Location Information Find this icon Settings Security and Location Information Check Google s location service and enable the GPS positioning function to download the third party positioning software by yourself ...

Страница 38: ...ation 7 13 Safety Find this icon Settings Security and Location Information You can set screen lock mode display password device manager application operations unknown source settings of installation passwords of applications from unknown sources and trusted credentials ...

Страница 39: ... Safety 7 14 Account Find this icon Settings Account Establish the accounts and synchronize the information you can synchronize the contact information and calendars to the clouds of other products but you need to set the accounts and servers ...

Страница 40: ...ds Find this icon Settings Languages and Input Methods For language selection text input and automatic error correction options you can select your favorite keyboard and input method and set the text to speech and pointer speed Other input methods installed will be displayed in this interface ...

Страница 41: ...SEUIC Technologies Co Ltd 40 Figure 7 32 Languages and Input Methods 7 16 Backup and Reset Find this icon Settings Backup and Reset You can back up or restore the data and reset the factory data ...

Страница 42: ...eset to Factory Defaults 7 17 Date and Time Find this icon Settings Date and Time You can use the time or time zone provided by the network or manually set the date and time select the time zone or choose the display format of the time and date ...

Страница 43: ... 7 34 Date and Time 7 18 Accessible Find this icon Settings Accessible Here you can set the zoom in gestures high contrast text hanging up by pressing the Power button mono audio color invert color calibration touch and holding for delay ...

Страница 44: ...essible 7 19 Developer Options Find this icon Settings Developer Options Settings About Phone Version Number click on Version Number many times to open the Developer Options and get some other information on the device which is common for Android ...

Страница 45: ...SEUIC Technologies Co Ltd 44 Figure 7 36 Developer Options 7 20 About Phone Find this icon Settings About Phone Detailed information of device ...

Страница 46: ... model of this device 3 Function number Display the function number of this device 4 Android version Android system version 5 Baseband version Module version number 6 Touchscreen firmware version number Touchscreen version number 7 Device serial number Display the S N of this device 8 Kernel version Device kernel information 9 Version number Device system software version Figure 7 38 Model Hardwar...

Страница 47: ...tions 8 1 Scanning Tool 1 Find this icon click it to enter this interface and press the button Scan to scan normally Figure 8 1 Main Interface of Scanning Tool 2 Click Bar code Setting to enter the setting interface of the bar code type and set the bar code type required ...

Страница 48: ...Ltd 47 Figure 8 2 Settings of Bar Code 3 Click Basic Settings to set the scanning duration angle and time out period Figure 8 3 Basic Settings 4 Click Application Settings to set the basic scan switch as shown in Figure 8 4 ...

Страница 49: ...fter this function is enabled the bar code type will be displayed when the bar code is scanned 7 Stop scanning when raising this button After this function is enabled the scanning light will go out immediately when the scanning button is raised after this function is disenabled the scanning light will go out after it is constantly on for scanning duration when the scanning button is raised 8 Cycli...

Страница 50: ...special characters 13 Terminator You can choose the bar code terminator by yourself including Enter Tab Space None 14 Bar code sending mode You can send it by focus entry broadcast mode analog keyboard or clipboard mode for the analog keyboard input method supporting hard keyboard needs to be selected as shown in Figure 8 6 Figure 8 6 Developer Options 15 Developer options Enter the password 88888...

Страница 51: ...to run in the background and click the Scan button in any editing interface to scan 2 Select Exit to allow the program to exit and close 8 2 System Upgrade Customers can conveniently realize remote upgrade through this application 1 Find this icon click it to enter System Upgrade as shown in the following figure ...

Страница 52: ... current version is the latest version if there is an update it will prompt that there is a new version Click it to enter the download interface as shown in the figure Figure 8 9 Check for Updates and Downloads 3 Click Download After successful download by clicking Update Now the device will automatically be restarted and enter the upgrade state as shown in the figure ...

Страница 53: ...IC Technologies Co Ltd 52 Figure 8 10 Update Now When the power is lower than 30 there is a prompt of Fail to Update Figure 8 11 Treatment for Low Power 4 System upgrade settings are as shown in the figure ...

Страница 54: ...ch is matched with the terminal After the terminal is upgraded all your personal information may be removed Please back up your personal information before upgrading 8 3 Mobile Manager In order to realize that customers set Android handheld terminal permissions this product does not allow the users to use the non specified applications 1 Find this icon Settings Application Click the Settings butto...

Страница 55: ...Figure 8 13 Default Starter 2 Administrator Settings and Change Password 1 Short press the Menu button in the lower right corner of the Mobile Manager interface to add the desktop operations Figure 8 14 Password Unsetting Interface ...

Страница 56: ...e following figure Figure 8 15 Initial Password Settings Set the initial administrator password according to the requirements such as 123456 click the OK button to successfully set the password Note It cannot be blank and the contents of the password update bar and password confirmation bar must be consistent 2 Short press the three points Menu button in the lower right corner again as shown in th...

Страница 57: ... Enter Interface Enter corresponding administrator password 123456 The following figure appears after verification Figure 8 17 Application Addition Interface Select the application to be added to Desktop and click OK to complete the addition select an ...

Страница 58: ... following figure Figure 8 18 Main Interface 3 Administrator Change Password In the application addition interface click Settings in the upper right corner to enter the setting interface and click Change Password to jump to the password modification interface Figure 8 19 Change Password 4 Administrator Change Name Enter Settings and click Mobile Manager to change the name of Mobile Manager ...

Страница 59: ...es Co Ltd 58 Figure 8 20 Change Name 5 Replacement of wallpapers Enter the Settings interface and click Change Wallpaper to jump to the following figure Figure 8 21 Change Wallpaper 6 Unset the default starter settings ...

Страница 60: ...22 Unset Default Starter Settings 1 Method 2 In the Mobile Manager setting interface change Mobile Manager Self starting at Startup to Mobile Manager Not Self starting at Startup as shown in the following figure Figure 8 23 Unset Default Starter Settings 1 Note It is recommended to adopt Method 2 Other application settings will be reset by Method 1 ...

Страница 61: ... of the same model through this application so that the related configurations of two devices are exactly the same The configuration cannot be imported to different types of devices Find this icon click it to enter the quick configuration interface Figure 8 24 Main Interface of Quick Configuration Click the QR code display icon to open ...

Страница 62: ... path of the external SD card is external SD card SysSetting Setinfo tar gz 1 Manual import 1 Put the configuration package the file name is Setinfo tar gz in the external SD card SysSetting directory as shown in the figure Figure 8 25 Configuration Package Directory 2 Enter the shortcut configuration interface and click File Import The following prompt will pop up Click OK ...

Страница 63: ... items and status of the imported file will pop up After clicking OK a restart prompt will pop up Click Restart Now to complete some configurations will not take effect immediately if the device is not restarted Figure 8 27 File Configuration Imported Successfully 2 Import by QR code ...

Страница 64: ...ode on the Shortcut Configuration interface and put the QR code to be imported into the scanning box as shown in the following figure Figure 8 28 Import Window by QR Code 2 After successful scanning and transmission the items and status of the file imported by QR code will pop up After clicking OK a restart prompt will pop up Click Restart Now to complete some configurations will not take effect i...

Страница 65: ...exported file is Setinfo tar gz The path of the exported file is a External SD card SysSetting b Built in SD card SysSetting When the device has an external SD card the file is preferentially exported to the external SD card 1 By clicking File Export on the Shortcut Configuration interface if the following interface pops up it indicates that the file is exported successfully When there is a config...

Страница 66: ...SEUIC Technologies Co Ltd 65 Figure 8 30 File Export 2 The name of the exported file is Setinfo tar gz You can view it from File Management Mobile Memory OR External Memory Card SysSetting ...

Страница 67: ...QR code to generate a QR code and then scan the QR code to connect with the Bluetooth channel and transmit the configuration file 1 Click Export by QR Code on the Shortcut Configuration interface If the following interface pops up it indicates that the file is exported successfully Click OK ...

Страница 68: ...SEUIC Technologies Co Ltd 67 Figure 8 32 Export by QR Code 2 The generated QR code picture is at the bottom of the application you can click the QR code icon to view it Figure 8 33 QR Code Picture ...

Страница 69: ...Touch screen Glove Mode After this function is enabled the touch screen can be operated by hands wearing gloves and the sensitivity of the touch screen is higher at this time 8 5 2 Disable Pull down State Enable this function This function takes effect immediately and the menu cannot be pulled down Disable this function This function takes effect immediately and the menu can be pulled down normall...

Страница 70: ...on the right side of the screen is not available Disable this function The virtual Menu button on the right side of the screen can be used normally 8 5 6 Disable transmission of the scan button value to the application Enable this function Some applications such as Telnet programs will transmit all button values to the server Disable this function In some cases prohibit such applications as Telnet...

Страница 71: ...es to the white list The applications signed with the digital certificates in the white list can be directly installed under the condition that the system item unknown source is not opened The default passwords of the application are 4007770876 Figure 8 35 White List of Digital Certificates 1 Certificates imported to APK files The application will search all APK files in the internal storage devic...

Страница 72: ...lled packages The application will display the names of the installed third party APPs and packages in the system After checking one or more display items users can click the Import button to import the certificates in the selected APK file into the system Figure 8 37 Name List of Installed Packages ...

Страница 73: ...certificate from the white list of the system The display items that are in gray and without check boxes are the default certificates of the system and cannot be deleted Figure 8 38 Category of Signed White List Notes The added certificate will be named after the package name of the APP For certificates with the same content but different package names only one record is saved and named after the ...

Страница 74: ... state After the device is in the inactive state for a period of time the mobile data terminal will be turned off Set this time period to 15S to 30Min or to never sleep The battery power runs down Charge or replace the battery The bar code is not decoded when CRUISE2 read it The scanning tool program is disabled Load the Scanning Application in CRUISE2 In the Bar Code Settings interface or the App...

Страница 75: ...tication failure WLAN passwords are incorrect Fail to take pictures Prompt No Storage Device Exit USB Storage Mode Prompt Camera Failure The camera cannot be turned on when QR scan light is emitted after QR code campaign is disabled Prompt SD card space is insufficient Clear memory or switch the storage locations Fail to surf the Internet through mobile data Mobile data is disabled Enable the data...

Страница 76: ...ssories Please keep the original packing box and packing materials for future maintenance or storage of this device The accessories below can improve your work better You can choose them according to your needs CRUISE2 serial products One USB cable One adapter ...

Отзывы: