MONTAGE- UND GEBRAUCHSANWEISUNG
Deutsch
Version 04/19
Ident-Nr. 1-021-764
DE
EN
Saunasteuerung
CK 41
O-CK41
SAUNA
ON
Temperatur 74°C
PROG
OK
CLIMA
START
STOP
Страница 1: ...MONTAGE UND GEBRAUCHSANWEISUNG Deutsch Version 04 19 Ident Nr 1 021 764 DE EN Saunasteuerung CK 41 O CK41 SAUNA ON Temperatur 74 C PROG OK SAUNA CLIMA START STOP...
Страница 2: ...gsteil montieren 12 4 2 Bedienteil montieren 12 4 3 Ofenf hler F1 mit bertemperatur Sicherung montieren 13 4 4 Bankf hler F2 optional montieren 13 4 5 Feuchte Temperaturf hler FTS2 optional montieren...
Страница 3: ...ell Start 24 8 4 Sauna Betrieb Automatik Betrieb 26 8 5 Klima Betrieb Manueller Betrieb Schnell Start 31 8 6 Klima Betrieb Automatik Betrieb 33 8 7 Wasserstandskontrolle 37 8 8 Automatisches Kabinen N...
Страница 4: ...etzungen die im schlimmsten Fall sogar t dliche sein k nnen In den Warnhinweisen werden Signalw rter verwendet die folgende Bedeutun gen haben GEFAHR Wenn Sie diesen Warnhinweis nicht beachten sind To...
Страница 5: ...Sicherheitshinweise der ange schlossenen Ger te 2 1 Bestimmungsgem er Gebrauch Die Saunasteuerung CK 41 dient ausschlie lich zum Steuern und Regeln der Funktionen gem den technischen Daten Die Saunas...
Страница 6: ...Die Saunasteuerung ist au erhalb der Saunakabine in ca 1 70 m H he oder gem den Empfehlungen des Kabinenherstellers zu montieren Die Umgebungstemperatur muss im Bereich von 10 C und 40 C liegen Der O...
Страница 7: ...tehen k nnen verstehen Kinder d rfen nicht mit der Saunasteuerung spielen Kinder unter 14 Jahren d rfen die Saunasteuerung nur reinigen wenn sie beaufsichtigt werden Wenn Sie unter dem Einfluss von Al...
Страница 8: ...ung Artikelnummer HT SWL 3 3 Produktfunktionen Die Saunasteuerung CK 41 verf gt ber folgende Funktionen Regeln von Kombi Sauna fen mit einer Heizleistung bis 10 5 kW und einer Verdampferleistung bis 3...
Страница 9: ...asteuerung CK 41 erm glicht zwei Betriebsarten Sauna und Klima Betrieb Sauna Betrieb Im Sauna Betrieb steht trockene W rme zur Verf gung Die Temperatur in der Kabine ist hoch 80 bis 100 C Die Feuchtew...
Страница 10: ...lay der Saunasteuerung wird nur der Sollwert f r die Feuchte in relative Fuftfeuch tigkeit angezeigt Die tats chliche Feuchte in der Saunakabine ist bei getakteter Feuchte abh ngig von der Kabinengr e...
Страница 11: ...ngsteil ist spritzwassergesch tzt trotzdem kann direkter Kontakt mit Wasser die Ger te besch digen Montieren Sie beide Teile der Saunasteuerung an einem trockenen Ort an dem eine maximale Luftfeuchte...
Страница 12: ...ungen Das Bedienteil wird an der Kabinenau enwand im maximalen Abstand von 3 Meter zum Leistungteil montiert Gr ere Abst nde sind mit geeigneter Ver l ngerung m glich 1 Bereiten Sie den Montageauschni...
Страница 13: ...ier Anschl sse der Ofenf hler Leitung 5 gem der Abb 4 an 4 Legen Sie die Anschlussplatte 2 quer in die Halbschalen des Ofenf hlers 5 Schlie en Sie die Halbschalen verschrauben Sie diese mit den beiden...
Страница 14: ...on 15 cm zur Kabinendecke ein 4 5 Feuchte Temperaturf hler FTS2 optional montieren Beachten Sie Abb 5 Kapitel Abbildungen Der Feuchte Temperaturf hler ist an der Kabinenwand oberhalb der hinteren Sitz...
Страница 15: ...n Es ist bauseits eine allpolige Trennvorrichtung mit voller Abschaltung ent sprechend der berspannungskategorie III vorzusehen Beachten Sie vor der Montage der Sauna Steuerung die Anforderungen in de...
Страница 16: ...hren und gem dem Schaltplan Abb 6 an der Anschlussklemme m anschlie en 5 4 L fter optional anschlie en L fterleitungen durch die Montage ffnungen J Anschlussbereich f r 230 V 400 V K in das Geh useun...
Страница 17: ...nnung 5 2 Schlie en Sie die Bankf hler Leitungen an die Klemmen mit der Beschriftung sw br in der Klemmleiste 4 an 5 8 Feuchte Temperaturf hler FTS2 optional anschlie en 1 F hren Sie die F hlerleitung...
Страница 18: ...ren Sie das Anschlusskabel des Bedienteils durch die Kabeldurchf hrung 9 in den Anschlussbereich f r Kleinspannung 5 Stecken Sie den Stecker des Flachbandkabels in die Anschlussbuchse 2 5 10 Installat...
Страница 19: ...derkehrender Warnton ert nt im Display wird Err4 angezeigt Die Steuerung schaltet den Ofen ab g Schalten Sie die Sauansteuerung aus h Klemmen Sie die wei e Ofenf hler Leitung wieder an 3 Pr fen Sie di...
Страница 20: ...00 00 24 00 1 Betriebsschalter 1 einschalten in der Anzeige 5 erscheint oder eine willk rliche Anzeige SAUNA OFF Uhrzeit 2 OK Taste 6 dr cken in der Anzeige 5 erscheint oder eine willk rliche Anzeige...
Страница 21: ...er maximalen Heizzeit aus Sicherheitsgr nden automatisch ab ber die 2 x 2 polige Stiftleiste auf der oberen Bedien Platine kann die maximale Heizdauer auf 12 h 18 h oder 24 h eingestellt werden Einste...
Страница 22: ...8 Bedienung Beachten Sie die Abb 8 Kapitel Abbildungen 8 2 Einstellm glichkeiten Der Sauna Betrieb bzw Klima Betrieb kann im Manuellen Betrieb Schnell Start oder im Automatik betrieb erfolgen 1 Manuel...
Страница 23: ...n zum Einstellen des automatischen Heizbeginnes von 0 24 Uhr z B 18 00 Uhr 3 Heizdauer zum Einstellen der Heizdauer von 1 Minute bis 6 Stunden z B 02 30 Stunden und Minuten 4 Temperatur 15 110 C im Sa...
Страница 24: ...K 6 dr cken in der Anzeige 5 erscheint SAUNA SET Heizdauer 06 00 oder der zuletzt eingestellte Wert Mit den UP DOWN Tasten 7 den gew nschten Wert eingeben z B 02 30 Taste PROG OK 6 dr cken in der Anze...
Страница 25: ...bei den Tastern 8 und A erl schen Die Steuerung ist im Stand by b Selbstt tig Nach Ablauf der eingestellten Heizzeit siehe Kapitel Heizdauer eingeben 00 00 06 00 schaltet die Sauna Steuerung den Ofen...
Страница 26: ...eter Wert 2 Einstellen auf Sauna Betrieb Taste A SAUNA bet tigen WARNUNG Brandgefahr Brennbare Gegenst nde die auf dem hei en Saunaofen liegen k nnen sich entz nden und Br nde verursachen Legen Sie NI...
Страница 27: ...AUNA SEND Heizbeginn 18 30 Nach ca 1 Sekunde erscheint in der Anzeige SAUNA OFF Heizbeginn 18 30 Der Heizbeginn ist eingestellt 4 Heizdauer eingeben 00 00 06 00 Mit den UP DOWN Tasten 7 bis zur Anzeig...
Страница 28: ...erscheint in der Anzeige SAUNA OFF Temperatur aktuelle Temperatur Die gew nschte Temperatur ist eingestellt 6 L fter einstellen 0 100 0 aus 100 max Mit den UP DOWN Tasten 7 bis zur Anzeige L fter bl t...
Страница 29: ...ezeigt Taste PROG OK 6 dr cken in der Anzeige 5 erscheint der program mierte Soll Wert Nach 20 Sekunden erscheint wieder die aktuelle Temperatur b Soll Werte ndern Mit den UP DOWN Tasten 7 bis zum gew...
Страница 30: ...eingestellten Zeitpunkt zu heizen b Automatik Betrieb deaktivieren Mit den UP DOWN Tasten 7 bis zur Anzeige Automatik bl ttern Taste PROG OK 6 dr cken in der Anzeige 5 erscheint SAUNA SEND Automatik O...
Страница 31: ...ROG OK 6 dr cken in der Anzeige 5 erscheint KLIMA SET Heizdauer 06 00 oder der zuletzt eingestellte Wert Mit den UP DOWN Tasten 7 den gew nschten Wert eingeben z B 02 30 Taste PROG OK 6 dr cken in der...
Страница 32: ...i den Tastern 8 und B erl schen Die Steuerung ist im Stand by b Selbstt tig Nach Ablauf der eingestellten Heizzeit siehe Kapitel Heizdauer eingeben 00 00 06 00 schaltet die Sauna Steuerung den Ofen au...
Страница 33: ...Parameter Wert 2 Einstellen auf Sauna Betrieb Taste B SAUNA bet tigen WARNUNG Brandgefahr Brennbare Gegenst nde die auf dem hei en Saunaofen liegen k nnen sich entz nden und Br nde verursachen Legen S...
Страница 34: ...dauer eingeben 00 00 06 00 Mit den UP DOWN Tasten 7 bis zur Anzeige Heizdauer bl ttern Taste PROG OK 6 dr cken in der Anzeige 5 erscheint KLIMA SET Heizdauer 06 00 oder der zuletzt eingestellte Wert M...
Страница 35: ...chte Temperatur ist eingestellt 6 Feuchte einstellen 10 80 Mit den UP DOWN Tasten 7 bis zur Anzeige Feuchte bl ttern Taste PROG OK 6 dr cken in der Anzeige 5 erscheint KLIMA SET Feuchte 50 r F oder de...
Страница 36: ...in der Anzeige KLIMA OFF L fter OFF Der L fter ist eingestellt 8 Einstellungen ansehen ndern W hrend des Sauna Betriebes k nnen Sie s mtliche Temperatur Heizdauer oder L fter Einstellungen ansehen un...
Страница 37: ...och voraus dass der Verdampfer den hierf r erforderlichen Signalausgang besitzt Der Betrieb ohne diese Funktion ist ebenso m glich b Automatik Betrieb deaktivieren Mit den UP DOWN Tasten 7 bis zur Anz...
Страница 38: ...t unterschiedlichen Drehzahlen Nach Beendigung des Trockenprogammes schaltet die Anzeige 5 auf Stand by 8 9 Bei l ngeren Betriebspausen EIN AUS Schalter 1 der Steuerung ausschalten Hinweis Es wird emp...
Страница 39: ...n 3 Batterie Typ CR2032 9 f r Uhr auf obere Platine austauschen Abb 1 4 Laschen 3 des Bedienteiles 2 in die beiden seitlichen Aufnahmen 4 einsetzen und vorsichtig bis zum Anschlag auf das Geh useunter...
Страница 40: ...e Die Sau nasteuerung ist nicht mehr betriebsbereit Fehler Beschreibung Ursache Behebung ERR 1 bertemperatursicherung F1 defekt Siehe Punkt 6 Pr fungen durchf hren auf Seite 18 ERR 3 F hlerleitungsbru...
Страница 41: ...Temperatur automatisch nach unten Bei wiederholten Erscheinen der Meldung HH ist die Sauna Steuerung nicht mehr betriebsbereit 1 Hauptsicherungen der Sauna Steuerung im Sicherungskasten aus schalten...
Страница 42: ...mit Wasser bergossen oder sehr feucht gereinigt werden Benutzen Sie zum Reinigen ein leicht angefeuchtetes Reinigungstuch das mit etwas milder Seifenlauge Sp lmittel versehen ist Entsorgen Sie die Ve...
Страница 43: ...Schaltstrom pro Phase Heizung 16 A Schaltleistung Verdampfer 3 5 kW Schaltstrom Verdampfer 16 A Nennspannung 230 V Umgebungstemperatur 10 C bis 40 C Schutzart Spritzwassergesch tzt IPX 4 Anschluss an...
Страница 44: ...izdauer 6 Stunden Die EN 60335 2 53 schreibt f r private Saunen eine Heizzeitbegrenzung von 6 h vor F r Saunen in Hotels Wohnbl cken und hnlichen Standorten ist eine Heizzeitbegrenzung von 12 h zul ss...
Страница 45: ...Version 04 19 Ident no 1 021 764 INSTRUCTIONS FOR INSTALLATION AND USE English EN Sauna control unit CK 41 O CK41 SAUNA ON Temperature 74 C PROG OK SAUNA CLIMA START STOP...
Страница 46: ...rating unit 12 4 3 Installing the heater sensor F1 with excess temperature fuse 13 4 4 Installing bench sensor F2 optional 13 4 5 Installing the humidity temperature sensor FTS2 optional 14 5 Electric...
Страница 47: ...a operating mode Automatic mode 26 8 5 Climate operating mode Manual operation quick start 31 8 6 Climate mode Automatic mode 33 8 7 Water level control 37 8 8 Automatic cabin night drying program 38...
Страница 48: ...warning notices This prevents damage to property and injuries which could in the worst case be fatal The warning notices contain keywords which have the following meanings DANGER Serious or fatal inju...
Страница 49: ...s Also observe the safety information for the devices con nected 2 1 Intended use The CK 41 sauna control unit is used exclusively for operating and controlling the sauna functions in accordance with...
Страница 50: ...talled outside the sauna room at a height of approx 1 70 m or in accordance with the rec ommendation issued by the sauna manufacturer The ambient temperature must be within a range spanning 10 C to 40...
Страница 51: ...rds that could occur Children must not play with the sauna control unit Children under 14 years of age may only clean the sauna control unit if they are supervised For health reasons do not use the sa...
Страница 52: ...off item number HT SWL 3 3 Product functions The CK 41 sauna control unit features the following functions Regulation of combi sauna heaters with a heating output of up to 10 5 kW and an evaporation...
Страница 53: ...41 sauna control unit provides two operating modes sauna mode and climate mode Sauna operating mode Dry heat is provided in sauna mode The temperature in the room is high 80 to 100 C The humidity leve...
Страница 54: ...set value for the humidity level in of relative humidity is displayed by the sauna control unit The actual humidity level in the sauna room when humidity is timed depends on the size of the room and t...
Страница 55: ...operating unit and power supply unit is protected against water splashes however direct contact with water could still damage the unit Install both parts of the sauna control unit in a dry place at w...
Страница 56: ...he operating unit is installed on the outside wall of the cabin with a maximum clearance of 3 metres from the power supply unit Larger clearances are possible with a suitable extension 1 Prepare the i...
Страница 57: ...nnectors for the heater sensor wire 5 in accordance with Fig 4 4 Place the connection panel 2 crossways in the heater sensor half shells 5 Place the two half shells together screw them together using...
Страница 58: ...e roof of the sauna room 4 5 Installing the humidity temperature sensor FTS2 optional Note Fig 5 figures chapter The humidity temperature sensor must be installed on the wall of the sauna room above t...
Страница 59: ...wer supply An all pole disconnecting device with full cut off compliant with overvoltage category III must be fitted on site Before installing the sauna control unit take note of the requirements in t...
Страница 60: ...ng lower part 1 1 and connect to the termi nal m according to the circuit diagram Fig 6 5 4 Connecting the fan optional Guide the fan lines through the installation openings J connection area for 230...
Страница 61: ...g 7 into the low voltage connection area 5 2 Connect the wires for the bench sensor to the terminals labelled sw br in terminal strip 4 5 8 Installing humidity temperature sensor FTS2 optional 1 Guide...
Страница 62: ...nection cable for the operating unit through the cable bush ing 9 into the low voltage connection area 5 Connect the plug of the ribbon cable to the connection socket 2 5 10 Finishing the installation...
Страница 63: ...control unit A recurring warning tone sounds Err4 appears in the display The control unit switches off the heater g Switch off the sauna control unit h Reconnect the white wire for the heater sensor 3...
Страница 64: ...24 00 1 Turn on the operating switch 1 The following appears in display 5 or a random display SAUNA OFF Time 2 Press the OK button 6 The following appears in display 5 or a random display SAUNA SET Ti...
Страница 65: ...omatically after the maximum heating period for safety reasons Using the 2 x 2 pin connector on the top control board the maximum heating duration can be set to 12 18 or 24 hours Einstellung der Heizd...
Страница 66: ...the other switch 8 Operation Note Fig 8 figures chapter 8 2 Setting options The sauna mode or climate mode can be operated in manual mode quick start or automatic mode 1 Manual mode Operation starts...
Страница 67: ...to set the automatic start of heating for a time from 0 24 e g 18 00 3 Heating duration to set the heating duration of 1 minute to 6 hours e g 02 30 hours and minutes 4 Temperature 15 110 C in sauna m...
Страница 68: ...OG OK 6 button in the display 5 the following appears SAUNA SET Heating duration 06 00 or the last set value Use the UP DOWN buttons 7 to set the required value e g 02 30 Press the PROG OK 6 button in...
Страница 69: ...or the 8 and A buttons The control unit is in standby b Automatic After the set heating duration expires see chapter Entering the heating duration 00 00 6 00 the sauna control unit automatically switc...
Страница 70: ...g on appears e g SAUNA OFF Parameter Value 2 Setting sauna mode Press A SAUNA button WARNING Risk of fire Flammable objects that are placed on the sauna heater could ignite and cause fires NEVER place...
Страница 71: ...ter approx 1 second the following appears in the display SAUNA OFF Start of heating 18 30 The start of heating has been set 4 Entering the heating duration 00 00 6 00 Use the UP DOWN buttons 7 to scro...
Страница 72: ...1 second the following appears in the display SAUNA OFF Temperature Current temperature The required temperature has been set 6 Setting the fan 0 100 0 off 100 max Use the UP DOWN buttons 7 to scroll...
Страница 73: ...6 to view the programmed set value in the display 5 After 20 seconds the current temperature appears again b Changing the set values Use the UP DOWN buttons 7 to scroll to the required menu item e g H...
Страница 74: ...t at the set time b Deactivating the automatic mode Use the UP DOWN buttons 7 to scroll to the Automatic display Press the PROG OK 6 button in the display 5 the following appears SAUNA SEND Automatic...
Страница 75: ...G OK 6 button in the display 5 the following appears CLIMATE SET Heating duration 06 00 or the last set value Use the UP DOWN buttons 7 to set the required value e g 02 30 Press the PROG OK 6 button i...
Страница 76: ...8 and B buttons The control unit is in standby b Automatic After the set heating duration expires see chapter Entering the heating duration 00 00 6 00 the sauna control unit automatically switches th...
Страница 77: ...pears e g SAUNA Climate OFF Parameter Value 2 Setting sauna mode Press button B SAUNA WARNING Risk of fire Flammable objects that are placed on the sauna heater could ignite and cause fires NEVER plac...
Страница 78: ...set 4 Entering the heating duration 00 00 6 00 Use the UP DOWN buttons 7 to scroll to the Heating duration display Press the PROG OK 6 button in the display 5 the following appears CLIMATE SET Heating...
Страница 79: ...re The required temperature has been set 6 Setting the humidity 10 80 Use the UP DOWN buttons 7 to scroll to the Humidity display Press the PROG OK 6 button in the display 5 the following appears CLIM...
Страница 80: ...he following appears in the display CLIMATE OFF Fan OFF The fan has been set 8 Viewing changing settings During sauna operation you can view or change all temperature heating dura tion or fan settings...
Страница 81: ...ecessary signal output for this function Operation without this function is also possible b Deactivating the automatic mode Use the UP DOWN buttons 7 to scroll to the Automatic display Press the PROG...
Страница 82: ...un at different speeds After the drying program ends the display 5 switches to standby 8 9 For longer breaks in operation Turn the ON OFF switch 1 of the control unit off Note It is recommended for ni...
Страница 83: ...ng lower part 7 3 Replace battery type CR2032 9 for clock on upper board Fig 1 4 Insert tabs 3 of the operating unit 2 into the two lateral holders 4 and carefully press onto the housing lower part 7...
Страница 84: ...ates an electrical malfunction in the system The sauna control unit is no longer operational Error Description Cause rectification ERR 1 Excess temperature F1 defective See point 6 Performing tests on...
Страница 85: ...l automatically regulate the temperature down If the message HH appears repeatedly the sauna control unit is no longer ready for operation 1 Turn off main fuses of the sauna control unit in the fuse b...
Страница 86: ...CE The control unit should not be doused with water or cleaned with too much moisture For cleaning use a slightly damp cleaning cloth that has some mild soap solution detergent Please dispose of packa...
Страница 87: ...nt per phase heater 16 A Contact rating evaporator 3 5 kW Switched current evaporator 16 A Rated voltage 230 V Ambient temperature 10 C to 40 C Protection type protected against jets of water IPX 4 Co...
Страница 88: ...duration 6 hours EN 60335 2 53 specifies a heating time limitation of 6 h for private saunas For sau nas in hotels apartment blocks and similar locations a maximum heating period limit of 12 hours is...
Страница 89: ...4 2 1 3 4 100 mm m m 6 5 1 1 2 3 4 5 8 7 6 1 3 4 5 6 7 8 9 B C D E A F G H I J 6 K 2 L Detail 7mm 2 1 5 4 3 6 A 9 8 4 7 B 4 6 5 1 2 3 d e r t o r d e r t o r e t i h w s s i e w e t i h w s s i e w A...
Страница 90: ...teamer Heizsystem heating system Sensor F hler I sensor I WM Verteilung Distribution 400V 3N 50Hz U V W N N V1 r r w w swbr or or br sw w w r L1 r W W1 L3 V WM V1 L2 N N U LED C K A B S B1 F2 5 rt gn...
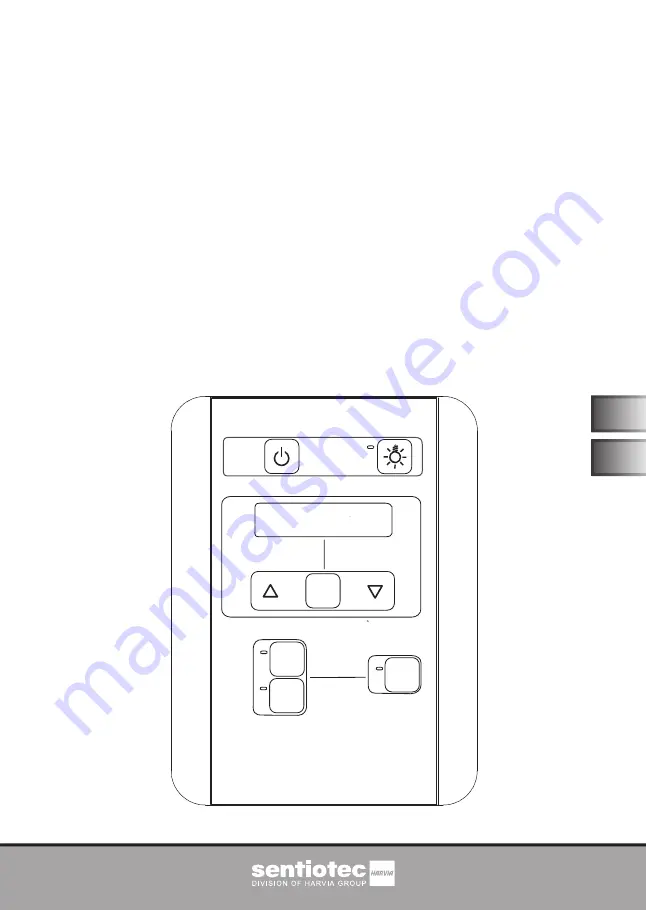
Страница 91: ...3 4 8 CK 41 1 2 3 4 5 6 7 8 1 Betriebsschalter Ein Aus 2 Lichtschalter 3 Ein Aus Taster 4 Licht Taster 5 Anzeige 6 PROG OK Taste 7 UP DOWN Tasten 8 Start Stop Taste A SAUNA B KLIMA SAUNA Uhrzeit OFF 1...
Страница 92: ...sentiotec GmbH Division of Harvia Group Oberregauer Stra e 48 A 4844 Regau T 43 0 7672 22 900 50 F 80 info sentiotec com www sentiotec com...