background image

50

Dual-Deck VCR User’s Guide

VCR SETTINGS

1

Child Lock

Off

2

Remote Eject

On

3

Panel Display

Auto

4

Screen Display

Auto

5

RF Output Channel

Ch3

6

Clock Settings

7

Advanced Settings

   /     = Move

   = Sel

MENU = Quit

press

press

MENU

7

press

5

press

press

1

1

to Keep Timer Events
& Clock Setting

MAIN MENU

1

Copy Settings

2

Playback Settings

3

Record/Edit Settings

4

Channel Settings

5

VCR Settings

6

Timer Recording

7

Language/Langue

   /     = Move

   = Sel

MENU = Quit

RESET FACTORY SETTINGS

WARNING!

ALL SETTINGS

WILL BE LOST

1

Keep Timer Events And 
Clock Setting

2

Clear Everything

Press CLEAR to Reset

Press MENU to Quit

ADVANCED SETTINGS

1

Reset Factory Settings

2

Front A/V Input

Line 1

3

Rear A/V Input

Line 2

4

Line 2 Video In

Comp

5

Line 2 A/V Out

Auto

   /     = Move

   = Sel

MENU = Quit

press

2

to 

Clear Everything,

then press

CLEAR

RESET F

ACTOR

Y SETTINGS

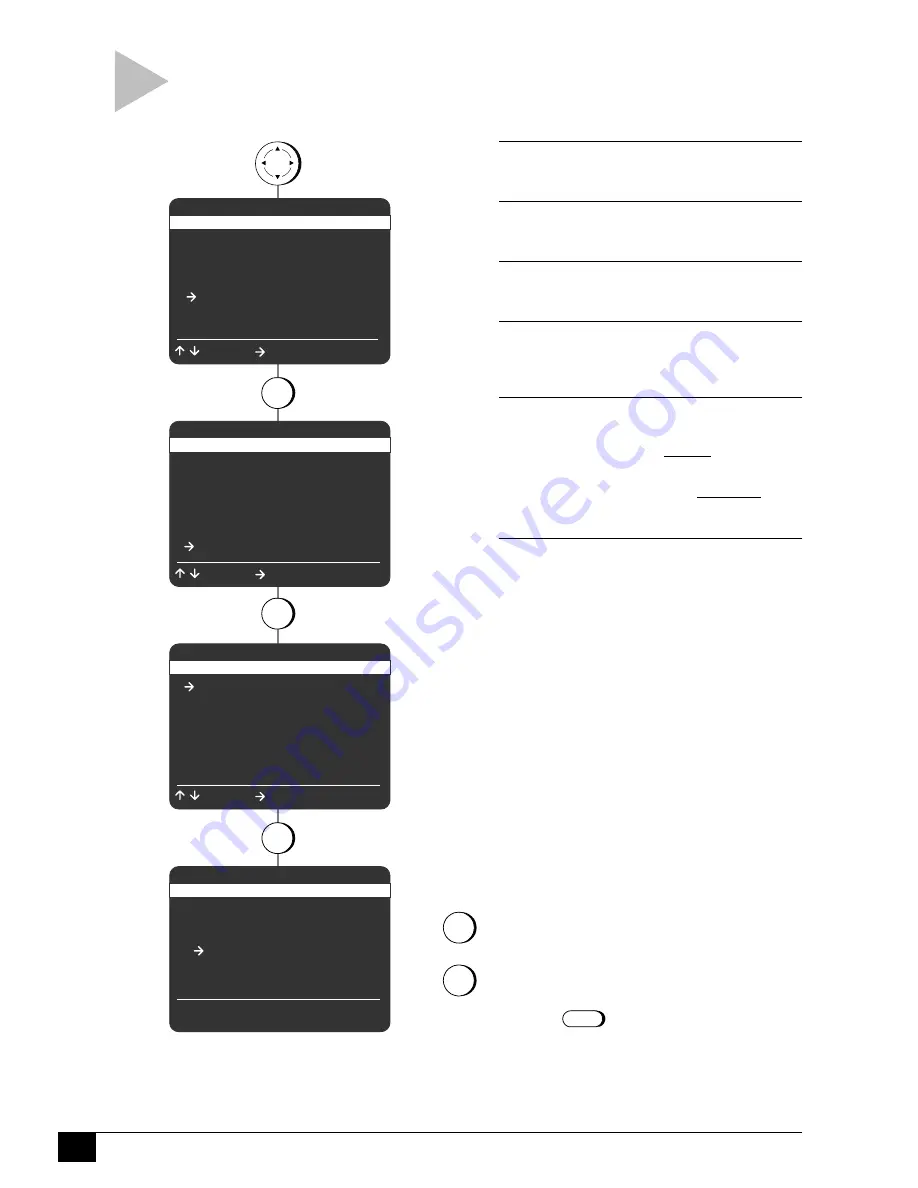
Follow these steps to reset the Dual-Deck VCR to its
factory settings. If you wish, you may preserve your
clock settings and any saved timer recordings.

1

O P E N   “ M A I N   M E N U ”

Press MENU.

2

S E L E C T   “ V C R   S E T T I N G S ”

Press 5.

3

S E L E C T   “ A D V A N C E D   S E T T I N G S ”

Press 7.

4

S E L E C T   “ R E S E T   F A C T O R Y
S E T T I N G S ”

Press 1.

5

D E C I D E   W H A T   T O   R E S E T

Press 1 or 2.

– Resets everything except the clock

and any saved Timer Recordings.

– Clears all VCR settings including the

clock and any saved Timer Recordings.

6

R E S T O R E   S E T T I N G S

Press CLEAR to confirm your decision to
reset factory settings; or, press MENU to
cancel and exit the menu system.

Содержание DDV2120

Страница 1: ...D D V 2 1 2 0 D U A L D E C K V C R U S E R S G U I D E S S C 2 1 2 0 0 5 0 3 0 1 F l y i n g E r a s e H e a d s Q u a s i S V H S P l a y b a c k J o g S h u t t l e R e m o t e ...

Страница 2: ...rovides guidelines for proper grounding and in particular specifies that the cable ground shall be connected to the grounding system of the building as close to the point of cable entry as practical C O P Y R I G H T N O T I C E Federal law provides severe civil and criminal penal ties for the unauthorized reproduction distribution or exhibition of copyrighted motion pictures and vid eotapes Title...

Страница 3: ...isplay 9 3 COPY 10 Basic Copying 10 Copy Settings 11 4 PLAY 12 Basic Playback 12 Playback Settings 13 5 RECORD 14 Basic Recording 14 Record Settings 15 6 TIMER RECORD 16 Timer Recording 16 Timer Recording Errors 18 7 VCR PLUS 19 Channel Mapping 19 VCR Plus Worksheet 20 VCR Plus Recording 21 VCR Plus Timer Extend 22 8 EDIT 23 Automatic Editing 23 Manual Editing 24 Audio Video Dubbing 25 Copy Audio ...

Страница 4: ...PPENDIX A ADVANCED CONNECTIONS 36 RF Output Channel 36 Cable Box Control 37 Stereo Monitor TV Hookup 39 Other A V Hookup 40 S Video Hookup 41 Line 2 A V Out 42 Line Input Labeling 43 APPENDIX B CUSTOM SETTINGS 44 Language Settings 44 Auto Clock Settings 45 Manual Clock Settings 46 Daylight Savings Time 47 Channel Settings 48 VCR Settings 49 Reset Factory Settings 50 APPENDIX C HELP 51 Troubleshoot...

Страница 5: ...lation to ensure reliable opera tion of the video unit and to protect it from overheating These openings must not be blocked or covered Never place your VCR on a bed sofa rug or other similar surface on or near a radiator or heat register This video unit should not be placed in a built in installation such as a bookcase or rack unless proper ventilation is provided or the manufacturer s instructio...

Страница 6: ...efore use S E R V I C I N G Do not attempt to service this video unit your self as opening or removing covers may ex pose you to a dangerous voltage or other hazards Refer all servicing to qualified ser vice personnel D A M A G E R E Q U I R I N G S E R V I C E Unplug this video unit from the wall outlet and refer servicing to qualified service per sonnel under the following conditions a When the ...

Страница 7: ...control as shown b Insert two AA batteries paying attention to observe the correct polarities c Replace the cover 1 G E T T I N G S T A R T E D This Chapter will guide you through initial setup of your Dual Deck VCR including basic connections Auto Setup and remote programming U N P A C K I N G Power Ch Rec Deck Select Menu TV VCR Copy VCR Video Audio DDV2120 0 100 8 7 9 5 2 1 3 MENU POWER COPY TA...

Страница 8: ...V 60Hz wall outlet B A S I C C O N N E C T I O N S To Line Inputs on your Television 4 T U R N O N T V V C R C A B L E B O X Press POWER on your television VCR and or Cable Box 5 S E T T E L E V I S I O N C H A N N E L C h a n n e l 3 If you chose the Standard RF Option set your television to channel 3 If you experience interference on channel 3 you may use channel 4 instead how ever you must firs...

Страница 9: ...you will be prompted to set the menu language Press 1 for English or 2 for French 2 C O N F I R M A N T E N N A C A B L E C O N N E C T I O N If you have not already done so make sure you have connected an antenna or basic cable to the IN FROM ANT jack on the VCR back panel Press MENU to continue 3 R U N A U T O S E T U P As soon as you press MENU the Dual Deck VCR will automatically perform the f...

Страница 10: ...VIEW 4 6 C OPY TAP E REV FW D REPEAT SKIP AUDIO DUB VIDEO DUB 3 C H E C K Y O U R R E S U LT S If the television advances to the next active channel programming is complete If the television does not respond try another 2 digit code Some televisions are not listed but can be programmed 4 O P E R AT E Y O U R T E L E V I S I O N When you want to control your television press the TV key then try any...

Страница 11: ... Display to the clock tape counter or time remaining on the tape D E C K 1 Press to make Deck 1 active All deck control keys PLAY REWIND etc will only affect Deck 1 D E C K 2 Press to make Deck 2 active All deck control keys PLAY REWIND etc will only affect Deck 2 D I S P L AY Press to turn the On Screen Display on and off F A S T F O R W A R D While the VCR is stopped press to fast forward the ta...

Страница 12: ...kip ahead 1 minute at a time up to 5 minutes While the VCR is copying press 1 5 times to skip edit remove the next 1 5 minutes see page 24 S L O W While a tape is playing press to play the tape in slow motion at variable speeds S P S L P Press to set the record speed to SP Standard Play or SLP Super Long Play SLP is three times longer than SP S T I L L F A D V While a tape is playing or recording ...

Страница 13: ...he blinking selection arrow down 1 0 P L AY Press to play the tape in the active deck While a tape is playing or recording press to pause the tape in the active deck In the menu system press to move the blinking selection arrow up 1 1 F A S T F O R W A R D While the VCR is stopped press to fast forward the tape in the active deck While a tape is playing press to visually search forward Cue In the ...

Страница 14: ... O I N D I C AT O R Lights when the channel you are watching is broadcast in stereo 8 D E C K 2 S TAT U S I N D I C AT O R Lights to show you that Deck 2 is active Also graphically displays the status of the tape in Deck 2 e g Stop Play Rewind etc 9 D E C K 1 P L AY R E C O R D S P E E D Shows you the current playback SP LP or SLP or record speed SP or SLP for Deck 1 1 0 C L O C K TA P E C O U N T...

Страница 15: ... V V I E W Shows you the input source you are currently watching Channel Deck 1 Deck 2 Line 1 or Line 2 7 D E C K 2 S TAT U S Shows you the status of the tape in Deck 2 e g Stop Play Rewind Fast Forward etc 8 D E C K 2 C O U N T E R P O S I T I O N Shows you the current tape counter position or time remaining on the tape in Deck 2 as set by the CLK CTR key 9 D E C K 2 P L AY R E C O R D S P E E D ...

Страница 16: ...S E R T T A R G E T T A P E Insert the tape you want to copy to in Deck 2 Make sure the tape has a record safety tab or it will eject when you press COPY TAPE 3 C O P Y Y O U R T A P E Press COPY TAPE The Copy indicator will light on the front panel display and the VCR will begin copy ing from Deck 1 to Deck 2 4 O P T I O N S W H I L E C O P Y I N G To pause press COPY TAPE The Copy indicator will...

Страница 17: ...to match the Deck 1 playback speed recommended for best copy quality Off Allows the Deck 2 record speed to be set independently of the Deck 1 playback speed Turn Speed Matching off only if you want to record two or more SP tapes onto one SLP tape You must set the Deck 2 record speed to SLP manually see page 14 Auto Automatically adjusts the Deck 2 record speed to avoid running out of tape before c...

Страница 18: ...d VHS tape or S VHS tape into Deck 1 or Deck 2 2 P L AY TA P E Press PLAY 3 O P T I O N S D U R I N G P L AY B A C K Freeze To freeze a single frame press STILL F ADV Frame Advance To advance one frame at a time rotate the JOG WHEEL forward or backward or press STILL F ADV again Shuttle To gradually increase or decrease the playback speed rotate the SHUTTLE RING forward or backward Slow Motion To ...

Страница 19: ...quence i e Deck 1 will play then Deck 2 will play This is useful when watching a movie that includes two tapes Loop Tapes will play in a continuous loop until you press STOP on the deck in Play This is useful for continuous playback of training or sales tapes Normal Each deck will play independently default setting 4 A u t o P l a y R e w i n d Play Tapes without a record safety tab will play auto...

Страница 20: ... increments press REC repeatedly OTR will appear on the on screen display followed by the number of minutes the VCR will record Continue pressing REC to add up to 9 hours and 30 minutes When the recording time has elapsed the VCR will stop recording auto matically OTR Loop Record When you reach OTR 9 30 press REC again to enter OTR Loop mode The selected Deck will record over and over again until ...

Страница 21: ...You may also fix the Record Source to Line 1 the front A V inputs Line 2 the rear A V inputs Deck 2 or Tuner the current television show 4 D e c k 2 R e c o rd S o u rc e Auto is recommended for this setting as well You can also fix the Deck 2 record source to Line 1 Line 2 Deck 1 or Tuner 5 8 S c e n e E d i t L i s t Please refer to page 23 6 S e t u p T i t l e r M e s s a g e Please refer to p...

Страница 22: ...ber e g for January press 01 S e t D a y Enter the day as a 2 digit number e g for the ninth press 09 S e t H o u r Enter the hour as a 2 digit number e g for 12 00 press 12 S e t M i n u t e Enter the minute as a 2 digit number e g for 12 00 press 00 S e t A M P M Press 1 for AM or 2 for PM 6 T I M E R R E C O R D This chapter provides step by step instructions for programming Timer Recordings Fo...

Страница 23: ...2 L i n e 1 Records from an external source connected to the front line inputs 3 L i n e 2 Records from an external source connected to the rear line inputs 4 C h s C h a n n e l S i m u l c a s t Records video from TV and audio from Line 2 usually connected to an FM stereo Use the 0 9 keys to set the channel number 9 S E T D E C K Press 1 or 2 or use the UP DOWN RIGHT arrow keys to set which deck...

Страница 24: ...tape will record for 6 hours 1 1 V I E W E V E N T S U M M A R Y Press MENU to confirm the event and view a summary of all programmed events The event is now stored in memory and will record at the scheduled time It is not neces sary to turn the VCR off or put it into a Timer mode the event will record regard less of the state of the VCR The Timer indicator will light on the front panel display If...

Страница 25: ...ed method of timer recording Follow these steps to match your local channels to the VCR Plus preassigned channels This process is know as Channel Mapping and must be done before you can begin using VCR Plus C H A N N E L M A P P I N G 1 O P E N M A I N M E N U Press MENU 2 S E L E C T R E C O R D E D I T S E T T I N G S Press 3 3 S E L E C T V C R P L U S S E T U P Press 7 4 S E L E C T V C R P L ...

Страница 26: ...r s Choice 1 93 ________ Viewer s Choice 2 94 ________ HBO 2 95 ________ HBO 3 96 ________ Showtime 2 97 ________ Cinemax 2 98 ________ QVC 99 ________ B R O A D C A S T VCR Plus Your Local Network Channel Channel WB 03 ________ Fox 04 ________ NBC 05 ________ ABC 08 ________ CBS 11 ________ PBS 13 ________ UPN 21 ________ Univision 23 ________ O T H E R VCR Plus Your Local Network Channel Channel...

Страница 27: ...lete Program Record to maximize high quality recording time for the given tape length see note on page 18 SP Standard Play Use for best quality a T 120 tape will record for 2 hours SLP Super Long Play Use for maximum recording time a T 120 tape will record for 6 hours 3 W h i c h D e c k Deck 1 The event will be recorded in Deck 1 Deck 2 The event will be recorded in Deck 2 4 V I E W E V E N T S U...

Страница 28: ...ler Message 7 VCR Plus Setup Move Sel MENU Quit VCR Plus Setup VCR Plus Channel Setup Timer Extend Off Cable Box Control Off Cable Box Code Cable Box Output Line 1 Move Sel MENU Quit MENU 3 7 for Timer Extend press 1 O P E N M A I N M E N U Press MENU 2 S E L E C T R E C O R D E D I T S E T T I N G S Press 3 3 S E L E C T V C R P L U S S E T U P Press 7 4 S E L E C T T I M E R E X T E N D Press th...

Страница 29: ...in Deck 1 to the end of the same scene and press SCENE TITLE The VCR will save the ending counter position of this scene To clear the end point press CLEAR once To clear the begin point press CLEAR again 9 A D D M O R E S C E N E S O P T I O N A L Repeat Steps 6 8 to store up to 8 total scenes 1 0 A S S E M B L E T H E TA P E Press COPY TAPE The VCR will automatically copy all marked scenes in ord...

Страница 30: ...e front panel display 8 R E P O S I T I O N S O U R C E TA P E Press the DECK 1 key then use the deck control keys to reposition the source tape at the start of the next segment Stop or pause the tape at this position 9 R E S U M E E D I T I N G Repeat Steps 6 8 to add all desired scenes from Deck 1 to Deck 2 When finished select Deck 2 then press STOP To automatically edit out commercial segments...

Страница 31: ...AND another source device to the rear A V inputs the Dual Deck VCR will ONLY recognize the microphone as Line 2 Tu n e r To dub from the currently selected television channel D e c k 1 To dub from a tape in Deck 1 5 C U E S O U R C E Position your source device at the point you wish to begin dubbing e g cue the external CD or tape player to the desired track or pause the tape in Deck 1 at the desi...

Страница 32: ...recorded from a microphone connected to the rear Mic jack O ff Copy Audio Insert is disabled The existing audio will be copied 4 C O N N E C T A U D I O S O U R C E Connect your external audio source to the front Line 1 or rear Line 2 inputs using standard RCA audio cables 5 C U E T A P E S Cue up all devices Source tape in Deck 1 Target tape in Deck 2 The external audio source tape player CD play...

Страница 33: ...ord function e g Record One Touch Record Copy or Timer Record 8 R E C O R D T I T L E R M E S S A G E You can overlay the title on your video for up to 20 seconds in 5 second increments Press SCENE TITLE 1 to 4 times to record your Titler Message for 5 10 15 or 20 seconds respectively N O T E You must be recording a video signal when you record the Titler Message i e you cannot record a title with...

Страница 34: ...ecording see page 14 Timer Recording see page 16 VCR Plus Recording see page 19 7 E N D R E C O R D I N G Press STOP on Deck 1 or allow the preset recording time to run out e g One Touch Recording Timer Recording and VCR Plus all have preset recording times press press 1 Copy Settings 2 Playback Settings 3 Record Edit Settings 4 Channel Settings 5 VCR Settings 6 Timer Recording 7 Language Langue M...

Страница 35: ...or the confirmation screen to count down If you are not present for the 59 second countdown the VCR will automatically mark the commercials anyway e g if you set a Timer Recording VCR Plus or One Touch Recording and the TV is turned off the commercials will still be marked To cancel press STOP in Deck 1 and the commercials will not be marked 9 M A R K C O M M E R C I A L S When the 59 seconds have...

Страница 36: ...inutes of a record ing will not be skipped A commercial will not be skipped if a record ing starts in the middle of a commercial segment if one isolated commercial is shown without others or if a commercial is longer than one minute Part of a recorded program may be skipped if the program segment is between commer cials and less than one minute or if there are frequent dark and quiet scenes press ...

Страница 37: ...press MAIN MENU COPY SETTINGS 1 Comm Free Copy On 2 EZ Copy Off 3 Speed Matching On 4 Copy Audio Insert Off 5 Copy Mode Auto Move Sel MENU Quit MENU 1 press 1 for Comm Free Copy N O T E S The Commercial Free Copy function will only recognize commercial groups that have been marked by COMMERCIAL ADVANCE Auto Commercial Free Copy will be disabled if there is a Timer event scheduled on Deck 2 A U T O...

Страница 38: ...ncludes standard recording One Touch Recording Timer Recording copying or recording with the 8 Scene Editor M a n u a l I n d e x M a r k s You can place an Index Mark manually any time a tape is recording by pressing SEARCH INDEX Index will flash briefly on the On Screen Display while the mark is recorded 0 100 8 7 9 5 2 1 3 MENU POWER VCR Plus TV VCR SLOW TRK AUTO TRK SEARCH INDEX TV SELECT VOL ...

Страница 39: ...INDEX 3 S E L E C T I N D E X S E A R C H S C A N Press 1 4 S E A R C H S C A N F O R I N D E X M A R K S Choose one of the following S c a n Press FAST FORWARD or REWIND to begin scanning for Index Marks forwards or backwards When Index Scan locates an Index Mark it will play the tape for 5 seconds If it is the scene you want to watch press PLAY If it is not the VCR will automatically search for ...

Страница 40: ...up and re enter a number Press SEARCH INDEX to advance the tape to the specified time 4 R e t u r n t o 0 0 0 0 0 Advances your videotape to tape counter position 0 00 00 This is useful when editing from a baseline counter value of 0 00 00 When selected the VCR will automati cally rewind or fast forward the tape to counter position 0 00 00 5 M a n u a l C A P l a y b a c k See sidebar at left pres...

Страница 41: ...h features starting on page 33 4 F I N D N E X T P R E V I E W O R S TA R T O F M O V I E Press 5 or 6 to select one of the following 5 F i n d N e x t P re v i e w The VCR will cue forward and begin playing the first preview You can either watch the preview or press SEARCH INDEX to cue to the next preview and so on The VCR actually cues slightly past the preview and then rewinds and plays the pre...

Страница 42: ...NU Quit MAIN MENU MENU press MENU 5 VCR SETTINGS 1 Child Lock Off 2 Remote Eject On 3 Panel Display Auto 4 Screen Display Auto 5 RF Output Channel Ch3 6 Clock Settings 7 Advanced Settings Move Sel MENU Quit to Exit Menu system Set TV to channel 3 or 4 Ch3 Ch4 CH3 4 1 O P E N M A I N M E N U Press MENU 2 S E L E C T V C R S E T T I N G S Press 5 3 S E T R F O U T P U T C H A N N E L Press 5 to set ...

Страница 43: ... P L U S S E T U P Press 7 7 T U R N C A B L E B O X C O N T R O L O N Press the down arrow key until Cable Box Control is selected then press the right arrow key to turn Cable Box Control on 8 E N T E R C A B L E B O X C O D E Press the down arrow key until Cable Box Code is selected then use the number keys on the remote control to enter the 2 digit code for your brand of cable box from the list...

Страница 44: ...9 73 Toshiba 36 Unika 20 21 29 42 44 Universal 43 52 63 82 Videoway 07 45 50 59 Viewstar 13 20 21 22 23 24 25 26 58 62 Warner Amex 06 Zenith 07 45 50 59 press 7 press continued Cable Box Code Cable Box Output for Cable Box Control VCR Plus Setup VCR Plus Channel Setup Timer Extend Off Cable Box Control Off Cable Box Code Cable Box Output Line 1 Move Sel MENU Quit 9 S E T C A B L E B O X O U T P U ...

Страница 45: ...ver 2 S E T S T E R E O T O A U X I L I A R Y M O D E Set your stereo receiver to Aux or Line refer to your stereo owner s guide for the proper setting Follow these steps to connect your Dual Deck VCR to a stereo system stereo television or monitor TV STEREO TV MONITOR TV CONNECTION 1 C O N N E C T V C R T O S T E R E O T V M O N I T O R T V Connect RCA cables from the Line Out 1 audio jacks R and...

Страница 46: ... on your TV screen R e c o rd D e v i c e Press TV VIEW until playback from Line 1 front panel inputs or Line 2 rear panel inputs appears on your TV screen then press REC on the active deck T i m e r R e c o rd F ro m D e v i c e Select Line 1 or Line 2 as your Record Source in the Timer Record menu see page 17 All other Timer Record settings should be set in the usual manner L a b e l D e v i c e...

Страница 47: ...posite video input The S Video input will be disabled S V i d Line 2 will be set to the S Video input The Line In 2 composite video input will be disabled N O T E S To use the S Video In connection you must turn it on in the menu system You can use either S Video In OR the Line 2 input but not both at the same time VCR SETTINGS 1 Child Lock Off 2 Remote Eject On 3 Panel Display Auto 4 Screen Displ...

Страница 48: ...output to the current TV View whatever is currently on your television screen Deck 1 Fixes the Line 2 output to Deck 1 Deck 2 Fixes the Line 2 output to Deck 2 Tuner Fixes the Line 2 output to the Tuner Line 1 Fixes the Line 2 output to the Line 1 input Line 2 Fixes the Line 2 output to the Line 2 input press MENU press 5 MAIN MENU 1 Copy Settings 2 Playback Settings 3 Record Edit Settings 4 Chann...

Страница 49: ...CVR Stereo Receiver TV Television 5 S E T R E A R A V I N P U T Press 3 to label the Rear A V Input to one of the following Line2 Line 2 default Vid2 Video 2 SAT Satellite Receiver LD Laserdisc Player DVD Digital Video Disc Player DSS Digital Satellite System VCR3 Third Video Cassette Recorder GAME Video Game RCVR Stereo Receiver TV Television press MENU press 5 MAIN MENU 1 Copy Settings 2 Playbac...

Страница 50: ...een menu language to English or French 1 O P E N M A I N M E N U Press MENU 2 S E L E C T L A N G U A G E Press 7 repeatedly to set the on screen menu language to English or French MENU PRINCIPAL 1 Config de copier 2 Config de lecture 3 Config d enreg dit 4 Config des canaux 5 Config du magn toscope 6 Enreg programmable 7 Language Langue Chois Chang MENU Fin MAIN MENU 1 Copy Settings 2 Playback Se...

Страница 51: ...ts Alaska Standard Time Hawaii Selects Hawaii Standard Time C l o c k S e t C h a n n e l Auto Automatically searches for a local channel broadcasting the time via XDS Extended Data Services Ch If you know of a station in your area that broadcasts time information you can set the Auto Clock Set channel manually Use the 0 9 keys to set the desired channel usually PBS Line 1 Allows the clock to be s...

Страница 52: ...ngs 3 Record Edit Settings 4 Channel Settings 5 VCR Settings 6 Timer Recording 7 Language Langue Move Sel MENU Quit MAIN MENU MENU press 5 press 6 press to SET MONTH SET YEAR SET DAY SET HOUR SET MINUTE SET AM PM SET MONTH 1 12 08 Aug 2001 12 25 PM Su Mo Tu We Th Fr Sa 1 2 3 4 5 6 7 8 9 10 11 12 13 14 15 16 17 18 19 20 21 22 23 24 25 26 27 28 29 30 31 To Set MENU to Quit VCR SETTINGS 1 Child Lock ...

Страница 53: ... right arrow key to select from the following Auto The VCR will automatically use local channel information to determine the status of Daylight Savings Time in your area and then set the clock accord ingly Off The VCR will not adjust the clock for Daylight Savings Time On The VCR will adjust the clock for Daylight Savings Time as follows One hour will be added to the time at 2 00 AM on the first S...

Страница 54: ...l S h o w We a k C h a n n e l s Yes Channels with weak signal strength will be displayed instead of being replaced with a blue screen No A blue screen will appear when a weak channel is received C h a n n e l A u d i o Stereo Enables stereo sound when avail able otherwise reverts to mono Mono Enables mono sound Use when connecting the VCR to a mono output device such as a monitor SAP Second Audio...

Страница 55: ...right from 6 00 a m to 10 00 p m and dim from 10 00 p m to 6 00 a m Bright The panel display will be bright at all times Dim The panel display will be dim at all times Off The panel display will be off at all times 4 S c re e n D i s p l a y On The entire On Screen Display OSD will be shown each time you press a deck or tuner control key Play Stop Ch etc Off The OSD will remain off unless you pres...

Страница 56: ... 1 3 Rear A V Input Line 2 4 Line 2 Video In Comp 5 Line 2 A V Out Auto Move Sel MENU Quit press 2 to Clear Everything then press CLEAR R E S E T F A C T O R Y S E T T I N G S Follow these steps to reset the Dual Deck VCR to its factory settings If you wish you may preserve your clock settings and any saved timer recordings 1 O P E N M A I N M E N U Press MENU 2 S E L E C T V C R S E T T I N G S P...

Страница 57: ...CR key Note If you press TV key by acci dent remote will only operate TV Remote won t operate TV Program the remote control for your brand of TV see page 4 Press the TV key Remote control doesn t operate every TV function Some TV brands only respond to limited number of functions On screen display shows Error Turn power off then turn power on again Inspect tape slots for foreign objects VCR doesn ...

Страница 58: ...ch is only present on precorded tapes No menu or On Screen Displays Tape may be blank snow appears on screen If so menus and On Screen Display cannot be shown Stop tape or record on tape to enable displays Remote may be set to control TV and not VCR Press VCR key to reactivate it Date Time Stamp may be set to Cont Continuous with recording in progress Press STOP on recording deck to restore normal...

Страница 59: ...nary head Linear Control 1 stationary head Erase 1 full track 1 audio track 2 Flying Erase Heads on Deck 2 VIDEO Input RCA Type 75 ohms unbalanced 1 V P P x2 Output RCA Type 75 ohms unbalanced 1 V P P Horiz Res Monochrome more than 230 lines S N Ratio Better than 43 dB AUDIO Input AUDIO IN RCA 8 dbm 47K ohms x2 Output AUDIO OUT RCA 8 dbm 1 5K ohm TV Tuner 181 channel frequency synthesized VHF inpu...

Страница 60: ...orized Sensory Science service center O t h e r Wa r r a n t y C o v e r a g e Commercial Industrial or Educational use has the same warranty coverage as stated in this warranty W h a t a re t h e E x c e p t i o n s This warranty does not cover 1 Normal maintenance service such as video head cleaning 2 Damage from misuse abuse neglect or accident natural disasters or Acts of God 3 Cabinetry decor...

Страница 61: ...e TV 2 Copy Audio Insert 11 26 Copy indicator 8 Copy Mode 11 Copy Settings 11 Copy Tape key 5 7 10 23 Copy Protected Tapes 10 Copying Basic 10 Counter Position 9 Customer Service 51 D Date and Time 9 Date Time Stamp 15 33 Daylight Savings Time 47 Deck 1 key 5 Deck 1 Status indicator 8 Deck 2 key 5 Deck 2 Status indicator 8 Deck Select key 7 Direct Time Search 34 Display key 5 9 Dual Playback 13 Du...

Страница 62: ... Screen Display 49 Search Features 32 34 Search Index Marks 33 Search Index key 6 Sequential Playback 13 Sequential Recording 15 Show Weak Channels 48 Shuttle 12 Shuttle ring 6 Simulcast 17 48 Skip 12 Skip Edit 24 Skip key 6 Slow keys 6 Slow Motion 12 SLP 8 11 14 18 21 Source Tape 10 23 24 26 SP 8 11 14 18 21 SP SLP key 6 Speed Matching 11 Stereo 36 43 48 Stereo Hookup 39 Stereo indicator 8 Still ...

Страница 63: ... 16 17 18 19 20 21 22 23 24 25 26 27 28 29 30 31 To Set MENU to Quit ADVANCED SETTINGS 1 Reset Factory Settings 2 Front A V Input Line 1 3 Rear A V Input Line 2 4 Line 2 Video In Comp 5 Line 2 A V Out Auto Move Sel MENU Quit VCR SETTINGS 1 Child Lock Off 2 Remote Eject On 3 Panel Display Auto 4 Screen Display Auto 5 RF Output Channel Ch3 6 Clock Settings 7 Advanced Settings Move Sel MENU Quit 5 6 ...

Страница 64: ... and marketing innovative digital entertainment products including digital televisions Internet media players DVD players and high end home theater components for the digital living room We take pride in our ability to deliver unparalleled customer support and are honored to have received the prestigious Inside Track award for Supplier Loyalty two years running Should you have any questions feel f...

Отзывы: