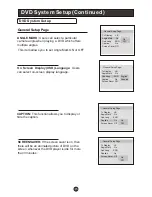
Sens S1500U Скачать руководство пользователя страница 36

DVD Features

Basic Playback 

Preparations

 1.Place the DVD in the disc slot. The disc will be 
    loaded automatically after one to two seconds
    then the DVD player reads the DVD and displays
    the opening menu

If there is no disc placed in 

    DVD mode, OPEN will display on the screen all 
    the times)
        
        Do not place a disc that is unplayable  in this 
        DVD player.


2. Some discs may start playback with a menu. Use 
the cursor buttons on the remote control to select 
menu options and press PLAY/ENTER to start. You 
may also press the digit buttons to select a menu 
option directly. Many DVDs will not allow this during 
start-up. 

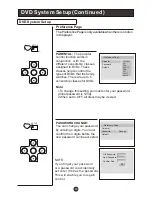
1. Press PAUSE/STEP  to pause playback (still mode). 
    The sound will be muted during still mode.
2. Press PLAY/ENTER to resume normal playback.


Pause playback

1.

 Press STOP      button to go to stop mode, the TV

    screen  will show the start logo.  With some discs, 
    such as DVD or CDs, the player can resume 
    playback from the point where it was stopped.

2.

 Press PLAY/ENTER to resume playback from the 

    location where the playback was stopped.

3.

 Press STOP twice to stop completely.

Stop playback

   Previous and Next

Fast forward and Fast reverse 

1

. Press    FWD        to fast forward through the disc.  

    Each time the   FWD      button is pressed, the 
    fast forward motion speed changes.

2

. Press PLAY/ENTER to resume normal playback.

3

. Press   REV         to fast reverse through the disc.

    Each time the   REV      button is pressed, the 
    fast reverse motion speed changes.

4

. Press  PLAY/ENTER  to resume normal playback.


Basic playback

1

. When paused, press  PAUSE/STEP continuous  

    to  single  step  forward to the next frame in the 
    video. 

2

. Press PLAY/ENTER to resume normal playback.

Single step playback

Preparations

   Press the TV/DVD button on the remote control 
   to enter the DVD status.
   Note: Do not insert a disc until the DVD input states 
   open

Pause playback

Stop playback

   Previous and Next

Fast forward and Fast reverse 

Basic playback

Single step playback

Some discs do not start automatically. Press 
PLAY/ENTER to start playback.

During Playing, pressing the PREV      key will 
restart the last chapter and skip chapters 
backwards with each subsequent press until the 
start of the disc is reached.
Each press of NEXT        key during playing will 
skip the current chapter and play the next one.

Содержание S1500U

Страница 1: ...Please read this manual carefully before using this TV set and keep it for future reference LCD TV LCD TV DVD Combo USER MANUAL S1500U S1900U S1900UDVD...

Страница 2: ...nt operating and maintenance servicing instructions in the literature accompanying the appliance WARNING TO PREVENT FIRE OR SHOCK HAZARD DO NOT EXPOSE THIS APPLIANCE TO RAIN OR MOISTURE CAUTION TO PRE...

Страница 3: ...r pinched particularly at plugs convenience receptacles and the point where they exit from the apparatus 11 Only use attachments accessories specified by the manufacturer 12 Use only with the cart sta...

Страница 4: ...e this equipment if an unauthorized change or modification is made CAUTION USE OF CONTROLS OR ADJUSTMENTS OR PERFORMANCE OF PROCEDURES OTHER THAN THOSE SPECIFIED HEREIN MAY RESULT IN HAZARDOUS RADIATI...

Страница 5: ...TV Channel You Want Picture Mode Audio Mode Sleep GUIDE ARC button button CH LIST button FAV LIST b utton Menu Operations Video Menu Options Video Menu Options Continued Audio Menu Options Audio Menu...

Страница 6: ...ing this machine To your safety and extend the life span of LCD TV please read the following items carefully before using l Please read and understand all the instructions before operation l l l Pleas...

Страница 7: ...down to select the item in the menu CH TV channel up to select the item in the menu 6 Power indicator 7 Remote Sensor Press to turn on your TV or to put it in standby mode To disconnect all power unp...

Страница 8: ...le or antenna signals to the TV either directly or through your cable box 2 Connect audio output from an external device to these jacks 4 S VIDEO Connect S Video out from an S Video device to the jack...

Страница 9: ...e your position to operate the remote control if the television cannot be turned on or off as expected Keep the remote control away from heat sources or humid areas to ensure effective performance of...

Страница 10: ...tton DVD SLOW DVD ANGLE DVD SEARCH DVD AUDIO Mode DVD TITLE PBC DVD PROGRAM Zoom Function DVD CALL DVD 10 Exit On Screen Display Select the aspect ratio Shows program schedule in TV Open the channel l...

Страница 11: ...V Sleep button Shows program schedule in TV Select the aspect ratio Open the favorite channel list in TV Open the channel list in TV Adjust sound mode MENU Select additional channels Adjust Picture Mo...

Страница 12: ...ndicated in the illustration To attach a wall mount bracket to your TV CAUTION These servicing instructions are for use by qualified service personnel only To reduce the risk of hazards do not perform...

Страница 13: ...irection if needed Multi family Dwellings Apartments Connect to wall antenna socket wall antenna socket VHF antenna UHF antenna outdoor antenna Single family Dwellings Houses Connect to wall jack for...

Страница 14: ...your TV There may be noise associated with the resolution vertical pattern contrast or brightness in PC mode If noise is present change the PC mode to another resolution change the refresh rate to an...

Страница 15: ...the VCR s output jacks to the TV input jacks as shown in the figure When connecting the TV to VCR match the jack colors Video yellow Audio Left white and Audio Right red If you connect an S VIDEO out...

Страница 16: ...ox s output jacks to the TV input jacks as shown in the figure When connecting the TV to a Cable Box match the jack colors Video yellow Audio Left white and Audio Right red 2 Select the input source b...

Страница 17: ...A number will appear On screen indicating the volume level Mute 1 Press MUTE button to mute the sound temporarily A mute icon Appears on the screen 2 Press MUTE button or VOL again to restore the sou...

Страница 18: ...his function allows you to turn off the television after a pre selected minutes 5 Min 10 Min 15 Min 30 Min 45 Min 60 Min 90 Min 120 Min 180 Min 240Min number of GUIDE only available in digital signal...

Страница 19: ...utton to select the channel you desired FAV LIST button Adding favorite channels Press FAV LIST under one channel The favorite channel list opens Press CH or CH to select a blank box then press OK to...

Страница 20: ...ly The picture quality on the screen can be adjusted as follows 1 Press MENU button and CH CH until the following menu appears on the screen 2 Press VOL OK button to enter the menu function and CH CH...

Страница 21: ...re This will increase or decrease Warm red and Cool blue colors to suit personal preferences Select Cool to give the white colors a blue tint Standard to give the white colors a neutral tint Warm to g...

Страница 22: ...increase or decrease the level of the lower pitched sounds Treble Press CH CH button and OK to confirm then press VOL VOL to increase or decrease the level of the higher pitched sounds Sound Surround...

Страница 23: ...onal sound signal as well as the original one When having selected SAP button on the remote control this TV can only receive the signal when the TV station transmits the proper signals Mono sound is a...

Страница 24: ...K button to start to scan press EXIT to cancel All channels now available will be automatically preset in order After the search has finished the first program number will display on the screen This s...

Страница 25: ...the item that you want to change afterward press to input the numbers and symbols and OK button to confirm Channel Skip Press VOL OK button to enter the submenu then press CH CH to select the channel...

Страница 26: ...among Low High and Middle to change the transparency of the OSD To select Low the OSD is opacity Screen Mode Press VOL VOL to select among Normal Wide Zoom and Cinema to change the display mode displ...

Страница 27: ...hen Auto mode on the time can not be adjusted Select Off you can operate to set the time manually Date Press VOL VOL to select the position and digits button to set the date Time Press VOL VOL to sele...

Страница 28: ...available and language availability will differ by broadcast DTV Caption Press VOL VOL to select Service1 Service2 Service3 Service4 Service5 Service6 Off DTV Caption Style Press VOL OK to enter the s...

Страница 29: ...firm If OK the parameter will return to the factory set Are you sure OK Cancel Lock Menu Options Lock Enter Password Back EXIT Video Audio Channel Lock Function 1 Press MENU button and CH CH until the...

Страница 30: ...am Block Press VOL OK to enter the submenu as follows Program Block Parental Lock Parental Guide MPAA Rating CA Eng Rating CA Fren Rating Block Unrated Select Back EXIT CH VOL Video Audio Channel Lock...

Страница 31: ...and situations and rare language TV 14 Parents strongly cautioned these types of rated programs may contain sexual content strong language and more intense violence TV MA Mature audience only these t...

Страница 32: ...s type of movie rating means all ages admitted to see the movie PG Parental guidance suggested Some material may not be suitable for children PG 13 Parents Strongly Cautioned this type of movie rating...

Страница 33: ...terial may not be suitable for children 14 In these types of rated programs some content may not be suitable for viewers under the age of 14 Parents are strongly cautioned not to have their children v...

Страница 34: ...rams are only for adult viewers only Blocked Unrated Press VOL VOL to select On or Off Used to lock all the channel not rated Password Press VOL OK to enter the submenu press digits button to input th...

Страница 35: ...t Back Adjust EXIT OK CH VOL 50 50 Note In PC mode Advance Video is no useful PC Press CH CH button to select and VOL OK to confirm the PC menu as below Auto Sync Press CH CH button and then press VOL...

Страница 36: ...ayback was stopped 3 Press STOP twice to stop completely Stop playback Previous and Next Fast forward and Fast reverse 1 Press FWD to fast forward through the disc Each time the FWD button is pressed...

Страница 37: ...function Using a disc recorded in multi angle you can view the scene from different angles for example front side whole view and exterior scene Press this key can change the mode of audio such as Audi...

Страница 38: ...move between pictures Press pause to stop on the current picture Press PLAY ENTER to resume normal playing A JPEG disc contains JPEG jpg format picture information that can be decoded by a micro comp...

Страница 39: ...nse of chopping off extreme left and right edges of the original film picture For this feature to work the disc must be specially coded Such discs are uncommon 4 3 LB LB Letter Box You may select this...

Страница 40: ...ver Off On Off Tv Display LB This item allows you to set Angle Mark ON or OFF ANGLE MARK Users can select a particular camera angle when playing a DVD which offers multiple angles On Screen Display OS...

Страница 41: ...setting you must enter your password Initial password is 1234 2 When set to OFF all discs may be viewed Preference Page Parental Password Change Default Old Password New Password Confirm Pwd PASSWORD...

Страница 42: ...xcept password and parental lock status for this DVD player back to the manufacturers original settings Press ENTER to perform the reset Note Some functions may not be available depending on the type...

Страница 43: ...n the way the disc was burned In a few cases their performance may not be consistant or may not even operate at all This DVD Player is designed and manufactured according to the Region Management Info...

Страница 44: ...12cm Disc diameter 30cm 20cm 12cm 12cm Horizontal resolution More than 500 line No more than 430 line No more than 350 line No more than 250 line Multiple kinds Picture proportion One kind One kind On...

Страница 45: ...ly is interrupted No sound Press MUTE button and verify if Mute mode is on Switch to another channel and verify if the same problem happens Press VOL button to see if the problem can be solved Poor so...

Страница 46: ...45 Power consumption 60W Model 15 without DVD Remote control Batteries User manual Warranty card NOTE Design and specifications are subject to change without notice Dimensions quoted in this manual ar...

Страница 47: ...01 0090507699...

Отзывы: