background image

The components of the SDC 8200 system in detail

18

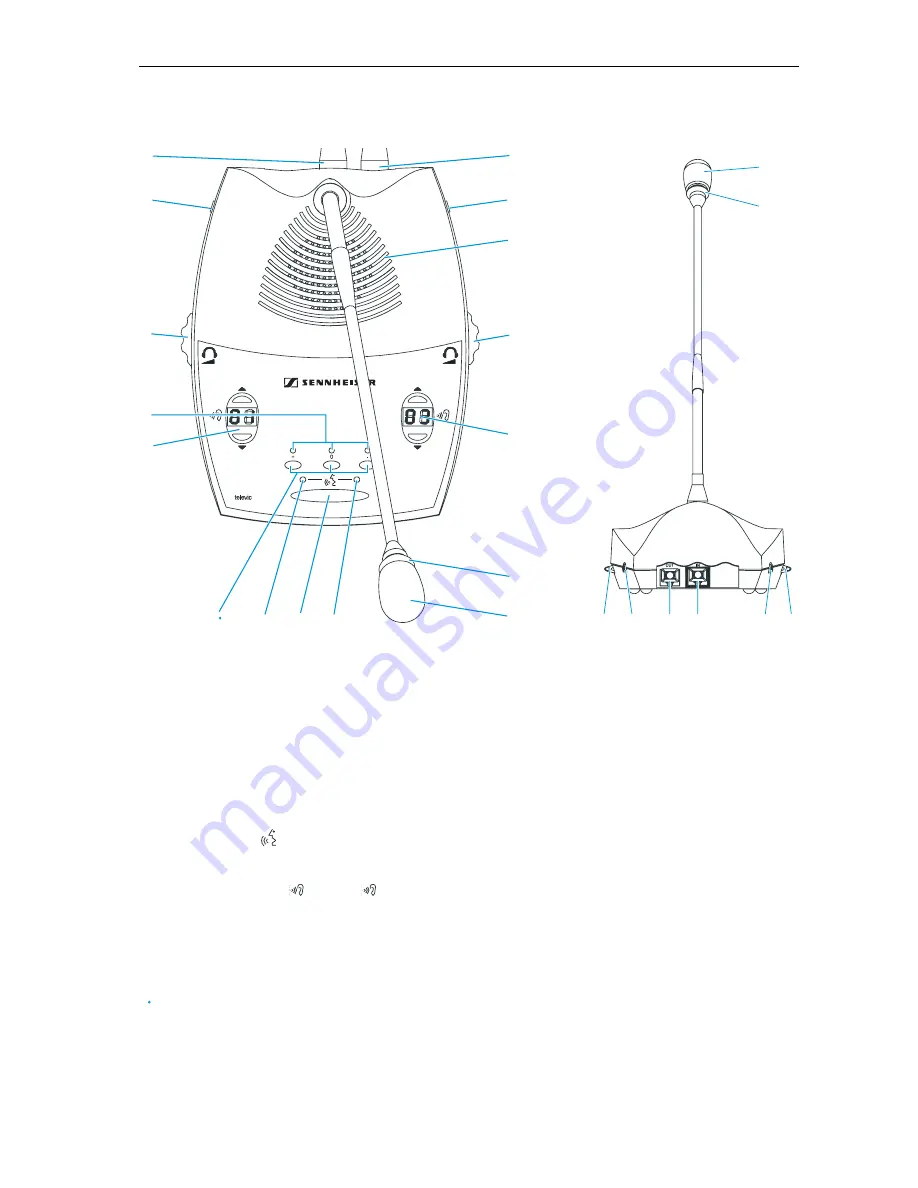
SDC 8200 DC conference unit

IN socket (RJ 45)

OUT socket (RJ 45)

Right headphone output (3.5 mm mono jack socket)

Loudspeaker

Red signal light ring

Microphone

“Microphone active” LED

Microphone key 


“Request to speak” LED

Channel display with “

” and “

” channel selection keys

Headphone volume control for left headphone output 

Left headphone output (3.5 mm mono jack socket)

Headphone volume control for right headphone output 

3 voting keys

3 voting LEDs


22

22


Содержание SDC 8200 AO

Страница 1: ...Conference System SDC 8200 System Manual...

Страница 2: ...half a century of accumulated expertise in the design and man ufacture of high quality electro acoustic equipment have made Sen nheiser a world leading company in this field Please take a few moments...

Страница 3: ...ing the delegate units 28 Taking the floor Making a request to speak 28 Turning off the microphone Cancelling a request to speak 32 Adjusting the volume of the headphones connected to a conference con...

Страница 4: ...iguring the SDC 8200 system 60 Introduction to the central unit s operating menu 60 The start display 60 The six main menus 60 Setting the volume of the consoles built in loudspeakers 85 Configuring t...

Страница 5: ...eter console number 101 Displaying the booth and desk number of an interpreter console 102 Adding interpreter consoles to an existing configuration 102 Loading the factory preset default configuration...

Страница 6: ...acement cable that matches the power out put sockets in your country or to replace the obsolete socket with one to current standards 10 Protect the mains cable from being walked on or pinched particul...

Страница 7: ...f electric shock if the unit is opened There are no serviceable parts inside Refer servicing to qualified personnel only This symbol is intended to alert the user to the presence of important operatin...

Страница 8: ...system is set up by personnel not familiar with the safety regula tions y the system is converted or altered incorrectly y the safety instructions are not observed Attention High Volume This is a pro...

Страница 9: ...f connecting an infrared language distribution system SDC stands for Sennheiser Digital Conference System the new generation of mobile and expandable conference and interpretation equipment The SDC 82...

Страница 10: ...mits every word in excellent audio quality The red signal light ring on the microphone serves as an indicator of who is allowed to take the floor The conference consoles are available in six different...

Страница 11: ...em and at the same time serves as an interface for additional audio systems Via the operating menu of the SDC 8200 CU central unit the conference and interpretation system can be configured for any ro...

Страница 12: ...e analog output unit has nine audio outputs to which you can connect y an infrared language distribution system y PA systems y recording units etc One analog output unit can output the floor channel a...

Страница 13: ...B channel of an interpreter console choose the operating mode between and within the interpreter booths etc y Delegate database The delegate database allows the conference manager to centrally man ag...

Страница 14: ...l as an interpreter console are available All consoles feature y a built in loudspeaker via which the floor channel is output y a microphone key for activating the microphone y a microphone if the mic...

Страница 15: ...dots for displaying voting options vot ing results and other important information The interpreter console features y special interpretation functions y a muting function MUTE key y tone controls for...

Страница 16: ...hone output 3 5 mm mono jack socket Loudspeaker Red signal light ring Microphone Microphone active LED Microphone key Request to speak LED Headphone volume control for left headphone output Left headp...

Страница 17: ...RJ 45 Right headphone output 3 5 mm mono jack socket Loudspeaker Priority key Red signal light ring Microphone Microphone active LED Microphone key Request to speak LED NEXT key Left headphone output...

Страница 18: ...jack socket Loudspeaker Red signal light ring Microphone Microphone active LED Microphone key Request to speak LED Channel display with and channel selection keys Headphone volume control for left he...

Страница 19: ...utput 3 5 mm mono jack socket Loudspeaker Priority key Red signal light ring Microphone Microphone active LED Microphone key Request to speak LED NEXT key Channel display with and channel selection ke...

Страница 20: ...ket Loudspeaker Chip card slot Chip card LED and menu selection keys Red signal light ring Microphone Microphone active LED Microphone key Request to speak LED Dot matrix display Channel display with...

Страница 21: ...dspeaker Chip card slot Chip card LED and menu selection keys Priority key Red signal light ring Microphone Microphone active LED Microphone key Request to speak LED Dot matrix display Channel display...

Страница 22: ...d B Channel keys A and B ENGAGED LEDs A and B MESSAGE key MUTE key Red signal light ring Microphone Microphone active LED MIC key Initialized LED RELAY 1 to RELAY 3 keys LS CHAN key Dot matrix display...

Страница 23: ...key Air vents AUX IN 1 audio input XLR 3F AUX IN 2 audio input XLR 3F AUX OUT 1 audio output XLR 3M MASTER OUT socket RJ 45 SLAVE IN socket RJ 45 SLAVE OUT socket RJ 45 DATA OUT socket RJ 45 AUX OUT a...

Страница 24: ...o input XLR 3F AUX IN 2 audio input XLR 3F AUX OUT 1 audio output XLR 3M MASTER OUT socket RJ 45 not connected SLAVE IN socket RJ 45 not connected SLAVE OUT socket RJ 45 not connected DATA OUT socket...

Страница 25: ...the central unit and the SDC 8200 AO functions correctly FLOOR LED lights up if the floor channel is being used DIGITAL BUS OUT socket RJ 45 for connecting an additional analog output unit DIGITAL BU...

Страница 26: ...ables you can y interconnect the conference and interpreter consoles y interconnect up to 10 central units for setting up a large conference and interpretation system y connect an SDC 8200 AO analog o...

Страница 27: ...position I and the start display is shown on the LC display y The central units are turned off if the POWER switch is set to position 0 and the start display is not shown on the LC display y The confe...

Страница 28: ...this central unit Note It is however possible to simultaneously turn on interconnected cen tral units via a switchable multiple socket To turn a central unit off Set the POWER switch to position 0 The...

Страница 29: ...e the floor immediately The red signal light ring and the Microphone active LED on your console light up permanently indicating that you can now take the floor If the speaker limit has been reached yo...

Страница 30: ...ur console light up permanently indicating that you can now take the floor If the speaker limit has been reached you will join the waiting list and the green Request to speak LED on your console start...

Страница 31: ...eak LED on your console starts flashing The chairman or the conference manager can either assign you the speaking right by turning on your microphone or ignore your request to speak When the chairman...

Страница 32: ...adjusts the volume for both connected headphones The volume is steplessly adjustable and the volume control has no stop At each system start up the volume is automatically reset to a medium level Caut...

Страница 33: ...an choose between the floor channel and the offered interpretation channels To select an interpretation channel Connect Sennheiser mono headphones to your conference console Press the or channel selec...

Страница 34: ...ntrolled you can y make sure that only authorized delegates can participate in voting ses sions y take roll call votes i e you can see the name of each conference partici pant and his or her voting po...

Страница 35: ...modes 1 of 3 or 1 of 5 by pressing the corresponding key below the display Note If your conference system comprises conference consoles with three and five voting keys and you carry out a voting in Vo...

Страница 36: ...rom the request to speak list the speaking right using the SDC 8200 CV chairman unit Press the und menu selection key The first three consoles from which a request to speak has been made are shown on...

Страница 37: ...l adjusts the volume for both headphones At each system start up the volume is automatically reset to a medium level Caution Hearing damage due to high volumes This is a professional conference system...

Страница 38: ...nel of an interpreter console If you interpret into a second language but also if you interpret for other interpreters who take the relay Auto floor configure the B channel of your console as follows...

Страница 39: ...gned to your booth choose the A channel If you interpret into a target language not assigned to your booth choose the B channel In this case make sure that the B channel is configured to the lan guage...

Страница 40: ...em on page 60 it is however possible to make changes to individual settings during a conference Adjusting the volume of the consoles built in loudspeakers Adjust the volume of the consoles built in lo...

Страница 41: ...y symbol disappears from the lower right corner of the display The operating menu of the central unit can be accessed at any time by pressing the ENTER key see Working with the central unit s operatin...

Страница 42: ...ew value is saved and you return to the previous menu level To keep the current value unchanged Press the EXIT key The current value remains unchanged and you return to the previous menu level To exit...

Страница 43: ...43 y choose the audio settings for the AUX inputs and outputs of the central unit y reset the conference and interpretation system Reset y configure the interpreter booths and the interpreter consoles...

Страница 44: ...200 CU central unit you can connect up to 120 6 x 20 consoles y Per SDC 8200 CU M central unit you can connect up to 50 e g 5 x 10 or 3 x 15 1 x 5 consoles Calculate the maximum cable length using the...

Страница 45: ...p to 20 conference and interpretation consoles can be interconnected in one string Calculate the maximum cable length using the Powercalc exe soft ware see Determining maximum cable lengths on page 47...

Страница 46: ...controlled the PC must be connected to the master central unit To set up a conference system with several central units you first have to interconnect the consoles in cable strings and then connect t...

Страница 47: ...p the conference system whether it will work or not This program can also be downloaded from www sennheiser com Structuring an interpretation system If your SDC 8200 system comprises interpreter conso...

Страница 48: ...target lan guage the red signal light ring and the Microphone active LED on their consoles light up Mode between booths Override Interpreters who are seated in different booths but interpret into the...

Страница 49: ...essing the MIC key The auto floor function If the original floor language is not a language of which all interpreters have a complete understanding and from which they work you can enable the auto rel...

Страница 50: ...ction In this case all interpreters interpret the original floor language into their respective target languages These interpretations are fed to the corresponding interpretation channels The below il...

Страница 51: ...sockets AUX IN 1 and AUX IN 2 of the central unit external audio sources which output a balanced mono signal can be connected to the conference system External audio sources are for example y wired m...

Страница 52: ...units we recommend mounting the central units into a rack Warning Danger of life threatening electric shock If you connect the central unit to an ungrounded power outlet persons touching the central...

Страница 53: ...note that intrinsically harmless leakage currents of the individual units may accumulate thereby exceeding the allowable limit value Ground the rack via an additional ground connection Make sure that...

Страница 54: ...l unit Connect the grey RJ 45 plug of the system cable to the IN socket of the first console of a cable string Initialize the consoles as described in the section Turning on the cen tral unit for the...

Страница 55: ...F2 function key you can unlock the operating controls of a slave which then automatically becomes a master This allows you to e g configure the AUX outputs or to divide a large conference and inter p...

Страница 56: ...he floor channel and up to four interpretation channels Optionally you can connect an SDC 8200 AO analog output unit to the cen tral unit The analog output unit features nine XLR 3M audio outputs via...

Страница 57: ...nnels are available at the outputs AUX OUT 2 3 4 5 6 of the 15 pole sub D socket If an SDC 8200 AO analog output unit is connected to the DATA OUT socket of the SDC 8200 CU central unit additional cha...

Страница 58: ...central unit Connect the DIGITAL BUS OUT socket of the first SDC 8200 AO to the DIGITAL BUS IN socket of the second SDC 8200 AO and so on Note You can connect up to four SDC 8200 AO analog output uni...

Страница 59: ...ce of the central unit to control the conference system Connect the other serial interface to the COM 1 interface of the cen tral unit to control the interpretation system Note If you are using more t...

Страница 60: ...eans A cable string is connected to this port means No cable string is connected to this port see section Making a system diagnosis on page 109 To get from the start display into the central unit s op...

Страница 61: ...erview of the settings that can be adjusted in the main and sub menus is given on the following pages Volume SDC 8200 Vx xx SDC 8200 Vx xx SDC 8200 Vx xx SDC 8200 Vx xx SDC 8200 Vx xx SDC 8200 Vx xx 1...

Страница 62: ...eaker 1 Volume 3 Loudspeaker ENTER EXIT Loudspeaker ENTER EXIT Conference Volume Press ENTER to Save ENTER ENTER ENTER Loudspeaker Middle 0 dB Press ENTER to Save Loudspeaker 3 Middle Loudspeaker Bass...

Страница 63: ...TER ENTER EXIT ENTER ENTER EXIT ENTER EXIT EXIT 2 Interpretation 5 Chairmen ENTER EXIT ENTER EXIT 3 Loudspeaker 1 Conference SDC 8200 Microphones Middle 0 dB Press ENTER to Save Microphones 3 Middle M...

Страница 64: ...Continue Set Chairmen ENTER ENTER EXIT ENTER ENTER EXIT ENTER EXIT Press ENTER to Save Press ENTER to Save Press ENTER to Save ENTER 4 Microphnones Conference 5 Chairmen EXIT EXIT 7 Initialise Units...

Страница 65: ...ENTER ENTER EXIT ENTER EXIT Add Unit Press ENTER to Save ENTER EXIT ENTER ENTER Manual Init 3 Delete Unit Delete Unit Mic Number 00 Press ENTER to Del ENTER EXIT ENTER Manual Init 4 Reserve Unit Rese...

Страница 66: ...Initialise Units 3 Load Defaults Automatic Init Save initialisation Press ENTER to ENTER EXIT ENTER EXIT Load Defaults Configuration will be overwritten Continue ENTER EXIT ENTER Conference 8 Reset R...

Страница 67: ...Test Tone 2 Level Test Tone Status OFF ENTER ENTER EXIT ENTER EXIT Test Tone Level LOW Test Tone Frequency HIGH ENTER EXIT Test Tone 3 Frequency ENTER EXIT Options 2 Test Units Test Units Status OFF E...

Страница 68: ...2 ENTER ENTER EXIT ENTER EXIT Vote Labels A2 Vote Labels 0 A3 ENTER EXIT Vote Labels 3 0 ENTER EXIT 8 Reset Conference 9 Options EXIT SDC 8200 Vx xx 1 Conference EXIT 2 Interpretation EXIT EXIT EXIT...

Страница 69: ...age Booth Configuration 2 B Channel Booth Configuration Language ENG Press ENTER to Save ENTER ENTER EXIT ENTER EXIT Booth Configuration B Channel 02 Press ENTER to Save Booth Configuration Auto floor...

Страница 70: ...Language Booth Configuration 2 B Channel Booth Configuration Language ENG Press ENTER to Save ENTER ENTER EXIT ENTER EXIT Booth Configuration B Channel 02 Press ENTER to Save Booth Configuration Auto...

Страница 71: ...s of the Interpretation menu part 3 of 5 Load Config 1 Press ENTER to Load ENTER ENTER EXIT 1 Conference Interpretation 1 Configuration SDC 8200 Vx xx 2 Interpretation EXIT 3 Aux In Out 2 Initialise U...

Страница 72: ...nit Press ENTER to Save ENTER ENTER EXIT EXIT Reset Press ENTER to perform Reset ENTER EXIT Add Unit Press ENTER to Save Load Defaults Configuration will be overwritten Continue ENTER EXIT ENTER EXIT...

Страница 73: ...ss ENTER to Save ENTER ENTER EXIT EXIT Max Desks Max Desks 3 Press ENTER to Save Mode between Booths Mode Override Press ENTER to Save ENTER EXIT ENTER EXIT Options 3 Mode between Booths EXIT EXIT 1 C...

Страница 74: ...ess ENTER to Save ENTER ENTER ENTER EXIT EXIT Aux Out 1 Status OFF Press ENTER to Save ENTER EXIT 2 Interpretation 3 Aux In Out EXIT 4 System 2 Aux Out 2 EXIT EXIT ENTER Aux Out 1 2 Volume XLR Aux Out...

Страница 75: ...lume Aux Out 2 2 Channel Aux Out 2 Volume 00 Press ENTER to Save ENTER ENTER EXIT EXIT Aux Out 2 Channel 00 Press ENTER to Save ENTER EXIT 2 Interpretation 1 Aux Out 1 3 Aux In Out EXIT 4 System 3 Aux...

Страница 76: ...lume Aux Out 3 2 Channel Aux Out 3 Volume 00 Press ENTER to Save ENTER ENTER EXIT EXIT Aux Out 3 Channel 00 Press ENTER to Save ENTER EXIT 2 Interpretation 2 Aux Out 2 3 Aux In Out EXIT 4 System 4 Aux...

Страница 77: ...lume Aux Out 4 2 Channel Aux Out 4 Volume 00 Press ENTER to Save ENTER ENTER EXIT EXIT Aux Out 4 Channel 00 Press ENTER to Save ENTER EXIT 2 Interpretation 3 Aux Out 3 3 Aux In Out EXIT 4 System 5 Aux...

Страница 78: ...lume Aux Out 5 2 Channel Aux Out 5 Volume 00 Press ENTER to Save ENTER ENTER EXIT EXIT Aux Out 5 Channel 00 Press ENTER to Save ENTER EXIT 2 Interpretation 4 Aux Out 4 3 Aux In Out EXIT 4 System 6 Aux...

Страница 79: ...to Save ENTER ENTER ENTER EXIT EXIT Aux Out 6 Channel OFF Press ENTER to Save ENTER EXIT 2 Interpretation 3 Aux In Out EXIT 4 System 7 Aux In 1 EXIT EXIT ENTER Aux Out 6 2 Volume Headphone Aux Out 6 V...

Страница 80: ...l Aux In 1 2 Sensitivity Aux In 1 Level 00 Press ENTER to Save ENTER ENTER EXIT EXIT Aux In 1 Sensitivity Low Press ENTER to Save ENTER EXIT 2 Interpretation 6 Aux Out 6 3 Aux In Out EXIT 4 System 8 A...

Страница 81: ...TER ENTER EXIT EXIT Aux In Out 9 External Equalizer ENTER EXIT Aux In 2 Sensitivity Low Press ENTER to Save ENTER EXIT 2 Interpretation 7 Aux In 1 3 Aux In Out EXIT EXIT 4 System EXIT ENTER ENTER Aux...

Страница 82: ...cs 2 Port Errors ENTER ENTER EXIT ENTER EXIT ENTER EXIT System 2 Camera Control Camera Control Status OFF Press ENTER to Save ENTER EXIT ENTER System 3 Control Panel Control Panel Status OFF Press ENT...

Страница 83: ...TER ENTER EXIT EXIT System 5 Version Version xx xx xx x xx ENTER EXIT Loudspeaker Switch Off Yes Press ENTER to Save ENTER EXIT 3 Aux In Out 3 Control Panel 4 System EXIT 5 Language EXIT ENTER ENTER A...

Страница 84: ...ge 1 Choose Language License 1 Serial Number Choose Language English ENTER ENTER EXIT EXIT ENTER EXIT Serial Number xxxxxxxx ENTER EXIT SDC 8200 Vx xx 6 License 4 System License 2 View License View Li...

Страница 85: ...isation is shown on the display press the ENTER key All connected conference consoles are initialized automatically and any previous configuration is deleted Manually initializing all conference conso...

Страница 86: ...uration To add newly connected conference consoles to an already existing config uration From the central unit s operating menu choose Conference Initialise Units and Manual Init one after the other T...

Страница 87: ...ers which you want to reserve and press the ENTER key each time you have chosen a microphone number The chosen microphone numbers are reserved To assign a reserved microphone number to a conference co...

Страница 88: ...tion system is PC controlled The conference modes Direct Access Fifo Group 1 to Group 4 Override With request and With Req No clear can also be chosen if your conference and interpretation system is n...

Страница 89: ...rophones Via the Microphones menu item you can adjust the audio settings bass middle and treble response automatic gain reduction pick up area around the microphone for the consoles microphones If sev...

Страница 90: ...l unit s operating menu choose Conference Chairmen and Set Chairman one after the other The list number 01 list numbers are from 01 to 50 is highlighted in black Choose the desired list number and pre...

Страница 91: ...u can delete the list of configured VIP units in order to configure other conference consoles as VIP units From the central unit s operating menu choose Conference VIP and Clear VIP one after the othe...

Страница 92: ...he other Choose Status ON All microphones are activated one after the other in the order in which the consoles were initialized The red signal light ring of the currently active microphone lights up A...

Страница 93: ...art from the conference system the SDC 8200 system comprises a sep arate interpretation system To be able to make use of the interpretation system you require the SDC 8200 ID interpreter consoles Via...

Страница 94: ...have cre ated and saved the interpreter configuration the new number of inter preter consoles will automatically be saved in the configuration 3 From the central unit s operating menu choose Conferen...

Страница 95: ...e Save Config menu appears 4 Choose as Config 1 or as Config 2 and press the ENTER key The modified interpreter conifguration is saved and becomes effective immediately Note If you exit the Save Confi...

Страница 96: ...n order to be able to configure more than four languages you have to purchase one of the language licenses available see Licenses for expanding the SDC 8200 CU central unit on page 115 Example Let us...

Страница 97: ...erating menu choose Interpretation Options and Mode in Booths one after the other The current mode in shown on the display Choose the desired mode You can choose between the modes Mixed and Toggle Ove...

Страница 98: ...that the interpreter is able to interpret into a second language the B channel has to be configured to this language Note The second target language must already be configured as the main target langu...

Страница 99: ...ENTER key Choose Auto floor and press the ENTER key Choose Yes to enable the auto floor function and press the ENTER key to save this configuration The relay interpretation is automatically relayed t...

Страница 100: ...an individual booth number on page 100 and Manually assigning an interpreter console an individual desk number inter preter console number on page 101 Manually assigning an interpreter console an ind...

Страница 101: ...MENU or MENU menu selection key until the desired desk number DESK is shown on the display Press the MIC key to transmit the selected desk number to the cen tral unit Note If an error occurs during i...

Страница 102: ...r interpreter console number on page 101 If all booth and desk numbers are assigned correctly press the ENTER key on the central unit to save this configuration The displays of the interpreter console...

Страница 103: ...ystem installed in a separate room to carry out a remote conference Via the audio outputs you can connect e g a recording unit Via the Aux In Out menu you can configure the central unit s audio inputs...

Страница 104: ...out possible health risks arising from use This system is capable of producing sound pressure exceeding 85 dB A 85 dB A is the sound pressure cor responding to the maximum permissible volume which is...

Страница 105: ...hoose Aux In Out Choose one of the audio outputs AUX OUT 2 to AUX OUT 6 Choose Channel The current channel number is shown on the display Choose the desired channel number and press the ENTER key to s...

Страница 106: ...shown on the display Reduce the volume and press the ENTER key to save your setting Aux Out 3 3 Status Aux Out 3 Status OFF Press ENTER to Save Caution Hearing damage due to high volumes This is a pro...

Страница 107: ...he display Choose Status ON and press the ENTER key to save your setting Note If the external equalizer is activated via the central unit s operating menu the central unit outputs the audio signals of...

Страница 108: ...P switches 2 switch positions ON or OFF and the rotary switch 16 switch positions 1 to F you assign a channel number to the output OUT 1 reference output The outputs OUT 2 to OUT 8 are auto matically...

Страница 109: ...itch to position 9 Close the housing and tighten the screws In order to avoid that the two analog output units are later confused we recommend marking the second analog output unit with a sticker Conn...

Страница 110: ...e central unit s operating menu choose System and Camera Control one after the other The current status of the camera control is shown on the display Choose Status ON and press the ENTER key to save y...

Страница 111: ...in loudspeaker of the ambient sound console on or off From the central unit s operating menu choose System Ambient Sound and Loudspeaker one after the other To turn the loudspeaker on choose Switch O...

Страница 112: ...desired language and press the ENTER key Displaying the central unit s serial number To display the central unit s serial number From the central unit s operating menu choose License and Serial Numbe...

Страница 113: ...available from Sennheiser electronic To enter a new license code From the central unit s operating menu choose License and Upgrade License one after the other 0 is shown on the display Turn the jog w...

Страница 114: ...d that it is turned on Only the microphone of the chairman unit can be activated Make sure that the max number of simultaneously active microphones is set to at least 1 see Setting the speaker limit o...

Страница 115: ...Software module Mic Management 500978 SDC 8200 S VM Software module Voting Management 500979 SDC 8200 S VD Software module Result Display 500980 SDC 82008200 S IM Software module Interpreter Managemen...

Страница 116: ...DC 8200 CU M Max number of consoles 120 50 Operation of the SDC 8200 DV delegate unit yes no Max number of connectable analog output units 4 Daisy chainable yes no Expandable by additional licenses ye...

Страница 117: ...3 mV Headset input impedance 1 k at 1 kHz Max output level at headphone output 1 7 V at 90 mW S N at headphone output 80 dB A 75 dB A 80 dB A 68 dB A Power consumption max 2 5 W max 3 5 W Operating te...

Страница 118: ...A Frequency response 100 14 000 Hz THD N 0 5 1 5 dBu Headphone output Output power max 90 mW at 32 Signal to noise ratio max 75 dBA Frequency response 100 14 000 Hz THD N 0 2 0 dBu PC interface COM 1...

Страница 119: ...8200 CU DATA OUT socket Frequency reponse 100 14 000 Hz Output level XLR max 8 dBu balanced Output level RCA max 8 dBu unbalanced Output impedance 80 at 1 kHz Signal to noise ratio 86 dB A Operating t...

Страница 120: ...e camera control must be connected to the SDC 8200 CU central unit s COM 2 interface RS 232 connection The settings for the communications port for camera control are Bits per second 19 200 Data bits...

Страница 121: ...10131 The chairman unit 0001 is deactivated M Mic No 4 CRC 4 A delegate unit is activated M00030110 A delegate unit is activated and it has the micro phone number 0003 m Mic No 4 CRC 4 A delegate unit...

Страница 122: ...trol panel is to be reset Reset The control panel must be connected to the central unit s COM 2 interface RS 232 connection The settings for the communications port for the control panel are Bits per...

Страница 123: ...001015E The microphone with the number 0001 is deacti vated 1 D Mic No 4 CRC 4 A microphone goes into request 1D00020137 The microphone with the number 0002 goes into request mode E 00 CRC 4 All micro...

Страница 124: ...s should be connected to the OUT socket It is also possible to connect a cable daisy chain with conference consoles to the central unit and when the cable daisy chain reaches 100 m insert a repeater i...

Страница 125: ...im under the terms of this guarantee send the device including accessories and sales receipt to the responsible service partner To minimise the risk of transport damage we recommend that the original...

Страница 126: ...3 Connect the equipment into an outlet on a circuit different from that to which the receiver is connected 4 Consult the dealer or an experienced radio TV technician for help The users manual or instr...

Страница 127: ......

Страница 128: ...Sennheiser electronic GmbH Co KG 30900 Wedemark Germany Phone 49 5130 600 0 Fax 49 5130 600 300 www sennheiser com Printed in Germany Publ 02 07 516539 A01...

Отзывы: