background image

888

MGT Docking Station version II

3.2 Bump Test

Bump test is the process which checks and verifies the performance of the 

monitors and ensures that sensors are correctly responding to the target gas. 

To perform a Bump Test, follow the below:

Insert the monitor(s) into the bay facing down.

Slightly press down on the monitor until it locks into place.

Press the Bump Test button for 2 seconds to execute Bump test.

During the 20~30seconds, bay LEDs begin to light as the test progress.

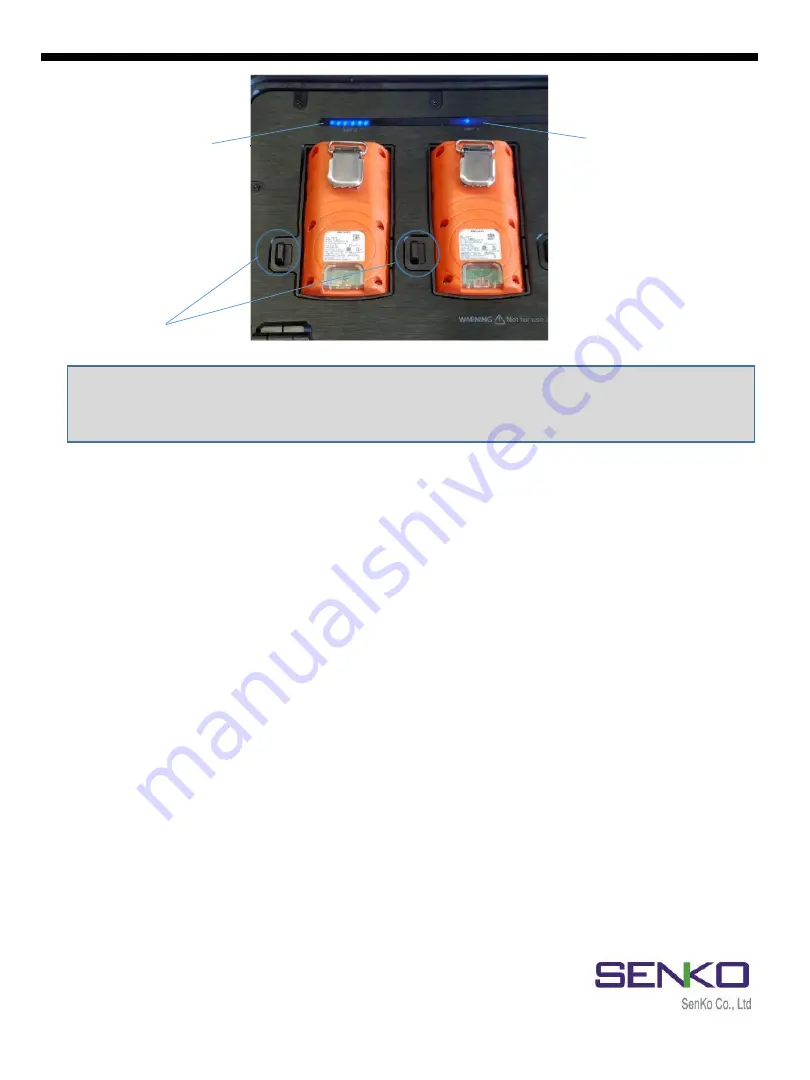
When test is finished, all (six) blue Bay LEDs illumination indicates if the MGT 

has passed the test (see Figure 3).

Otherwise, the third blue Bay LED illumination indicates if the MGT has failed 

the test (see Figure 3).

Figure 3

MGT has passed 

the test (six LEDs)

MGT has failed the 

test (only 3

rd

LED)

Bay locking 

mechanism 

Note: 

Do not use the monitors that failed the calibration test.

To remove the MGT monitors from the bay, pull to the left side bay

locking mechanism (lower-left side of each bay).

4. Trouble Shooting

4.1 

Bay Light does not turn on /test not performed

Clean Monitor IR window.

IR interference (bright lights/sunlight).

Monitor in gas alarm state.

4.2 

All tests fail

Gas cylinder empty 

check pressure gauge if it indicates at least 100psi/10bar.

Gas Expired 

check gas expiration date located on the cylinder.

Wrong gas concentration(s) 

gas cylinder and MGT concentrations not same.

Wrong gas type 

check gas type.

Содержание MGT Version II

Страница 1: ...MGT Docking Station Version II User s Manual MGT Docking Station version II www senkocanada com sales senkocanada com...

Страница 2: ...Inlet 2 5 Installation of Gas Cylinder 3 Testing 3 1 Calibration 3 2 Bump Test 4 Trouble Shooting 5 Docking Station II Manager Software 5 1 Software Installation 6 Connecting to the MGT Docking Statio...

Страница 3: ...and devices Severe vibration or shock to the device may cause a sudden reading change and cause the device malfunction Do not leave or use the device at the watery place or at where there is any liqui...

Страница 4: ...s It also maintains all the important event logs that demonstrate users are working within company requirements 4 1 2 Instructions and Parts 1 1 Description a b c d e f g h i j k l m n o p q No Descri...

Страница 5: ...x 43 7 x 21 3cm 20 66 x 17 20 x 8 40 Weight Without cylinder 11 0kg Temperature 41 to 104 F 5 to 40 C Warranty Full 2 years Battery Type Rechargeable Lithium Ion Battery Life Up to 1 000 Bump Tests L...

Страница 6: ...LEDs and meanings Each Bay has six blue LEDs see Figure 1 which indicates the process status Each of them will turn on by order from left to right while testing After testing is finished make sure all...

Страница 7: ...straps and close the cylinder compartment Check the pressure gauge on the front panel Re install thumbscrews After installing a gas cylinder ensure USB is attached 3 Testing 3 1 Calibration Calibratio...

Страница 8: ...therwise the third blue Bay LED illumination indicates if the MGT has failed the test see Figure 3 Figure 3 MGT has passed the test six LEDs MGT has failed the test only 3rd LED Bay locking mechanism...

Страница 9: ...devices internal configurations The software can adjust and make changes to the Docking Station and the MGT units using SENKO IR Link and or partly USB Disk 5 1 Software Installation After downloadin...

Страница 10: ...MGT Docking Station version II 10 The Installation will be ready to begin Click Install...

Страница 11: ...ote The IR Link connection works only when it is placed into the Bay 1 USB drive must be installed to store the test results Do not open the software if IR Link is not plugged to PC When the Docking M...

Страница 12: ...Link starts to flash rapidly After few seconds Read complete message will be displayed and current settings of Docking Station II will be showed on the interface Figure 4 Note If Send timeOut message...

Страница 13: ...the bump calibration Maintenance Notification Latching Alarms Until the users push the button the alarm will be activated continuously Auto Zero When the device is turned on the zero calibration will...

Страница 14: ...ftware 7 1 Overview of Software MGT Docking Station version II Figure 7 Load the data Refresh Click serial number Select the address Calibrated by Approved by Print All the information will be shown a...

Страница 15: ...plays current setting of the Docking Station II and will discard any unsaved changes in the Tab Calibrate If the box is not selected calibration process will not proceed by pressing Calibration button...

Страница 16: ...ed and alarm occurs alarm will not stop until resetting the unit push button If not selected and alarm occurs alarm will stop once present gas concentration goes below the alarm set points Auto Zero T...

Страница 17: ...vents file in USB Disk Click Refresh button to view and download the latest logs After clicking Refresh button all logs will be available to view see Figure 8 To download the logs follow the below Plu...

Страница 18: ...all data will be available to view see Figure 9 To print latest calibration certificate follow the below Plug the IR Link into a USB port on PC and place into Bay Unit 1 Double click and open the inst...

Страница 19: ...or modify the product or any other cause of damage beyond the range of the intended use including damage by fire lightening water damage or other hazard voids liability of the manufacturer In the even...

Отзывы: