


4/4
CONTACT INFORMATION
Technical support
Product information
CAUTION: to use this product it is necessary to use the dedicated "MyAlarm3 Cloud" APP downloadable via the QR Code
on the cover or via the app store and apple store.
First startup procedure:
1. Download the iOS / Android APP (see QR Code on the cover or search for MyAlarm3 Cloud in the stores);
2. Download the installation manual from the APP or from the QR Code on the cover to get the complete guide;
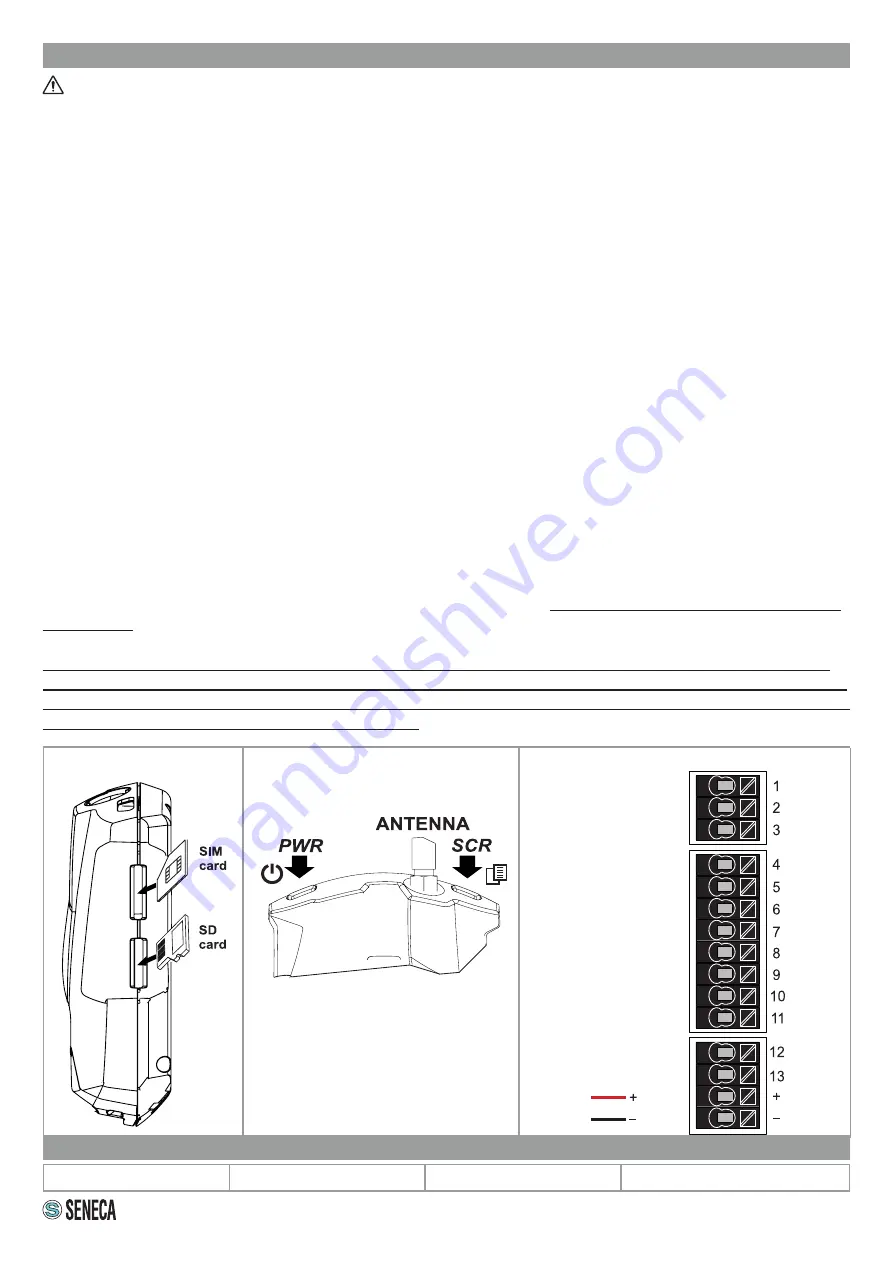
3. Insert the mini SIM card into the switched-off MyAlarm3 Cloud (*);
4. Check that the SD card is correctly inserted (see image 1);
5. Power the control unit by connecting it to the Power Supply socket or alternatively use the cable with the forks (do not turn on the
device without power as it is in shipping mode).
To confirm the first startup procedure is correct, the Yellow GSM LED will change flashing from 1 to 3 times a second.
(*) if a SIM card other than the one supplied with the KIT is used, ensure you have removed the locking PIN when you switched on
using another device (i.e. a smartphone)
Simplified activation procedure (for the complete procedure see the installation manual):
1. Open the MyAlarm3 Cloud APP, register your Seneca cloud account (if you don't already have one) and wait for the account
activation email;
2. After receiving the account activation email, select the "ACTIVATE ACCOUNT" key.
3.
After activating the account, open the app again and log in for the first time entering the username and password you hasve just
created;
4.
Enter the 5 + 10 character "activation code" on the back of the control unit and select the "ACTIVATE" button (if it is not the first
service associated with the account, from the app click "change system "and then select the “ADD” button); (*)
5. From now on, the service is active and the control unit's owner account can access the MyAlarm3 Cloud system from both the web
browser and the MyAlarm3 Cloud mobile app, as well as invite other users to use his newly activated MyAlarm3 Cloud.
Switching on and menu keys:
MyAlarm3 Cloud is fitted with an ON/OFF PWR key positioned in the LH top corner (Figure 2).
To switch it off, keep the PWR key pressed for a few seconds. The device is fitted with a MENU key, in the RH top corner.
Pressing this key displays the parameters.
N.B.:
in order to guarantee the correct operation of the MyAlarm3 Cloud control unit, THE CONTENT OF THE SD CARD MUST NOT
BE REMOVED
IMPORTANT! SENECA s.r.l. is not responsible for the length of time, operation or lack of notifications (alarms, information
data, etc...) provided through push notifications, SMS, email, voice calls, etc. These communications depend on third parties
internet connectivity and/or telephony services on which SENECA s.r.l. can not intervene directly. For any further information
please see the Cloud services supply contract. Thank you.
CONTROL UNIT INSTALLATION AND FIRST ACTIVATION
Figure 2
Figure 1
AUX 1
Common to the two relays
AUX 2
DIN 1
DIN 2
DIN 3
DIN 4
AUX+12 Vdc
GND
AIN 1
AIN 2
GND
NTC
Supply
Supply
Input for sensor
ELECTRICAL CONNECTIONS


