background image

6

OPERATiON

3.1   SPECifiC SAfETY iNSTRUCTiONS

 Before starting work, make sure that the safety and trig-

ger devices are working perfectly and that all screws and 

nuts are firmly tightened.

 Do not manipulate the stapler in any way.

 Do not dismantle or block any part of the stapler. This ap-

plies in particular to the trigger safety mechanism!

 Do not perform any „emergency repairs“ using inappropri-

ate methods.

 Ensure that the stapler undergoes regular and proper 

maintenance.

 Avoid any weakening or damage to the stapler, e.g. from

  - knocking or engraving

  - modification work not authorised by the manufacturer

  - working on templates made of hard material (e.g. steel)

  - dropping or pushing over the floor

  - using it as a hammer

  - any type of violent force.

3.2   CONNECTiON TO THE COMPRESSED AiR SUPPLY

  3.2.1  Requirements for the compressed air supply

To ensure that the stapler operates, perfectly filtered, dry, 

oiled compressed pressure is required in sufficient quan-

tities (see chap. 1.2, „Technical data“). Observe the fol-

lowing points when selecting the compressed air supply:

 If the pressure in the supply network is higher than the 

permissible operational pressure of the stapler (8.3 

bar), an additional pressure control valve (pressure 

regulator) with a downstream pressure control valve 

must be installed in the supply line.

 When compressed air is generated by a compres-

sor the natural atmospheric humidity condenses. This 

condensation must be removed by a moisture trap. 

Otherwise corrosion can begin in the compressed air 

system and in the stapler and cause wear and tear.

 Permanently installed lines for the compressed air 

system should have an internal diameter of at least 19 

mm. The hose connection to the stapler should have an 

internal diameter of at least 8 mm.

 Compressed air lines should be laid with a downward 

slope from the compressor to the consumer.

 Terminals for consumers should be connected to the 

upper side of permanently installed compressed air 

lines.

  3.2.2 Lubrication

If there is no maintenance unit, oil the air inlet on the 

stapler with SENCO pneumatic oil; under normal op-

erational conditions 5-10 drops twice daily is enough.

  3.2.3 Connection

To connect the stapler to the compressed air supply 

carry out the following steps:

1.

 Ensure that the pressure in the compressed air system 

does not exceed the permissible operational pressure 

of the stapler (8.3 bar).

2.

 Set the air pressure at the lowest level of the recom-

mended operational pressure (6 bar).

3.

 Empty the magazine to avoid a staple from being eject-

ed in the following steps. This could happen if parts of 

the stapler are not in the starting position due to previ-

ous maintenance or repair work or due to transport.

4.

 Connect the connecting nipple (11) on the stapler to 

the compressed air supply using a hose connection 

equipped with quick connectors.

5.

 Make sure the stapler is working perfectly.

To do this, place the outlet on a piece of wood or wood- 

work.

-  Now pull the stapler towards you without activating the 

trigger. The system should not be set off.

-  Repeat the process with an activated trigger. The sys-

tem should now be set off at regular intervals.

3.3   fiLLiNG THE MAGAziNE

        DANGER

if iNCORRECT STAPLES ARE USED, SAfE OPERA-

TiON CANNOT BE GUARANTEED. fOR THiS REASON 

YOU SHOULD ONLY USE STAPLES APPROVED BY 

THE MANUfACTURER (SEE CHAP. 1.2, „TECHNiCAL 

DATA“). 

To fill the magazine carry out the following steps:

1.

 Disconnect the system from the compressed air supply.

2.

 Pull the staple slide so far back that the rest snaps into 

place.

3.

 Place the staple block with the tips facing down into the 

magazine.

4.

 Unlock the staple slide by pressing on the rest. Let the 

staple slide glide forward.

5. 

Reconnect the compressed air supply.

To empty the magazine, repeat the procedure in reverse.

Staple 

supply 
Staple  

slide 

(closed)

Rest for 

staple  

slide

llustration 3.3/1: Filling the magazine

3.4   HANDLiNG DURiNG OPERATiON

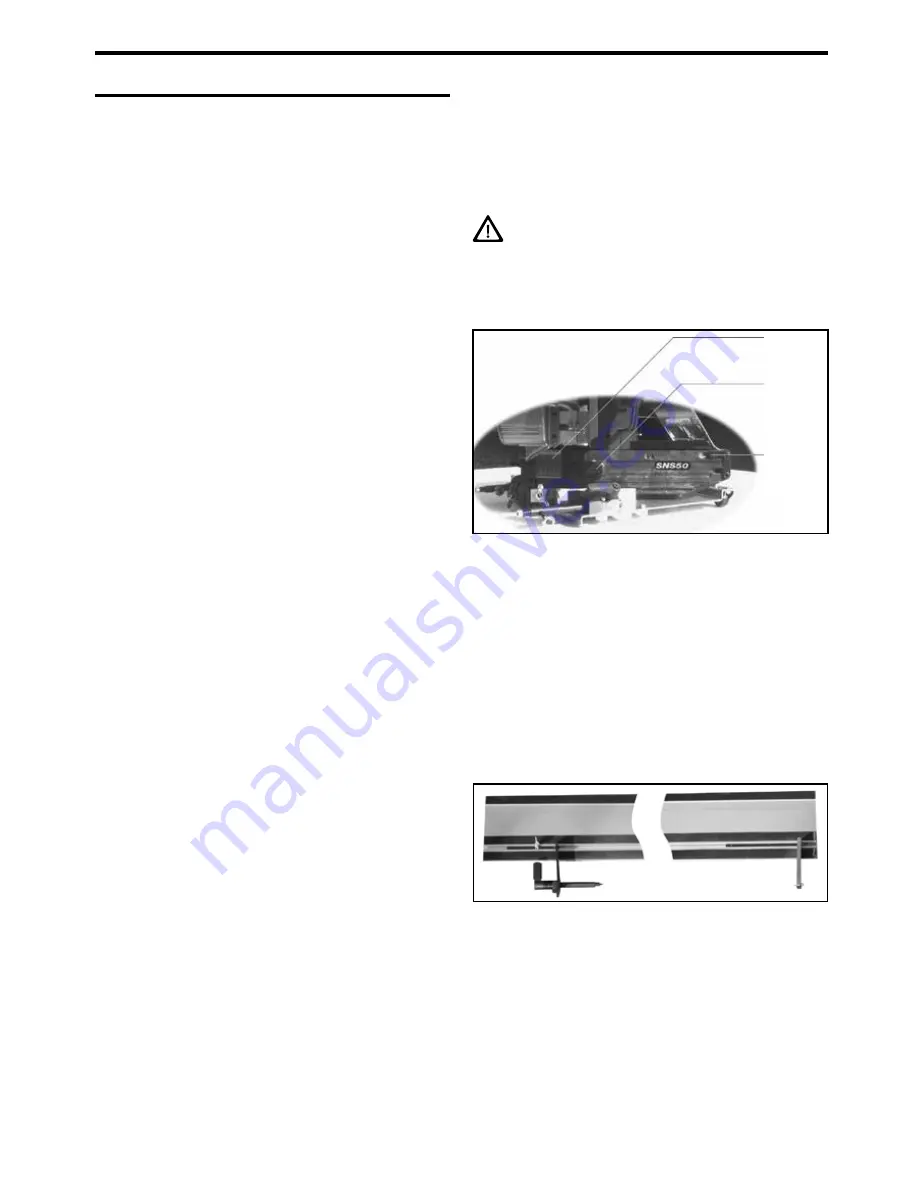
  3.4.1  Operation with guide rails

Illustration 

3.4.1/1

: Guide rails with mounted clamping 

arms (view from below)

To use the stapler with guide rails, carry out the following 

steps:

1.

 First, mount the supplied limit stops on the guide rails. 

The fixed limit stop (on the right in illustration 3.4.1/1) 

is fixed using elasticity. Push the tensile limit stop into 

the guide rails in such a way that it lies in the joint of the 

panel to be processed.

Содержание SNS50

Страница 1: ...Verpa Senco B V Pascallaan 88 8218 NJ Lelystad The Netherlands www verpa senco com 2014 by Senco Brands Inc 13 05 2014 Stapler SNS50 SQS55 Wegmatik Instruction manual...

Страница 2: ...e with staple supply Trigger Staple slide Clamping lever for lateral guide rollers Lateral guide roller Castors height adjustable Switch lever for staple spacing Trigger Connecting nipple compressed a...

Страница 3: ...ring operation 6 3 4 1 Operation with guide rails 6 3 4 2 Operation without guide rails 7 3 4 3 Removal of blockages 7 3 5 Settings 8 3 5 1 Setting for the driving depth 8 3 5 2 Switching the staple s...

Страница 4: ...2 4 m s2 Recommended lubricant If there is no maintenance unit oil the air inlet on the stapler with SENCO pneuma tic oil under normal operational conditions 5 10 drops twice daily are enough Delivery...

Страница 5: ...nt parts from the manufacturer and its representatives may be used when repairing the stapler Repair work may only be carried out by experts approved by the manufacturer or other experts and observing...

Страница 6: ...atic oil under normal op erational conditions 5 10 drops twice daily is enough 3 2 3 Connection To connect the stapler to the compressed air supply carry out the following steps 1 Ensure that the pres...

Страница 7: ...improved lateral guidance you should modify the guide roller bracket from position I to position II see illustration 3 4 2 1 Illustration 3 4 2 1 Modification of the guide roller Guide rollers bracke...

Страница 8: ...ine with a larger cross section To switch the staple spacing carry out the following steps 1 Tip the switch lever against the spring pressure to the right 2 Swing the switch lever into the desired pos...

Страница 9: ...screws and nuts are tight Make sure the trigger system is working perfectly Repair Repairs to the pressure tank may only be conducted by ex perts approved by the manufacturer or other experts using t...

Страница 10: ...10 Lists of replacement parts 9 1 Basic stapler SCREWS SECURED WITH OKS 90 Existing O rings inserted with grease YB0123 or 540003...

Страница 11: ...020 1 STAPLER UNIT SQS55 STAPLER UNIT SNS50 12 EJ01930 1 WHEEL CONTROL 1 13 EJ01940 1 WHEEL CONTROL 2 14 EJ019B0 1 CLAMPING ARM 15 KD0042 4 SCREW 16 KD0380 2 HEXAGONAL SPLINT NUT M6 17 KD0382 1 SCREW...

Страница 12: ...12 9 2 Clock pulse generator Inserted with Weicon Aiti Size AS 040 P Existing O rings inserted with grease YB0123 or 540003...

Страница 13: ...T 13 EJ01921 1 VALVE BRACKET RIGHT 14 GDE0157 1 PEG 15 KDN1510 1 EYELET SCREW 16 KD0055 1 THREAD PEG 17 KD0128 1 THREAD PEG 18 KDN0527 1 DISC DIN9021 19 KDN0583 4 SCREW 20 KDN0701 1 NUT 21 KDN0703 2 D...

Страница 14: ...14 9 3 Stapler unit Screws and nuts secured with OKS90...

Страница 15: ...T 16 EJ0190R 2 HANDLE SHELL LEFT 17 EJ0190S 2 HANDLE SHELL RIGHT 18 EJ01912 1 BRACKET2 19 HDE0158 2 TRIGGER 20 HDE0218 1 SOCKET 21 KB0031 1 SCREW 23 KD0042 4 SCREW 24 KDN0160 2 CYLINDER SCREW 25 KDN05...

Страница 16: ...16 9 4 Stapler Illustration 9 4 1 Stapler...

Страница 17: ...1 Seal assembly FA0185 1 Panel FA0191 FA0190 1 1 Staple guide SNS50 Staple guide SQS55 GC0067 1 Handle FC0347 1 Cover GB0420 1 Cover GC0616 1 Seal GC0617 1 Staple slide GC0618 1 Spring GF0039 1 Cover...

Страница 18: ...LAMP 6 EJ01935 1 ADJUSTABLE AXIS 7 KDN0625 2 U DISC 8 KDN0746 1 SCREW 9 KDN0846 1 SCREW 10 KDN1438 1 PRESSURE SPRING 11 KDN1507 1 SL SAFETY MECHANISM 8 12 MDM0019 1 BALL BEARINGS 13 MDM0248 1 CLAMPING...

Страница 19: ...LAMP 6 EJ01935 1 ADJUSTABLE AXIS 7 KDN0625 2 U DISC 8 KDN0746 1 SCREW 9 KDN0846 1 SCREW 10 KDN1438 1 PRESSURE SPRING 11 KDN1507 1 SL SAFETY MECHANISM 8 12 MDM0019 1 BALL BEARINGS 13 MDM0248 1 CLAMPING...

Страница 20: ...llustration 10 7 1 Clamping arm Replacement parts Clamping arm POSITION PART NUMBER NUMBER DESIGNATION 1 EJ013B3 1 Bracket 2 EJ013B5 1 Index bolt 3 EJ013B6 1 Centring pin 4 KDN1255 1 Wing screw 5 KDN1...

Страница 21: ...ler SNS50 SQS55 Wegmatik EJ02000 EJ01900 to which this declaration relates are in their delivered condition in compliance with the following standards or standardising documents Equipment and product...

Страница 22: ...22...

Страница 23: ...Verpa Senco B V Pascallaan 88 8218 NJ Lelystad The Netherlands www verpa senco com 2014 by Senco Brands Inc 13 05 2014 Klammerger t SNS50 SQS55 Wegmatik Betriebsanleitung...

Страница 24: ...mit Klammervorrat Ausl ser Klammerschieber Klemmhebel f r seitliche F hrungsrollen Seitliche F hrungsrolle Laufrollen h henverstellbar Umschalthebel f r Klammerabstand Ausl ser Anschlu nippel Druckluf...

Страница 25: ...s 28 3 4 Handhabung im Betrieb 28 3 4 1 Betrieb mit F hrungsschiene 28 3 4 2 Betrieb ohne F hrungsschiene 29 3 4 3 Beseitigung von Verklemmungen 29 3 5 Einstellungen 30 3 5 1 Einstellung der Eintreibt...

Страница 26: ...zen Sie SENCO Pneumatic l in die Luft zuf hrung des Ger tes bei normaler Bean spruchung gen gen zweimal t glich 5 bis10 Tropfen Lieferumfang Eintreibger t Anschlag und Spannarm f r F hrungsschiene 2 F...

Страница 27: ...et werden Instandsetzungsarbeiten d rfen nur vom Hersteller Be auftragte oder andere Sachkundige unter Beachtung der in der Betriebsanleitung enthaltenen Angaben durchf h ren Sachkundiger ist wer auf...

Страница 28: ...ist spritzen Sie SENCO Pneumatic l in die Luftzuf hrung des Ge r tes bei normaler Beanspruchung gen gen zweimal t glich 5 bis10 Tropfen 3 2 3 Anschlu F hren Sie zum Anschlu des Eintreibger tes an die...

Страница 29: ...bger t ohne F hrungsschiene eingesetzt werden Das Eintreibger t wird dabei durch die seitlichen F hrugsrollen gef hrt F r eine bessere Seitenf hrung sollten Sie dazu den F h rungsrollenhalter von Posi...

Страница 30: ...erwenden Sie eine Zuleitung mit gr erem Querschnitt F hren Sie zum Umschalten des Klammerabstandes folgende Arbeitsschritte durch 1 Kippen Sie den Umschalthebel gegen den Federdruck nach rechts 2 Schw...

Страница 31: ...uckluftversorgung Kontrolle aller Schrauben und Muttern auf festen Sitz Pr fen des Ausl sesystems auf einwandfreie Funktion Reparatur Reparaturen am Drucktank d rfen ausschlie lich durch vom Herstelle...

Страница 32: ...32 Ersatzteillisten 9 1 Basisger t SCHRAUBEN MIT OKS 90 GESICHERT Vorhande O Ringe mit Fett YB0123 oder 540003 eingesetzt...

Страница 33: ...SQS55 TACKEREINHEIT SNS50 12 EJ01930 1 RADF HRUNG 1 13 EJ01940 1 RADF HRUNG 2 14 EJ019B0 1 SPANNARM 15 KD0042 4 SCHRAUBE 16 KD0380 2 SECHSKANNTMUTTER M6 17 KD0382 1 SCHRAUBE 18 KD0383 4 SECHSKANTMUTTE...

Страница 34: ...34 9 2 Taktgeber Inserted with Weicon Aiti Size AS 040 P Vorhande O Ringe mit Fett YB0123 oder 540003 eingesetzt...

Страница 35: ...LHALTER RECHTS 14 GDE0157 1 STIFT 15 KDN1510 1 SENSCHRAUBE 16 KD0055 1 GEWINDESTIFT 17 KD0128 1 GEWINDESTIFT 18 KDN0527 1 SCHEIBE DIN9021 19 KDN0583 4 SCHRAUBE 20 KDN0701 1 MUTTER 21 KDN0703 2 SCHEIBE...

Страница 36: ...36 9 3 Tackereinheit Schrauben und Muttern mit OKS90 gesichert...

Страница 37: ...FFSCHALE LINKS 17 EJ0190S 2 GRIFFSCHALE RECHTS 18 EJ01912 1 HALTER2 19 HDE0158 2 AUSL SER 20 HDE0218 1 BUCHSE 21 KB0031 1 SCHRAUBE 23 KD0042 4 SCHRAUBE 24 KDN0160 2 ZYLINDERSCHRAUBE 25 KDN0584 2 SCHRA...

Страница 38: ...38 9 4 Tacker Bild 9 4 1 Tacker...

Страница 39: ...FA0191 FA0190 1 1 Klammerf hrung SNS50 Klammerf hrung SQS55 GC0067 1 Griff FC0347 1 Abdeckschieber GB0420 1 Abdeckschieber GC0616 1 Verschlu GC0617 1 Klammerschieber GC0618 1 Feder GF0039 1 Abdeckung...

Страница 40: ...5 EJ01931 1 KLEMMST CK 6 EJ01935 1 VERSTELLACHSE 7 KDN0625 2 U SCHEIBE 8 KDN0746 1 SCHRAUBE 9 KDN0846 1 SCHRAUBE 10 KDN1438 1 DRUCKFEDER 11 KDN1507 1 SL SICHERUNG 8 12 MDM0019 1 KUGELLAGER 13 MDM0248...

Страница 41: ...5 EJ01931 1 KLEMMST CK 6 EJ01935 1 VERSTELLACHSE 7 KDN0625 2 U SCHEIBE 8 KDN0746 1 SCHRAUBE 9 KDN0846 1 SCHRAUBE 10 KDN1438 1 DRUCKFEDER 11 KDN1507 1 SL SICHERUNG 8 12 MDM0019 1 KUGELLAGER 13 MDM0248...

Страница 42: ...Spannarm Bild 10 7 1 Spannarm Ersatzteile Spannarm POSITION TEILENUMMMER ANZAHL BENENUNG 1 EJ013B3 1 Tr ger 2 EJ013B5 1 Rastriegel 3 EJ013B6 1 Zentrierstift 4 KDN1255 1 Fl gelschraube 5 KDN1438 1 Druc...

Страница 43: ...Klammerger t SNS50 SQS55 Wegmatik EJ02000 EJ01900 auf die sich diese Erkl rung bezieht im Lieferzustand mit den folgenden Normen oder normativen Dokumenten bereinstimmt Ger te und Produktsicherheitsg...

Страница 44: ...44...

Отзывы: