English
Espanol
Francais
Tool Use
Uso de la Herramienta
Utilisation de l’Outil
3
1
2
●
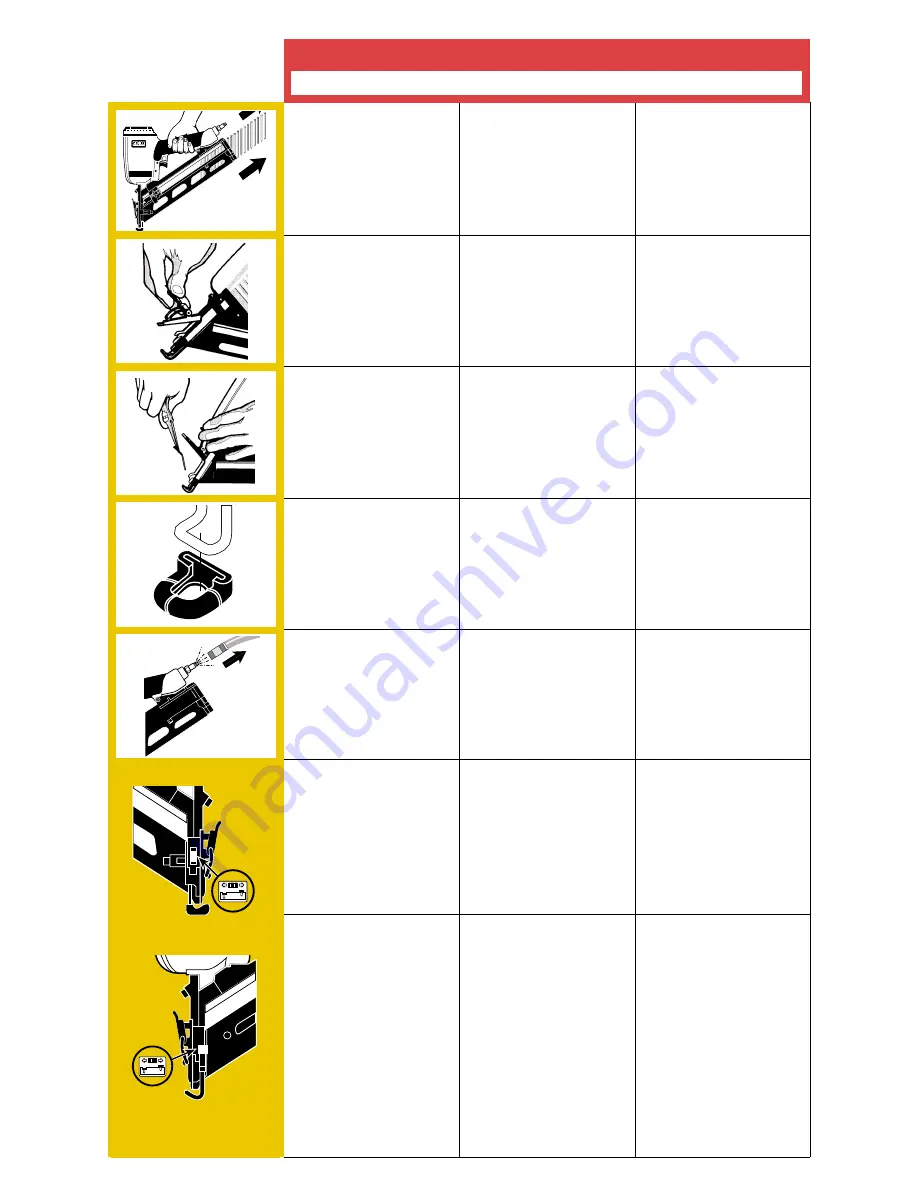
Release the feeder shoe and
slide it forward. Remove
fasteners from the tool.
●
Suelte el alimentador y deslícelo
hacia adelante. Retire los
sujetadores de la herramienta.
●
Relâchez le poussoir et faites le
glisser vers l’avant. Enlevez les
projectiles.
●
Release E-Z Clear latch and
open door.
●
Suelte el pestillo de alivio fácil
(E-Z) y abra la puerta.
●
Relâchez le loquet transparent
“E-Z” et ouvrez le volet de front.
●
Remove jammed fastener. Close
door and latch.
●
Remueva el sujetador atascado.
Cierre la puerta con pestillo.
●
Enlevez le clou coinçé. Fermez
le volet de front et le loquet.
●
A No-Mar Pad (HF0017) can be
added to the bottom of the safety
element in an effort to help
prevent scuffs or damage to the
work surface. This pad is marked
to indicate the exit point of the
nail, making alignment easier.
●
Un cojinete “No–Mar” (HF0017)
puede ser agregado debajo del
elemento de contacto con el
trabajo (seguro) en un esfuerzo
para ayudar a prevenir maras o
daños a la superficie de trabajo.
El cojinete esta marcado para
indicar el punto de salida del
clavo, haciendo mas fácil su
alineación.
●
Une protection (HF0017) peut
être ajoutée à la base de
l'élément de contact dans le but
d'éviter de marquer ou
endammager la surface du
produit cloué. Un repère figure
sur cette protection, indicant le
sens de sortie du clou, pour en
faciliter l'alignement lors de la
mise en place.
●
To adjust the depth the fastener
is driven, first disconnect the air
supply.
●
Para ajustar la profundidad de
clavo o engrapado, debe
primero desconectar el aire.
●
Pour ajuster la profondeur à
laquelle le clou est enfoncé,
déconnecter tout d’abord
l’appareil de la source d’air
comprimé.
SFN40 Only
SFN1/SFN30 Only
●
Using the thumb or index finger,
rotate wheel (located on side of
guide body) to adjust the safety
element to achieve desired
depth. Adjustments are in half-
turn increments.
Warning: Do not extend the
safety element 1/4" beyond the
shortest setting. This could
disengage the safety element
and render the tool inoperable.
●
Usando el dedo pulgar o el dedo
indice, rote la manivela
(localizada a un lado de la placa
de nariz) para ajustar el seguro
a la profundidad deseada.
Ajustes deben incrementarse
cada media vuelta
No sobrepase el seguro mas de
1/4" de pulga de la ultima marca.
Esto causaría el desenganche
del seguro haciendo la
herramienta inoperable.
●
A l’aide du pouce ou de l‘index,
faire tourner la molette (située
sur´ le cote du front) pour ajuster
la position du palpeur de
sécurité. Paliers de réglages par
1/2 tour.
Ne pas dépasser 1/4" (6,35 mm)
de sortie du palpeur par rapport
a la position la plus courte. Cela
pourrait le désengager et rendre
l'appareil inutilisable.
●
To adjust the depth the fastener
is driven, first disconnect the air
supply. Using your thumb or
index finger, rotate wheel
(located on the side of the guide
body) to adjust the DEPTH
CONTROL safety yoke to
achieve desired depth.
Warning: Do not lengthen the
DEPTH CONTROL safety yoke
more than 1/4" beyond it’s
shortest setting. This could
disengage the safety yoke and
render the tool inoperable.
●
Para ajustar la prufundidad del
clavo primero se debe
desconectar el aire. Usando el
dedo pulgar o índice, rote la
rueda de ajuste (localizada a un
lado de la placa de la nariz) para
ajustar el dispositivo de
seguridad del CONTROL DE
PROFUNDIDAD a la profundidad
deseada.
Advertencia: No sobrepase el
dispositivo de seguridad del
CONTROL DE PROFUNDIDAD
más de 1/4 de pulgada de la
marca más corta. Esto causaría
el desenganche del dispositivo
de seguridad, haciendo la
herramienta inoperable.
●
Pour ajuster la profondeur à
laquelle le clou est enfoncé,
déconnecter tout d'abord
l'appareil de la source d'air
comprimé. A l’aide du pouce ou
de l‘index, faire tourner la
molette (située sur´ le cote du
front) pour ajuster la position du
palpeur de sécurité. Paliers de
réglages par 1/2 tour. Ne pas
dépasser 1/4" (6,35mm) de
sortie du palpeur par rapport a la
position la plus courte. Cela
pourrait le désengager et rendre


