background image

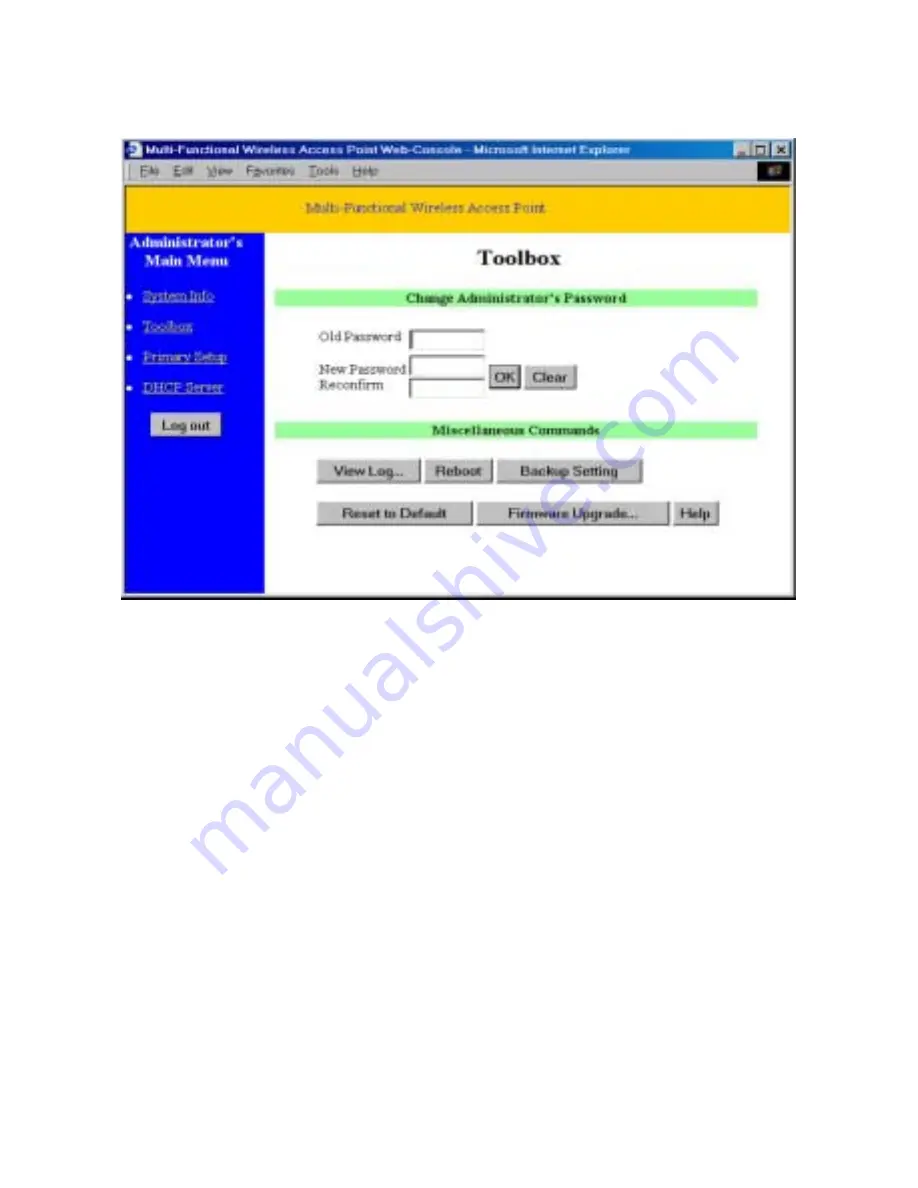
3.3 Toolbox 


This option enables you to change the administrator password. 

There are some useful buttons in this page: 

View Log


View the system logs 

Reboot


Reboot this device 

Backup Setting


You can backup your settings by clicking this button and 

save it as a bin file. Once you want to restore these settings, 

please click 

Firmware Upgrade

 button and use the bin file 

you saved. 

Reset to Default


Reset the settings of this device to the default values 

Firmware Upgrade


Prompt the administrator for a file and upgrade it to this 

device 

Note

: we strongly recommend you to change the system password for security 

reason. 

-14- 

Содержание SL-2511SR

Страница 1: ...Senao 2 Port Switch Wireless Router User Guide Before operating the unit please read this manual thoroughly and retain it for future reference Model No SL 2511SR...

Страница 2: ...or transmitted in any form or by any means mechanical magnetic electronic optical photocopying manual or otherwise without the prior written permission Trademarks All product company brand names are t...

Страница 3: ...manual may cause harmful interference to radio communications Operation of this equipment in a residential area is likely to cause interference in which case the user at his own expense will be requir...

Страница 4: ...er 3 Configuring Wireless Access Point 11 3 1 Start up and Log in 11 3 2 System Info 13 3 3 Toolbox 14 3 4 Primary Setup 15 3 5 DHCP Server 18 3 6 MAC Address Control 20 Appendix A TCP IP Configuratio...

Страница 5: ...arefully for fully exploiting the functions of this product Functions and Features High speed for wireless LAN connection 11Mbps data rate by incorporating Direct Sequence Spread Spectrum DSSS Roaming...

Страница 6: ...to assign different access right for different users Firmware Upgradable Provides firmware upgrade via Web Browser or Windows Application 1 2 Packing List Wireless Access Point unit Installation CD RO...

Страница 7: ...reless On An active station is connected to the corresponding LAN port Link Act 1 2 Link status Green Blinking The corresponding LAN port is sending or receiving data 10 100 Data Rate Green On Data is...

Страница 8: ...per second 7...

Страница 9: ...or ISDN TA modem 2 2 Procedure for Hardware Installation 1 Decide where to place your Wireless Access Point You can place your Wireless Access Point on a desk or other flat surface or you can mount it...

Страница 10: ...switch preferred or hub and connect the Ethernet cable from the AP to the switch hub s UPLINK port You may need to switch on the UPLINK feature on the switch hub The AP supports up to 253 network com...

Страница 11: ...r the self test phase When it is in the self test phase the indicators M1 will be lighted ON for about 10 seconds and then M1 will be flashed 3 times to indicate that the self test operation has finis...

Страница 12: ...r Internet Explorer This approach can be adopted in any MS Windows Macintosh or UNIX based platforms 3 1 Start up and Log in Activate your browser and disable the proxy or add the IP address of this p...

Страница 13: ...ers and for system administrator To log in as an administrator enter the system password the factory setting is admin in the System Password field and click on the Log in button If the password is cor...

Страница 14: ...ides the function for observing this product s settings and working status A Network ID SSID The current setting of SSID B Firmware Version The current firmware version on this device C MAC Address Th...

Страница 15: ...settings by clicking this button and save it as a bin file Once you want to restore these settings please click Firmware Upgrade button and use the bin file you saved Reset to Default Reset the settin...

Страница 16: ...e operating mode of this device The default mode is AP which is the normal operation mode of a wireless AP You can change it to the Bridge mode if you want this product to work as a wireless bridge 3...

Страница 17: ...it is transferred from one station to another The standardized IEEE 802 11 WEP 64 bit or 128 bit is used here 6 WEP Key 1 2 3 4 When you enable the 64 bit or 128 bit WEP key security please select one...

Страница 18: ...devices to Bridge mode and set the Channel to the same channel number Note This device can t be a wireless AP when it is operating as a wireless bridge This means there is no wireless client can asso...

Страница 19: ...ese settings This product supports the function of DHCP server If you enable this product s DHCP server and configure your computers as automatic IP allocation mode then when your computer is powered...

Страница 20: ...ng computer You must specify the starting and ending address of the IP address pool Clients List List the current mapping of the IP and MAC address for each DHCP client Fixed Mapping In general DHCP s...

Страница 21: ...ecific IP address to a certain MAC address MAC Address Control Check Enable to enable the MAC Address Control All of the settings in this page will take effect only when Enable is checked Connection c...

Страница 22: ...y to allow or deny the clients whose MAC addresses are not in the Control table to associate to the wireless LAN Control table Control table is the table at the bottom of the MAC Address Control page...

Страница 23: ...the DHCP clients Combobox and then click on the Copy to button to copy the MAC address of the client you select to the ID selected in the ID Combobox Previous page and Next Page To make this setup pag...

Страница 24: ...t please refer to your network card manual Moreover the Section A 2 tells you how to set TCP IP values for working with this device correctly A 1 Install TCP IP Protocol into Your PC 1 Click Start but...

Страница 25: ...st And choose TCP IP in the Network Protocols Click OK button to return to Network window 6 The TCP IP protocol shall be listed in the Network window Click OK to complete the install procedure and res...

Страница 26: ...n click Control Panel 2 Double click Network icon Select the TCP IP line that has been associated to your network card in the Configuration tab of the Network window 3 Click Properties button to set t...

Страница 27: ...a Select Obtain an IP address automatically in the IP Address tab 26...

Страница 28: ...b Don t input any value in the Gateway tab 27...

Страница 29: ...c Choose Disable DNS in the DNS Configuration tab 28...

Страница 30: ...elect Specify an IP address in the IP Address tab The default IP address of this product is 192 168 123 254 So please use 192 168 123 xxx xxx is between 1 and 253 for IP Address field and 255 255 255...

Страница 31: ...b In the Gateway tab add the IP address of the gateway you use in the New gateway field and click Add button 30...

Страница 32: ...c In the DNS Configuration tab add the DNS values which are provided by the ISP into DNS Server Search Order field and click Add button 31...

Страница 33: ...Cable Modem 10 100 RJ45 Port for LAN RS 232 for ISDN TA modem TNC connector Roaming Seamless roaming IEEE802 11b compliant IP Sharing Supports PAT NAT Security 64 128 bit WEP data encryption Manageme...

Страница 34: ...mental Temperature Range 0 to 55 C 32 to 131 F operating 20 to 80 C 4 to 176 F storage Humidity non condensing 5 to 95 typical Physical Specifications Dimensions 145 L mm x 220 W mm x 40 H mm Weight 7...

Страница 35: ...ment generates uses and can radiate radio frequency energy and if not installed and used in accordance with the instructions may cause harmful interference to radio communications However there is no...

Отзывы: