background image

8

3.


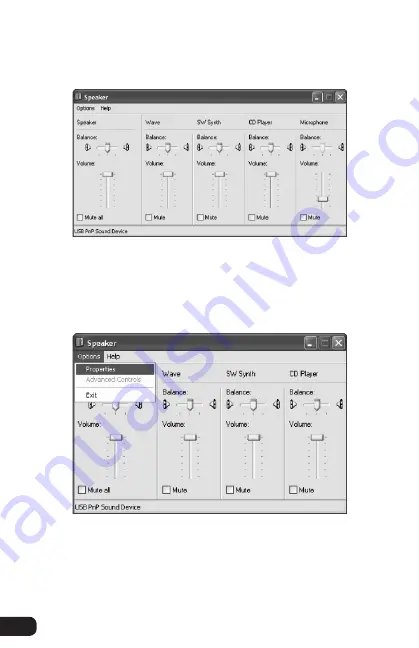
If.the.Microphone.volume.adjustment.column.appears.on.
the.right.side.of.the.window,.skip.to.step.6..

If.the.Microphone.volume.adjustment.column.does.not.
appear.on.the.right.side.of.the.window,.click.Options.in.
the.menu.bar,.and.then.select.Properties.

▪   ▪   ▪   ▪   ▪   ▪   ▪   ▪   ▪   ▪   ▪   ▪   ▪   ▪   ▪   ▪   ▪   ▪   ▪   ▪   ▪   ▪   ▪   ▪   ▪   ▪   ▪   ▪   ▪   ▪   ▪   ▪   ▪   ▪   ▪   ▪   ▪   ▪   ▪   ▪   ▪   ▪   ▪    

Plugging in and Setting Up

4.

. In.the.Mixer.device.drop-down.menu,.make.sure.USB.PnP.

Sound.Device.is.selected..Under.Adjust.volume.for,.make.
sure.the.Playback.radio.button.is.selected.

Содержание ub-440

Страница 1: ...erview 3 Precautions 4 Assembling the UB 440 5 Plugging In and Setting Up 6 Gain Control 12 Using the Attenuation Pad 12 Monitoring with Your Headphones 12 High Pass Filter 13 Positioning the UB 440 13 Troubleshooting 14 Specifications 15 Warranty 16 ...

Страница 2: ...own studio quality recordings The built in headphone amplifier provides real time monitoring for playback and multitracking Separate headphone and microphone gain controls plus the ease of plug and play connectivity make this the perfect choice for the professional and home recording aficionado Among the benefits you ll enjoy USB plug and play connectivity Cardioid polar pattern Integrated preamp ...

Страница 3: ... stand USB cable User manual MIC GAIN MAX MIN HP VOLUME MIN MAX MIC GAIN MAX MIN HP VOLUME MIN MAX Microphone capsule Pad switch Power LED High pass filter switch USB port Continuously variable gain slider Headphone volume control Headphone jack ...

Страница 4: ... water and flammable gases or liquids Do not attempt to disassemble or repair this product yourself There are components inside that can produce a hazardous electric shock Handle this product with care Clean this product with a soft dry cloth only To avoid damage to this product be careful to not overtighten or improperly thread any threaded fittings Make sure that this product is intact and that ...

Страница 5: ... centered over the base of the stand Tighten the microphone mount by rotating the washer d counterclockwise until secure Insert the UB 440 s mounting thread into the microphone mount e Make sure the Senal logo on the front of the UB 440 is facing you when the stand is tilted upward Screw the locking collar onto the mounting thread f until secure a b c d e f Assembling the UB 440 ...

Страница 6: ... on your computer Once the UB 440 is plugged in the power LED on the front of the microphone will glow blue 2 Your computer will automatically detect the UB 440 but it may not set it as the default sound device To set the UB 440 as the default go to the Control Panel and then double click on the Sounds and Audio Devices icon 3 Click on the Audio tab In the drop down menu under Sound playback selec...

Страница 7: ...nges and exit Adjusting the Microphone Volume via the Computer You can adjust the microphone s volume from the computer s Sounds and Audio Devices Properties window 1 Go to the Control Panel and then double click on the Sounds and Audio Devices icon 2 Click on the Volume tab Under Device volume click on the Advanced button to display the Speaker window ...

Страница 8: ...ophone volume adjustment column does not appear on the right side of the window click Options in the menu bar and then select Properties Plugging in and Setting Up 4 In the Mixer device drop down menu make sure USB PnP Sound Device is selected Under Adjust volume for make sure the Playback radio button is selected ...

Страница 9: ...elect it Click OK to confirm your selection The Microphone volume adjustment column should appear on the right side of the window 6 To adjust the microphone volume click and drag the slider up or down To mute the volume click the checkbox labeled Mute You can close the window when you are done adjusting the volume ...

Страница 10: ...one and one end of the cable corresponds with the USB port on your computer Once the UB 440 is plugged in the power LED on the front of the microphone will glow 2 Your computer will automatically detect the UB 440 but it may not set it as the default sound device To set the UB 440 as the default go to System Preferences and select Sound Plugging in and Setting Up ...

Страница 11: ... input device Plugging in and Setting Up From the Sound window you can adjust the computer s input and output volumes adjust the stereo balance and elect to show the volume in the menu bar 4 Click on the Output tab and then click on USB PnP Sound Device to select it as the default sound output device ...

Страница 12: ...attenuation pad slide the pad switch so it rests under the 10 dB marking To turn off the attenuation pad slide the pad switch so it rests under the 0 dB marking Monitoring with Your Headphones You can plug your headphones directly into the UB 440 to monitor your recording without the latency that often occurs when monitoring through a computer s headphone jack To monitor through your UB 440 plug y...

Страница 13: ...0 s cardioid polar pattern will pick up sound mostly from in front of the microphone You will usually want the front of the microphone the side with the Senal logo to face the sound source although it is important to experiment with microphone placement and positioning to find the best solution for your specific needs You can adjust the angle of the microphone stand to aim the microphone toward th...

Страница 14: ...ones or the headphones are too quiet Make sure the headphones are plugged into the microphone s headphone jack Turn up headphone volume on the microphone Turn up the volume on your computer If your headphones have their own built in volume control turn it up The sound is distorted Turn down the microphone s gain control Turn on the microphone s attenuation pad Move the microphone away from the sou...

Страница 15: ...ncy Response 50 Hz to 18 kHz Signal to noise ratio 60 dB at 1 kHz Sensitivity 46 dB 4 dB at 1 kHz 5 0 V 680 Ω 0 dB 1 V u bar Power DC 5 0 V Headphone out 3 5 mm 1 8 Weight microphone and stand 1 95 lb 0 89 kg Compatible operating systems Windows 2000 Windows XP Windows Vista Windows 7 Windows 8 Macintosh OS X ...

Страница 16: ...n abuse improper installation or maintenance EXCEPT AS PROVIDED HEREIN THE WARRANTY PROVIDER MAKES NEITHER ANY EXPRESS WARRANTIES NOR ANY IMPLIED WARRANTIES INCLUDING BUT NOT LIMITED TO ANY IMPLIED WARRANTY OF MERCHANTABILITY OR FITNESS FOR A PARTICULAR PURPOSE This warranty provides you with specific legal rights and you may also have additional rights that vary from state to state To obtain warr...

Отзывы: