background image

6

DWO 1-Lite

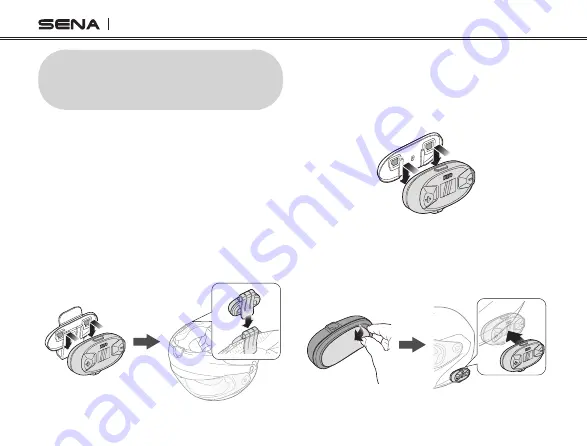
2.2  Using the Glued Surface 

Mounting Adapter

1.  Insert the main module into the glued 

surface mounting adapter using the two 

connecting slots on the back.

2.  Remove the cover of the adhesive sticker 

on the back to glue the headset on to the 

helmet.

3.  Attach the headset on the left side of the 

helmet.

2  INSTALLING THE HEADSET ON 

YOUR HELMET

Before installing the headset, you need to choose 

between the clamp and the glued surface mounting 

adapter. To install the headset to the helmet, follow 

the steps below:

2.1  Using the Clamp

1.  Insert the main module into the clamp using 

the two connecting slots on the back.

2.  Insert the headset into the helmet using the 

clamp.

Содержание DWO 1-Lite

Страница 1: ...1 0 0 USER S GUIDE ENGLISH DWO 1 Lite Motorcycle Intercom...

Страница 2: ...radeable in open terrain PRODUCT FEATURES Blast your favorite tunes talk over the intercom with your buddies hear directions from your GPS and more all through your DWO 1 Lite Bluetooth headset With b...

Страница 3: ...Lite 11 4 1 2 Pairing When the DWO 1 Lite is Turned Off 12 4 1 3 Pairing When the DWO 1 Lite is Turned On 12 4 2 Second Mobile Phone Pairing 13 1 BEFORE STARTING 5 1 1 Package Contents 5 2 INSTALLING...

Страница 4: ...l Pairings 22 8 3 Firmware Upgrades 22 9 TROUBLESHOOTING 22 9 1 Fault Reset 22 9 2 Factory reset 23 5 MOBILE PHONE USAGE 13 5 1 Using Phone Functions 13 5 2 Speed Dialing 14 5 2 1 Assigning Speed Dial...

Страница 5: ...nction Button DC Power Charging Firmware Upgrade Port Speakers and Microphone Port LCD Display Speakers and Wired Boom Microphone Wired Boom Microphone Clamp Glued Surface Mounting Adapter Speaker Spo...

Страница 6: ...dset on to the helmet 3 Attach the headset on the left side of the helmet 2 INSTALLING THE HEADSET ON YOUR HELMET Before installing the headset you need to choose between the clamp and the glued surfa...

Страница 7: ...ted properly close to your mouth when you wear the helmet Adjust the direction of the microphone so that the fin side of the microphone is facing outward away from your lips Fin 2 3 Installing the Spe...

Страница 8: ...3 Charging the Headset The headset can be charged using many common methods via the supplied USB power data cable Depending upon the charging method the headset will be fully charged in about 2 5 hour...

Страница 9: ...Button and Button It takes about 2 5 hours to be completely charged Charging Status LCD Charging Fully Charged Note Any 3rd party USB charger can be used with Sena products if the charger is approved...

Страница 10: ...iring The headset can also be paired with another Sena headset 3 5 Adjusting the Volume You can raise or lower the volume by tapping the Button or the Button Volume is set and maintained independently...

Страница 11: ...e pairing mode lasts for 3 minutes To cancel phone pairing tap the Multi function Button 4 1 Phone Pairing There are three ways to pair the phone 4 1 1 Initially Pairing the DWO 1 Lite The headset wil...

Страница 12: ...ng 2 On your smartphone search for DWO 1 Lite 3 Enter 0000 for the PIN Some smartphones may not ask for PIN 4 1 2 Pairing When the DWO 1 Lite is Turned Off 1 While the headset is off press and hold th...

Страница 13: ...old the Multi function Button for 3 seconds in stand by mode to activate the voice dialer of your mobile phone 4 2 Second Mobile Phone Pairing 1 To enter the Configuration menu press and hold the Mult...

Страница 14: ...dial numbers before using the speed dial Speed Dial Presets could be assigned in the configuration menu 5 2 2 Using Speed Dial Presets 1 Press and hold the Button for 3 seconds and you will hear a vo...

Страница 15: ...t Speed Dial 6 If you want to exit the speed dial immediately tap the Button or the Button until you hear a voice prompt Cancel and tap the Multi function Button 2 Tap the Button or the Button to navi...

Страница 16: ...ation Intercom Friend B Intercom Friend C Intercom Friend D YOU 1 Press and hold the Multi function Button of the headset A and B for 5 seconds until you hear a voice prompt Intercom pairing 6 STEREO...

Страница 17: ...headset and wait until the intercom connection is automatically established 3 Repeat steps 1 and 2 to pair with Intercom Friends C D 4 The intercom pairing queue is Last Come First Served If a headset...

Страница 18: ...HD quality 7 2 Two way Intercom You can start end an intercom conversation with one of any intercom friends by tapping the Multi function Button Intercom Friend 1 Tap the Multi function Button Interco...

Страница 19: ...he Button or the Button to navigate between the menus You will hear voice prompts for each menu item 3 You can enable disable the feature or execute the command by tapping the Multi function Button 8...

Страница 20: ...ng Enable Disable or Execute Delete All Pairings Execute Factory Reset Execute Exit Configuration Execute Configuration Setting Enable Disable or Execute Second Mobile Phone Pairing None Speed Dial Ex...

Страница 21: ...n until you hear a voice prompt Cancel and tap the Multi function Button to confirm You will then hear a voice prompt Cancel 8 2 1 Assigning Speed Dial 1 To assign a phone number as a speed dial tap t...

Страница 22: ...t to factory default settings 8 2 2 Voice Prompt Default Enable You can disable voice prompts by configuration setting but the following voice prompts are always on Voice prompts for configuration set...

Страница 23: ...1 Lite 9 2 Factory reset If you want to restore the headset to factory default settings use the Factory Reset in the configuration menu The headset automatically restores the default settings and tur...

Страница 24: ...ight 2021 Sena Technologies Inc All rights reserved 1998 2021 Sena Technologies Inc All rights reserved Sena Technologies Inc reserves the right to make any changes and improvements to its product wit...

Отзывы: