background image

MENUS CONTROL

-16-

Installation Settings

INSTALLATION

Singnal Source

Auto Search

Channel Skip

Channel Edit

Air

Singnal Source

 "        " 

Press

button to adjust the Singnal Source

which can choose "Air, Cable".

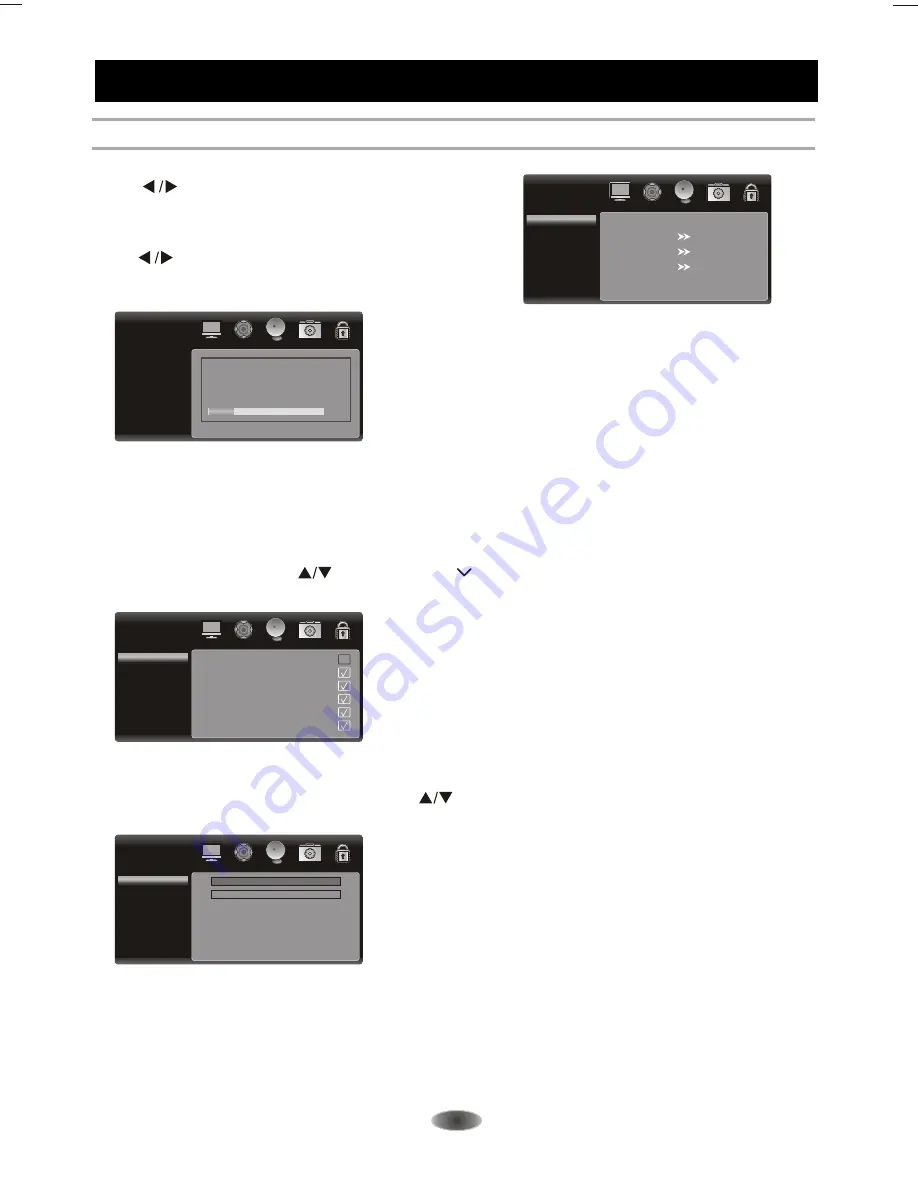
Auto Search

"        " 

Press

button to adjust  Auto Search, then 

press [OK] button to enter the Auto Search sub menu.
A Channel Search Menu will  appear as below.

"AUTO Search" all of the channels at the one time and store all of the channels which
have signal, then back to channel 1 .In the process of auto search, press "MENU" button to
interrupt search .

Channel Skip

You can skip unnecessary program channels of your choice not to be displayed during viewing and 
scanning when pressing the"        " buttons.Select "    " by pressing " OK " buttons to select the
channel that would not  like to skip from the channel scan operation. 

Channel Skip

1

Analog

2

Analog

3

Analog

4

Analog

5

Analog

6

Analog

Channel Edit

This setting lets you edit channels. press the "        " buttons to select Channel Edit Once you 
have selected your setting, press [ SOURCE ] to confirm.

Channel Edit

Channel Index

Channel Edit

1

Auto Search

Status: Scanning...

Analog Channels: 0

Digital Channels: 0

20%

Cable

Содержание LE-320

Страница 1: ...To obtain the best performance and safety please read this manual carefully Please keep this manual for future reference LE 320 LE 320 ...

Страница 2: ...14 20 Picture Settings 14 Sound Settings 15 Advanced Settings 19 PC Settings 20 Setup Settings 17 SPECIFICATIONS 23 TROUBLESHOOTING 22 ANALOG MENU SCREENS 21 UPLAYER CONTROL 12 13 Photo View 12 Music Play 12 Video Play 13 Important Notice 13 Basic operation 14 Installation Settings 16 Antenna And Power Connections 6 Inserting Batteries In The Remote 6 Positioning The TV Set 6 Stand Foot Installati...

Страница 3: ... a long period of time Do not dismantle this product by yourself as this may cause damage Do not touch the screen surface with fingers as this may scratch or mar the LED screen Do not impact the LED screen with hard pressure as this may damage the LED screen severely The battery battery or batteries or battery pack shall not be exposed to excessive heat such as sunshine fire or the like WARNING AN...

Страница 4: ...tened on the wall Place the set on a place that allows good ventilation Do not use the set near damp and cold areas protect the set from overheating Keep away from direct sunlight The apparatus shall not be exposed to dripping or splashing and that no objects filled with liquids such as vases shall be placed on the apparatus Do not use the set near dust place To reduce the risk of fire or electric...

Страница 5: ...ecognition plug and play 5 High class LED screen features high brightness high contrast and wide viewing angle responding fast 6 Supports high definition signal formats 7 This TV can be used as a high performance PC monitor for it has a VGA interface Computer sound source can also be supported to realize the multimedia function 8 Low power consumption in standby mode to save energy 9 Latest high i...

Страница 6: ...racket on the stand foot with 4pcs BT4X14 screw Attention The screws must the tight Photo A Step Three Installation of the stand foot 1 Put the TV on the platform and make sure the screen down to the platform with one soft Cloth Pad to avoid the scratch of the LCD screen and cabinet Photo B 2 Insert the stand foot from the bottom of the TV and make sure the direction of the stand foot The stand fo...

Страница 7: ...together Do not use different types of batteries for example Manganese and Alkaline batteries together Note that there are chargeable and non chargeable batteries Do not attempt to charge non chargeable batteries Remove the batteries from the remote control unit if you do not intend to use the unit for a long time Precautions when using batteries Do not drop the remote control unit Do not subject ...

Страница 8: ...r Remote Sensor 1 Power Button 3 Speakers 4 Channel Up Down Button 5 Volume Up Down Button 6 Menu Button 7 Source Button 8 Standby Button Note This machine uses induction buttons Operation with the finger on the sensor area corresponding buttons at the center of a 2 seconds or more re operation 4 5 6 7 8 1 2 3 3 ...

Страница 9: ...UDIO output signal 5 AV IN Connect AUDIO and VIDEO input signal from signal source such as DVD 6 Y Pb Pr hare the same AUDIO input with AV 7 EARPHONE VGA Connect a PC via a VGA cable 9 VGA AUDIO IN Audio input for PC 10 ANTENNA IN Connect a coaxial cable to receive signal from the antenna or cable Component input Connect YPbPr signal from signal source such as DVD S Audio output speakers will be m...

Страница 10: ... CATV cable to the cable not provided with this unit then connect to the antenna input of this unit for best reception 2 If the antenna cable in your home is other than the above two or you have problems in installing the antenna please contact your dealer Antenna Cable Connection Notes Current outdoor antenna or cable TV usually use 75 OHM coaxial antenna cable For better reception suggest using ...

Страница 11: ...wed channel 10 Volume Up Down V V Press to adjust the volume 13 Menu Press to enter or exit from the TV menu 8 INFO buttons INFO Press to display the current information including screen format source etc 12 MTS Press to select desired sound output Mono Stereo or SAP depending on the broadcasting channel 11 Mute Press to mute or restore the volume 9 Channel Up Down CH CH Press to select previous n...

Страница 12: ... buttons Press to adjust the desired item on the TV mode 18 19 19 EXIT button Press to exit from OSD display or function 20 21 23 22 24 25 26 20 Uplayer button Press to into Uplayer menu 23 Previous button Press to play the previous music or picture 21 Fast Backward button Press to make fast backward when playing music by Uplayer 22 Fast Forward button Press to make fast forward when playing music...

Страница 13: ...d press OK again to view the next picture in sequence 3 If appear The current folder is empty press MENU key and choose Media Type to set sub menu and then choose photo to view picture Sort press OK button select between Name Genre Atrist Album options Media Type press OK button select between photo Music Video options Thumbnail Size press OK button select between Small Middle Large options 4 In p...

Страница 14: ...may cause system can not operate smoothly Although this is very rare phenomena you can shut down the power supply and initialize the system to recover to normal situation Remarks With the system constantly improvement and upgrade the actual display and operating instructions may be slightly different with the service manual This is normal phenomenon is normal condition And you also can use and enj...

Страница 15: ... note if there is an exception PICTURE Picture Mode Brightness Contrast Color Sharpness Color Temp Tint 50 Soft 50 50 50 50 PICTURE Off Noise Reduction MPEG NR Display Mode Back Light Picture Mode the picture mode Personal Soft Normal Bright four kinds Press to adjust the Picture Mode Sharpness This function is not available in PC mode Press to adjust the Sharpness Brightness and usually is adjust...

Страница 16: ...ht Press button to adjust the Back Light Sound Settings Bass P ress button to adjust the bass of the TV Treble P ress button to adjust the treble of the TV Balance Press button to adjust the balance of the TV Surround Press button to adjust the SURROUND sound effect which can choose from Off On AVL Press button to adjust the AVL of the TV which can choose from Off On Personal Equalizer Equalizer w...

Страница 17: ... In the process of auto search press MENU button to interrupt search Channel Skip You can skip unnecessary program channels of your choice not to be displayed during viewing and scanning when pressing the buttons Select by pressing OK buttons to select the channel that would not like to skip from the channel scan operation Channel Skip 1 Analog 2 Analog 3 Analog 4 Analog 5 Analog 6 Analog Channel ...

Страница 18: ...Press button to select Closed Caption Press OK button to enter the Closed Caption menu Time Zone Sleep Time Showing the country s time zone Date Time Set the TV Date Time AUTO Press button to select Press button to select Press button to select Lets you choose the off TV time from OFF 5Minutes 10Minutes 15Minutes 30Minutes 45Minutes 60Minutes 90Minutes 120Minutes 180Minutes and 240Minutes On at th...

Страница 19: ...s you select between Red Cyan Yellow Magenta Black White Green Blue options Window Opacity Lets you select between transparent translucent solidoptions Analog Caption press button to adjust the Analog Caption Which can choose Off CC1 Cc2 CC3 CC4 Text1 Text2 Text3 Text4 Digital Closed Caption press button to adjust the Digital Closed Caption Which can choose Service1 Service2 Service3 Service4 Serv...

Страница 20: ...tton to enter Input password to enter default password is 0000 Advanced channel Block Parental Control Change Password cleanAll Channel Block Turn this option on to block the channel you see in the Select Channel option Use the left right arrow buttons to find the channel you want to block Then press the down arrow button to select Block Channel Press OK to place a check mark in the Block Channel ...

Страница 21: ...ly or manualiy 1 AUTO ADJUST Press button to auto adjust PC size and position 2 H Position Press button to adjust the H Position of the television 3 V Position Press button to adjust the V Position of the television 4 PHASE Press button to adjust the phase of the picture 5 CLOCK Press button to adjust the updating frequency of the picture PC Settings PC Auto Adjust H Position V Pisition Phase Cloc...

Страница 22: ...l display modes The menu of Y Pb Pr mode is exactly same as the menu of HDMI mode The following table is an illustration of some of the typical video display Modes 1 480i 2 480p 3 576i 4 576p 5 720p 50 60Hz 6 1080i 50 60Hz 7 1080p 50 60Hz ANALOG MENU SCREENS VGA Input typical display modes The following table is an illustration of some of the typical video display modes 21 1 640X480 recommend 60Hz...

Страница 23: ...et by the PC Suggest to change to the best resolution or other standard resolutions of Windows system SNOWY DOTS AND INTERFERENCE If the antenna is located in the fringe area of a television signal where the signal is weak the picture may be marred by dots When the signal is extremely weak it may be necessary to install a special antenna to improve the reception 1 Adjust the position and orientati...

Страница 24: ...tatus displaying method On screen display Function adjustment indicator Menu display Language of OSD Multiple options RF aerial input 75 ohm unbalanced AV video input 75 ohm 1 0Vp p RCA AV audio input 10k ohm 0 5Vrms Power Requirement Power Consumption Audio Output Dimension WxHxD Weight AC 110 240V 50 60Hz 8W 8W 777 5 x 560 x 210mm 10 3kg SPECIFICATIONS 23 TV NTSC M PAL M N 80W ...

Отзывы: