


POLR020001SE 039609 060622
7
•
After the warm-up phase is over, the “0” symbol flashes on the screen, indicating that the instrument is ready for use; the buzzer icon is lit,
and the instrument makes a sound every second. You can press the “
MUTE
” button to mute the buzzer. If the buzzer is already muted, press
the “
MUTE
” button again to reactivate the buzzer.
•
By default, the instrument as soon as it is turned on will perform a sensor autozero, and the autozero icon (
A
) will be lit red. However, the
autozero function can be disabled by holding down the autozero button “RESET” for at least three seconds; then the instrument will be in
the manual autozero mode. The autozero in manual mode can be done by briefly pressing the “RESET” button; pressing this button for three
seconds will re-enable the autozero mode. When the instrument is restarted, the autozero mode (
A
) will be restored.
•
After the warm-up phase, the sensitivity icon (
S
) will be red, indicating that the device is at its maximum sensitivity.
•
Place the nose of the probe where a leak is most likely to have occurred. If the instrument detects a leak, it will report a leak level on the
display that is proportional to the amount of gas detected and will emit a sound; the greater the leak, the sharper the sound emitted by the
instrument. It is recommended to move the instrument out of the area of the leak for at least 10 seconds before making a new detection pass.
•
When the work is finished, press the “OFF/ON” button 3 seconds to turn off the instrument.
Note
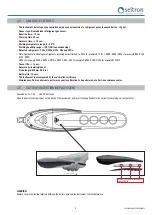
: Remove the insulation sheet from the battery compartment before first use.
CAUTION:
Pressing the “SENS” button cycles between three levels of instrument sensitivity (green=minimum, yellow=medium, red=maximum).
4.1
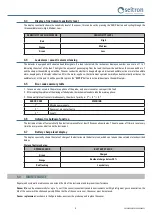
Gas detection method
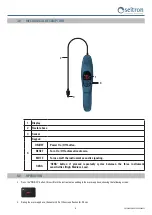
The figure below exemplifies the method of leak detection:
•
Bend the flexible end of the instrument into the shape that best suits the case at hand; slowly move the probe closer to the leakage
point.
•
If the instrument detects a leak it will signal this by showing a number from 1 to 7 on the display, where 1 is the minimum concentration
level and 7 is the maximum. At the same time, the instrument will emit a sound to signal the presence of gas, the higher the frequency
the higher the gas concentration.
•
Stand back and approach the area of suspected gas leak to confirm that there is indeed a leak at that location.
•
When the source of the leak has been found, it is necessary to report it and check the entire system until all leaks have been found and
properly reported.
4.2
Automatic and manual autozero setting
So as to avoid the interference on detection caused by refrigerant in the environment, the detector allows the sensor to automatically
self-zero.
Automatic autozero (Default)
: When the
A
Icon is turned on, the instrument will automatically autozero the room gas concentration
and, only when it detects a higher concentration, it will activate the buzzer. This option is on by default; to diasttivate it and bring the
instrument into manual autozero mode, press the “RESET” button for 3 seconds.
Reset (Autozero) manual
: In case the manual mode is on, sensor zeroing can be done by briefly pressing the autozero “RESET” button.
When the screen shows ‘
8
’, it means that the zeroing has taken place correctly. At this point, a gas concentration higher than the ambient
concentration can be detected. To return the instrument to autozero mode, press the “RESET” key for 3 seconds.
Note
: If the gas concentration in the environment is very low, the Autozrero function will make the instrument more sensitive, and vice versa,
if there is a high gas concentration in the environment, the instrument will be less sensitive.
Содержание BE COOL R1
Страница 1: ...USE AND MAINTENANCE Refrigerant gas leak detector BE COOL R1...
Страница 2: ......
Страница 10: ......
Страница 11: ......


