Seip TM 50 Скачать руководство пользователя страница 4

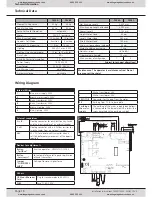
Installation Instructions TM50/TM80 - MO911/1V0

Page 4

It is within legal regulation and without restriction, to use a 
Seip door operator with any garage door that has been ap-
proved for use with other certified door operators!

Directives and Regulations

The TM garage door operator comply to the latest European direc-
tives and regulations� The declaration of conformity is enclosed at 
the end of these instructions�

Use of the operators

The operators were designed for the use with up-and-over doors 
(tilting and canopy-type) and sectional doors� 
All garage doors need to be maintained before automation� The 
door must be easily opened and closed by hand� A garage door 
must not be automated unless it is easy to open and close manu-
ally�

Garage Doors

In January 2001 the European regulations EN12604 and EN12605 
became compulsory for garage doors� Before installing an au-
tomatic door operator it must be assured that the garage doors 
applies to these regulations (the information can be obtained from 
the manufacturers‘ declaration of confirmity)� A Seip door opera-
tor may be installed to any door that complies to the regulations� 
Should a garage door not be compliant then please refer to the 
chapter „older garage doors“�

The installers declaration of conformity

No matter whether a door operator was delivered together with a 
garage door or seperately, the installer must issue a declaration of 
conformity for the complete installation�
With this declaration the installer assures, that the installation 
was made according to the instructions given by the manufactur-
ers (e�g� the installation instructions of the garage door and the 
operator)� This declaration can only be issued by the installer and 
may not be issued from the manufacturer! 
If both components comply to the directives and the installation 
was made as to the manufacturers instructions the whole installa-
tion will normally be CE-compliant�
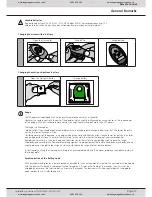
Older Garage Doors

When automating an older garage-door the TS-series will still 
comply to the regulations - through the automatic force setting 
the requested values for forces and reversion will be according to 
the regulations�
But it needs to be taken in consideration that most older garage 
doors do not meet the regulations EN 12604 and EN 12605 - 
especially regarding security features� They might still have sharp 
edges bearing the danger of severe injuries - for example sectional 
doors might not have a finger protection between the sections� 
Unfortunately the entire regulations do not mention how to 
handle the automation of such an older garage door - the danger 
basically is not the automation but the construction of the door�

Therefore we strongly recommend to
- check the garage door for sharp edges bearing danger when the 
door is moving; take any necessary action to avoid the dangers 
and make the door safer
- check the doors‘ springs and readjust them if necessary
- grease or oil the pivotal points and rollers of the garage door
- check that the door may be easily used by hand

If, however, the dangers cannot be avoided we recommend to use 
the automatic pre-warning function of the operator� The opera-
tors‘ lighting will then be blinking for approx� 5 sec� before every 
movement of the garage door� People inside the garage will be 
warned before the opening and can step back from the garage 
door in time�

Instruction for the users

Please instruct the users as follows:
- Use of the hand transmitter
- Use of the emergency release in case of a power failure
- Hand over the separate „User Manual“ to the customer
- Inform the user about the Security Advises in the User Manual

Regulations and Usage

Information and Remarks

www.thegaragedoorcentre.co.uk

0800 525 442

www.thegaragedoorcentre.co.uk

www.thegaragedoorcentre.co.uk

0800 525 442

www.thegaragedoorcentre.co.uk

Содержание TM 50

Страница 1: ...3 1 TM 50 TM 80 ENGLISH TGarage Door Operator INSTALLATION AND PROGRAMMING INSTRUCTIONS www thegaragedoorcentre co uk 0800 525 442 www thegaragedoorcentre co uk www thegaragedoorcentre co uk 0800 525 442 www thegaragedoorcentre co uk ...

Страница 2: ...ogramming Remote Components Free Programming 13 Setting the speeds Setting the opening speed Changing the length of Soft Stop Automatic Closing 14 Setting the time Pre Warning by internal lighting Connecting a Photo Cell Performance of Control Devices Avoiding automatic closing temporarily Further Safety Advice for Automatic Closing Adjusting the Lighting Duration 15 Remote Control Registering and...

Страница 3: ...line with one impulse wire C D 24V AC Output max 200mAmp 24 V Programming Running Length and Forces Keep the LEARN button pressed for 3 seconds release it the operators light is now blinking and press it again shortly Remote Components Transmitters Digi Pad Remote Wall Push Button Keep the LEARN button pressed for 3 seconds release it the operators light is now blinking and press the desired hand ...

Страница 4: ...nd the installation was made as to the manufacturers instructions the whole installa tion will normally be CE compliant Older Garage Doors When automating an older garage door the TS series will still comply to the regulations through the automatic force setting the requested values for forces and reversion will be according to the regulations But it needs to be taken in consideration that most ol...

Страница 5: ...e door manufacturer s manual If possible install the drive at a height of at least 2 10 m and the manual release at a height less than 1 80 m Locate the push button within sight of the door but away from moving parts and at a minimum height of 1 50 m Fix the label warning against entrapment next to the push button The label fixed to the manual release may not be removed After installation ensure t...

Страница 6: ...ator the limit blocks must be set up and the operator must be put in programming mode Otherwise the operator will produce an error mes sage Minimum Headroom A minimum distance of 35mm between the garage door and the ceiling is re quired Door Hight No optionals are required for doors up to 2 250mm hight Between 2 250mm und 2 500mm a lintel sided extension for the rail might be required The operator...

Страница 7: ...you made in the middle of the garage door Fit the operator to the ceiling when you have made sure the C rail is running straight to the front Use the supplied bracket to fix the C rail to the ceiling 3 5 Now fit the door arm to the garage door 5 Take care that the angle between the operator and the door arm does not exceed a max of 45 it may be lower 6 The limit blocks must be tightened and the pr...

Страница 8: ...ont of the trolley Pic 2 If not the block must be moved until it touches the trolley 4 Tighten the blocks screw to keep it in place Take care not to tighten it too strongly the c rail should not be bended 5 Now the garage door needs to be opened manually The trolley will lock into the chain you have to release it once again to fully open the garage door Pic 1 6 The block for the opening direction ...

Страница 9: ...opening cycle 4 Check the function of the emergency release together with a second person Stay inside the garage and close the door with the operator Let the second person open the door manually with the door keys If this works the emergency release is mounted properly Do not leave the garage and close the garage door with the operator before you have tested the emergency release When there is a s...

Страница 10: ... start the learning cycles When set to free programming then pls refer to page 13 Programming Functions Adjusting the time for the integrated lighting The LERN button must be pressed for approx 6 seconds until the green LED starts blinking then release the button Pressing the button again will confirm the the new time for the integrated lighting Increasing the running speeds When setting the openi...

Страница 11: ...ire It must be removed from C D and must be connected to the safety device as shown below If both a photo cell and a hatch door contact must be used then both items must be connected in one line Photo Cell D C 24V 24V 24 V 24 V N C 8 2 kW Hatch Door Contact C D 8 2 kW Standard function Openings If the device detects an obstacle within approx 2 seconds after running from closed position then the op...

Страница 12: ...nt and running distance it hits the OPENING limit block it closes slowly until it reaches CLOSED position it opens fast until it reaches OPEN position it closes fast until it reaches CLOSED position The operators light keeps blinking for a little while after the operator stops running Once the operators light stops blinking the programming has been successful Programming Remote Components 1 Keep t...

Страница 13: ...ess the LEARN button followed by the TEST button keep both pressed for approx 1 second and release them You are automatically in the mode for setting the opening speed The program is now in the mode to set the opening speed 5 Setting the opening speed After completing step 4 the red LED is blinking up to 8 times followed by break Setting the opening speed is made the same way as described in step ...

Страница 14: ...warning lights may connected together with the integrated operators lighting using the connectors 5 6 230V 160 Watts max The operators housing must be removed in order to access the connectors Cabling and connections of 230V components may only be done my authorised professionals 3 Connecting a Photo Cell As a non contact safety device a photo cell must be connect when using the automatic closing ...

Страница 15: ...l be switched on with every incoming command The adjusted time will run from the moment the command was received Factory pre set the light will stay on for 3 minutes This time may be changed in steps of 10 seconds up to a total of 10 minutes To change the time proceede as follows 1 Keep the red LEARN button pressed for 6 seconds Release the button once the green LED comes on 2 Press the red LEARN ...

Страница 16: ... Pressing the devices but ton again will run the operator Repeat steps 1 and 2 for any further device HomeLink Integrated car remotes usually use the HomeLink system by Johnson Controls Systems from version 6 or higher are com patible with the operator First the hand transmitter must be copied into the HomeLink module closer information on your specific system can be found on the internet www euro...

Страница 17: ...h a lower range than in an ordi nary garage build of stone The more steel was used for the walls the shorter the range of your remote control Remote control activity in the area Radio and television transmitters close to your garage might reduce the range Older baby phones and other household remote equipment Some equipment like remote head phones and baby phone might prodecure strong disturbant s...

Страница 18: ...he chain Internal Wiring 1 Blue mains supply 230V 2 Brown mains supply 230V 3 Black transformer 230V 4 Black transformer 230V 5 Brown Lighting 230V 6 Blue Lighting 230V External connections A B Floating connector for push button key switch and the impulse cables of an external receiver C D Floating connector with a 8 2kOhm resistor for impulse cables from a photo cell receiver 24V 24V AC for a pho...

Страница 19: ...ceiver is disconnected If so the remote trans mitter or receiver might be defective The operator reacts on the push button but not on the transmitter Check the battery of the transmitter Try registering the transmitter with the operator page 16 The operator neither reacts on the push button nor on the transmitter Disconnect the receiver or remove the transmitter battery Use your push button switch...

Страница 20: ...wide and 2 50m high as to 06 02 2012 Prüfungen beantragt für Kipp und Sektionaltore bis zu 5m Breite und 2 50m Höhe Stand 06 02 2012 Document No AN 02122011 Dokument Nr AN 02122011 in accordance with the Radio and Telecommunications Ter minal Equipment Act FTEG and Directive 1999 5 EC R TTE Directive Gemäß dem Gesetz über Funkanlagen und Telekommunikations endeinrichtungen FTEG und der Richtlinie ...

Отзывы: